Canon PIXMA MP270 Owner's manual
- Category
- Multifunctionals
- Type
- Owner's manual
This manual is also suitable for

Make sure to read this manual before using the machine. Please keep it in hand for future reference.
Getting Started
Read Me First
series
Photo All-In-One
series

Model Number: K10339 (MP250)
Internet Explorer is a trademark or registered trademark of Microsoft Corporation in the
U.S. and/or other countries.
•
Microsoft is a registered trademark of Microsoft Corporation.•
Windows is a trademark or registered trademark of Microsoft Corporation in the U.S.
and/or other countries.
•
Windows Vista is a trademark or registered trademark of Microsoft Corporation in the
U.S. and/or other countries.
•
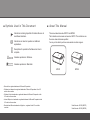
Symbols Used in This Document■
Instructions as notes for operation or additional
explanations.
Instructions including important information. Be sure to
read these indications.
Descriptions for operations that take some time to
complete.
Model Number: K10339 (MP270)
This manual describes about MP270 and MP250.
The illustrations and screens are based on MP270. The instructions are
the same unless otherwise specied.
You may not be able to purchase some models in certain regions.
About This Manual■
MP270 MP250
Indicates operations in Windows.
Indicates operations in Macintosh.
Macintosh and Mac are trademarks of Apple Inc., registered in the U.S. and other
countries.
•

1
6
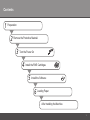
After Installing the Machine
Install the Software
5
Install the FINE Cartridges
4
Turn the Power On
3
Remove the Protective Material
2
Loading Paper
Preparation
1
Contents

2
2 3 4 5 61
1
A
1
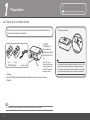
Preparation
Before turning on the machine, remove all orange tapes and protective sheets from
the inside and outside of the machine.
power cordFINE Cartridges
Color Black
A USB cable (A-B type) is necessary to connect the machine with your computer.•
Manuals•
Setup CD-ROM (containing the drivers, applications and on-screen manuals)•
Warranty•
Check the Included Items■
Choosing a Location□
Do not install the machine where an object may fall on it. The
object may fall inside the machine, resulting in malfunction.
•
Do not place any object on top of the machine. It may fall into
the machine when opening covers, resulting in malfunction.
•
The FINE
Cartridges and
power code are
placed inside of the
Paper Output Tray
(A).
Open the Paper
Output Tray with your
hands, and take out
the FINE Cartridges
and power code.

3
1 3 4 5 62
E
D
B
A
C
1
2
3
4
2
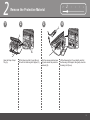
Remove the Protective Material
Open the Paper Output
Tray (A).
Lift the Scanning Unit (Cover) (B) and
x it with the Scanning Unit Support (C).
Lift the Scanning Unit (Cover) slightly and fold
the Scanning Unit Support, then gently close the
Scanning Unit (Cover).
Pull the orange protective tape
(D) and remove the protective
material (E).

4
3
A
1
2
B
B
B
B
3
1 2 4 5 63
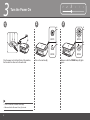
Turn the Power On
Plug the power cord into the left side of the machine,
then connect the other end to the wall outlet.
Turn on the machine (B).
Do NOT connect the USB cable at this stage.•
Make sure that the Document Cover (A) is closed.•
Make sure that the POWER lamp (B) lights
green.
MP270
MP250
MP270
MP250

5
1 2 3 5 64
D
A
E
F
1
E
4
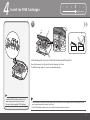
Install the FINE Cartridges
Be sure to use the supplied FINE Cartridges.•
Lift the Scanning Unit (Cover) (A) and x it with the Scanning Unit Support (D).
Handle the FINE Cartridges carefully. Do not
drop or apply excessive pressure to them.
•
If the Scanning Unit (Cover) is left open for more than 10 minutes, the FINE Cartridge Holder moves to the right. In this
case, close and reopen the Scanning Unit (Cover).
•
The FINE Cartridge Holder (F) moves to the installation position.
If the FINE Cartridge Holder does not move, make sure that the machine is turned on.•
Close the Document Cover (E) and lift it with the Scanning Unit (Cover).

6
4
H
J
I
3
2
G
4
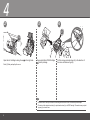
Open the Ink Cartridge Locking Cover on the right side.
Pinch (G) rmly and pull up the cover.
Remove the Black FINE Cartridge
from its package.
Be careful not to stain your hands or surrounding work area with ink on the removed protective tape.•
Pull the orange protective tape (H) in the direction of
the arrow and remove it gently.
Do not touch the electrical contacts (I) or print head nozzles (J) on a FINE Cartridge. The machine may not print
properly if you touch them.
•

7
1 2 3 5 64
65
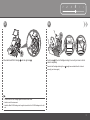
Push down of the Ink Cartridge Locking Cover until you hear a click to
close it completely.
View the Ink Cartridge Locking Cover straight on and check that it is locked
correctly (not at an angle).
Place the Black FINE Cartridge into the right slot .
Do not knock the FINE Cartridge against the sides of the holder.•
Install the Black FINE Cartridge into the right slot, and the Color FINE Cartridge into the left
slot.
•
Install in a well-lit environment.•

8
4
K
L
7 8
1 2 3 5 64
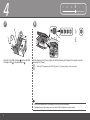
Insert the Color FINE Cartridge into the left FINE
Cartridge Holder in the same way as .
Wait until "1" appears on the LED (K) (about 1-2 minutes) and go to the next step.•
Once you have installed the FINE Cartridges, do not remove them unnecessarily.•
Lift the Scanning Unit (Cover) slightly and fold the Scanning Unit Support, then gently close the
Scanning Unit (Cover).
If the Alarm lamp (L) lights orange, make sure that the FINE Cartridges are correctly installed.•

9
1 2 3 4 65
5
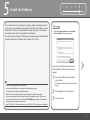
Install the Software
Quit all running applications before installation.•
To use the machine by connecting it to a computer, software including the drivers
needs to be copied (installed) to the computer's hard disk. The installation process
takes about 20 minutes. (The installation time varies depending on the computer
environment or the number of applications to be installed.)
Log on as the administrator (or a member of the Administrators group).•
Do not switch users during the installation process.•
It may be necessary to restart your computer during the installation process. Follow the on-
screen instructions and do not remove the Setup CD-ROM during restarting. The installation
resumes once your computer has restarted.
•
Mac OS 9, Mac OS X Classic environments, or Mac OS X v.10.3.8 or earlier are not supported.•
Internet connection may be required during the installation. Connection fees apply.•
If the Found New Hardware or Found New
Hardware Wizard dialog box appears:
□
Click Cancel to quit the dialog box.
Proceed from .
Remove the USB cable connected to
your computer.
The dialog box may close. In this case, proceed
from .
1
2
3
If you connect a USB cable to the machine
before installation of the drivers, this screen
appears.
The screens below are based on Windows Vista operating system Ultimate Edition
(hereafter referred to as "Windows Vista") and Mac OS X v.10.5.x.

10
5
2
A
A
1
1
2
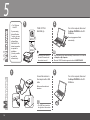
TURN OFF THE
MACHINE (A).
Operating noise continues
for about 25 seconds until
the machine turns off.
•
The USB Port is located on
the right side of the machine.
•
Connect the machine to
the computer with a USB
cable.
Make sure the machine is
turned on.
If the program does not start automatically, double-click the CD-ROM icon
in Computer or My Computer.
When the CD-ROM contents appear, double-click MSETUP4.EXE.
•
Turn on the computer, then insert
the Setup CD-ROM into the CD-
ROM drive.
The setup program will start
automatically.
Turn on the computer, then insert
the Setup CD-ROM into the CD-
ROM drive.
For Windows
Vista/XP
□
If you are using
Internet Explorer
7 or later, you can
use the Web print
software Easy-
WebPrint EX. An
internet connection
is required for
installation.
(It is also possible
to install this
software later.)
MP270
MP250

11
1 2 3 4 65
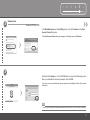
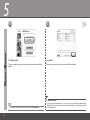
3
3
Click Run Msetup4.exe on the AutoPlay screen, then click Continue on the User
Account Control dialog box.
Double-click the Setup icon of the CD-ROM folder to proceed to the following screen.
Enter your administrator name and password, then click OK.
If the CD-ROM folder does not open automatically, double-click the CD-ROM icon on the desktop.•
If you do not know your administrator name or password, click Help, then follow the on-screen
instructions.
If the User Account Control dialog box reappears in following steps, click Continue.
Windows Vista
Windows XP/2000

12
5
54
Click Install.
Click Easy Install.
The drivers, application software, and on-screen manuals are installed all
together.
For Windows Vista/XP
If you are using Internet Explorer 7 or later, you can use the Web print software Easy-
WebPrint EX. An internet connection is required for installation. (It is also possible to install
this software later.)
•
Follow any on-screen instructions to proceed with the installation.
If you want to select particular items to install, click Custom Install.•

13
1 2 3 4 65
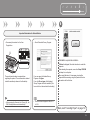
6
Serial No. * * * * * * * * *
B
Click Exit to complete the installation.
The product serial number is required when
registering the product. The serial number is located
inside the machine (as shown in the illustration).
Necessary Information for the User
Registration
□
If you can agree to Extended Survey
Program, click Agree.
If you click Do not agree, the Extended
Survey Program will not be installed. (This
has no effect on the machine's functionality.)
The screen does not appear on Mac OS X
v.10.3.9.
•
Next, read "6 Loading Paper" on page 14!
If Restart is displayed, follow the instruction to restart the
computer.
After restarting the computer, remove the Setup CD-ROM
and keep it in a safe place.
About Extended Survey Program□
Important Information for the Installation
When opening the Scanning Unit (Cover) (B), the
FINE Cartridge Holder moves automatically.
•
When using Macintosh, it is necessary to restart the
computer before scanning using the Operation Panel on
the machine for the rst time.

14
6
2
1
3
4
C
A
1
2
3
B
1 2 3 4 5 6
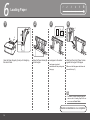
Loading Paper
Open the Paper Support (A) and pull it straight up,
then slant it back.
Move the Paper Guides (B)
to both edges.
Slide the left and right Paper Guides
against both edges of the paper.
Load paper in portrait
orientation with the printing side
facing up.
For details on media sizes and types you
can use, refer to "Loading Paper" in the on-
screen manual: Basic Guide.
•
Machine installation is now complete!
Make sure that the paper stack does not
exceed the line (C).
Load paper in the center.

15
After Installing the Machine
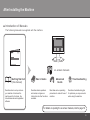
Introduction of Manuals■
The follow ing manu als are sup plie d wi th the mach ine.
Getti ng St arted
(this m anual)
Describes how to set up and use
your machine. Introduces the
machine and its functions, the
included manuals and application
software.
Basic Guid e
on-screen manua ls
Describes basic operations
and media, and gives an
introduction to other functions
available.
Advan ced
Guide
Describes various operating
procedures to make full use of
machine.
Describes troubleshooting tips
for problems you may encounter
when using the machine.
Troub leshootin g
For details on opening the on-screen manuals, refer to page 16.

16
Solution M enu is a gateway to fun ctio ns and info rmat ion that al low you to m ake ful l us e of the machin e!
Solution Menu■
Open various applications and on-screen manuals with a single click.
You can start Solution Menu from the Canon Solution Menu icon on the desktop (Windows) or
on the Dock (Macintosh).
If you have a problem with machine settings, click the Change settings or nd solutions to
problems. in Solution Menu to open My Printer (Windows only).
*The buttons displayed vary depending on the
country or region of purchase.
Example: Windows Vista
Click this button to open the on-screen manuals.

17
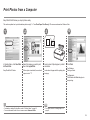
Various appli cati on s oftware are ins tall ed on
the comput er a long with the d rive rs.
You can prin t cr eative item s by cor recting/
enhancing phot os u sing the ap plic atio ns.
Try Using the Machine!
For detail s on how to use the app lica tion
software a nd t he m achine, ref er t o th e on-
screen man uals : Ba sic Guide a nd A dvan ced
Guide.

18
2
1
3
4
B
C
A
ED
F
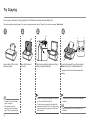
Try Copying
This section explains with plain paper. For various copying procedures, refer to "Copying" in the on-screen manual: Basic Guide.
For details, refer to "6 Loading
Paper" on page 14.
•
You can copy a document by simply placing it on the Platen Glass and pressing the start button.
Load a sheet of A4 or Letter-
sized plain paper.
Open the Document
Cover (A).
Place the document face-down and align it
with the Alignment Mark (B).
Close the Document Cover, then press the
Black button (D) or the Color button (E).
Copying will start. Remove the document after
printing.
Do not open the Document Cover until copying is
complete.
•Do not place any objects weighing more than 4.4
lb / 2.0 kg on the Platen Glass (C).
•
Do not press or put weight on the original with
pressure exceeding 4.4 lb / 2.0 kg. Doing so may
cause the scanner to malfunction or the Platen
Glass to break.
•
The machine may make
operating noise when feeding
paper. This is normal operation.
•
Make sure that the Output Tray Extension (F) is
extended.
•
Page is loading ...
Page is loading ...
Page is loading ...
Page is loading ...
-
 1
1
-
 2
2
-
 3
3
-
 4
4
-
 5
5
-
 6
6
-
 7
7
-
 8
8
-
 9
9
-
 10
10
-
 11
11
-
 12
12
-
 13
13
-
 14
14
-
 15
15
-
 16
16
-
 17
17
-
 18
18
-
 19
19
-
 20
20
-
 21
21
-
 22
22
-
 23
23
-
 24
24


Canon PIXMA MP270 Owner's manual
- Category
- Multifunctionals
- Type
- Owner's manual
- This manual is also suitable for
Ask a question and I''ll find the answer in the document
Finding information in a document is now easier with AI
Related papers
-
Canon PIXMA K10339 User manual
-
Canon PIXMA MP190 Operating instructions
-
Canon PIXMA MP470 Operating instructions
-
Canon PIXMA MP210 Operating instructions
-
Canon IP2600 User manual
-
Canon PIXMA iP4700 Owner's manual
-
-
Canon PIXMA MG5120 Owner's manual
-
Canon 3295B002 User manual
-