Page is loading ...

IINNSSTTAALLLL TTHHEE BBAATTTTEERRYY
Your GMRS480 radio uses the NiMH battery pack or 4 AA
alkaline batteries. If alkaline batteries are used, we
recommend using Duracell Ultra alkaline batteries.
To install the NiMH Battery Pack:
1) Make sure your radio is off.
2) Remove the battery compartment
door by firmly moving the clip away from
the door allowing the door to be removed.
3) Place the pack in the compartment, paying close
attention to the round alignment key. If the pack is
installed incorrectly, the unit will not operate and
the compartment door will not close properly.
4) Replace the battery compartment and secure the clip
back in place.
5) The battery pack must be charged before using it for the
first time.Insert the charger adapter into the accessory
jack and allow 12-14 hours charging time to fully charge
the battery pack.
This unit has a battery level meter on the display to indicate
the status of the batteries.When the batteries in the unit are
low, the icon will flash and the unit will
periodically emit a tone. Replace the alkaline batteries
immediately or if you are using the NiMH battery pack, you
must recharge the batteries in order to continue using
the radio.
Note: It is recommended that the radio be turned off while
charging. If the unit is turned on, the display will show a C
indicating charging.
Congratulations on your purchase of the Uniden GMRS480
(General Mobile Radio Service) radio.This product is a light-
weight, palm-sized radio. Use it at sporting events to stay in
contact with family and friends, hiking, skiing, outdoors, or in
a neighborhood watch for vital communication.This compact,
state-of-the-art device is equipped with many features.
OOPPTTIIOONNAALL AACCCCEESSSSOORRIIEESS
Your package contains the GMRS480 radio, NiMH battery
pack, AC wall charger, this reference guide, and a product
registration card.You can also operate the unit using 4 AA
alkaline batteries (not included).The following optional
accessories may be purchased from your participating
Uniden dealer or call 1-800-554-3988 or visit us on the
web at www.uniden.com
•Earset Mic w/ PTT - #HS2468
•Vox Headset Mic - #HSV2469
•NiMH Battery Pack w/AC Charger and
DC Car Charger - #BPCC80
Adjusting the Sound (Key Beeps)
Your radio emits a beep each time one of the buttons is
pressed.To turn this sound off, press menu/select while
turning on the radio.To turn this sound on, press
menu/select while turning on the radio.
Navigating through the Menu
To access the advanced features of the GMRS480, your
radio has a menu function.
THANK YOU
FOR PURCHASING A UNIDEN PRODUCT
BBAATTTTEERRYY LLEEVVEELL AANNDD
LLOOWW BBAATTTTEERRYY AALLEERRTT
Talking on Your Radio
To talk to others using the radio:
1) Press and hold the PTT button and speak in a clear,
normal voice about 2-3 inches away from the
microphone.While you are transmitting, the
icon will appear on the display.To avoid cutting off
the first part of your transmission, pause slightly
after pressing the PTT button before you
start talking.
2) When you are finished speaking, release the PTT
button.You can now receive incoming calls.While
receiving, the icon will appear on the display.
*Range may vary depending on environmental and/or topographical conditions.
Vibrate Alert for Incoming Calls
Your GMRS480 radio is equipped with a vibrator
that can be used for notification of an incoming call
alert from other Uniden radios equipped with the
same feature.
To select the vibrate alert:
1) Enter the menu. Advance through the menu, the
icon will appear on the display along with on
or of indicating the vibrate alert feature status.
2) Press either the ▲ or ▼button to toggle
between on or of.
3) Exit the menu.
Channel Scan Feature
Your GMRS480 radio has a channel Scan feature
that allows you to easily scan all 15 channels.When
an active channel is detected, the unit will pause on
that channel until the channel is clear.Then after a
4 second delay, the unit will continue scanning.
Pressing PTT while the scan is paused on a channel
will allow you to transmit on that channel.
To turn on channel scanning:
Press and hold either the ▲ or ▼ button until the
icon appears on the display.The channel
number on the display will rapidly cycle through the
channels.
To turn off channel scanning:
Press and release the ▲ or ▼button.
Ambient Temperature Display
Your radio will periodically display the ambient temperature
either in degrees F° or degrees C°.
To change this setting:
1) Enter the menu. Advance through the menu until the
icon appears on the display.The letters F or C will be
blinking indicating the selection.
• 8 GMRS/7 FRS Channels
• 38 CTCSS Codes
• Up to 5 mile range*
• Ambient Temperature Display
• 5 Selectable Call Tone Alerts
• NiMH Battery Pack Included
• Vibrate Alert for incoming calls
• 7 NOAA Weather Radio Channels
• LCD Display with Holographic Effect
• Optional Headset Accessories
• Earset Mic w/PTT Included
• AC Charger Included
• 10 Memory Locations
• Battery Level Meter
• Channel Monitor
• Water Resistant
• Channel Scan
• Keypad Lock
GMRS480
Turning the Radio On and Adjusting the Volume
1) Rotate the on/off/volume control clockwise to turn the
unit on and increase the speaker volume.
2) Rotate the on/off/volume control counterclockwise to
decrease the speaker volume and turn the unit off.
UUSSIINNGG TTHHEE RRAADDIIOO
In order to get the most out of your new radio, read this
reference guide completely before attempting to operate
the unit.
Your unit has (2) modes of operation.
1) GMRS Radio Mode
2) Weather Radio Mode
The Weather Radio Mode will be discussed later.
Choosing a CTCSS Code
Each of the GMRS/FRS channels 1-15 may have any one
of the codes 0-38 selected. Code "0" indicates no CTCSS
code selected and your radio can receive a signal
regardless of the code settings of the transmitting radio.
1) Enter the menu. Advance through the menu, the
CTCSS code on the LCD display will flash.
2) Press the ▲ or ▼ button to increase or decrease the
code number displayed.
3) Exit the menu to return to "normal" mode.
Choosing a Channel
Your radio has 15 channels and 38 CTCSS codes you can
use to talk to others.In order to speak to someone, each
of you must be set to the same channel and CTCSS code.
To choose a channel:
Press the ▲ or ▼ button to increase or decrease the
channel number displayed.
Using the Memory Feature
The Memory Feature allows you to store up to 10 frequently
used channels.Each channel can have a unique CTCSS code
assigned to it.When the Memory feature is turned on, the
menu is automatically expanded to enable memory program-
ming [refer to the User Programming Menu].
To select the Memory Feature:
1) Enter the menu. Advance through the menu until the
SAVED icon on the display is shown.You will see
on or of blinking indicating the memory feature status.
2) Press either the ▲ or ▼ button to toggle between
on or of.
3) If on is selected, press menu/select to advance to the
Memory Programming menu.
4) The current memory location 1-10 will be flashing on
the display. Press the ▲or ▼ button to scroll through
the locations.When you pass location 10 an E will flash
indicating that you can press menu/select to exit the menu.
5) Press menu/select to advance to the channel selection.
The channel saved in the selected location will be
flashing on the display.
6) Press the ▲ or ▼ button to chose the desired channel
for memory. To erase a location, simply choose "0" for
the channel.
7) Press menu/select to advance to the CTCSS selection.
The current CTCSS assigned to the channel will be
flashing on the display.
8) Press the ▲ or ▼ button to choose the desired
CTCSS code.
9) Press menu/select to program another memory location
or press and hold the menu/select button to exit the
menu. If no key is pressed after 10 seconds, the radio will
return to normal mode.
When the Memory feature is on, only those stored channels
will be available after exiting the menu.You can now select any
of the memory channels to be used by the radio by pressing
the ▲ and ▼button.In addition, entering the scan mode will
scan only the memory channels.The memory will remain in
use until you enter the menu and turn the Memory feature off.
Keypad Lock
To lock the keypad, press and hold the WX/lock button until
the icon is displayed.To remove the keypad lock, press and
hold the WX/lock button until the icon disappears.
To install the alkaline batteries:
1) Make sure the radio is off.
2) Remove the battery compartment door by firmly
moving the clip away from the door allowing the
door to be removed.
3) Install 4 AA alkaline batteries (not included) into the
battery compartment. Be certain to follow the + and -
symbols in the compartment. Installing the batteries
incorrectly will prevent the unit from operating.
4) Replace the battery compartment door and secure the
clip back in place.
1) To enter the menu, press and hold the menu/select
button for 1 second.
2) Additional presses of the menu/select button will
advance through the menu until exiting to "normal"
operating mode.
3) Other methods of exiting the menu function are:
a. Press and hold the menu/select button for 1 second
again.
b. Press PTT.
c. Wait 10 seconds until the unit automatically returns to
"normal" mode.
Transmitting a Call Alert Tone
Your GMRS480 radio is equipped with 5 selectable
call tones that will be transmitted when the call
button is pressed.
To select a call tone:
1) Enter the menu. Advance through the menu
until the CALL icon on the display is shown.The
current call tone number (1-5) will be indicated.
2) Press the ▲ or ▼ button to increase or
decrease the number to the desired call tone.
Each tone will be heard through the speaker.
3) Exit the menu.
To transmit the selected call alert tone, momentarily
press the call button.The selected tone will automat-
ically be transmitted for a fixed length of time.
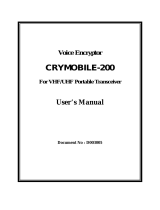
1 Antenna 15 Weather Indicator
2 Monitor Button 16 Receive Indicator
3 PTT Button 17 Transmit Indicator
4 Up Key 18 Battery Level Meter
5 Down Key 19 Scan Indicator
6 Menu/Select Key 20 Channel Indicator
7 Microphone 21 Vibrate Indicator
8 Speaker 22 Memory Operation Indicator
9 On/Off/Volume Control 23 Call Alert
10 Beltclip 24 Temperature Reading
11 Headset Jack 25 Lock Indicator
12 Weather/Lock Key 26 CTCSS Code
13 Call Key
14 Battery Cover
FFCCCC GGMMRRSS LLIICCEENNSSEE
Use of the GMRS480 (General Mobile Radio Service)
within the United States requires a FCC GMRS license.
An individual 18 years of age or older, is eligible for a
GMRS system license.You will need two forms from the
FCC, FCC Form 159 and FCC Form 605 Main Form and
Schedule F.You can find these forms online at:
www.fcc.gov/formpage.html or call 1-800-418-3676.
GMRS480 web OM.qxd 07/15/2002 5:25 PM Page 1

FCC Information
This device complies with Part 15 of the FCC Rules. Operation is subject to the following conditions:
•This device may not cause harmful interference.
•This device must accept any interference received, including interference that may cause undesired operation.
Important: Changes or modifications to this unit not expressly approved by Uniden could void your authority to operate this unit.Your radio is set up to transmit a regulated signal on an assigned frequency.It is against the law to
alter or adjust the settings inside the radio to exceed those limitations.Any adjustments to your radio must be made by qualified technicians.
To be safe and sure:
• Never open your radio’s case.
• Never change or replace anything in your radio except the batteries.
Your radio might cause TV or radio interference even when it is operating properly.To determine whether your radio is causing the interference, turn it off.If the interference goes away, your radio is causing it.Try to eliminate the
interference by moving your radio away from the receiver. If you cannot eliminate the interference, the FCC requires that you stop using the radio.
Audio Accessories: Do not operate the radio with audio accessories at high volume levels. Hearing experts advise against continuous high volume operation. If you experience a ringing in your ears, reduce the volume level or
discontinue use.Always make sure the radio is turned off before plugging audio accessories into the accessory jack.
Hazardous Environments: Do not operate the radio in hazardous environments. Explosion or fire may result. Do not operate the radio near unshielded electrical blasting caps.Under certain conditions, radios can interfere with
blasting operations and may cause an explosion. Turn your radio OFF to prevent accidental transmission when in a blasting area or in areas posted:“Turn off two-way radio.” Construction crews often use remote control RF
devices to set off explosives.
Care and Safety: To clean the radio, use a soft cloth dampened with water.Do not use cleaners or solvents because they can harm the body of the unit and leak inside, causing permanent damage.Use a dry, lint-free cloth to
clean the battery contacts. Do not submerge the unit in water. If the unit gets wet, turn it off and remove the batteries immediately.Dry the battery compartment with a soft cloth to minimize potential water damage.Leave the
battery compartment cover off overnight to ensure complete drying. Do not use the radio until the unit is completely dry.
OONNEE YYEEAARR LLIIMMIITTEEDD WWAARRRRAANNTTYY
Important: Evidence of original purchase is required for warranty service.
WARRANTOR: UNIDEN AMERICA CORPORATION (“Uniden”)ELEMENTS OF WARRANTY:
Uniden warrants, for one year, to the original retail owner, this Uniden Product to be free from defects in materials and craftsmanship with only the limitations or exclusions set out below.
WARRANTY DURATION:This warranty to the original user shall terminate and be of no further effect 12 months after the date of original retail sale.The warranty is invalid if the Product is:
(A) damaged or not maintained as reasonable or necessary, (B) modified, altered, or used as part of any conversion kits, subassemblies, or any configurations not sold by Uniden, (C) improperly installed,
(D) serviced or repaired by someone other than an authorized Uniden service center for a defect or malfunction covered by this warranty, (E) used in any conjunction with equipment or parts or as part of
any system not manufactured by Uniden, or (F) installed or programmed by anyone other than as detailed by the owner’s manual for this product.
STATEMENT OF REMEDY:In the event that the product does not conform to this warranty at any time while this warranty is in effect, warrantor will either, at its option, repair or replace the defective unit
and return it to you without charge for parts, service, or any other cost (except shipping and handling) incurred by warrantor or its representatives in connection with the performance of this warranty.
Warrantor, at its option, may replace the unit with a new or refurbished unit.THE LIMITED WARRANTY SET FORTH ABOVE IS THE SOLE AND ENTIRE WARRANTY PERTAINING TO THE PRODUCT
AND IS IN LIEU OF AND EXCLUDES ALL OTHER WARRANTIES OF ANY NATURE WHATSOEVER, WHETHER EXPRESS, IMPLIED OR ARISING BY OPERATION OF LAW, INCLUDING, BUT NOT
LIMITED TO ANY IMPLIED WARRANTIES OF MERCHANTABILITY OR FITNESS FOR A PARTICULAR PURPOSE. THIS WARRANTY DOES NOT COVER OR PROVIDE FOR THE REIMBURSEMENT
OVERPAYMENT OF INCIDENTAL OR CONSEQUENTIAL DAMAGES. Some states do not allow this exclusion or limitation of incidental or consequential damages so the above limitation or exclusion may
not apply to you.
LEGAL REMEDIES:This warranty gives you specific legal rights, and you may also have other rights which vary from state to state.This warranty is void outside the United States of America.
PROCEDURE FOR OBTAINING PERFORMANCE OF WARRANTY:If, after following the instructions in the owner’s manual you are certain that the Product is defective, pack the Product carefully
(preferably in its original packaging).The Product should include all parts and accessories originally packaged with the Product. Include evidence of original purchase and a note describing the defect that
has caused you to return it.The Product should be shipped freight prepaid, by traceable means, to warrantor:
Uniden America Corporation
Parts and Service Division
4700 Amon Carter Blvd., Fort Worth, TX 76155
(800) 297-1023, 7 a.m. to 7 p.m. Central, Monday through Friday
www.uniden.com
Covered under one or more of the following U.S.patents:
4,684,870 4,734,049 4,963,844 5,203,015 5,214,789 5,491,745
5,497,508 5,517,677 5,557,606 5,613,201 5,628,059 5,634,196
5,634,205 5,678,176 5,722,070 5,787,345 5,526,528 5,574,994
5,610,946 5,697,096 5,717,312 5,901,341 6,021,326
SSPPEECCIIFFIICCAATTIIOONNSS
Channels 8 GMRS/7 FRS, 7 Weather
CTCSS Codes 38 Sub-Audible Tones
Operating Frequency UHF 462.550- 462.725 MHz
VHF 162.400-162.550 MHz
Power Source 6V NiMH Battery Pack 4 AA
Alkaline Batteries
Output Power 2W ERP maximum
Battery Life 10 Hours - NiMH Battery Pack
(5/5/90 duty cycle)
35 Hours - Alkaline Batteries
Frequency Chart
Ch. Freq. Ch. Freq.
1 462.5625 8 462.5750
2 462.5875 9 462.6250
3 462.6125 10 462.6750
4 462.6375 11 462.5500
5 462.6625 12 462.6000
6 462.6875 13 462.6500
7 462.7125 14 462.7000
15 462.7250
CTCSS Chart (Hz)
Code Freq. Code Freq.
0 Disabled 20 131.8
1 67.0 21 136.5
2 71.9 22 141.3
3 74.4 23 146.2
4 77.0 24 151.4
5 79.7 25 156.7
6 82.5 26 162.2
7 85.4 27 167.9
8 88.5 28 173.8
9 91.5 29 179.9
10 94.8 30 186.2
11 97.4 31 192.8
12 100.0 32 203.5
13 103.5 33 210.7
14 107.2 34 218.1
15 110.9 35 225.7
16 114.8 36 233.6
17 118.8 37 241.8
18 123.0 38 250.3
19 127.30
© 2001 Uniden America Corporation
All rights reserved • Printed in China
UTZZ-480
NOAA Weather Radio Frequency List
Channel 1 162.550 Mhz Channel 5 162.450 Mhz
Channel 2 162.400 Mhz Channel 6 162.500 Mhz
Channel 3 162.475 Mhz Channel 7 162.525 Mhz
Channel 4 162.425 Mhz
To return to the GMRS Radio:
1) Momentarily press WX/lock button again.
Your GMRS480 radio can receive weather broadcasts from the NOAA National Weather
Service.While using the Weather Radio, you are not able to receive GMRS communica-
tions unless you press the PTT or call button which will immediately exit the weather radio
mode and return to GMRS radio mode.
To turn on the Weather Radio:
1) Momentarily press WX/lock button.
Choosing a Weather Channel
There are 7 NOAA channel frequencies available and these frequencies are common
between the US and Canada.You will need to know what frequency is being transmitted
in your location.
Press the ▲ or ▼ button to increase or decrease the channel number displayed.
The Auto Squelch feature is never active in Weather Radio mode.
UUSSIINNGG TTHHEE WWEEAATTHHEERR RRAADDIIOO
LCD Backlight
The LCD backlight will automatically turn on with any key press.The LCD display will
illuminate for 5 seconds before turning off.
Auto Squelch Feature
The GMRS480 radio is equipped with an automatic squelch system which shuts off weak
transmissions and unwanted noise due to terrain conditions or if you have reached your
range limit.
To temporarily disable the Auto Squelch and monitor the selected channel, press and hold
the monitor button.When you hear a double beep, the monitor button can be released.
The Auto Squelch will be re-engaged when you momentarily press the monitor button
or PTT.
Automatic Power Save Feature
Your radio has a unique circuit designed to dramatically extend the life of the batteries. If
there is no transmission within 5 seconds, your radio switches to the Power Save mode.
The radio is still able to receive transmissions in this mode.
2) Press either the ▲ or ▼ button to toggle between F or C.
3) Exit the menu.
Note: Once the radio is turned on, please allow time for an accurate temperature reading
to be collected.
GMRS480 web OM.qxd 07/15/2002 5:25 PM Page 2
/