RAB Lighting HAYBAY150N/D10/LOS Operating instructions
- Type
- Operating instructions

INSTRUCTIONS
HAYBAY
®
INSTALLATION
RAB Lighting is committed to creating high-quality, aordable, well-designed and energy-ecient LED lighting and controls that make it easy for electricians to install
and end users to save energy. We’d love to hear your comments. Please call the Marketing Department at 888-RAB-1000 or email: [email protected]
Fig: 1
IMPORTANT
READ CAREFULLY BEFORE INSTALLING FIXTURE. RETAIN THESE INSTRUCTIONS FOR FUTURE REFERENCE.
RAB xtures must be wired in accordance with the National Electrical Code and all applicable local codes. Proper grounding is
required for safety. THIS PRODUCT MUST BE INSTALLED IN ACCORDANCE WITH THE APPLICABLE INSTALLATION CODE BY A PERSON
FAMILIAR WITH THE CONSTRUCTION AND OPERATION OF THE PRODUCT AND THE HAZARDS INVOLVED.
WARNING: Make certain power is OFF before installing or maintaining xture. No user serviceable parts inside.
WARNING: To prevent wiring damage or abrasion, do not expose wiring to edges of sharp objects.
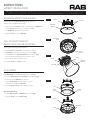
FIXTURE MOUNTING
HAYBAY
Fig: 2
Cord
Wiring Box
Hook
Chain
Fixture
Fixture
Wiring Box
Pendant
Chain
For Hook Mounting (Fig 1)
CAUTION: SUITABLE FOR DAMP LOCATION OR INDOOR
APPLICATIONS WITH HOOK & CORD
1. Open Wiring Box to gain access to wiring connections.
2. Slide Cord through the Hook.
3. Mount Fixture with Hook to a sturdy ceiling structure.
4. Use Chain (supplied by others) for supplemental
support while installing the xture.
5. Connect Cord to supply wires inside a junction box
using approved wire connectors.
For Pendant Mounting (Fig 2)
CAUTION: SUITABLE FOR DAMP LOCATION OR INDOOR
APPLICATIONS WITH PENDANT STEM (3/4” NPS Pendant Stem,
supplied by others)
1. Feed Cord through Pendant stem. Cord may be replaced if
more length is required.
2. Connect supply wires to xture wires inside a junction box using
approved wire connectors.
3. Use Chain (supplied by others) for supplemental support
of Fixture.

INSTRUCTIONS
HAYBAY
®
INSTALLATION
RAB Lighting is committed to creating high-quality, aordable, well-designed and energy-ecient LED lighting and controls that make it easy for electricians to install
and end users to save energy. We’d love to hear your comments. Please call the Marketing Department at 888-RAB-1000 or email: [email protected]
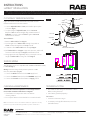
Mounts directly to Fixture Housing with (4) 8-32 x ¼
Phillips screws (supplied with housing).
1. Align and place Screws through clearance holes on Reector as
shown. (Fig 3), see Posistion 1 as shown in Fig. 4.
2. Turn Reector clockwise to lock in place.
3. Tighten Screws to secure Reector.
Lens Mounting (Clamp Band needed for lens mounting).
1. Loosen Thumb Screw on Clamp Band as shown in Fig 6.
2. Mount lens onto Reector (or refractor).
3. Orient Clamp Band so wide edge faces down,
then place over Lens and Relector.
4. Tighten Thumb Screw until assembly is secure.
Wire Guard Mounting
1. Mount Wire Guard over Reector as shown in Fig 7.
2. Tighten Screw to secure Wire Guard.
(Collar required for tall prismatic refractor).
1. Move Screw from Position 1 (for aluminum reflector)
to Position 2 (for prismatic refractor) as shown. (Fig 4).
2. Insert Collar inside Prismatic Refractor as shown in Fig 5.
Place screw head through clearance hole in collar.
3. Turn collar clockwise to lock in place.
4. Tighten Screws on Collar to secure.
ALUMINUM REFLECTOR MOUNTING
ACCESSORIES
TALL OR SHORT PRISMATIC
REFRACTOR & COLLAR MOUNTING
2
Fig: 4
Fig: 3
Fig: 5
Fig: 6
Fig: 7
Fixture
Screws (4)
Aluminum
Reector
Fixture
Collar
Prismatic
Refractor
Screws (4)
Screw
Screw
Position 1
Screw
Position 2
Strain Relief
Screw
Reector
Lens
Clamp
Band
Thumb
Screw
Reector
Wire Guard

INSTRUCTIONS
HAYBAY
®
INSTALLATION
RAB Lighting is committed to creating high-quality, aordable, well-designed and energy-ecient LED lighting and controls that make it easy for electricians to install
and end users to save energy. We’d love to hear your comments. Please call the Marketing Department at 888-RAB-1000 or email: [email protected]
Note: These instructions do not cover all details or variations in equipment nor do they
provide for every possible situation during installation operation or maintenance.
HAYBAY IN 0720
Easy Answers
rablighting.com
Visit our website for product info
Tech Help Line
Call our experts: 888 722-1000
e-mail
Answered promptly - [email protected]
Free Lighting Layouts
Answered online or by request
© 2020 RAB LIGHTING Inc.
Northvale, New Jersey 07647 USA
RAB WARRANTY: RAB’s warranty is subject to all terms and conditions found at rablighting.com/warranty.
Set Screw
Sensor
Fixture
Adjustable
Arm
Surfaces should be level
Stem
Chain
Hook
Loop
Tether
Cable
Gripper
Reector
Large sensor kit for use with reflector accessory. Small sensor kit
functions and mounts in the same manner.
1. Connect Adjustable Arm to Stem, which will snap into place
as shown. (Fig 8).
2. To adjust height of Adjustable Arm, loosen Set Screw.
Bottom of Arm should be roughly aligned with bottom of
Reector accessory or base of Fixture. Tighten Set Screw
when surfaces are level.
The following sensors are compatible with HAYBAY: LCHBSENSE15/D10,
LOSBAY800 (Fig 9).
Wiring: Universal voltage driver permits operation at 120V
thru 277V, 50 or 60 Hz (Fig 10).
1. Connect the Black xture lead to the LINE supply lead.
2. Connect the White xture lead to the COMMON supply lead.
3. Connect the Ground wire from xture to Supply ground.
To Level Fixture
1. Remove Tether Cable from Gripper.
2. Feed straight end of Tether Cable through closest link on
Chain and then through the end Loop on itself.
3. Continue to feed Tether Cable end through Gripper.
4. Pull Tether Cable and Gripper in opposite directions, which will
feed more cable through the Gripper, until xture is level.
5. Using approved tools (supplied by others), cut away the excess
length of Tether Cable sticking out of the Gripper.
OCCUPANCY SENSOR MOUNTING
SENSOR WIRING
Fig: 8
Fig: 9
Fig: 10
LED
Dimmable
Driver
Sensor
G D- D+
Load
Line
Neutral
TROUBLESHOOTING
1. Check that the line voltage at the xture is correct.
Refer to wiring directions.
2. Is the xture grounded properly?
For Sensors:
1. Is motion in detection range?
2. Is sensitivity too high (false detections) or too low
(lack of detection)?
CLEANING & MAINTENANCE
CAUTION: Be sure xture temperature is cool enough to touch.
Do not clean or maintain while xture is energized.
1. Clean xture and components with non-abrasive
cleaning solution.
2. Do not open xture to clean the LED. Do not touch the LED.
73472-RAB
-
 1
1
-
 2
2
-
 3
3


RAB Lighting HAYBAY150N/D10/LOS Operating instructions
- Type
- Operating instructions
Ask a question and I''ll find the answer in the document
Finding information in a document is now easier with AI
Related papers
-
RAB Lighting GDFFLED39W Operating instructions
-
-
-
RAB Lighting CDLED6WD-26W-80D935-S Operating instructions
-
RAB Lighting CDLED6PC-20W-50D935-Z Operating instructions
-
-
RAB Lighting PRT80NW/D10/E2 Operating instructions
-
RAB Lighting SK12XL12RYN Operating instructions
-
RAB Lighting VANLED40FR/E2 Operating instructions
-
RAB Lighting FFLED18W/MS Operating instructions
Other documents
-
RAB PARK34 Operating instructions
-
-
RAB HID-65-E26-8XX-BYP-GL Operating instructions
-
Ortech 1702-14SN User manual
-
RAB GDX17-205 Operating instructions
-
 BARRON TL106EX Series Large Die-cast Installation guide
-
RAB A17 FA User manual
-
-
 BARRON TL402 Series Large Installation guide
-
RAB RBAY17S Operating instructions

