Page is loading ...

Our US-based
install experts
are standing
by to help.
Call us at:
888-333-9952
Or, chat at:
SANUS.com/chatSV
Get it right the
first time.
HeightFinder™
shows you
where to drill.
Check it out at:
SANUS.com/1171
Want to watch
a video that
shows how
easy this DIY
project will be?
Watch it now at:
SANUS.com/2773
Recommended placement
WE’RE HERE TO HELP
F
215
INSTRUCTION MANUAL
Para Español ver página 22
BONUS!
+
Two 10"
Cable
Tunnels
4K HDMI
Cable

2
IMPORTANT SAFETY INSTRUCTIONS – SAVE THESE INSTRUCTIONS – PLEASE READ ENTIRE MANUAL PRIOR TO USE
Before getting started, let’s make sure this mount is perfect for you!
No
—
Perfect!
Yes
—
This mount is NOT compatible. Visit MountFinder.sanus.com or call
1-888-333-9952 to find a compatible mount.
Do you have
all the tools
needed?
1
2
3
4
What is your
wall made of?
50 lbs.
(22.6 kg)
Ready to begin?
Does your TV
(including accessories)
weigh more than
50 lbs. (22.6 kg)?
Drywall with
wood studs?
Solid concrete or
concrete block?
Perfect!
Wood Stud Install
Concrete Install
Awl
Pencil Level
Stud Finder
Screwdriver
Tape
Measure
7/32 in.
(5.5 mm)
Wood
Drill Bit
Electric
Drill
Hammer
1/2 in.
(13 mm)
Socket
Wrench Drill Bit
3/8 in.
(10 mm)
Concrete
Unsure?
Call Customer Service: 1-888-333-9952
Concrete kit CMK1 (not included)
CAUTION:
DO NOT
install into
drywall alone
Please read through these instructions completely to be sure you’re comfortable with this easy install process.
Also check your TV owner’s manual to see if there are any special requirements for mounting your TV.
If you do not understand these instructions or have doubts about the safety of the installation, assembly or use
of this product, contact Customer Service at 1-888-333-9952.
CAUTION: Avoid potential personal injury or property damage!
● This product is designed for use in wood stud, solid concrete, and concrete block walls - DO NOT install into drywall alone
● This product is designed for INDOOR USE ONLY
● The wall must be capable of supporting five times the weight of the TV and mount combined
● Do not use this product for any purpose not explicitly specified by manufacturer
● Manufacturer is not responsible for damage or injury caused by incorrect assembly or use

3
Dimensions
7.87in
200mm
3.94in
100mm
15.75in
400mm
11.81in
300mm
.34in
8.7mm
4.02in
102mm
.99in
25.2mm
45deg
45deg
5deg
15deg
15.0in
381mm
9.06in
230mm
8.27in
210mm
2.91in
74mm
.33in
8.4mm
3.1in
78mm
2.8in
71mm
WITHOUT EXTENSION
BRACKETS
17.07in
433.7mm
17.07in
433.7mm
6deg
TV INTERFACE
WALL PLATE
ROLL CONTROL
TOP VIEW - EXTENDED
TOP VIEW - RETRACTED
SIDE VIEW - EXTENDED
SIDE VIEW - RETRACTED
3-D
Before getting started, let’s make sure this mount is perfect for you!

4
M4 x 12mm
M6 x 12mm M6 x 35mm
M4 x 35mm
M6 x 20mm
M8 x 16mm
M8 x 12mm
M8 x 35mm
5/16 x 2¾ in.
2.5mm
22mm
M8 x 25mm M8 x 50mm
WELCOME! THANKS FOR
CHOOSING SANUS VUEPOINT.
THIS IS GOING TO BE EASY!
LET’S GET STARTED.
STEP 1
Attach TV brackets to back of TV.
STEP 2
Attach wall plate to wall using
provided hardware.
STEP 3
Hang TV on arm.
Our live, US-based install
experts are standing by to help.
Call us at:
Or, chat at:
Get it right the rst time!
HeightFinder
™
shows you
where to drill.
Use it now at:
Want to watch a video that
shows how easy this is?
Watch it now at:
M5 x 6mm
M
4
/
M
5
M
6
/
M
8
5/16 x 2¾ in.
Fischer UX10 x 60R Anchor
NOTE: Not all hardware included will be used.
WARNING: This product contains small items that could be a choking hazard if swallowed.
Before starting assembly, verify all parts are included and undamaged. If any parts are missing or damaged, do not return the damaged item to
your dealer; contact Customer Service. Never use damaged parts!
Supplied Parts and Hardware
STEP 1 Parts and Hardware
01
Faceplate
TV Screws
Washers Spacers
TV Bracket
Extender
TV Bracket
Screw
08
x4
09
x4
12
x4
11
x4
10
x4
13
x4
14
x4
16
x4
15
x4
04
x4
05
x4
06
x4
07
x4
03
x8
x1
02
x4

5
M4 x 12mm
M6 x 12mm M6 x 35mm
M4 x 35mm
M6 x 20mm
M8 x 16mm
M8 x 12mm
M8 x 35mm
5/16 x 2¾ in.
2.5mm
22mm
M8 x 25mm M8 x 50mm
WELCOME! THANKS FOR
CHOOSING SANUS VUEPOINT.
THIS IS GOING TO BE EASY!
LET’S GET STARTED.
STEP 1
Attach TV brackets to back of TV.
STEP 2
Attach wall plate to wall using
provided hardware.
STEP 3
Hang TV on arm.
Our live, US-based install
experts are standing by to help.
Call us at:
Or, chat at:
Get it right the rst time!
HeightFinder
™
shows you
where to drill.
Use it now at:
Want to watch a video that
shows how easy this is?
Watch it now at:
M5 x 6mm
M
4
/
M
5
M
6
/
M
8
5/16 x 2¾ in.
Fischer UX10 x 60R Anchor
STEP 2B: Concrete Installation Kit CMK1 [NOT INCLUDED]
STEP 2 Parts and Hardware
STEP 3 Parts and Hardware
Nut Cap
17
x1
18
x1
Full Motion Arm
Wall Plate
Template
Lag Bolt
Lag Bolt
Concrete Anchor
C1
x2
C2
x2
19
x2
21
x1
20
x1
22
x1
Washer
Clip
Long Clip
Cabel
Tunnel
Contact Customer Service at 1-888-333-9952 to have these
additional pieces shipped directly to you.
Locking Screw
Cable Tunnel Kit
x4
23
x1
24
x2
25
10 in.
(25.4 cm)
2.5 in.
(6.3 cm)

6
cm
inches
cm
inches
inch dimensions are approximate
inches cm mm
3 7.5 75
4 10 100
7 ⅞ 20 200
11 ¾ 30 300
15 ¾ 40 400
W
H
STEP 1 Attach Faceplate to TV
1.1 Measure Your TV Hole Pattern 1.2 Assemble Your Faceplate
Measure the width and height of your TV
hole pattern in mm.
Record your measurements:
Width_______mm x Height_______mm
Based on your TV hole pattern measurements
(W mm x H mm), determine your Faceplate
configuration: A, B, C, D or E.
A
200
[7 ⅞ in.]
200
[7 ⅞ in.]
400
[15¾ in.]
400
[15¾ in.]
B
These smaller hole patterns only use
Faceplate
01
. Do not use the four TV
brackets
02
and eight screws
03
.
02
100
[4 in.]
100
[4 in.]
03
Assemble TV brackets
02
onto Faceplate
01
and secure using eight screws
03
in
the corner holes indicated.
02
01
01
03
300
[11 ¾ in.]
300
[11 ¾ in.]
02
100 x 100
200 x 100
200 x 200
For TV Hole Pattern
Measurements
(Dimensions in mm)
300 x 300
400 x 400
For TV Hole Pattern
Measurements
(Dimensions in mm)

7
03
D E
03
200
[7 ⅞ in.]
200
[7 ⅞ in.]
01
Assemble TV brackets
02
onto Faceplate
01
and secure using eight screws
03
in
the corner holes indicated.
Assemble TV brackets
02
onto Faceplate
01
and secure using eight screws
03
in
the corner holes indicated.
01
02
02
02
02
C
03
Assemble TV brackets
02
onto Faceplate
01
and secure using eight screws
03
in
the corner holes indicated.
02
02
01
400
[15¾ in.]
400
[15 ¾ in.]
400
[15¾ in.]
300
[11 ¾ in.]
300
[11 ¾ in.]
300
[11 ¾ in.]
400 x 300
For TV Hole Pattern
Measurements
(Dimensions in mm)
300 x 200
400 x 200
For TV Hole Pattern
Measurements
(Dimensions in mm)
200 x 300
200 x 400
For TV Hole Pattern
Measurements
(Dimensions in mm)

8
Too Long
Too Short
Correct
1.3 Select TV Screw Diameter
1.4 Select TV Screw Length
Standard configurations
are shown. For special
applications, or if you
are uncertain about your
hardware selection, contact
Customer Service.
CAUTION:
Verify adequate thread
engagement with your screw/
washer/spacer combination
AND TV bracket.
– Too short will not hold the TV.
– Too long will damage the TV.
M4
M6
M8
a
b
a
: For flat-back TVs,
no spacers
06
or
07
required.
b
: Spacers
06
or
07
supplied for:
● Round (irregular) back TVs
● Extra space needed (for cables
or inset mounting holes)
FLAT BACK ROUND BACK CABLES INSET HOLES
Test the four TV screw diameters (M4,
M6, and M8) in the threaded inserts on
the back of your TV to determine which
screw diameter fits your TV.
06 07

9
1.5 Attach TV Bracket
TV Bracket Configuration B
Illustrated (with spacers)
0406 0507
04 05
a: Flat Back
b: Round Back / Extra Space
TV Bracket Configuration A
Illustrated (with spacers)
Position your TV bracket configuration (A, B, C, D or E) onto your TV, making sure the bracket is both centered and level over your TV hole pattern.
NOTE: The hanging tab
H
on faceplate
01
must be oriented toward the top of the TV.
Secure the TV bracket using your selection: (a) screw/washer or (b) screw/washer/spacer.
CAUTION: Avoid potential personal injuries and property damage! DO NOT use power tools for this step. Tighten the screws only enough to
secure the TV bracket to the TV. DO NOT overtighten the screws.
H
01
16
16
08
08
01
01
02

10
1. Locate your stud. Verify and mark the center of the stud by finding the stud edges using an awl, a thin nail, or an edge to edge stud finder.
2. Position the template
17
at your desired height and line up the holes with your stud center line. Level the template and tape in place.
WELCOME! THANKS FOR
CHOOSING SANUS VUEPOINT.
THIS IS GOING TO BE EASY!
LET’S GET STARTED.
STEP 1
Attach TV brackets to back of TV.
STEP 2
Attach wall plate to wall using
provided hardware.
STEP 3
Hang TV on arm.
Our live, US-based install
experts are standing by to help.
Call us at:
Or, chat at:
Get it right the rst time!
HeightFinder
™
shows you
where to drill.
Use it now at:
Want to watch a video that
shows how easy this is?
W
atch it now at:
WELCOME! THANKS FOR
CHOOSING SANUS VUEPOINT.
THIS IS GOING TO BE EASY!
LET’S GET STARTED.
STEP 1
Attach TV brackets to back of TV.
STEP 2
Attach wall plate to wall using
provided hardware.
STEP 3
Hang TV on arm.
Our live, US-based install
experts are standing by to help.
Call us at:
Or, chat at:
Get it right the rst time!
HeightFinder
™
shows you
where to drill.
Use it now at:
Want to watch a video that
shows how easy this is?
Watch it now at:
WELCOME! THANKS FOR
CHOOSING SANUS VUEPOINT.
THIS IS GOING TO BE EASY!
LET’S GET STARTED.
STEP 1
Attach TV brackets to back of TV.
STEP 2
Attach wall plate to wall using
provided hardware.
STEP 3
Hang TV on arm.
Our live, US-based install
experts are standing by to help.
Call us at:
Or, chat at:
Get it right the rst time!
HeightFinder
™
shows you
where to drill.
Use it now at:
Want to watch a video that
shows how easy this is?
W
atch it now at:
WELCOME! THANKS FOR
CHOOSING SANUS VUEPOINT.
THIS IS GOING TO BE EASY!
LET’S GET STARTED.
STEP 1
Attach TV brackets to back of TV.
STEP 2
Attach wall plate to wall using
provided hardware.
STEP 3
Hang TV on arm.
Our live, US-based install
experts are standing by to help.
Call us at:
Or, chat at:
Get it right the rst time!
HeightFinder
™
shows you
where to drill.
Use it now at:
Want to watch a video that
shows how easy this is?
Watch it now at:
≤ 5/8 in.
(16 mm)
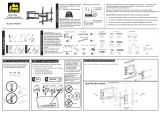
STEP 2A Attach Wall Plate to Wall
Wood Stud Installation
CAUTION: Avoid potential personal injury or property damage!
● Drywall covering the wall must not exceed 5/8 in. (16 mm)
● Minimum wood stud size: nominal 2 x 4 in. (51 x 102 mm) actual 1 ½ x 3 ½ in. (38 x 89 mm)
21
17

11
WELCOME! THANKS FOR
CHOOSING SANUS VUEPOINT.
THIS IS GOING TO BE EASY!
LET’S GET STARTED.
STEP 1
Attach TV brackets to back of TV.
STEP 2
Attach wall plate to wall using
provided hardware.
STEP 3
Hang TV on arm.
Our live, US-based install
experts are standing by to help.
Call us at:
Or, chat at:
Get it right the rst time!
HeightFinder
™
shows you
where to drill.
Use it now at:
Want to watch a video that
shows how easy this is?
W
atch it now at:
WELCOME! THANKS FOR
CHOOSING SANUS VUEPOINT.
THIS IS GOING TO BE EASY!
LET’S GET STARTED.
STEP 1
Attach TV brackets to back of TV.
STEP 2
Attach wall plate to wall using
provided hardware.
STEP 3
Hang TV on arm.
Our live, US-based install
experts are standing by to help.
Call us at:
Or, chat at:
Get it right the rst time!
HeightFinder
™
shows you
where to drill.
Use it now at:
Want to watch a video that
shows how easy this is?
Watch it now at:
WELCOME! THANKS FOR
CHOOSING SANUS VUEPOINT.
THIS IS GOING TO BE EASY!
LET’S GET STARTED.
STEP 1
Attach TV brackets to back of TV.
STEP 2
Attach wall plate to wall using
provided hardware.
STEP 3
Hang TV on arm.
Our live, US-based install
experts are standing by to help.
Call us at:
Or, chat at:
Get it right the rst time!
HeightFinder
™
shows you
where to drill.
Use it now at:
Want to watch a video that
shows how easy this is?
W
atch it now at:
WELCOME! THANKS FOR
CHOOSING SANUS VUEPOINT.
THIS IS GOING TO BE EASY!
LET’S GET STARTED.
STEP 1
Attach TV brackets to back of TV.
STEP 2
Attach wall plate to wall using
provided hardware.
STEP 3
Hang TV on arm.
Our live, US-based install
experts are standing by to help.
Call us at:
Or, chat at:
Get it right the rst time!
HeightFinder
™
shows you
where to drill.
Use it now at:
Want to watch a video that
shows how easy this is?
Watch it now at:
3. Drill pilot holes using a 7/32 in. (5.5 mm) diameter drill bit. Remove template
17
.
IMPORTANT: Be sure to drill into the center of the stud.
IMPORTANT: Pilot holes must be drilled to a depth of 2 ¾ in. (70 mm).
4. Install full motion arm
18
using two lag bolts
19
. Tighten the lag bolts only until they are pulled firmly against the wall plate.
CAUTION: Improper use could reduce the holding power of the lag bolt. DO NOT over-tighten the lag bolts.
Wood Stud Installation
7/32 in.
(5.5 mm)
2¾
in. (70 mm)
4
3
19
19
17
18

12
1. Position the template
17
on the wall at your desired height. Level the template and mark the hole locations.
2. Drill two pilot holes using a 3/8 in. (10 mm) diameter masonry drill bit.
IMPORTANT: Pilot holes must be drilled to a depth of 3 in. (75 mm). Never drill into the mortar between blocks.
WELCOME! THANKS FOR
CHOOSING SANUS VUEPOINT.
THIS IS GOING TO BE EASY!
LET’S GET STARTED.
STEP 1
Attach TV brackets to back of TV.
STEP 2
Attach wall plate to wall using
provided hardware.
STEP 3
Hang TV on arm.
Our live, US-based install
experts are standing by to help.
Call us at:
Or, chat at:
Get it right the rst time!
HeightFinder
™
shows you
where to drill.
Use it now at:
Want to watch a video that
shows how easy this is?
Watch it now at:
WELCOME! THANKS FOR
CHOOSING SA NUS VUEPOINT.
THIS IS GOING TO BE EASY!
LET’S GET STARTED.
STEP 1
Attach TV brackets to back of TV.
STEP 2
Attach wall plate to wall using
provided hardware.
STEP 3
Hang TV on arm.
Our live, US-based install
experts are standing by to help.
Call us at:
Or, chat at:
Get it right the rst time!
HeightFinder
™
shows you
where to drill.
Use it now at:
Want to watch a video that
shows how easy this is?
Watch it now at:
17
21
Concrete Installation Kit CMK1 is not included
(see page 5) Contact Customer Service
at 1-888-333-9952 to have the additional
hardware shipped directly to you.
STEP 2B Attach Wall Plate to Wall
Solid Concrete / Concrete Block Installation
3/8 in.
(10 mm)
3 in. (75 mm)
CAUTION: Avoid potential personal injury or property damage!
● Mount wall plate assembly
18
directly onto concrete surface (no wall covering)
● Minimum solid concrete thickness: 8 in. (203 mm)
● Minimum concrete block size: 8 x 8 x 16 in. (203 x 203 x 406 mm)
17

13
WELCOME! THANKS FOR
CHOOSING SANUS VUEPOINT.
THIS IS GOING TO BE EASY!
LET’S GET STARTED.
STEP 1
Attach TV brackets to back of TV.
STEP 2
Attach wall plate to wall using
provided hardware.
STEP 3
Hang TV on arm.
Our live, US-based install
experts are standing by to help.
Call us at:
Or, chat at:
Get it right the rst time!
HeightFinder
™
shows you
where to drill.
Use it now at:
Want to watch a video that
shows how easy this is?
Watch it now at:
WELCOME! THANKS FOR
CHOOSING SANUS VUEPOINT.
THIS IS GOING TO BE EASY!
LET’S GET STARTED.
STEP 1
Attach TV brackets to back of TV.
STEP 2
Attach wall plate to wall using
provided hardware.
STEP 3
Hang TV on arm.
Our live, US-based install
experts are standing by to help.
Call us at:
Or, chat at:
Get it right the rst time!
HeightFinder
™
shows you
where to drill.
Use it now at:
Want to watch a video that
shows how easy this is?
Watch it now at:
43
3. Remove the template
17
and insert two anchors
C2
(Fischer UX 10 x 60R - included in the Concrete Installation Kit CMK1*).
CAUTION: Be sure the anchors
C2
are seated flush with the concrete surface.
4. Install full motion arm
18
using two lag bolts
C1
. Tighten the lag bolts only until they are pulled firmly against the wall plate.
CAUTION: Improper use could reduce the holding power of the lag bolt. DO NOT over-tighten the lag bolts
C1
.
*
Contact Customer Service at 1-888-333-9952 to have the Concrete Installation Kit CMK1 shipped directly to you.
C2
C1
18

14
HEAVY! You may need assistance with this step.
STEP 3 Hang TV onto Wall Plate
1. Install the nut cap
20
on wall plate assembly
18
.
2. Fold first section of the arm of full motion arm
18
against the wall to provide stability.
1 2
18
18
20

15
3 4
3. Hang the TV onto the arm of full motion arm
18
by first hooking the hanging tab
H
, then resting the TV into place.
4. Lock the TV to the full motion arm
18
with locking screw
21
and washer
22
.
IMPORTANT: This locking screw
21
must be installed to secure the TV onto the full motion arm
18
.
01
18
H
18
21
22
18
18
01

16
Manage Cables
Fully extend the arms before routing cables.
Route the cables through the channels on the top and bottom of the arm
18
for a cleaner look.
18

17
Manage Cables - Cable Tunnel
1
NOTES:
● This product is NOT recommended for brick, plaster, or
wallpapered walls.
● If wall has been painted, allow paint to cure at least 30 days
before installing cable tunnels.
● Wipe away any dirt, dust, grease, etc. on the surface and let dry
completely before installing.
● The tunnels
25
can be painted to match your wall.
● The tunnels
25
can be cut to fit the length required.
To Remove Adhesive Clips
1. Insert a flat object (e.g. - knife blade) behind the clip and the
adhesive pad and pry o the plastic clip.
2. Peel o the adhesive pad with your fingers.
3. If adhesive residue remains, use a cloth soaked in an organic
solvent to wipe away the residue.
NOTE: First test the solvent in a concealed spot to make
sure it will not damage the wall surface.
23
23
24
Space clips
23
evenly along the length of the tunnel(s)
25
with a clip near each end. To combine tunnels, use the long
clip
24
to connect where they meet.
A Press firmly until clips snap in place.
B Peel o backing of adhesive pads on clips.
NOTE: If using two tunnels, install five
clips - four
23
clips and one long clip
24
.
If using only one tunnel, install three
clips
23
.
TIP: If the edges of the two tunnels do not align, reverse
one tunnel end for end.
A
B

18
42 3
25
25
25
25
Arrange cables on either
side of the clips. Reattach
tunnels
25
to clips
23
and clip
24
, capturing
the cables behind them.
Press firmly along the
length of the tunnels where
the clips are located until
clips snap in place.
NOTE: Leave enough
slack in the cables above the tunnel
to prevent them from interfering with
or rubbing against the tunnel when
moving the TV. This could cause the
tunnel to separate from the clips.
TIP: Use tape the hold the cables
in place during install.
Carefully lift tunnel
assembly and position it
at the desired location
making sure it is level.
Press firmly for 10
seconds at each clip
location along the
length of the assembly
to secure the clips
23
and clip
24
to
the wall.
Peel the tunnels
25
away from
the clips
23
and
24
.
23
24
23
23
24

19
L
o
o
s
e
n
T
i
g
h
t
e
n
TV Adjustments
TILT ADJUSTMENT
Your TV should adjust easily when moved, then stay in place.
If your TV is too loose or too tight, adjust the tilt tension knob by hand.
NOTE: Once your TV is in place, tighten the tilt tension knob to
prevent unwanted movement.
LEVEL ADJUSTMENT
To adjust the leveling of your TV, loosen the locking screw
21
, level
your TV, then tighten locking screw
21
.
IMPORTANT: This locking screw
21
must be installed to secure
the TV onto the full motion arm
18
.
Tilt Tension Knob
21
18

20
18
HEAVY! You may need
assistance with this step.
1 2 3
REMOVING THE TV
1. Disconnect the cables from your TV.
2. Remove locking screw
21
.
3. Carefully lift your TV up and off of wall plate assembly
18
.
21
/