VDO MS 2000 Owner's manual
- Category
- Car navigation systems
- Type
- Owner's manual
This manual is also suitable for

Deutsch
English
Français
Español
ItalianoPortuguês
Nederlands
Svenska
Norsk
Dansk
Erste Schritte und wichtige Hinweise
First Steps and Important Notes
Premiers pas et instructions importantes
Primeros pasos y advertencia importante
Primi passi e avviso importante
Primeiros passos e avisos importantes
Aan de slag en belangrijke aanwijzingen
Komma igång och viktiga anvisningar
Komme i gang og viktige råd
Kom i gang og viktige anvisningar
MS 2000
MS 2100 TMC
Quick Start Guide

23
Contents
Safety Advice and Important Information. . . . . . . . . . . . . . . . . . . . . . . . . . . . . . . . . . . . . . . . 23
Maintenance and Cleaning. . . . . . . . . . . . . . . . . . . . . . . . . . . . . . . . . . . . . . . . . . . . . . . . . . . . 24
What's Included? . . . . . . . . . . . . . . . . . . . . . . . . . . . . . . . . . . . . . . . . . . . . . . . . . . . . . . . . . . . . 25
Controls and Connection Ports . . . . . . . . . . . . . . . . . . . . . . . . . . . . . . . . . . . . . . . . . . . . . . . . . 26
Initial Setup . . . . . . . . . . . . . . . . . . . . . . . . . . . . . . . . . . . . . . . . . . . . . . . . . . . . . . . . . . . . . . . . 28
Assembly and Mounting . . . . . . . . . . . . . . . . . . . . . . . . . . . . . . . . . . . . . . . . . . . . . . . . . . . . . .28
Configuration . . . . . . . . . . . . . . . . . . . . . . . . . . . . . . . . . . . . . . . . . . . . . . . . . . . . . . . . . . . . . . 29
GPS and TMC . . . . . . . . . . . . . . . . . . . . . . . . . . . . . . . . . . . . . . . . . . . . . . . . . . . . . . . . . . . . . . . 29
The Settings Menu (Basic Settings). . . . . . . . . . . . . . . . . . . . . . . . . . . . . . . . . . . . . . . . . . . . . . 31
The “Navigation” Menu . . . . . . . . . . . . . . . . . . . . . . . . . . . . . . . . . . . . . . . . . . . . . . . . . . . . . .32
POI – Selecting “Special Destinations”. . . . . . . . . . . . . . . . . . . . . . . . . . . . . . . . . . . . . . . . . . . 35
The “Route Planner” Menu . . . . . . . . . . . . . . . . . . . . . . . . . . . . . . . . . . . . . . . . . . . . . . . . . . . 36
The “Multimedia” Menu. . . . . . . . . . . . . . . . . . . . . . . . . . . . . . . . . . . . . . . . . . . . . . . . . . . . . .37
Connection to a PC / PC Map Tool – Additional Map Material . . . . . . . . . . . . . . . . . . . . . . . 40
Troubleshooting . . . . . . . . . . . . . . . . . . . . . . . . . . . . . . . . . . . . . . . . . . . . . . . . . . . . . . . . . . . . 42
System Requirements for Use on a Personal Computer . . . . . . . . . . . . . . . . . . . . . . . . . . . . . 43
Technical Data . . . . . . . . . . . . . . . . . . . . . . . . . . . . . . . . . . . . . . . . . . . . . . . . . . . . . . . . . . . . . . 43
Safety Advice and Important Information
Before you start to mount and use this navigation system, please familiarise yourself with its
various components and functions. Furthermore, please read through the safety instructions
carefully to avoid causing injury to yourself and/or other road users.
The use of the navigation system does not under any circumstances release the driver
from his/her personal responsibility. The applicable road traffic regulations and cur-
rent traffic conditions always have priority.
For safety reasons, you should install the device and enter the required information in
the navigation system before you start your journey or when your vehicle is stationary.
If you decide to install the device in your vehicle using a mount, please be aware of
the following: On no account should the screen be adjusted by moving the device it-
self. Position the screen so that you are able to glance at the display quickly and easily.
The device should also be positioned in a way that avoids reflections and glare from
the screen. The screen should not be installed/positioned in a place that obstructs your
view of things that are necessary for driving the vehicle (e.g. the view of the road or
the vehicle's instruments). The screen should also not be positioned within the area di-
rectly in front of the airbag as this may prevent the airbag from inflating. Make sure
the device is sufficiently secure so that it will not become dislodged even in the event
of emergency braking or a collision.
Only look at the screen when it is safe to do so. If you need to look at the screen for a
longer period of time, stop the vehicle at an appropriate and safe place.
The values are calculated for information displayed in the system's “on board compu-
ter”: the current speed, journey time and covered distance. However the accuracy of
these values cannot be guaranteed in every case. The actual speed can always be de-
termined by reading the vehicle's speedometer.
Contents • General Notes
MS2000-2100Traffic.book Seite 23 Mittwoch, 4. Januar 2006 3:02 15

24
The navigation system does not take the relative safety of the suggested routes into
consideration. Road closures, roadworks, height and weight restrictions, traffic and
weather conditions, or other factors that can influence the safety and the journey time
of the route are not taken into consideration for the suggested routes. Use your own
judgement to check the suitability of the suggested routes. If required, use the “Recal-
culate” function to calculate alternatives to the original route. Alternatively take the
road you prefer and the software will automatically perform a re-routing (i.e. calcu-
late a new route based on your new position).
In certain areas, one-way streets, turning restrictions and no entry signs (e.g. pedestri-
an zones) cannot be accounted for. In such situations, pay particular attention to the
road signs and rules of the road that apply.
If you need the help of the emergency services (police, fire, ambulance etc), do not rely
exclusively on the navigation system. Act in a way that you consider to be suitable and
sensible in order to receive help in such a situation.
Do not subject the navigation system to high temperatures or extreme exposure to
sunlight. Temperatures over 50 °C can severely damage the navigation system, espe-
cially the lithium ion battery. The battery should only be charged if someone is moni-
toring the device. Do not open the battery with force as this may release corrosive
acids. Damaged batteries or batteries that are past their expiry date should no longer
be used and should be disposed of in a safe and suitable way.
Never expose the navigation system to humidity as this can result in damage. It is es-
pecially important to protect the navigation system from getting wet if you are on a
motorcycle, bicycle or in a convertible car. This is because the device is not splash-
proof.
Avoid touching the screen with sharp or rough-edged objects as these can damage the
sensitive touchscreen display.
GPS (Global Positioning System) is a satellite-based system that supports geographical
and time-related information all around the world. The system is operated and con-
trolled by the United States of America. The USA is also responsible for the availability
and accuracy of this system. All changes to the GPS availability and accuracy as well as
other factors from the surrounding environment can influence the operation of the
navigation system. SVDO Trading GmbH does not accept any liability whatsoever for
the availability and accuracy of GPS data.
Please ensure that every person intending to use the navigation system reads this safe-
ty information and the recommendations for operating the system beforehand.
Before attaching the mount to the front windscreen, you should clean, with the cloth
provided or benzene, the area of the windscreen that you wish to stick the suction cup
to. This is to remove grease and dust from the area.
Differences between daytime and nighttime temperatures and/or humidity and mois-
ture can break the vacuum seal under the suction cup. Therefore you should attach the
navigation system so that it will not cause any damage if it fell off the windscreen. As
a precautionary measure, you should detach the navigation system at night. Before
the start-up it is necessary to check the fixing of the holder.
Furthermore, if you plan to leave the vehicle unattended for a long period of time,you
should remove the navigation system from the vehicle in order to avoid theft.
Maintenance and Cleaning
Please do not use any cleaning agents or detergents to clean the screen and case of
the device. The best method is to use a soft, damp cloth.
General Instructions
MS2000-2100Traffic.book Seite 24 Mittwoch, 4. Januar 2006 3:02 15

25
What's Included?
Your navigation system package includes the following parts:
1 Navigation system (including lithium ion battery)
2 Mount with suction cup to attach the device to the windscreen.
3 Cloth for cleaning the windscreen before attaching the suction cup.
4 TMC antenna (only for MS 2100 Traffic) for receiving traffic information
5 DC cable 12V/24V to power the navigation system from within the vehicle (adapter for
cigarette lighter)
6 AC cable 100V/240V to power the navigation system from outside the vehicle
(including adapter for the UK)
You should not use any cables other than the AC and DC cables provided to power the
device and to charge the battery!
7 DVD-ROM (Microsoft
®
Windows
®
) with additional map data, PC-MapTool, Microsoft
®
ActiveSync
®
and general user's guide
8 USB data cable to connect the navigation system to a PC
(Microsoft
®
Windows
®
Personal Computer)
9 Quick start guide (multilingual)
1
2
3
5
4
6
7
9
8
What's Included?
MS2000-2100Traffic.book Seite 25 Mittwoch, 4. Januar 2006 3:02 15

26
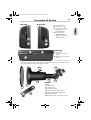
Controls and Connection Ports
3 On-off switch / multi-function switch / status LED
• Quick tap: switches the navigation system to stand-by mode.
• Another quick tap will turn the system on again. The stand-by screen appears.
• Hold down the button for about 3 seconds to switch off the navigation system.
• To switch the device back on, hold down the button for 3 seconds again.
The navigation system will be completely restarted.
The status LED can display the following colours:
Green Battery fully charged. The navigation device is being powered by the battery or
the power cable (either 100V/240V or 12V/24V).
Yellow Battery is being charged
Red Battery level is critical, almost dead.
Front
1 Display / touchscreen
2 Infrared sensor
Usable with remote
control on steering
wheel RCS 5100
(accessories)
1
2
3
Back
4 Compartment for lith-
ium ion battery (cover)
5 GPS antenna
(adjustable)
6 Connection for exter-
nal GPS antenna
7 Loud speaker
8 Holder for mounting
device, e.g. swan neck
4
5
6
7
8
Overview of Device
MS2000-2100Traffic.book Seite 26 Mittwoch, 4. Januar 2006 3:02 15

27
15 Reset: If the navigation systems stops responding to your actions, you can reset the sys-
tem by pressing this button (e.g. with a straightened-out paper clip or another sharp
object). The data you have saved will not be lost!
9 Slot for SD card
10 Headphone socket
11 Connection for TMC
antenna (only for
MS 2100 Traffic)
12 Connection for
100V/240V mains
adapter or 12V/24V
cigarette lighter
Left Side Right Side
12
11
9
10
Underside
13 Serial port
Only for service pur-
poses!
14 USB port for connecting
to a PC
13
14
15
Mount
16 Base
17 Suction cup
18 Locking lever
19 self-adhesive disk
20 Screws (vertical adjustment)
21 Screws (horizontal adjustment)
22 Axial adjustment
23 Optional longer center support arm
16
19
17
18
20
21
22
23
Overview of Device
MS2000-2100Traffic.book Seite 27 Mittwoch, 4. Januar 2006 3:02 15

28
Information about the lithium ion battery: The lithium ion battery can only be
charged within a temperature range of 0-45 °C. It takes approximately 5 hours to fully
charge the battery. Please note the safety instructions when operating the battery!
The battery life without an external power source is approx. 4 hours when the device
is being used for navigation and approx. 5 hours when the device is being used as an
MP3 player .
In many countries it is forbidden to dispose of empty batteries with normal household
waste. Please find out the regulations that apply in your area regarding the disposal
of used batteries.
Assembly and Mounting
On no account should the screen be adjusted by moving the device itself.
Dismounting: To detach the device, switch the pressure lever in the opposite direc-
tion and carefully pull the transparent rubber end of the suction cup to remove it from
the window.
Initial Setup
When you switch on the navigation system for the first time,
you must firstly deactivate the transport safety switch. This can
be done by performing the following steps:
• Open the battery compartment and lift up the battery. Here
it is important that the connecting cable is not unplugged.
• Next to the cable socket, you will see a small switch. Move
the switch downwards in order to activate the power sup-
ply.
• Connect the navigation system to a power supply - either to
the vehicle's cigarette lighter or the 100V/240V mains supply. The battery will then
start to charge.
To mount the device in the vehicle, proceed as follows:
• Find a suitable place in the vehicle for mounting the mount.
The screen be must be clearly visible from the driver's seat
but the device should not obscure the driver's view.
• Please note the safety instructions when choosing the loca-
tion page 23.
• Attach the navigation system near to the dashboard so that
it will not cause any damage if it falls down.
• Using the cloth provided, clean the area of the windscreen
that you wish to stick the suction cup to. This is to remove
grease and dust from the area.
• Press the suction cup against the glass and move the pres-
sure lever towards the glass until it locks into place.
• Attach the navigation system to the mount and make sure it is firmly locked in place.
Extensive information on installation can be found in the detailed installation instruc
-
tions provided.
Initial Setup and Mounting
MS2000-2100Traffic.book Seite 28 Mittwoch, 4. Januar 2006 3:02 15

29
Touchscreen: The navigation system is equipped with a touchscreen. You can tap the
on-screen button with your finger.
Avoid touching the screen with sharp or rough-edged objects as these can damage the
sensitive touchscreen display.
The following functions are available in the main selection screen:
Navigation (page 32): In this mode, you can enter a destination and then navi-
gate to the destination.
Settings (page 31): Here you can configure the basic settings, e.g. volume, your
preferred journey parameters, unit of measurement (kilometres or miles), your
home address.
Route Planner (page 36): In this mode, you can plan a route, determine the dis-
tance and enter various destinations/points en route.
Multimedia (page 37): Select this option if you want to play MP3 files or view
JPG images.
Note: Extensive information on operating the navigation system and PC Map Tool can
be found in the detailed user's guide on the DVD-ROM provided. Acrobat Reader
®
will
be needed to download these features (Acrobat Reader
®
is included on the DVD-
ROM)
GPS Reception
When you switch on the device for the first time, it can take several minutes for the GPS re-
ception to reach a sufficient level and to determine your current position. If you are unable
to obtain a sufficient GPS signal, please read the “Troubleshooting” chapter for suggestions
on solving the problem.
Con
f
iguration
• Press the on-off switch for about 3 seconds to
switch on the navigation system. The system
boots and the battery starts to charge.
• When you switch on the device for the first
time, you may have to select the desired lan-
guage for the navigation instructions as well as
the country map.
• Confirm your settings with OK.
• As soon as the system is ready, the main selec-
tion menu will appear on the screen.
The GPS reception can be checked by
doing the following:
• Tap the Settings buttons. Here you will see a
range of settings including Data Link.
• Tap OK.
• The following information is shown: GPS sig-
nal quality, number of GPS satellites currently
being received, latitude and longitude of cur-
rent position, current altitude.
Configuration
MS2000-2100Traffic.book Seite 29 Mittwoch, 4. Januar 2006 3:02 15

30
Note: Hold the navigation system vertically to obtain a better GPS signal. If necessary,
you can pivot the GPS antenna upwards to improve the reception.
GPS Quality
The quality of the GPS signal is indicated by the colour of the word GPS:
Red Insufficient signal quality, less than 3 satellites found.
YellowSufficient signal quality, less than 5 satellites. Still not enough to determine altitude.
Green Good signal quality, which also allows altitude to be calculated. At least 5 satellites
found.
Satellite Searching / GPS Resetting
If the navigation system was not used for several weeks, or if it was relocated se-
veral kilometres while switched off, the search of the current GPS position could
be very long. Therefore, for accelerating the entire process, it is recommended to
reset the GPS receiver. In this case, the current GPS position will be identified wi-
thout regard to previously stored data. Proceed as follows:
• Take the navigation system outdoor where there is an unhindered view of the sky.
• Choose the Adjustment option in the main menu.
• Move the arrow to the following Adjustment screen, choose the Data link field.
• Then use the Reset button.
• A safety question will be shown on the display whether you really want to reset the GPS
receiver.
• If you choose the No option, no reset will be made.
• If you choose the Yes option, the GPS receiver will be reset. Information on GPS will be
shown on the following screen. The current position will be determined. If the
GPS quality column is displayed in green colour, the navigation system is again ready
for use.
Note: If you are using the navigation system in an inner-city area, it may take longer
to load maps and navigation information. This is due to the large number of roads and
additional information (e.g. hotels, restaurants) as well as the high-density housing ar-
eas. Furthermore it may take longer to establish the GPS reception if you have just
driven out of an underground car park or another type of building where GPS signals
are blocked.
TMC (only MS 2100 Traffic)
During navigation the system regularly accesses the latest TMC traffic informa-
tion in the background, provided that this information is available in the country
you are in. The TMC status is indicated by the colour on the TMC button:
Green TMC reception is OK and there are no traffic jams at the moment.
Yellow TMC reception is OK. There are some traffic jams at the moment but not on
the calculated route.
Red TMC reception is OK. Traffic jam(s) on the route.
Note: To receive TMC messages, the antenna provided with the package must be con-
nected to the system MS 2100 Traffic. The antenna with suckers should be placed on
glass and fixed.
GPS and TMC
MS2000-2100Traffic.book Seite 30 Mittwoch, 4. Januar 2006 3:02 15

31
The Settings Menu (Basic Settings)
To configure the basic settings:
• Tap Settings. A sub-menu opens. Tap the arrow button on the bottom right
of the screen to scroll through the other pages of the sub-menu.
Tap Back to exit the sub-menu without saving changes. You return to the previous
menu. If you tap OK, the selections/changes you have made are confirmed and you re-
turn to the previous menu.
Set home address
Enter your home address in the Address box. Afterwards you can navigate to
this address by simply tapping the Home button.
Volume: This opens a selection screen where you can choose the volume level for the voice
alerts.
Select map: This opens a selection screen where you can choose from the installed maps.
Special destinations: Opens a list of the special destinations that can be displayed on the
map.
Profile: Choose your desired vehicle profile under Driver/vehicle. Here you can also specify
whether you wish to use motorways and ferries. Under Route options you can specify your
preferred journey mode. Choosing the Economical route option calculates the best com-
promise between journey duration and route length.
System settings
• Language + voice Tap this option to select your preferred language. Confirm your se-
lection with OK. You can then select the desired type of voice for the alerts (i.e. male or
female).
• km/miles Here you can select your preferred unit of measurement.
• Clock 12/24 Here you can select how you wish the time to be displayed:
12-hour or 24-hour clock.
• Brightness Here you can select the brightness setting for daytime/nighttime operation.
• Avoid road Choose this option if you want to avoid driving on a specific stretch of a
planned route - for example if the road is currently closed or if there is a traffic jam on
the road. The navigation system will guide you around the stretch of road in question.
The length of road selected here is important for the use of this mode later on in the
navigation or route planning functions!
• Calibrate screen Here you can precisely calibrate the screen by tapping the four crosses
that appear.
Favourite Destinations/Adding to Favourites
Whilst navigation is running, you can set specific points en route or addresses as
your favourite destinations by tapping the button Add to favourites. You can
edit or delete these destinations by going to the Favourite Destinations menu
of the system Settings. The favourite destinations you have set can be used
for navigation or route planning at any time.
Note: What you select here can be changed at any time. Extensive information on the
full scope of the settings can be found in the detailed user's guide on the DVD-ROM
provided.
Settings
MS2000-2100Traffic.book Seite 31 Mittwoch, 4. Januar 2006 3:02 15

32
The “Navigation” Menu
The purpose of the navigation system is to guide you from your present location to your de-
sired destination. The navigation function automatically determines your present location
using the GPS signal. You simply have to enter the address of your destination.
For the destination, you can use (new) addresses, favourite destinations, previous de-
stinations, your home address (Home) or “special destinations” (POI), e.g. hotels, petrol
stations. A POI can only be selected if you are in the Addresses mode.
If you activate the position tracking mode, you can view the vehicle's current GPS position
on the map. You can thus always tell what your current location is, where you have travelled
from and where you are travelling to.
The following section explains all the steps you need to perform: from entering
the address to the end of the navigation process.
• Firstly, tap the Navigation button in the main selection screen of the navi-
gation system.
The destination selection screen appears.
• Next tap the Address button.
• The address selection screen appears.
Note: If you wish to enter the name of a town or street that contains hyphens, then
use the space button rather than an actual hyphen!
• Next select the desired destination, in this case
Hamburg, by using the on-screen keyboard.
• You can also specify the destination location by
entering the postcode. Tap P.code and type in
the relevant postcode using the on-screen key-
board.
• While you are typing, a list of matching results
opens.
• Tap the list entry D 20095 Hamburg to select it.
You then move on to the next page where you
can select the street.
• Using the on-screen keyboard, type in the de-
sired street, e.g. Karlstraße.
• While you are typing, a list of matching results
opens.
• Tap the Karlstraße entry to select it. You may
have to scroll across to the desired list entry us-
ing the arrow buttons.
Navigation Mode
MS2000-2100Traffic.book Seite 32 Mittwoch, 4. Januar 2006 3:02 15

33
Tapping this button (bottom right of screen) will open the list of previously used des-
tinations. To minimise the list, tap the button again.
Using the “backspace” button, you can delete incorrect entries (either whole terms or
individual letters).
Tapping the wind rose will set the map to that it is facing north.
Exiting Navigation
To end the navigation, proceed as follows:
Tap the arrow symbol in the bottom right of the navigation screen.
• The extended navigation functions appear.
• Tap the End navigation button.
• Navigation is stopped and you return to the main selection screen.
• Once you have chosen the street, you will auto-
matically move on to the next screen where you
can select the house number.
• Using the on-screen keyboard, type in the de-
sired house number, e.g. 14.
• Tap the entry Karlstraße 14 to select it.
• You have now selected all elements for the de-
sired destination.
• The route will now be calculated and displayed
on the map.
• By tapping the Map button, you can show the
destination point on the country/town map.
• Tap the Calculate button.
• The route will automatically be calculated and
displayed on the map.
• As soon as the route has been calculated, you
can immediately start navigation. Simply tap
Navigation.
• Beforehand, you can also switch to the route
list by tapping the Route button.
•In the Route List you will see the individual
points en route, total route length, journey
time etc of the calculated route.
• Tap the Navigation button.
• You can now start driving and the navigation
system will guide you to your specified desti-
nation.
Navigation Mode
MS2000-2100Traffic.book Seite 33 Mittwoch, 4. Januar 2006 3:02 15

34
The following functions are available in the navigation screen and the route list:
Point en route
One point en route at a time is shown in the lower area. You will see the route length and
journey duration below the current point on route.
Show the next/previous point en route
You can browse through the route list by tapping the two arrow buttons left and right of
the itinerary description. The next or the previous point on route is shown. At the same time,
the map section focuses on this point on route.
Zoom in/out with the map
Using these two buttons - (–) and (+) - you can adjust the size and scale of the map section.
• To zoom out of the map, repeatedly tap the (–) button until you have decreased the
magnification to the desired level.
• To zoom in to the map, repeatedly tap the (+) button until you have increased the mag-
nification to the desired level.
Using the arrow button (bottom right of screen), you can open another menu.
This contains additional functions and information for the current operation/
process.
Additional Navigation Functions
• Tap the arrow symbol in the bottom right of the
navigation screen.
• The buttons for the extended navigation func-
tions appear.
Example: End navigation
• Tap the End Navigation button.
• You return to the main selection screen.
Example: Route&Sound
Tap the Route&Sound button to open the MP3 player. You can now use the functions of
the MP3 player and listen to your desired title. The song will being played will be interrupt-
ed by the voice alerts for navigation.
Example: Recalculate route
If you tap the Recalculate route button during the journey, the route to the specified des-
tination will be recalculated - starting from your current position. This recalculation is use-
ful, for example, when you select a road during the journey which is different to the one
suggested by the navigation system.
Navigation Mode
MS2000-2100Traffic.book Seite 34 Mittwoch, 4. Januar 2006 3:02 15

35
POI – Selecting “Special Destinations”
You can use a POI within a specified town as the destination (Point of Interest, special desti-
nation, e.g. car parks, petrol stations, hotels, restaurants, etc.).
The following steps must be performed when entering an address:
• Select the town
• Select the POI category
• Select desired POI
Example of POI Search: Selecting a Restaurant as the Destination
Assume you want to be guided to a particular restaurant in Hamburg, then proceed as fol-
lows:
• First, select Hamburg as the town of your destination.
• Make sure that the POI button is pressed in and select Restaurant from the list of POI
categories.
Note: The other functions are described in the detailed user's guide on the DVD-ROM
provided.
Tap the button with the name of the current street
in the upper part of the navigation screen.
• The buttons for the extended navigation func-
tions appear.
Example: Navigation info page “i”
This page shows the following information: dis-
tance to destination, expected time of arrival, cur-
rent altitude, etc.
A list of all the restaurants in Hamburg are listed ac-
cording to distance. The restaurants nearest to the
centre point of the town will be at the top of the
list.
• Tap the desired list entry in order to select it.
• You have now selected the restaurant as a POI
in Hamburg for the destination. The route will
now be calculated automatically and displayed
on the map.
• To start navigation, tap the Navigation button.
Navigation Mode
MS2000-2100Traffic.book Seite 35 Mittwoch, 4. Januar 2006 3:02 15

36
The “Route Planner” Menu
Navigation and Route Planner are basically structured in the same way. With the Navigation
function, the point of departure is always automatically set as the current GPS position. You
simply have to enter your destination. With Route Planner however, you can manually enter
the point of departure (as well as the destination). This means you can calculate routes be-
tween any points and specify the desired route before the trip.
When choosing the starting point and the destination, you can use (new) addresses, favou-
rite destinations, previous destinations, your home address (Home) or “special destina-
tions” (POI). A POI can only be selected if you are in the Addresses mode.
The process of entering and selecting addresses is described in detail in the chapter
Navigation. The on-screen buttons in this area of the display perform the same func-
tions in Route Planner as in Navigation. These buttons and functions are extensively
described in the chapter “Navigation”.
The following section explains all the steps you need to perform: from entering
the address to starting and ending the simulation process.
In the Navigation and Route Planner modes, you can quickly and easily call up
destinations or addresses you have entered before by tapping Previous desti-
nations. This saves you having to type in the information again.
Starting the Navigation Simulation
Tapping the Simulation button starts the navigation simulation. Please note a longer peri-
od of time will be required to simulate longer routes. You can stop the simulation at any
time.
• Tap the arrow symbol in the bottom right of the navigation screen.
• Tap the End navigation button.
• The navigation simulation is stopped and you return to the main selection screen.
Starting Navigation
Once you have specified the route for your journey, you can start navigation from within
the route description screen. The program will automatically replace the specified starting
point with your current GPS position
• Tap the Route Planner symbol in the main se-
lection screen.
• A selection screen appears
• Select the desired point of departure.
• Next, select a destination.
• A selection screen appears
• Select your desired destination.
Route Planner Mode
MS2000-2100Traffic.book Seite 36 Mittwoch, 4. Januar 2006 3:02 15

37
The “Multimedia” Menu
The navigation system offers the possibility of playing MP3 files or viewing JPEG images. In
order to be able to use these multimedia functions, the MP3 or JPEG files in question must
be saved on an SD card (not provided with this package).
If you have a SD card reader/writer, you can copy your MP3 files and JPG pictures di-
rectly from your PC to the SD card!
Insert the SD card in the slot on the left side of the device.
• Tap the Multimedia symbol in the main selection screen.
• The multimedia selection menu appears.
The MP3 Player - Playing Music Files
Tap the MP3 Player symbol.
On the screen you will see the title of the song, the total playing time and the elapsed play-
ing time as well any selected play functions (random, repeat) and the selected equalizer
mode, e.g. Jazz.
• By tapping the Navi button, you will return to the general navigation screen or to the
navigation currently running (Route&Sound).
• Tap the Browser button to open a file browser where you can choose your music titles
(see below).
• Tap Exit to close the MP3 player and return to the previous menu.
The MP3 player's Music menu appears. Using the
symbols in the menu, you can perform the follow-
ing functions:
1 Jump to previous tile
2 Jump to next title
3 Switch to previous folder
4 Switch to next folder
5 Volume control
6 Play
7 Stop
8 Open the Music Settings menu
1
3
2
4
5 6
7
8
Multimedia
MS2000-2100Traffic.book Seite 37 Mittwoch, 4. Januar 2006 3:02 15

38
Setting the Play Functions
Browser – Selecting Music Titles from Folders
The MP3 player offers you an easy-to-use browser to help you choose music titles using fold-
ers. Therefore if you save your titles in separate folders, you can use the browser to choose
the desired songs.
• Tap the Browser button on the screen.
Open the Music Settings menu.
The Music Settings menu offers you the follow-
ing options:
• Tap the Equalizer button to select the de-
sired equalizer settings, e.g. Jazz, Classic,
Rock.
• Tap the Random and Repeat buttons to acti-
vate or deactivate the corresponding func-
tions.
• To return to the Music menu, tap the Back
button.
The folder selection screen appears.
• Tap the up arrow to scroll up the list of fold-
ers.
• Tap the down arrow to scroll down the list of
folders.
• Tap the Back button to return to the previous
menu.
• Tap the desired folder in the browser screen.
The title selection screen appears.
• Next, tap the desired title; the Music menu
appears and the chosen title starts to play.
• Tap the up arrow to scroll up the list of titles.
• Tap the down arrow to scroll down the list of
titles.
• Tap the Back button to return to the previous
menu.
Multimedia
MS2000-2100Traffic.book Seite 38 Mittwoch, 4. Januar 2006 3:02 15

39
The JPEG Viewer – Viewing Pictures
Tap the JPEG viewer symbol.
• On the screen, you will see the picture and the number of the picture within the corre-
sponding folder.
• Tap the Browser button to open a file browser where you can choose your pictures.
• Tap Exit to close the JPEG viewer and return to the previous menu.
Browser – Selecting Pictures from Folders
The JPEG viewer offers you an easy-to-use browser to help you choose pictures using folders.
Therefore if you save your pictures in separate folders, you can use the browser to choose
the desired images.
• Tap the Browser button on the screen.
The JPEG viewer's JPEG menu appears. Using
the symbols in the menu, you can perform the
following functions:
1 Jump to previous picture
2 Jump to next picture
3 Switch to previous folder
4 Switch to next folder
5 Start slide show
6 If you tap on the picture, the image is dis-
played in full screen mode.
1
3
2
4
5
The folder selection screen appears.
• Tap the up arrow to scroll up the list of folders.
• Tap the down arrow to scroll down the list of
folders.
• Tap the Back button to return to the previous
menu.
• Tap the desired folder in the browser screen.
The picture selection screen appears.
• Tap the name of the desired picture in the
browser screen. The picture is displayed.
• Tap the up arrow to scroll up the list of pictures.
• Tap the down arrow to scroll down the list of
pictures.
• Tap the Back button to return to the previous
menu.
Multimedia
MS2000-2100Traffic.book Seite 39 Mittwoch, 4. Januar 2006 3:02 15

40
PC Map Tool – Additional Map Material
We recommend that you copy the additional map material on the DVD-ROM to one
or more SD cards. The map data will be available to use as soon as you have inserted
the SD card into the slot. Here it not necessary to modify the map data contained in
the internal memory of the navigation system - the original configuration remains un-
changed!
If you have a SD card reader/writer, you can copy the additional map material directly
from the DVD-ROM to the SD card (to the folder tb-navi)!
PC Map Tool
You can connect the navigation system to your PC and then copy additional map material
with the PC Map Tool (included on the DVD-ROM) to the internal memory of the device or
to a SD card (optional). You will need to install Microsoft
®
ActiveSync
®
(included on the
DVD-ROM) on your PC. Use the USB data cable supplied with the navigation system to con-
nect the device to your PC. Please connect the USB lead to both your PC and navigation sys-
tem before switching ON the system. Hold down the On/Off button for about 3 seconds to
switch the navigation system off. To switch the device back on, hold down the button for
3 second again.
Connection to a PC
MS2000-2100Traffic.book Seite 40 Mittwoch, 4. Januar 2006 3:02 15

41
The PC Map Tool allows you to add and delete map data. Please be aware that the se-
lection or transfer of all categories requires a lengthy PC calculating time (many
hours). The length of time will depend on the PC system resources. The navigation sys-
tem does have all European POI data preloaded onto the system, therefore we recom-
mend the selection "Do not change existing data sets on the PND". If at any stage the
POI data on the device is accidently deleted, the recommendation is to select only the
POI categories required, the data processing will then be considerably shorter.
The special feature "Map section plus Major Roads" allows you to create your own
map section within one country or regional map plus the Major Roads of the country
or regional map. Normally this complex operation takes many hours. We recommend
the transfer of the map section without the Country Major Roads. In this case please
select "Only show the network of the trunk roads within the selected region"
Detailed information concerning the navigation software and PC Map Tool are on the
DVD-ROM. Acrobat Reader
®
will be needed to download these features (Acrobat
Reader
®
is included on the DVD-ROM).
Notes on file management at the navigation system
After a connection via the Microsoft
®
ActiveSync
®
software has been established, the navi-
gation system will appear as “Mobile Device” in the file explorer on your PC. The “Resident-
Flash” directory contains the following sub-folders:
• Navigator navigation program
• System system files
• tb-navi You can delete the map data saved in this folder in order to free up memory or
to be able to transfer map data from the DVD-ROM.
Under no circumstances should you delete the folders named Navigator and System.
Doing so can make the navigation system unusable!
A map set always consists of multiple files that begin with the same country name. You
must always copy the complete set of files to the internal memory or to the SD map
(to the folder tb-navi). Similarly when deleting, you must always delete the entire file
set.
The PC Map Tool application installs the data map in the following file on the PC:
../Programme/PC Map Tool/prog.mov/TNSMAPS
Data can be then copied from this file to the SD card.
Connection to a PC
MS2000-2100Traffic.book Seite 41 Mittwoch, 4. Januar 2006 3:02 15
Page is loading ...
Page is loading ...
Page is loading ...
Page is loading ...
-
 1
1
-
 2
2
-
 3
3
-
 4
4
-
 5
5
-
 6
6
-
 7
7
-
 8
8
-
 9
9
-
 10
10
-
 11
11
-
 12
12
-
 13
13
-
 14
14
-
 15
15
-
 16
16
-
 17
17
-
 18
18
-
 19
19
-
 20
20
-
 21
21
-
 22
22
-
 23
23
-
 24
24


VDO MS 2000 Owner's manual
- Category
- Car navigation systems
- Type
- Owner's manual
- This manual is also suitable for
Ask a question and I''ll find the answer in the document
Finding information in a document is now easier with AI