Page is loading ...

1035530-X2-A
Installation and Care Guide
Toilet
K-3492
X product numbers are for Thailand (i.e. K-12345X)
⌫

1035530-X2-A 2 Kohler Co.
Tools and Materials
Thank You For Choosing Kohler Company
We appreciate your commitment to Kohler quality. Please take a few minutes to review this manual before you start
installation. If you encounter any installation or performance problems, please don’t hesitate to contact us. Our phone
numbers and website are listed on the back cover. Thanks again for choosing Kohler Company.
DANGER: Risk of electric shock. Disconnect power before servicing.
DANGER: Risk of electrical shock. For plug-in installations/wall-mounted electrical supply: Connect only
to a properly-grounded, grounding-type receptacle which is protected by a Ground-Fault Circuit-Interrupter
(GFCI). Do not remove the grounding pin or use a grounding adapter.
DANGER: Risk of electrical shock. For hardwire installations/through-floor electrical supply: Connect only
to a properly-grounded, dedicated 220 VAC, 15 A, 50 Hz circuit protected by a Class A Ground-Fault
Circuit-Interrupter (GFCI) or Earth-Leakage Circuit-Breaker (ELCB).
CAUTION: Risk of hazardous gases. If a new toilet is not installed immediately, temporarily place a rag in the
floor flange opening.
NOTICE: Follow all local plumbing and electrical codes.
NOTICE: Receptacles installed in bathrooms to be located at least 1 meter from a bathtub or shower if practical,
but in no case less than 0.5 meter.
Observe all local plumbing and building codes.
Carefully inspect the new toilet for damage.
Water and electrical supplies may installed through either the wall or the floor. For a more aesthetic look, installation
of the supplies through the floor is recommended.
There is a wiring schematic on the inside of the junction box cover.
Before You Begin

Kohler Co. 3 1035530-X2-A
1. Roughing-In
DANGER: Risk of electric shock. Disconnect power before servicing.
DANGER: Risk of electrical shock. For plug-in installations/wall-mounted electrical supply: Connect only
to a properly-grounded, grounding-type receptacle which is protected by a Ground-Fault Circuit-Interrupter
(GFCI). Do not remove the grounding pin or use a grounding adapter.
DANGER: Risk of electrical shock. For hardwire installations/through-floor electrical supply: Connect only
to a properly-grounded, dedicated 220 VAC, 15 A, 50 Hz circuit protected by a Class A Ground-Fault
Circuit-Interrupter (GFCI) or Earth-Leakage Circuit-Breaker (ELCB).
NOTE: This product is designed for installation with the electrical and water supplies located through either the wall
or the floor.
24-5/8" (62.5 cm)
L of Outlet
16-1/2" (41.9 cm)
16-5/8"
(42.2 cm)
18-1/4"
(46.4 cm)
Wall
14-1/8"
(35.9 cm)
12"
(30.5 cm)
Front of Bowl
C
3/8" Compression
Supply
6-5/8"
(16.8 cm)
15-7/8"
(40.3 cm)
7-1/4"
(18.4 cm)
4-3/8"
(11.1 cm)
38-3/4"
(98.4 cm)
Hardwire
Electrical Supply
Both the electrical and water supplies
can be installed on either the wall or
the floor. Follow the information for
your particular installation.
3/4" (1.9 cm)
3/4" (1.9 cm)
3/4" (1.9 cm)

1035530-X2-A 4 Kohler Co.
2. Install the Electrical Service and Water Supply
DANGER: Risk of electric shock. Disconnect power before servicing.
7-1/4" (18.4 cm)
GFCI-Protected
Receptacle
The wall locations of the
electrical and water supply
are interchangeable.
T-Bolts
6"
(15.2 cm)
12" (30.5 cm)
Floor Flange
2-3/4" (7 cm)
3/4" (1.9 cm)
2-3/4" (7 cm)
Maximum Height
Supply Stop
Supply Stop
Hardwire
Electrical Supply
DANGER: Risk of electrical shock. For plug-in installations/wall-mounted electrical supply: Connect only
to a properly-grounded, grounding-type receptacle which is protected by a Ground-Fault Circuit-Interrupter
(GFCI). Do not remove the grounding pin or use a grounding adapter.
DANGER: Risk of electrical shock. For hardwire installations/through-floor electrical supply: Connect only
to a properly-grounded, dedicated 220 VAC, 15 A, 50 Hz circuit protected by a Class A Ground-Fault
Circuit-Interrupter (GFCI) or Earth-Leakage Circuit-Breaker (ELCB).
Install the Electrical Service
NOTE: This product is designed for installation with the electrical supply located through either the wall or the floor.
Both types are illustrated. Refer to the dimensional information for your chosen installation.
Follow the dimensional information exactly when installing a hardwire electrical supply.
Install the electrical supply for your chosen installation.
Install the Water Supply
NOTE: This product is designed for installation with the water supply located through either the wall or the floor.
Both types are illustrated. Refer to the dimensional information for your chosen installation.
NOTE: A floor mounted water supply stop may be no higher than 2-3/4” (7 cm) from the floor.
Install the water supply. If you are installing a floor supply, study the dimensional information illustrated carefully.

Kohler Co. 5 1035530-X2-A
3. Install the T-Bolts
T-Bolts
Floor
Flange
4 Install the O-Ring
Install two 5/16” diameter T-bolts into the floor flange.
Place the wax ring in the putty ring located on the tank.

1035530-X2-A 6 Kohler Co.
5. Position the Tank
CAUTION: Risk of product damage. Do not push down on any part of the tank assembly other than the
cylinder. Damage may occur.
Outlet Ring
Remove outlet
gasket.
Centerlines
T-Bolts
Tank
Floor Flange
Replace
outlet
gasket.
Press here on cylinder.
Refill Tube
Remove the outlet gasket.
Mark the centerline on the floor.
Align the tank over the floor flange.
Lower the tank onto the floor flange. The T-bolts should align with the mounting slots in the base of the tank.
Carefully align the tank on the centerline.
Position the tank on the T-bolts.
Press down on the cylinder where the gasket was mounted. Do not press anywhere else on the tank assembly.
Replace the outlet gasket.
Position the loose end of the refill tube in the outlet ring.
CAUTION: Risk of product damage. Do not rock or lift the tank after placement. The seal created by the wax
ring may be broken, resulting in leaking.

Kohler Co. 7 1035530-X2-A
6. Secure the Tank
CAUTION: Risk of product damage. Do not overtighten the mounting nuts. Do not shorten the T-bolts.
Place a washer on each T-bolt.
Thread a nut onto each T-bolt.
Hand tighten the nuts.
IMPORTANT! If this installation replaces an existing toilet, a hose other than the one shipped with the water supply
may be used. Use a stainless steel, burst-resistant hose.
NOTE: This installation is configured to accept a floor water supply. A wall supply is also acceptable.
Connect the water.
Open the shut-off valve.
7. Connect the Water
Nut
Washer
T-Bolt
Base of
T
ank Unit
Flexible Hose
Floor supply shown.

1035530-X2-A 8 Kohler Co.
8. Check the Waterline
CAUTION: Risk of property damage. Before use, return the inlet valve lever to the unlocked (closed) position
to avoid overflow.
NOTE: The waterline is marked inside the tank by a notch and a label.
Turn on the water supply.
Move the lever on the motorized inlet valve into the locked (open) position.
Check the water level in the tank. If the water level is at the marked waterline, return the lever to the unlocked
(closed) position. If adjustments are needed, proceed to the next step.
To adjust the water level, use a flat blade screwdriver to gently turn the adjustment rod on the inlet valve. Turning
the rod counterclockwise will lower and clockwise will raise the water level.
Return the lever to the unlocked (closed) position.
Locked
Unlocked
Waterline
Adjust waterline.

Kohler Co. 9 1035530-X2-A
9. Install the Collar
Place the wiring harness plug, level switch wire, and refill tube on the floor so they extend out the rear access
opening.
Tape them to the floor so they will not be pinched or damaged.
Install the collar onto the tank.
Clip the spray shield into place over the fill valve.
Tape
Level
Switch
Wire
Electrical
Plug
Centerline
Refill Tube
Wiring Harness Plug
Spray Shield
Collar
Ta n k

1035530-X2-A 10 Kohler Co.
10. Install the Vitreous Shell
WARNING: Risk of personal injury. The vitreous shell weighs 80 lbs. (36 kg). Use proper lifting technique
when handling the vitreous shell.
Carefully pick up the vitreous shell and place it over the tank.
Make sure the trapway seats fully in the outlet gasket. If the vitreous shell does not sit evenly on the floor, the
trapway is not properly seated.
Make all adjustments gently until the trapway is properly seated.
CAUTION: Risk of product damage. Do not set the shell down hard. Gently lift and move the shell if it is not
placed correctly. If handled harshly, the shell may chip or break.
Vitreous
Tank
Collar

Kohler Co. 11 1035530-X2-A
11. Connect the Wiring
WARNING: Risk of personal injury. Make sure the plug (if plug-in connection is used) and receptacle are dry.
If any moisture is present, allow the area to dry before plugging the unit in.
If hardwire installation is desired, make the electrical connections at this time. Otherwise, plug the pump in.
Connect the refill tube.
Connect the wiring harness.
Connect the level switch.
Refill Tube
Wiring
Harness
Level Switch

1035530-X2-A 12 Kohler Co.
12. Check Operation
NOTE: The flushing mechanism works best if it is quickly tapped, not held down for an extended period of time.
NOTE: There is an approximate eight-second delay between the flush and the tank refilling.
Flush the toilet and check for proper operation.
Refer to the troubleshooting table if the toilet does not function properly.
13. Secure the Vitreous Shell
Insert a screw through both grommets.
Insert a screw in both of the provided holes and tighten. Do not overtighten.
Place a cap over each screw. The caps should be flush with the exterior of the shell.
CAUTION: Risk of product damage. Do not overtighten the screws when tightening. The vitreous shell
may chip or break if the screws are overtightened.
Push to
flush.
Cap
Screw
Grommet

Kohler Co. 13 1035530-X2-A
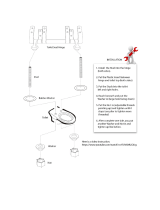
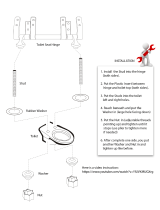
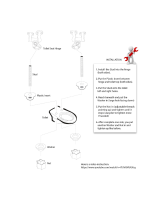
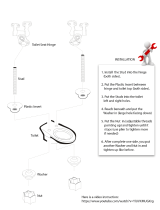
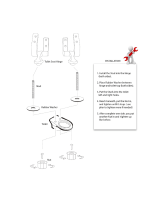
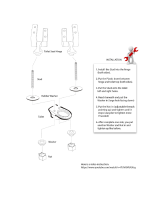
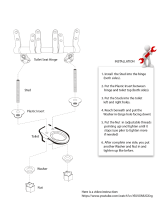
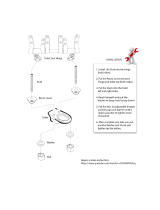
14. Install the Seat
Position a bolt and washer through each of the three holes in the toilet seat hinge.
Position the gasket on the bolts from the underside of the hinge.
Place a plastic tapered bushing, tapered-side-down, on each of the bolts.
Place an expansion sleeve on each bolt.
Thread a brass tapered bushing, tapered-side-up, onto each bolt. Do not tighten at this time.
Position the seat on the toilet and align the bolts with the toilet seat mounting holes.
Insert the bolts and sleeves into the holes.
Use a flat blade screwdriver to thread the bolts until they are snug, but do not fully tighten at this time.
Lower the seat and check seat alignment.
Align the seat on the toilet and then carefully raise the seat to expose the bolts.
Tighten the bolts. Do not overtighten.
Position the tab on the hinge cover with the slot in the hinge assembly and snap the hinge cover into place.
With the seat raised, gently push the seat cover forward. The seat and seat cover should close slowly.
Bolt
Brass Tapered
Bushing
Expansion Sleeve
Plastic Tapered
Bushing
Washer
Toilet
Toilet Seat
Mounting Hole
Hinge
Cover
Gasket
Hinge
Cover Tab
Hinge
Slot
Hinge
Cover/Seat

1035530-X2-A 14 Kohler Co.
15. Complete the Installation
NOTE: Do not caulk the access cover to the floor.
If this installation uses wall mounted electrical or water supplies, cut a recess in the access cover using a utility knife
at the spot marked on the access cover.
Place the access cover over the opening in the back of the toilet.
Caulk around the base of toilet. Do not caulk the area where the access cover meets the floor.
Access Cover
Toilet Back
Access
Opening
Cut with
utility knife.
Do not caulk base of
access cover.
Caulk
base of
toilet.

Kohler Co. 15 1035530-X2-A
Care and Cleaning
Kohler Company shall not be responsible or liable for any tank fitting damage caused by the use of cleaners containing
chlorine (calcium hypochlorite).
For best results, keep the following in mind when caring for your KOHLER product:
• Use a mild detergent such as liquid dishwashing soap and warm water for cleaning. Do not use abrasive cleaners
that may scratch or dull the surface.
• Carefully read the cleaner product label to ensure the cleaner is safe for use on the material.
• Always test your cleaning solution on an inconspicuous area before applying to the entire surface.
• Do not allow cleaners to sit or soak on the surface.
• Wipe surfaces clean and rinse completely with water immediately after cleaner application. Rinse and dry any
overspray that lands on nearby surfaces.
• Use a soft, dampened sponge or cloth. Never use an abrasive material such as a brush or scouring pad to clean
surfaces.
For detailed cleaning information and products to consider, visit www.kohler.com/clean.
WARNING: Risk of property or product damage. Do not use in-tank cleaners in your toilet. Products
containing chlorine (calcium hypochlorite) can seriously damage fittings in the tank. This damage can cause
leakage and property damage.
This troubleshooting guide is for general aid only. A Kohler Authorized Service Representative or qualified electrician
should correct all electrical problems. For warranty service, contact your dealer or wholesale distributor.
Troubleshooting
To troubleshoot this toilet you must first:
NOTE: If the toilet supply cord is damaged, it must be replaced by the manufacturer, its service agent or similarly
qualified persons in order to avoid a hazard.
Unplug the toilet or turn off the power.
If needed, turn on the water supply.
Plug the toilet back in or turn the power back on.
IMPORTANT! When the power is turned on, the toilet may flush three times and then function correctly. No action is
needed if this happens.
Note the results (how many times the toilet flushes, whether it operates normally).
Consult the following table and perform the recommended action.
Symptoms Probable Causes Recommended Action
1. The toilet does not flush. A. Various. A. Perform the troubleshooting steps
below.
2. The toilet randomly flushes A. The tank is overfilling. A. Immediately perform the
2 times. troubleshooting steps or turn
the water off. Turn the water
back on when troubleshooting.

1035530-X2-A 16 Kohler Co.
Symptoms Probable Causes Recommended Action
1. The toilet flushes 3 times, then A. The fill valve is not turning off. A. Repair or replace the fill valve.
operates normally.
B. The motorized valve is not B. Repair or replace the
closing. motorized valve.
2. The toilet flushes 5 times. A. The level switch has an A. Repair of replace the level
intermittent connection. switch.
B. The level switch is stuck in the B. Repair or replace the level
up position. switch.
C. The level switch is not C. Reconnect the level switch
properly connected. properly.
D. The level switch does not move D. Replace the level switch.
freely.
3. The toilet fails to operate. A. There is a problem with the A. Check the wiring and connect
wiring. the power.
B. The GFCI or ELCB is tripped. B. Reset the GFCI or ELCB (if
applicable).
C. There is a problem with the C. Check the pump connection.
pump connection.
D. The actuation switch is not D. Check the actuation switch
properly connected. connection.
E. The level switch is not E. Check the level switch
properly connected. connection.
F. The pump assembly does not F. Replace the pump assembly.
work.
G. The actuation assembly does not G. Replace the actuation assembly.
work.
Troubleshooting (cont.)

Kohler Co. 17 1035530-X2-A
Service Parts
1024576
Block
1037250
Valve
1053973
Inlet Nipple
1032285
Inlet Nipple
1020497
Braided Hose
1017207
Gasket
1017206
Collar
1031167
Water Sensor
1024416
Screw
1045747
Braided Hose
1030578
Cord
38820
O-Ring
1023378
Gasket
1023378
Gasket
84678
Nut
1017874
Spray Shield
1018085
Inlet
1043213
Fill Valve
1050640
Junction Box
1034173
Cover Packet
1030800
Cable Tie
1024416
Screw
1006734
Nut
1006734
Nut
**Finish/color code must be specified when ordering.
1023457
Wax Ring
81632
Floor Flang

1035530-X2-A 18 Kohler Co.
1030800
Cable Tie
**Finish/color code must be specified when ordering.
1023470
Spud
1025459
Switch
1037289
Washer
1018068
Refill Tube
1043214
Connector Kit
1020601
Connector
1053832
Pump Assembly
1055254
1022454
Priming Device
1025461
Tube
1023643
Hose Clamp
1023643
Hose Clamp
1017531
1017532
1017533
Washer
1017270
Tube
1017269
Tube
1023505
Clamp
1023505
Clamp
83040
Clamp
1017793
Shroud
1024416
Screw
1024417
Washer
1042615**
Hold Down Kit
1042617**
Panel
1022679**
Seat
1042395
Bumper
1030310**
Hinge Cover
Check Valve
Housing
Check Valve
Housing
1017534
Check Valve
Body
Pump Flush
Assembly
1023505
Clamp
1059370
1059371
1059373

Kohler Co. 19 1035530-X2-A
เครื่องมือและวัสดุที่ใชสำหรับการติดตั้ง
⌫ ⌫⌫⌫
⌦ ⌫
⌫⌫
คูมือการติดตั้ง
สุขภัณฑ รุน เพียวริส แฮท-บ็อกซ
ขอขอบคุณที่เลือกใชผลิตภัณฑโคหเลอร
ขอสังเกตกอนเริ่มการติดตั้ง
อันตรายจากไฟฟาช็อต
⌫ ⌫
⌫⌫⌦⌫
ขอสังเกต
ขอสังเกต ⌫
⌫
อันตรายจากไฟฟาช็อต การติดตั้งสายไฟแบบฝงผนัง ⌫⌫
⌫⌫
อันตรายจากไฟฟาช็อต การติดตั้งสายไฟแบบฝงพื้น ⌫⌫
ขอควรระวังจากกาซพิษ ⌫

1035530-X2-A 20 Kohler Co.
ขอสังเกต ⌫
1. ระยะการติดตั้ง
อันตรายจากไฟฟาช็อต
อันตรายจากไฟฟาช็อต การติดตั้งสายไฟแบบฝงผนัง ⌫⌫
⌫⌫
อันตรายจากไฟฟาช็อต การติดตั้งสายไฟแบบฝงพื้น ⌫⌫
/