Pioneer AVIC-F310BT User manual

Category
Car navigation systems
Type
User manual
Operation Manual
GPS NAVIGATION AUDIO SYSTEM
AVIC-F310BT
Be sure to read Important Information for the user first!
Important Information for the user includes the
important information that you must understand before
using this navigation system.
English
Thank you for buying this Pioneer product.
Please read through these operating instructions so you will know how to operate
your model properly. After you have finished reading the instructions, keep this man-
ual in a safe place for future reference.
Important
The screens shown in the examples may differ
from actual screens.
Actual screens may be changed without notice
for performance and function improvements.
Introduction
Manual overview 7
How to use this manual 7
Terminology 7
Definitions of terminology 7
Notice regarding MP3 file usage 7
iPod compatibility 8
Map coverage 8
Protecting the LCD panel and screen 8
Resetting the microprocessor 8
Before you start
Checking part names and functions 9
Inserting and ejecting a disc 10
Inserting a disc 10
Ejecting a disc 10
Inserting and ejecting an SD memory
card 10
Inserting an SD memory card 10
Ejecting an SD memory card 11
Plugging and unplugging a USB storage
device 11
Plugging in a USB storage device 12
Unplugging a USB storage device 12
Connecting and disconnecting an iPod 12
Connecting your iPod 12
Disconnecting your iPod 12
Protecting your product from theft 12
Flow from startup to termination 13
On first-time startup 13
Regular startup 13
How to use the detachable device
Checking part names and functions 14
Removing and attaching the detachable
device 14
Removing the detachable device 14
Attaching the detachable device 14
Installing the battery 15
Disposing of the battery 15
Turning on the detachable device 16
Charging the battery of detachable
device 16
Monitoring the battery status 16
Turning off the navigation system
automatically 16
Connecting with your PC 17
How to use the navigation menu screens
Screen switching overview 18
What you can do on each menu 18
Operating menu screens (e.g. Navigation
Menu screen) 19
Operating list screens (e.g. city list) 19
Operating the on-screen keyboard 19
How to use the map
How to read the map screen 20
Displaying the audio information
bar 21
Enlarged map of the intersection 21
Display during motorway driving 21
Operating the map screen 22
Changing the scale of the map 22
Switching the map orientation 22
Scrolling the map to the position you
want to see 23
Viewing information about a specified
location 23
Customising the map screen settings 23
Displaying POI on the map 24
Contents
Engb
2
Switching the map between 2D and
3D 25
Displaying manoeuvres 25
Setting the map colour change
between day and night 25
Changing the road colour 26
Setting Close Up View 26
Setting the Favourites icon
display 26
Setting the current street name
display 26
Changing the setting of navigation
interruption screen 27
Displaying safety camera locations 27
Setting a route to your destination
The basic flow of creating your route 28
Checking the location on the map 28
Checking the calculated route 28
Modifying the route calculation
conditions 29
Checking the current itinerary 30
Adding a waypoint 30
Checking and modifying the current
route
Checking the current itinerary 32
Editing waypoints 32
Adding a waypoint 32
Deleting a waypoint 33
Sorting waypoints 33
Modifying the route calculation
conditions 33
Using the demonstration guidance 34
Cancelling the route guidance 34
Searching for and selecting a location
Searching for a location by address 35
Searching for a name by entering
multiple keywords 36
Setting up a route to your home 36
Searching for Points of Interest (POI) 37
Searching for POIs by specifying a
category first 37
Searching for a POI directly from the
name of the facilities 37
Searching for a nearby POI 38
Searching for POIs around the
destination 38
Searching for POIs around the city 38
Selecting destination from Favourites 39
Searching for POIs by using the data on the
SD memory card 39
Selecting a location you searched for
recently 40
Searching for a location by coordinates 40
Searching for a location by scrolling the
map 41
Registering and editing locations
Registering a location into Favourites 42
Registering a location by
Favourites 42
Registering a location by scroll
mode 42
Editing registered locations 42
Editing the entry in Favourites 42
Sorting the entry in Favourites 43
Deleting the entry in Favourites 43
Registering and editing your home 43
Registering your home 43
Editing your home 44
Deleting an entry in History 44
Using hands-free phoning
Preparing communication devices 46
Displaying the Phone Menu 46
Registering your mobile phone 46
Searching for nearby phones 47
Searching for a specified phone 47
Engb
3
Contents
Pairing from your mobile phone 48
Connecting and disconnecting a registered
mobile phone 49
Connecting a registered mobile
phone 49
Disconnecting a mobile phone 49
Deleting a registered phone 49
Making a phone call 50
Direct dialling 50
Making a call home easily 50
Calling a number in the Contacts 50
Making a phone call using the received
call history 51
Making a phone call using the dialled
number history 51
Making a phone call using missed call
history 52
Dialling the entry in the
Favourites 52
Dialling a facilitys phone number 53
Dialling from the map 53
Receiving a phone call 53
Answering an incoming call 53
Rejecting an incoming call 54
Transferring the phone book 54
Clearing memory 55
Setting the phone 55
Setting the phone volume 55
Stopping Bluetooth wave
transmission 56
Answering a call automatically 56
Setting the automatic rejection
function 56
Echo cancelling and noise
reduction 56
Setting automatic connection 57
Editing the device name 57
Notes for hands-free phoning 57
Updating the Bluetooth wireless technology
software 58
Modifying the general settings for
navigation functions
Setting the volume for navigation system 59
Customising the regional settings 59
Selecting the language 59
Setting the time difference 59
Changing the unit between km and
miles 60
Changing the virtual speed of the
vehicle 60
Setting the keyboard layout 60
Replicating the settings 61
Setting Safe Mode 61
Inputting the fuel consumption information
for calculating the fuel cost 61
Setting the power-saving function 62
Adjusting the response positions of the
touch panel (touch panel calibration) 62
Correcting the current location 62
Checking the connections of leads 63
Checking the version information 63
Adjusting the screen brightness 63
Turning off the screen 64
Restoring the default setting 64
Returning the navigation system to the initial
state 64
Other functions
Exporting data for NavGate FEEDS 65
Fuel details 65
Recording your travel history 66
Exporting and importing the entry in
Favourites 66
Exporting the entry in Favourites 66
Importing Favourites edited on
NavGate FEEDS 67
Contents
Engb
4
Exporting the data of Fuel details from
Export/Import Menu screen 67
PC Mode function 68
Switching to PC Mode 68
Cancelling PC Mode 68
Basic flow of operation
Using the audio source 69
Switching the audio operation screen 69
Screen switching overview 70
What you can do on each menu 71
Using the radio (FM)
Reading the screen 72
Operating by hardware buttons 72
Storing and recalling broadcast
frequencies 72
Storing the strongest broadcast
frequencies 73
Tuning in strong signals 73
Using the radio (AM)
Reading the screen 74
Operating by hardware buttons 74
Storing and recalling broadcast
frequencies 74
Storing the strongest broadcast
frequencies 75
Tuning in strong signals 75
Playing audio CDs
Reading the screen 76
Operating by hardware buttons 76
Selecting a track from the list 77
Setting a repeat play range 77
Play tracks in random order 77
Scan tracks of a CD 77
Playback and Pause 78
Using advanced sound retriever 78
Playing music files on ROM
Reading the screen 79
Operating by hardware buttons 80
Selecting a track from the list 80
Setting a repeat play range 81
Play tracks in random order 81
Scan folders and tracks 81
Playback and Pause 81
Using advanced sound retriever 81
Playing music files on USB
Reading the screen 83
Operating by hardware buttons 83
Selecting a file from the list 84
Setting a repeat play range 84
Playing files in random order 84
Scan folders and files 85
Playback and Pause 85
Using advanced sound retriever 85
Using an iPod
Reading the screen 86
Operating by hardware buttons 87
Selecting a song from the list 87
Setting a repeat play range 87
Playback and Pause 88
Using advanced sound retriever 88
Operating this navigation system's iPod
function from your iPod 88
Playing songs in random order (shuffle) 89
Playing all songs in random order (shuffle
all) 89
Playing songs related to the currently playing
song 89
Searching for applicable items
alphabetically 89
Setting the audiobook play speed 90
Using the AUX source
Reading the screen 91
Engb
5
Contents
Switching the auxiliary setting 91
Selecting AUX as the source 91
Turning the source off
Customising the initial settings
Displaying the Initial Setting screen 93
Setting the illumination colour 93
Switching the auxiliary setting 93
Setting the rear output and subwoofer
controller 93
Setting the rear output 94
Switching the sound muting/attenuation 94
Audio adjustments
Displaying the Audio Menu screen 95
Using balance adjustment 95
Using the equaliser 95
Recalling equaliser curves 95
Adjusting the equaliser curves 96
Adjusting loudness 96
Using subwoofer output 97
Using the high pass filter 97
Adjusting source levels 98
Enhancing bass (Bass) 98
Returning the Navigation System to the
Default or Factory Settings
Setting items to be deleted 100
Appendix
Troubleshooting 102
Messages and how to react to them 105
Messages for audio functions 106
Positioning technology 108
Positioning by GPS 108
Map matching 108
Handling large errors 108
When positioning by GPS is
impossible 109
Conditions likely to cause noticeable
positioning errors 109
Route setting information 111
Route search specifications 111
Handling and care of discs 111
Built-in drive and care 112
Ambient conditions for playing a
disc 112
Playable discs 112
CD 112
Detailed information for playable media 113
Compatibility 113
Media compatibility chart 115
Bluetooth 117
SD and SDHC logo 117
WMA 117
AAC 117
Detailed information regarding connectable
iPods 118
iPod 118
iPhone 118
iTunes 118
Using the LCD screen correctly 119
Handling the LCD screen 119
Liquid crystal display (LCD)
screen 119
Maintaining the LCD screen 119
LED (light-emitting diode)
backlight 119
Display information 120
–“Navigation Menu screen 120
–“Settings Menu screen 120
–“Phone Menu screen 121
Glossary 122
Specifications 124
Contents
Engb
6
Manual overview
Before using this product, be sure to read Im-
portant Information for the user (a separate
manual) which contains warnings, cautions,
and other important information that you
should note.
How to use this manual
Finding the operation procedure for
what you want to do
When you have decided what you want to do,
you can find the page you need from the
Contents.
Finding the operation procedure from
a menu name
If you want to check the meaning of an item
displayed on the screen, you will find the ne-
cessary page from the Display information at
the end of the manual.
Glossary
Use the glossary to find the meanings of
terms.
Terminology
Before moving on, take a few minutes to read
the following information about the conven-
tions used in this manual. Familiarity with
these conventions will help you greatly as you
learn how to use your new equipment.
! Buttons on your navigation system are de-
scribed in ALL CAPITAL, B OLD lettering:
e.g.)
MENU button, MAP button.
! Items in different menus, screen titles, and
functional components are described in
bold with double quotation marks “”:
e.g.)
Navigation Menu screen or Audio
Source screen
! Touch panel keys that are available on the
screen are described in bold in brackets [ ]:
e.g.)
[Address], [Settings].
! Extra information, alternatives and other
notes are presented in the following for-
mat:
e.g.)
p If the home location has not been stored
yet, set the location first.
! References are indicated like this:
e.g.)
= For details, refer to Registering your
home on page 43.
Definitions of terminology
USB storage device
The term for USB memory only is USB sto -
rage device.
SD memory card
The SD memory card and SDHC memory card
are collectively referred to as the SD memory
card.
Notice regarding MP3 file
usage
Supply of this navigation system conveys only
a licence for private, non-commercial use and
does not convey a licence nor imply any right
to use this product in any commercial (i.e. rev-
enue-generating), real time broadcasting (ter-
restrial, satellite, cable and/or any other
media), broadcasting/streaming via internet,
intranets and/or other networks or in other
electronic content distribution systems, such
as pay-audio or audio-on-demand applica-
tions. An independent licence for such use is
required. For details, please visit
http://www.mp3licensing.com.
Introduction
Engb
7
Chapter
01
Introduction
iPod compatibility
This product supports only the following iPod
models and iPod software versions. Others
may not work correctly.
! iPod nano first generation; Ver. 1.3.1
! iPod nano second generation; Ver. 1.1.3
! iPod nano third generation; Ver. 1.1.3
! iPod nano fourth generation; Ver. 1.0.3
! iPod fifth generation; Ver. 1.3
! iPod classic; Ver. 2.0
! iPod touch first generation; Ver. 1.1.5
! iPod touch second generation; Ver. 2.2
! iPhone; Ver. 2.2
! iPhone 3G; Ver. 2.2
p In this manual, iPod and iPhone will be re-
ferred to as iPod.
p When you use this navigation system with
a Pioneer USB interface cable for iPod (CD-
IU50) (sold separately), you can control an
iPod compatible with this navigation sys-
tem.
p To obtain maximum performance, we re-
commend that you use the latest software
for the iPod.
p Operation methods may vary depending on
the iPod models and the software version
of iPod.
p For more details about iPod compatibility
with this navigation system, refer to the in-
formation on our website.
p iPod is a trademark of Apple Inc., regis-
tered in the U.S. and other countries.
p iPhone is a trademark of Apple Inc.
Map coverage
For more details about the map coverage of
this navigation system, refer to the information
on our website.
Protecting the LCD panel
and screen
p Do not allow direct sunlight to fall on the
LCD screen when this product is not being
used. Extended exposure to direct sunlight
can result in LCD screen malfunction due
to the resulting high temperatures.
p When using a mobile phone, keep the aer-
ial of the mobile phone away from the LCD
screen to prevent disruption of the video in
the form of spots, coloured stripes, etc.
p To protect the LCD screen from damage, be
sure to touch the touch panel keys with
your finger. (The stylus is supplied for spe-
cial calibrations. Do not use the stylus for
normal operations.)
Resetting the microprocessor
CAUTION
Pressing the RESET button clears the settings for
the audio source without clearing all the naviga-
tion function items. Please refer to the related
section before clearing.
= For more detailed information about the items
which would be erased, refer to Setting items
to be deleted on page 100.
The microprocessor must be reset under the
following conditions:
! Prior to using this product for the first time
after installation.
! If the product fails to operate properly.
! If there appear to be problems with the op-
eration of the system.
! When changing the combination of equip-
ment.
! When adding/removing additional pro-
ducts that connect to the navigation sys-
tem.
! If your vehicle position is shown on the
map with a significant positioning error.
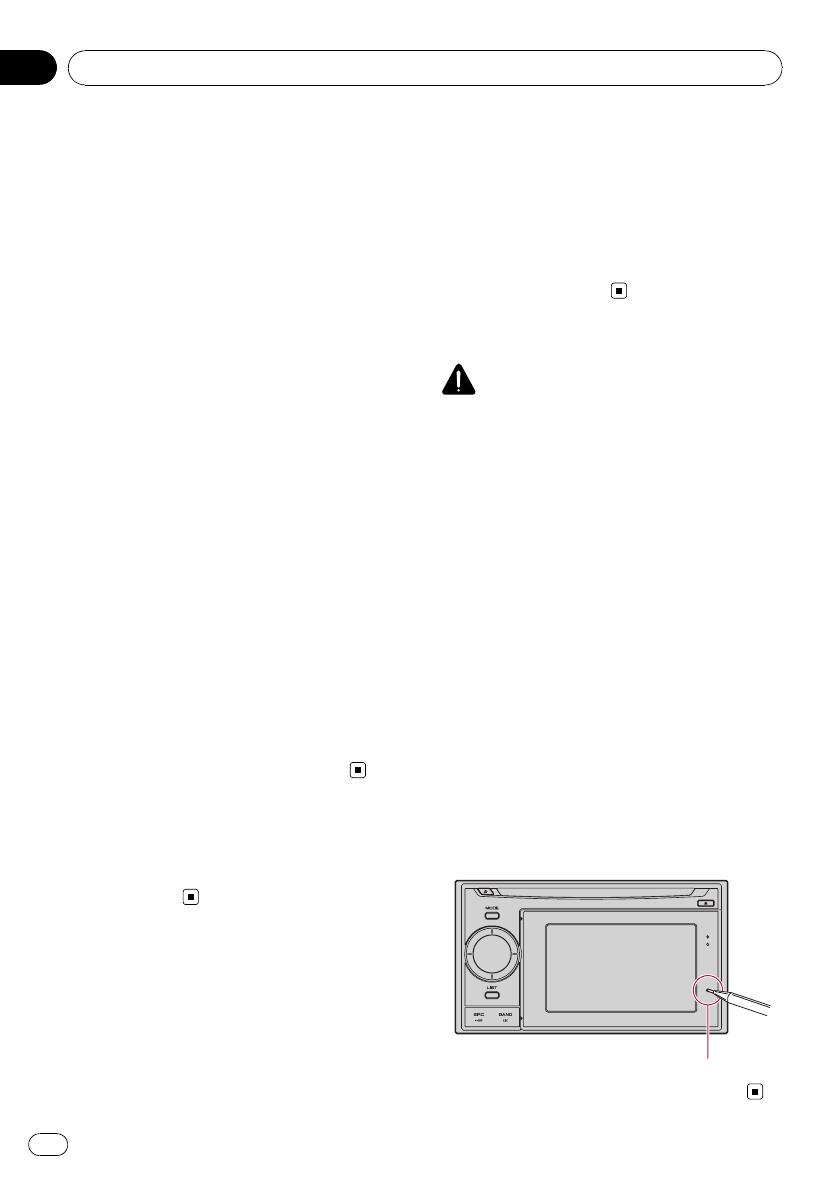
% Press the RESET button with a pen tip
or other pointed implement.
RESET button
Introduction
Engb
8
Chapter
01
Checking part names and functions
This chapter gives information about the
names of the parts and the main features
using the buttons.
12
4
3
6
78
a9
5
b
c
d
1 Disc loading slot
Insert a disc to play.
= For details concerning operations, refer
to Inserting and ejecting a disc on the
next page.
2 EJECT button
Press to eject the disc from the disc loading
slot.
3 Head unit
4 MODE button
! Press to switch between the map screen
and the audio operation screen.
! Press to display the map screen while
the screen of navigation function is dis-
played.
5 MULTI-CONTROL
MULTI-CONTROL is used only for the audio
function.
= For more details, refer to the descriptions
from Chapter 13 to Chapter 23.
! Rotating;
Adjusts the audio source volume.
! Moving MULTI-CONTROL to the left or
right;
Allows you to change the frequency one
step at a time; operates track search con-
trols.
! Keep moving MULTI-CONTROL to the
left or right;
Allows you to perform manual seek tun-
ing, fast forward or reverse.
6 LIST button
This button is used only for the audio func-
tion.
= For more details, refer to the descriptions
from Chapter 13 to Chapter 23.
Before you start
Engb
9
Chapter
02
Before you start
7 SRC/OFF button
This button is used only for the audio func-
tion.
= For more details, refer to the descriptions
from Chapter 13 to Chapter 23.
8 BAND/ESC button
This button is used only for the audio func-
tion.
= For more details, refer to the descriptions
from Chapter 13 to Chapter 23.
9 Detachable device
a LCD screen
b RESET button
= For details, refer to Resetting the micro-
processor on page 8.
c Bluetooth connection status indicator
Lights up when your phone is paired to the
navigation system by Bluetooth wireless
technology.
d DETACH button
Press to remove the detachable device from
the head unit.
Inserting and ejecting a disc
Inserting a disc
% Insert a disc into the disc loading slot.
p Do not insert anything other than a disc
into the disc loading slot.
Ejecting a disc
% Press the EJECT button.
The disc is ejected.
Inserting and ejecting an
SD memory card
CAUTION
! Keep the dummy SD card out of the reach of
small children to prevent them from acciden-
tally swallowing it.
! To prevent data loss and damage to the sto-
rage device, never remove it from this naviga-
tion system while data is being transferred.
! If data loss or corruption occurs on the sto-
rage device for any reason, it is usually not
possible to recover the data. Pioneer accepts
no liability for damages, costs or expenses
arising from data loss or corruption.
Inserting an SD memory card
1 Remove the detachable device from
the head unit.
= For details, refer to Removing and attaching
the detachable device on page 14.
2 Insert an SD memory card into the SD
card slot.
Insert it with the contact the top of the detach-
able device and press the card until it clicks
and completely locks.
Label side
Before you start
Engb
10
Chapter
02
p This system is not compatible with Multi
Media Card (MMC).
p Compatibility with all SD memory cards is
not guaranteed.
p This unit may not achieve optimum perfor-
mance with some SD memory cards.
p Do not insert anything other than SD mem-
ory cards or dummy SD cards into the SD
card slot.
p When you insert the SD memory card
which contains your customised POI data,
the navigation system restarts.
Ejecting an SD memory card
1 Display the Navigation Menu screen.
2 Touch [Eject SD].
A message confirming whether to restart the
navigation system appears.
3 Touch [OK].
The navigation system restarts, and then fol-
lowing message appears.
4 Press the SD memory card until it clicks.
The SD memory card is ejected.
5 Pull out the SD memory card.
p Insert the dummy SD card to keep the SD
card slot free of dust when the SD memory
card is not inserted.
6 Touch [Restart].
The navigation system restarts.
Plugging and unplugging a
USB storage device
CAUTION
! To prevent data loss and damage to the sto-
rage device, never remove it from this naviga-
tion system while data is being transferred.
! If data loss or corruption occurs on the sto-
rage device for any reason, it is usually not
possible to recover the data. Pioneer accepts
no liability for damages, costs or expenses
arising from data loss or corruption.
Before you start
Engb
11
Chapter
02
Before you start
Plugging in a USB storage device
% Plug a USB storage device into the USB
connector.
USB connector
USB storage device
p Compatibility with all USB storage device is
not guaranteed.
This navigation system may not achieve op-
timum performance with some USB sto-
rage devices.
p Connection via USB hub is not possible.
Unplugging a USB storage device
% Pull out the USB storage device after
checking that no data is being accessed.
Connecting and
disconnecting an iPod
CAUTION
! To prevent data loss and damage to the sto-
rage device, never remove it from this naviga-
tion system while data is being transferred.
! If data loss or corruption occurs on the sto-
rage device for any reason, it is usually not
possible to recover the data. Pioneer accepts
no liability for damages, costs or expenses
arising from data loss or corruption.
Connecting your iPod
Using the USB interface cable for iPod en-
ables you to connect your iPod to the naviga-
tion system.
p A USB interface cable for iPod (CD-IU50)
(sold separately) is required for connection.
1 Pull out the USB storage device after
checking that no data is being accessed.
USB connector USB interface
cable for iPod
p For more details about iPod compatibility
with this navigation system, refer to the in-
formation on our website.
p Connection via USB hub is not possible.
2 Connect your iPod.
Disconnecting your iPod
% Pull out the USB interface cable for iPod
after checking that no data is being ac-
cessed.
Protecting your product
from theft
The detachable device can be removed from
the head unit to discourage theft.
= For details, refer to Removing and attaching
the detachable device on page 14.
CAUTION
! Never grip the display and the buttons tightly
or use force when removing or attaching.
! Avoid subjecting the detachable device to ex-
cessive shocks.
Before you start
Engb
12
Chapter
02
! Keep the detachable device out of direct sun-
light and high temperatures.
! After removing the detachable device, keep it
in a safe place so it is not scratched or
damaged.
Flow from startup to
termination
1 Start the engine to boot up the system.
p To protect the LCD screen from damage, be
sure to use your fingers to touch the touch
panel keys. (The stylus is supplied for spe-
cial calibrations. Do not use the stylus for
normal operations.)
2 Turn off the vehicle engine to termi-
nate the system.
The navigation system is also turned off.
On first-time startup
When you use the navigation system for the
first time, select the language that you want to
use.
1 Start the engine to boot up the system.
After a short pause, the navigation splash
screen comes on.
And then the Select UI Language screen ap-
pears.
2 Touch the language that you want to
use on the screen.
The Voice Language Selection screen ap-
pears.
3 Touch the language that you want to
use for the voice guidance.
The navigation system will now restart.
4 Read the disclaimer carefully, checking
its details, and then touch [OK] if you
agree to the conditions.
The map screen appears.
Regular startup
% Start the engine to boot up the system.
p The screen shown will differ depending on
the previous conditions.
p When there is no route, the disclaimer ap-
pears after the navigation system reboots.
Read the disclaimer carefully, checking its
details, and then touch [OK] if you agree to
the conditions.
Before you start
Engb
13
Chapter
02
Before you start
Removing the detachable device from the
head unit enables you to set routes and search
locations even when you are out of your vehi-
cle.
Also, you can connect the detachable device
to your PC using the supplied USB cable.
This chapter describes how to use the detach-
able device as it is removed from the head
unit.
Checking part names and
functions
Bottom of the detachable device
1
Top of the detachable device
32
1 USB connector
Use to connect with your PC.
2 Power switch
Use to turn the detachable device on and
off.
3 SD card slot
= For more detailed information, refer to In-
serting and ejecting an SD memory card
on page 10.
Removing and attaching
the detachable device
Removing the detachable device
p The head unit can not be operated while
the detachable device is removed from the
head unit.
p Removing the detachable device automati-
cally turns the audio source off.
p Removing the detachable device while dis-
playing an audio screen automatically
turns the audio source off and switches to
display the map screen.
1 Press DETACH button to release the de-
tachable device.
2 Gently grip the right side of the front
panel and slowly pull it outward.
Take care not to drop the detachable device
and protect it from contact with water or other
fluids to prevent permanent damage.
3 Put the detachable device into the sup-
plied case for safe keeping.
Attaching the detachable device
p If the detachable device is turned on before
it is attached to the head unit, it will not
turn off when the ignition switch is turned
off (ACC OFF).
1 Turn off the power of detachable de-
vice.
2 Slide the detachable device to the left
until it clicks.
The detachable device and the head unit are
jointed on the left side. Make sure that the de-
tachable device has been jointed to the head
unit.
How to use the detachable device
Engb
14
Chapter
03
3 Press the centre on the right side of the
detachable device until it is firmly seated.
If you cant attach the detachable device to the
head unit successfully, try again. The detach-
able device may be damaged if you attach the
detachable device forcedly.
Installing the battery
CAUTION
! Do not under any circumstances attempt to
change the battery yourself.
! The battery should only be changed by
Pioneer service personnel.
Disposing of the battery
WARNING
! Keep the battery pack out of the reach of
small children to prevent them from acciden-
tally swallowing it.
! Batteries (battery pack or batteries installed)
shall not be exposed to excessive heat such
as sunshine, fire or the like.
CAUTION
When disposing of used batteries, please comply
with governmental regulations or environmental
public institutions rules that apply in your coun-
try/area.
Do not open the cover except when you dispose
the battery.
1 Remove the screw in the back of the
detachable device.
2 Slide the cover off.
3 Remove the battery.
How to use the detachable device
Engb
15
Chapter
03
How to use the detachable device
4 Detach the cable to disconnect the bat-
tery.
Turning on the detachable
device
If you turn on the detachable device while it is
removed from the head unit, the navigation
system switches to Detach mode.
p The following functions are not available in
Detach mode.
Voice guidance
Auto reroute function
Map matching
Hands-free phoning
Audio functions
p When the battery of the detachable device
is completely run down, the splash screen
is displayed the next time the system is
booted up.
Charging the battery of
detachable device
! The operating temperature range of the bat-
tery is from -20 °C to +60 °C.
! The charging temperature range of the battery
is from 0 °C to +55 °C.
Charging cannot be done when the tempera-
ture is outside of the charging temperature
range.
The battery of the detachable device is
charged in the following situations.
! When the detachable device is attached to
the head unit while the ignition switch is
turned on (ACC ON).
! When the detachable device is connected
to your PC.
p Before charging the detachable device
by connecting it to your PC, turn off the
power of detachable device. If the power
is on, the battery may not be charged.
p When connecting to your PC, the bat-
tery may not be charged depending on
the setting of the screen brightness.
Before charging the detachable device
by connecting it to your PC, set the
screen brightness to a low level.
= For details, refer to Adjusting the
screen brightness on page 63.
Monitoring the battery status
You can check the battery status of the detach-
able device.
1 Display the Navigation Menu screen.
2 Touch [Settings].
The Settings Menu screen appears.
The battery status indicator is displayed on the
upper right of the Settings Menu screen.
Battery status indicator
Fully charged
Sufficient power
Charging
Turning off the navigation
system automatically
When the battery of detachable device nearly
runs out, the navigation system automatically
turns off.
When the detachable device is turned on
again after charging the battery, it returns to
the last status of system.
How to use the detachable device
Engb
16
Chapter
03
1 A message appears when the remain-
ing battery life is getting low.
2 When the battery nearly runs out, the
navigation system automatically turns off
after a message appears.
Connecting with your PC
It is available to connect the detachable device
and your PC using the USB cable (supplied
with the navigation system).
1 Connect the supplied USB cable to USB
connector.
2 Connect the supplied USB cable to your
PC.
How to use the detachable device
Engb
17
Chapter
03
How to use the detachable device
Screen switching overview
What you can do on each menu
1 Map screen
Press the MODE button to display the naviga-
tion map screen.
2 Navigation Menu screen
You can search for your destination on this
menu. You can also check or cancel your set
route from this menu.
3 Settings Menu screen
You can access the screen to customise set-
tings.
4 Phone Menu screen
You can access the screen that is related to
hands-free phoning to see call histories and
change the settings on the Bluetooth wireless
technology connection.
5 Audio operation screen
When you play the audio source, this screen
appears regularly.
p To return to the previous screen, touch
.
How to use the navigation menu screens
Engb
18
Chapter
04
Operating menu screens (e.g.
Navigation Menu screen)
1 Screen title
2
Shows the next or previous page.
3
Returns the previous screen.
Operating list screens (e.g.
city list)
1 Screen title
2
Touching or on the scroll bar scrolls
through the list and allows you to view the re-
maining items.
3
Returns the previous screen.
4 Listed items
Touching an item on the list allows you to nar-
row down the options and proceed to the next
operation.
5
If all of characters cannot be displayed within
the displayed area, touching the key to the
right of the item allows you to see remaining
characters.
Operating the on-screen
keyboard
1 Text box
Displays the characters that are entered. If
there is no text in the box, an informative
guide with text appears.
2 Keyboard
Touch the keys to enter the characters.
3
Returns the previous screen.
4 [0-9], [Sym.], [Others]:
You can enter other characters of alphabet.
You can also enter text with marks such as [&]
or [+] or numbers.
Touch to toggle the selection.
p When you use any of A, Ä, Å, Æ,
the displayed result is the same.
5 [OK]:
Confirms the entry and allows you to proceed
to the next step.
6
:
Deletes the input text one letter at a time, be-
ginning at the end of the text. Continuing to
touch the button deletes all of the text.
How to use the navigation menu screens
Engb
19
Chapter
04
How to use the navigation menu screens
Most of the information provided by your navi-
gation system can be seen on the map. You
need to become familiar with how the informa-
tion appears on the map.
How to read the map screen
This example shows an example of a 2D map screen.
p Information with the mark (*) appears only
when the route is set.
p Depending on the conditions and settings,
some items may not be displayed.
1 Name of the street to be used (or next gui-
dance point)*
Touching this item enables you to hear the
next guidance again.
2 Next direction of travel*
When you approach a guidance point, this ap-
pears in green. Touching this item enables
you to hear the next guidance again.
3 Distance to the guidance point*
Shows the distance to the next guidance
point.
4 Zoom in/Zoom out
Touching
displays touch panel keys for
changing the map scale and the map orienta-
tion.
5 Current position
Indicates the current location of your vehicle.
The apex of the triangular mark indicates your
orientation and the display moves automati-
cally as you drive.
p The apex of the triangular mark is the
proper current position.
6 Street name (or city name) that your vehi-
cle is travelling along
= For details, refer to Setting the current
street name display on page 26.
7 Menu key
8 Map orientation indicator
! When North up is selected, is dis-
played.
! When Heading up is selected,
is
displayed.
The red arrow indicates north.
How to use the map
Engb
20
Chapter
05
  • Page 1 1
  • Page 2 2
  • Page 3 3
  • Page 4 4
  • Page 5 5
  • Page 6 6
  • Page 7 7
  • Page 8 8
  • Page 9 9
  • Page 10 10
  • Page 11 11
  • Page 12 12
  • Page 13 13
  • Page 14 14
  • Page 15 15
  • Page 16 16
  • Page 17 17
  • Page 18 18
  • Page 19 19
  • Page 20 20
  • Page 21 21
  • Page 22 22
  • Page 23 23
  • Page 24 24
  • Page 25 25
  • Page 26 26
  • Page 27 27
  • Page 28 28
  • Page 29 29
  • Page 30 30
  • Page 31 31
  • Page 32 32
  • Page 33 33
  • Page 34 34
  • Page 35 35
  • Page 36 36
  • Page 37 37
  • Page 38 38
  • Page 39 39
  • Page 40 40
  • Page 41 41
  • Page 42 42
  • Page 43 43
  • Page 44 44
  • Page 45 45
  • Page 46 46
  • Page 47 47
  • Page 48 48
  • Page 49 49
  • Page 50 50
  • Page 51 51
  • Page 52 52
  • Page 53 53
  • Page 54 54
  • Page 55 55
  • Page 56 56
  • Page 57 57
  • Page 58 58
  • Page 59 59
  • Page 60 60
  • Page 61 61
  • Page 62 62
  • Page 63 63
  • Page 64 64
  • Page 65 65
  • Page 66 66
  • Page 67 67
  • Page 68 68
  • Page 69 69
  • Page 70 70
  • Page 71 71
  • Page 72 72
  • Page 73 73
  • Page 74 74
  • Page 75 75
  • Page 76 76
  • Page 77 77
  • Page 78 78
  • Page 79 79
  • Page 80 80
  • Page 81 81
  • Page 82 82
  • Page 83 83
  • Page 84 84
  • Page 85 85
  • Page 86 86
  • Page 87 87
  • Page 88 88
  • Page 89 89
  • Page 90 90
  • Page 91 91
  • Page 92 92
  • Page 93 93
  • Page 94 94
  • Page 95 95
  • Page 96 96
  • Page 97 97
  • Page 98 98
  • Page 99 99
  • Page 100 100
  • Page 101 101
  • Page 102 102
  • Page 103 103
  • Page 104 104
  • Page 105 105
  • Page 106 106
  • Page 107 107
  • Page 108 108
  • Page 109 109
  • Page 110 110
  • Page 111 111
  • Page 112 112
  • Page 113 113
  • Page 114 114
  • Page 115 115
  • Page 116 116
  • Page 117 117
  • Page 118 118
  • Page 119 119
  • Page 120 120
  • Page 121 121
  • Page 122 122
  • Page 123 123
  • Page 124 124
  • Page 125 125
  • Page 126 126

Pioneer AVIC-F310BT User manual

Category
Car navigation systems
Type
User manual

Ask a question and I''ll find the answer in the document

Finding information in a document is now easier with AI