
- 1 -
Instruction Manual
TAKAHASHI
FC-100DZ

- 2 -
Thank you for purchasing the Takahashi FC-100DZ telescope.
The FC-100DZ is a high-powered telescope with an objective
lens that utilizes fluorite, and depending on the implementation of
reducers, atteners, or extenders, it may utilize many focal lengths.
In order to use your telescope to its highest potential, please read
this instruction manual very carefully, and familiarize yourself with
all of the functions this telescope offers. All Takahashi telescopes
have been strictly inspected before shipment. If there is anything
wrong with your telescope when unpacked, please contact your
authorized Takahashi dealer at once.

- 3 -
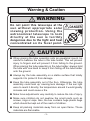
WARNING
CAUTION
Do not point this telescope at the
su n wit h out appro p riate so l a r
v i ewi ng pr o te c tio n. Us i ng t h e
astronomical telescope to look
d ir ec t l y a t t h e su n i s t e r r i b ly
dangerous due to the light and heat
concentrated on its focal point.
DANGER
When placing the tube assembly onto an equatorial mount, be
ی
careful to balance the tube in the tube holder. This will prevent
injury to fingers and will prevent it from falling to the ground.
When placing the tube assembly in the tube holder, always hold
the tube with one hand to keep it from falling o the tube holder
onto the ground.
Always lay the tube assembly on a stable surface that totally
ی
supports it to protect it from damage.
Keep the tube assembly out of the Sun. Otherwise, the tube
ی
assembly could heat up, causing lens damage. If the sun light
were to reach it directly, the temperature around it would greatly
increase and could cause a re.
Make focus adjustments very carefully to reduce the risk of injury.
ی
Make sure children do not swallow the smart parts such as
ی
screws, rings or caps. Also, the box contains huge plastic bags
which should be kept out of the reach of children.
Keep all packing materials away from an open flame. These
ی
materials are ammable.
Warning & Caution

- 4 -
Contents
Warning & Caution ------------------------------------------ 3
Contents
------------------------------------------------------- 4
Specications
------------------------------------------------ 5
Tube Assembly Layout
------------------------------------ 6
Setup
----------------------------------------------------------- 7
Focusing ------------------------------------------------------- 9
Attaching the Finder
-------------------------------------- 10
Observation
------------------------------------------------ 13
About the Accessories ----------------------------------- 15
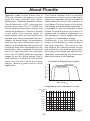
About Fluorite
---------------------------------------------- 22
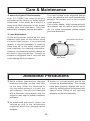
Care & Maintenance
------------------------------------- 23
Additional Precautions
----------------------------------- 23
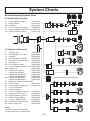
System Charts
--------------------------------------------- 24

- 5 -
Specications
Conguration ------------------------------ Doublet Fluorite Apochromat
Eective Aperture ----------------------- 100mm multi-coated
Focal Length ------------------------------ 800mm
Focal Ratio -------------------------------- 1:8
Resolving Power ------------------------- 1.16”
Limiting Magnitude ---------------------- 11.8
Light Gathering Power ------------------ 204x
With FC-35 Reducer 0.66x
Focal Length ----------------------------- 530mm
Focal Ratio ------------------------------- 1:5.3
Image Circle -----------------------------
φ
44mm (60% illuminated)
With FC/FS Multi Flattener 1.04x
Focal Length ----------------------------- 820mm
Focal Ratio ------------------------------- 1:8.2
Image Circle -----------------------------
φ
44mm (60% illuminated)
Diameter of Main Tube ----------------- 95mm
Total Length of Main Tube ------------- 840mm
Weight of Main Tube Assembly ------- 3.9kg
Finder Scope ------------------------------ 6x30 or 7x50 optionally available
Accessories -------------------------------
Warranty Card, Instruction Manual,
Hex Wrench (4mm)

- 6 -
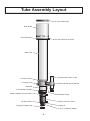
Tube Assembly Layout
Dew Shield Cap
Eyepiece Adapter Cap
31.7(1¼”) Eyepiece Adapter
Coupling S
50.8(2") Sleeve
Drawtube Clamp
Drawtube
F-50.8 Adater Coupling
Focusing Knob
Focuser Housing
Optional Finder Scope Bracket
Optional 6x30 Finder Scope
Main Tube
Dew Shield Ring
Dew Shield Lock Screw
Dew Shield
50.8(2”) Adapter (for Refraction)
50.8(2”) Extension Tube L

- 7 -
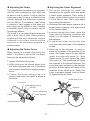
Balancing the Declination Axis ▼
Loosen the right ascension (R.A.) clamp 1
.
and make sure the declination (Dec.) axis
is in a horizontal position. At this time be
sure to adjust the balance of the R.A.
axis, as after this point it becomes very
dicult to rotate.
While making sure that the equipment 2
.
does not move, slowly tighten the Dec.
clamp and check the balance around the
axis.
When you feel that the balance is not 3
.
right, loosen the tube holder clamp and
move the telescope barrel back and
forth to find the most balanced position.
Determining the appropriate balance is
important when using a camera so take
your time to carefully balance the system.
▼Balancing the Right Ascension Axis
After the declination axis is well balanced, 1
.
tighten the Dec. clamp to x it into place.
Loosen the R.A. clamp and check the 2
.
balance around the R.A. axis.
If adjustment is required, move the mount 3
.
counter weight to nd proper balance.
If after pulling the weight all the way to 4
.
the tip of the balance shaft the telescope
is still too heavy, an additional weight may
be required (sold separately).
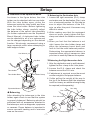
Balancing
ی
After attaching the telescope to the tube
holder, again check to see that the system
is properly balanced. Balancing should be
performed with all accessories attached to
the telescope, such as diagonals, eyepieces
or cameras. Proper balance is important to
ensure accurate tracking and to minimize
wear on the mount.
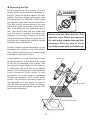
Installation on an Equatorial Mount
ی
As shown in the figure below, the tube
holder can be attached with two cap bolts.
With the tube holder open, place the
telescope inside the tube holder and then
close the tube holder. Before tightening
the tube holder clamp, carefully adjust
the balance of the optical tube assembly
(for further explanation see the Equatorial
Mount Manual). A dedicated tube holder
can be attached to all of our systems and
can be changed depending on the desired
function. We strongly recommend using a
large equatorial mount when attempting to
take images of stars.
Setup
Tube Holder
Tube Holder Clamp
Tube Holder Base
R.A. Axis
R.A. Clamp
Telescope
Counter Weight
Dec. Axis
Dec. Clamp
Equatorial Mount
Cap Bolt
Hex Wrench

- 8 -
- 8 -
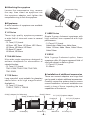
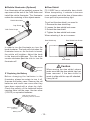
Attaching the eyepiece
ی
Loosen the compression ring, remove
the cap, then insert an eyepiece into
the eyepiece adapter and tighten the
compression ring to lock the eyepiece.
Eyepieces
ی
A wide variation of eyepieces are available
from Takahashi.
LE Series
▼
These high quality eyepieces possess
a wide field of view and come in several
models:
・
31.7mm(1¼”) barrel
LE5mm, LE7.5mm, LE10mm, LE12.5mm,
LE18mm, LE24mm, LE30mm
・
50.8mm(2”) barrel
LE40mm, LE50mm
TAK-UW Series
▼
Ultra wide angle eyepieces designed to
achieve sharpness for observation of
celestial bodies:
・
31.7mm(1¼”) barrel
TAK-3.3UW, TAK-5.7UW, TAK-7UW,
TAK-10UW
TOE Series ▼
Long eye-relief, most suitable for planetary
obs ervation wit h high magnifica tion.
Available in:
・
31.7mm(1¼”) barrel
TOE2.5, TOE3.3, TOE4.0
Installation of additional accessories
ی
There are several adapters and rings that
can be used to attach additional accessories.
Carefully review the system chart to ensure
correct installation. Incorrect installation can
result in loss of focus, impeding the true
capabilities of the device.
ABBE Series
▼
Simple 2 group 4-element eyepieces with
high contrast; less expensive with high
performance:
・
31.7mm(1¼”) barrel
Abbe 4mm, Abbe 6mm, Abbe 9mm,
Abbe 12.5mm, Abbe 18mm, Abbe 25mm,
Abbe 32mm
ERFLE
▼
With 3-group 5-element optics, these
eyepieces oer 60 degree apparent eld of
view with almost no are or ghost:
・
31.7mm(1¼”) barrel
Er-28mm
Compression Ring
Eyepiece
Plastic Ring
50.8(2”) Adapter (for Refraction)
Coupling S
M43x0.75
M36.5x1.0
31.7(1¼”) Eyepiece Adapter
31.7(1¼”) Eyepiece
50.8mm(2”) 31.7mm(1¼”)
50.8(2”) Sleeve
50.8mm(2”)
50.8(2”) Extension Tube L
M72x1.0

- 9 -
- 9 -
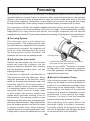
Focusing
Focusing System
ی
The telescope uses a rack-and-pinion
focusing system. This system permits rapid
and accurate focus adjustment. By turning the
focusing knob clockwise, the drawtube will
move out of the telescope tube. By turning
the focusing knob counter-clockwise, the
drawtube will move into the telescope tube.
Adjusting the focus point
ی
Remove the dew shield cap from the dew
shield and insert the eyepiece into the
eyepiece adapter or diagonal. After ensuring
that the drawtube clamp is loose, turn the
focusing knob slowly.
At the time of shipment, the drawtube is
fully retracted inside the telescope. When
using the telescope for the first time, slowly
rotate the focusing knob clockwise and it will
eventually adjust to the focusing point. In
order to achieve focus on celestial bodies,
it is sometimes easier to focus on a distant
terrestrial object, such as a radio tower
or tall building (the scenery should look
upside down) and then marking a line on
the drawtube. This marked position on the
drawtube can then serve as a reference when
observing celestial bodies. Slight adjustments
from the marked position can then be made
to achieve the best focus. When observing
celestial objects at a high magnication, even
a slight error in focus can cause them to look
After attaching an eyepiece to the telescope, it is necessary to adjust the focus in order to see
celestial bodies or scenery clearly. In particular, when using the telescope to view celestial
objects
, if the focus is o by a large amount, stars will not be visible even when in the eld
of view of the eyepiece. Furthermore, even a slight error in focus can degrade the image
through the telescope. When taking images of celestial bodies, accurate focus is critical.
The atmosphere will limit the highest magnification that can be used on any given night.
Begin by using a low power eyepiece, and focus the image. Then progressively increase
magnification by using shorter and shorter focal length eyepieces until the desired
magnication is reached.
This procedure allows the centering of the object at high magnication.
blurry or not visible. Therefore it is better
to begin with a low magnification eyepiece
and then gradually increase magnification,
adjusting focus each time.
About the Drawtube Clamp
ی
After achieving proper focus the drawtube
clamp can be used to lock the drawtube in
position. It is not absolutely necessary when
performing visual observations. However,
when imaging, the weight of the attached
camera could cause the drawtube to move
outward and in turn defocus the image.
Therefore it is best to use the drawtube
clamp to secure the drawtube in place.
When adjusting focus again, ensure the
drawtube clamp is properly loosened.
Forcefully turning the focusing knob while
the lock is tightened may damage the gear
or cause a scratch in the drawtube.
Drawtube Clamp
Drawtube will move out of the telescope tube by
turning the focusing knob clockwise.
Focusing Knob
Drawtube

- 10 -
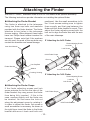
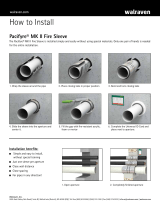
Attaching the Finder Bracket
ی
The finder is attached to the telescope
using two 4mm cap bolts and washers
provided with the nder bracket. The nder
attaches to two holes in the telescope
focuser casting. When shipped, these holes
have two Philips head screws inserted for
transport. Please note that if the washers
are not used, the ends of the cap bolts may
contact the drawtube and cause damage.
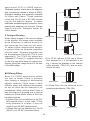
positioned. Use the small screwdriver to x
the 3 lock screws making sure to tighten
them equally and that gap between the
nder and the nder bracket is equal. Then
adjust the finder adjusting screw with the
lock nut to align the nder axis with the axis
of the main telescope.
Attaching the Finder
With the FC-100DZ, Takahashi oers a 6x30 or 7x50 nder as an optional accessory.
The following instructions provide information on installing the optional nder.
4mm Hex Wrench
Washer
Finder Bracket
Hex Cap Bolt
Finder Adjusting Screw
Groove
6x30 Finder Scope
Lock Screw
Lock Nut
6x30 Finder Bracket
Attaching the Finder Scope
ی
If the finder adjusting screws and lock
screw protrude too far into the tube of the
finder bracket they may prevent the finder
from being fully inserted. If this is the
case, unscrew slightly until the finder can
be inserted. You can move the lock nut
along the adjustment screw by rotating it.
In order to adjust the finder lock screw a
small screwdriver is necessary. As shown in
the right gure insert the nder in the nder
bracket and move it back and forth until
Focusing Housing
Finder Adjusting Screw
7x50 Finder Scope
Lock Screw
Lock Nut
7x50 Finder Bracket
Attaching the 6x30 Finder ▼
Attaching the 7x50 Finder ▼

- 11 -
a
b
c
Adjusting the Finder
ی
The magnication provided by an eyepiece
with the main telescope is often high and
its eld of view is narrow. Trying to aim the
telescope at and locating a celestial body
directly through the telescope eyepiece
can be difficult. Furthermore, when using
a camera to take images of the stars the
star image can be dicult to see. Locating
a celestial object using a camera can be
increasingly dicult.
The nder is a low-magnication telescope
with a wide field of view. When properly
aligned with the main telescope, objects
centered in the finder should also be
centered in the telescope eyepiece or
camera image.
Adjusting the Finder Focus
ی
When looking at a distant object with the
nder, if the focus is not correct, the nder
focus can be adjusted as follows:
Loosen the focus locking ring.1.
While looking at the distant object hold 2.
the nder eyepiece and turn it clockwise
and counter-clockwise to achieve proper
focus.
Tighten the focus locking ring in a 3.
position where the focus point is properly
achieved.
Lock Screw
Finder Adjusting Screw
Finder
Finder Eyepiece
Focus Locking Ring
Lock Nut
Finder Bracket
Adjusting the Finder Alignment
ی
Set up the telescope for visual use 1.
according to the system chart and attach
a lower power eyepiece. Then, select a
clearly visible distant object and center
it in the field of view. This is most easily
done during the daytime.
Exchange the lower power eyepiece for a 2.
higher power eyepiece, and again focus
on the distant object.
Looking through the finder, move the 3.
finder with the following procedure and
adjust it so the object is centered in on
the crosshair.
To adjust the finder, turn all lock nuts 4.
until they reach the head of the adjusting
screws.
Referring to the diagram, in order to 5.
move the crosshair in the direction of the
arrow, first loosen screw (a) and tighten
(push) the finder with screw (c). Next
loosen screw (b) and tighten the finder
with screw (c). This procedure will move
the crosshair in the desired direction. The
end of the nder will move in the opposite
direction and the object will move in the
direction of the small arrow. When the
finder is properly aligned, lock the finder
by tightening the lock nuts.
Crosshair
Telescope Field of View
Finder Field of View

- 12 -
Dew Shield
ی
FC-100DZ has a retractable dew shield.
When transporting, it retracts to become
more compact, and at the time of observation
it can pull out to prevent stray light
.
To pull out the dew shield, you need to
Remove the dew shield cap1
.
Loosen the dew shield lock screw 2.
Extend the dew shield3.
Tighten the dew shield lock screw4.
When retracting it, do so in reverse.
Dew Shield
Dew Shield cap
Reticle Illuminator (Optional)
ی
If an illuminator will be installed, remove the
cap screw at the end of the 7x50 nder and
install the reticle illuminator. The illuminator
makes the centering of dim objects easier.
Attach the reticle illuminator on the finder,
turning it clockwise.
Cap Screw
7x50 Finder Scope
Reticle Illuminator
Brighter/ON
Knob
Darker/OFF
Hold this cap and turn
the battery case as arrowed
Mercury Battery
(V76-PK)
Battery Case
In order to turn the illuminator on, turn the
knob clockwise. The knob will click when the
illuminator turns on. As the knob is turned,
the reticle will brighten. Adjust the knob
to the desired brightness. Turn the knob
counter-clockwise past the click to turn the
illuminator o.
Replacing the Battery
▼
Before changing the batteries in the
illuminator, please be certain to turn it off.
Unscrew the battery case. Remove the old
batteries and insert new ones after they
have been wiped with a clean dry cloth.
Check the polarity of the batteries before
inserting them into the case. Use two silver
(V76-PK) or equivalent batteries.
Dew Shield Lock Screw
Caution
When moving the dew shield, please
make sure that the dew shield cap has
been removed. If the dew shield is
made to slide with the cap still attached,
it may fall o.

- 13 -
Observation
Preparations Before Observation
ی
Refractive Telescopes like the FC-100DZ,
when under low temperatures may take
some time to stabilize. Taking the telescope
outside an hour before observing begins will
allow it to equalize with the colder air.
Visual Applications
ی
Determining Magnication ▼
The magnication of any eyepiece used with
the telescope can be calculated by using
the following formula:
(Focal Distance of the Telescope) / (Focal
Distance of the Eyepiece)
Example: Utilizing the LE-5mm
800mm / 5mm = 160x
Therefore, shorter focal length eyepieces
will produce high magnification. However,
generally the upper limit of magnification
will be 2x of the aperture (measured in
mm) of a telescope, and the lowest will be
0.14x of the aperture (measured in mm) of a
telescope.
With an aperture of 100mm, the FC-100DZ
upper limit becomes 200x and lower limit
becomes 14x, making the usable eyepiece
focus distance from 4 to 57mm. Takahashi
eyepieces, TOE-2.5mm, TOE-3.3mm, and
TAK-3.3UW mostly surpass this range,
so most are usable within this range on
a higher magnification. This telescope is
equipped with a high-performance objective
lens, as such if the conditions are good it
can still be used even if they surpass the
maximum magnication.
Diagonal Mirror & Diagonal Prism ▼
When observing objects near the zenith
is necessary, it is advisable to use a high
quality diagonal prism. The Takahashi 90-
degree prism diagonal is a quality multi-
coated prism and allows the observer to
easily view the zenith by looking down into
the prism. The diagonal prism has a 45-
degree light pass and produces an erect,
reversed (mirror) image. The diagonal prism
is designed to be used with 31.7mm(1¼”)
barrel eyepieces.
The prism’s light path length increases the
optical path length of the system. In order
to ensure proper focus, please connect
the prism to the telescope following the
appropriate system chart.
The 31.7mm(1¼”) diagonal prism is inserted
into the compression ring adapter at the
end of the focuser and is tightened until it
holds the diagonal prism firmly in place.
The eyepiece is then inserted into the
compression ring adapter of the diagonal
prism and held rmly in place by tightening
the compression ring.
The Takahashi 50.8mm(2") diagonal mirror
is useful for viewing with 50.8mm(2")
eyepieces. When used in conjunction
with the 50.8(2") to 31.7mm(1¼”) adapter,
31.7mm(1¼”) eyepieces can also be used.
Please refer to the appropriate system chart
for proper connections.
Astro Imaging
ی
Prime Focus Imaging ▼
When imaging with a telescope, focusing is
one of the most critical elements of making
great astro images. To achieve proper
focus, it is important to place the camera
sensor at the focal point of the telescope.
Because the focal length of the telescope
is large, it is also important to use a high
quality equatorial mount. Any unwanted
movement or error in tracking can ruin an
imaging session.
To produce images using the telescope,
one can use either a digital SLR, or a

- 14 -
sp e c i al i z e d C C D o r CM O S c a me r a .
Takahashi system charts show the adapters
and connections needed to attach a DSLR.
Standard adapters are generally available
for Nikon and Canon. These cameras
utilize the CA-35 and a DX-WR camera
ring for the specific camera. To attach
dedicated astrophotography cameras, some
specialized adapters are needed. Please
consult with your Takahashi dealer for
further details.
Enlarged Shooting
▼
When taking images of the moon’s craters
or the planets, the image scale available
whe n attachi ng a ca mera direc tly to
the telescope can often be too small.
To obtain higher magnification images,
a method known as eyepiece projection
may be useful. Eyepiece projection can
be accomplished using the TCA-4 (sold
separately). The TCA-4 will accept any
Takahashi 31.7mm(1¼”) eyepiece and has
a tube that can slide along the optical axis,
thereby giving the imager control of the size
of the nal image.
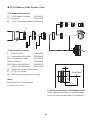
Utilizing Filters
ی
Some FC-100DZ accessories enable
the user to att ach filters to enhance
their viewing or imaging of astronomical
objects. However, filters come in many
different sizes, with different thicknesses,
so not all filters can be attached to all
accessories. When utilizing filters, there is
also the chance of ghosting due to internal
reections. Some places where a lter can
be utilized include:
A 48mm lter can be attached to the DX-•
WR camera mount. In this case, if filter
body thickness is to large, it may not
attach to the DX-WR camera mount.
A 48mm lter can be attached to a CA-35 •
(50.8/2") or a 50.8(2") extension tube L.
φ
67mm lter
CAA(TSA-102)
T-Mount DX-WR
Extender-Q 1.6x (50.8/2")
CA-35(50.8/2")
50.8(2") Extension Tube L
φ
48mm Filter
φ
62mm Filter
FC-35 Reducer 0.66x
The FC-35 reducer 0.66x has a 62mm •
filter attached to it. If the aperture is too
big, it cannot be attached to the camera
angle adjuster (TSA-102), and as such,
cannot be used.
A 67mm filter can be attached to the •
camera angle adjuster (TSA-102).

- 15 -
W h e n u s e d i n c o n j u n c t i o n w i t h t h e
extender-Q 1.6x (50.8/2”) if not used
together with a 50.8(2") extension tube S
as specied by the system chart, there is a
chance that the focus point won’t properly
focus or that it may not display its full
potential.
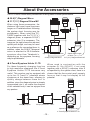
About the Accessories
50.8(2”) Diagonal Mirror
11mm
Optical Path Length 106.5mm
Optical Path Length 81.0mm
4-Turret Eyepiece Holder 31.7D
Optical Path Length
63.5mm
50.8(2") Adapter
50.8(2") Extension Tube L
31.7(1¼”) Diagonal Prism MC
4-Turret Eyepiece Holder 31.7D
ی
For those frequently changing from low
to high resolution eyepieces, the 4-Turret
Eyepiece Holder 31.7D becomes very
useful. This revolver can be equipped with
up to four 31.7mm(1¼”) diameter sleeve
eyepieces at the same time, allowing to
quickly change between these four. In
addition, since the diagonal prism is already
incorporated into it, no matter the direction
of the celestial body it can be enjoyed from
any posture.
50.8(2”) Diagonal Mirror
ی
31.7(1¼”) Diagonal Prism MC
ی
When using these accessories, the
distance light must travel becomes
longer, so if installed without following
the system chart focusing may be
problematic. When using the FC-
100DZ together with the 31.7(1¼”)
diagonal prism, a separate 50.8(2")
extension tube S is necessary. The
image on the right shows the required
optical path length, and may be used
as a reference for connecting them. In
addition, when the 50.8(2") diagonal
mirror is attached to 50.8 diameter
eyepiece other than Takahashi’s,
depending on the eyepiece, focusing
may be problematic.
The FC-100DZ utilizes many accessories to bring about a better performance.

- 16 -
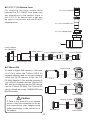
31.7(1¼”) 2x Barlow Lens
ی
Fo r do u b l i n g th e fo c al l en g t h w h i le
keeping the FC-100DZ from producing
any aberrations in the images, there is
the 31.7(1¼”) 2x barlow lens. It can also
be used in conjunction with the 50.8(2")
diagonal mirror.
T-Mount DX
ی
To install a digital SLR camera, in the case
of a TCA-4 utilize the T-Mount DS-X for
enlarged shooting and for focused shooting
utilize the FC-35 reducer 0.66x, the FC/
FS Multi attener 1.04x and the extender-Q
1.6x (50.8/2") together with the T-Mount DX-
WR, and for shoots that use the 76D reducer
use the T-Mount DX-60W. The T-Mount DX
can be utilized with many CANON EOS and
NIKON models.
Caution
If there is any tilt at all in your camera
mount, even from scratches or dirt on
the connections, star images could
suer (particularly in the corners or at
the edges).
50.8(2") Adapter
(For Refraction)
50.8(2") Extension Tube L
31.7(1¼”) Adapter (DM)
50.8 Diagonal Mirror
31.7(1¼”) Eyepiece
31.7(1¼”) Eyepiece
31.7(1¼”) 2x Barlow Lens
31.7(1¼”) 2x Barlow Lens
31.7(1¼”) Eyepiece Adapter
Coupling S
50.8(2") Sleeve
TCA-4
DSLR Camera
T-Mount DX-60W
76D Reducer
DSLR Camera
T-Mount DX-WR
CA-35 (50.8/2")
DSLR Camera
T-Mount DX-S

- 17 -
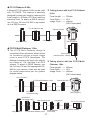
FC-35 Reducer 0.66x
ی
4-element FC-35 reducer 0.66x can be used
with FC-100DZ. This reducer is specially
designed for deep sky imaging, reducing the
focal length to 530mm f/5.3 and reducing
exposure time. To attach a DSLR camera,
use CA ring 102 and DX-WR or equivalent
up to a DSLR camera.
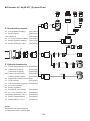
FC/FS Multi-Flattener 1.04x
ی
The FC/FS Multi-Flattener design is
▼
comprised of two elements, which allows
for correction across a larger image
circle in most FC/FS telescopes. The
attener increases the focal ratio slightly
by a factor of 1.04, resulting in an f/8.2
system. To attach a DSLR camera, use
the CA ring 100 and the appropriate DX-
WR for your camera. It can also be used
for visual observation per the system
diagram below.
Visual Adapter
(CCA-250)
DSLR Camera
DSLR Camera
T-Mount DX-WR
T-Mount DX-WR
Multi CA Ring 100
Multi CA Ring 100
CA-Ring 102
FC/FS Multi-Flattener 1.04x
FC/FS Multi-Flattener 1.04x
FC-35 reducer 0.66x
M72-M55.9
Conversion Ring
M72-M55.9
Conversion Ring
CCA (TSA102)
CCA (TSA102)
CCA (TSA102)
CCD camera
(camera mount format)
Taking photos with the FC-35 Reducer ▼
0.66x
Focal Length ----- 530mm
Focal Ratio -------- f/5.3
Image Circle ------
φ
44mm
(60% illuminated)
Taking photos with the FC/FS Multi- ▼
Flattener 1.04x
Focal Length ----- 820mm
Focal Ratio -------- f/8.2
Image Circle ------
φ
44mm
(60% illuminated)
31.7(1¼”) Eyepiece
31.7(1¼”) Eyepiece Adapter
Coupling S

- 18 -
Optical Path Length- Roughly 32mm
M72mm P= 1mm Male M72mm P= 1mm Female
Extender-Q 1.6x (50.8/2")
ی
Short focal length eyepieces with general
eye relief tend to tire the user easily. The
extender-Q 1.6x (50.8/2") is capable of
extending the visual length to 1.6x 1280mm
(f/12.8), with visual performance being its
main focus, making it perfect for viewing the
moon and planets at high resolutions. When
using the eective maximum and minimum
Extender-Q 1.6x (50.8/2")
Extender-Q 1.6x (50.8/2")
DSLR Camera
T-Mount DX-WR
CA-35 (50.8/2")
magnifications to select an eyepiece they
can vary from 6.4mm to 9.1mm, allowing a
person to use long eye relief pieces without
much eort.
Photos Utilizing the Extender-Q 1.6x (50.8) ▼
Focal length -------- 1280mm
Focal ratio ----------- f/12.8
◆
Camera Angle Adjuster (TSA-120)
Necessary when using the FC-35 reducer
0.66x, FC/FS Multi-Flattener 1.04x and the
76D reducer. By rotating the camera at the
moment of shooting, it allows a person to
adjust the composition.
50.8(2") Adapter
(For Refraction)
50.8(2") Adapter
(For Refraction)
50.8(2") Extension Tube L
31.7(1¼”) Eyepiece
31.7(1¼”) Eyepiece Adapter
Coupling S
50.8(2") Sleeve
Caution
When connecting the 50.8(2") extension
tube L or otherwise the CA-35 (50.8/2")
behind the extender-Q 1.6x (50.8/2"),
please attach this part to the lter. Take
care to prevent it from colliding with the
extender-Q 1.6x (50.8/2").

- 19 -
DSLR Camera
T-Mount DX-S
TCA-4
TCA-4
ی
This is a high-functioning adapter that
can change between visual and enlarged
phot o sh o o t i n g with just one touch .
The magnification lens can be changed
quickly, and by plugging and unplugging
the magnification tube one can change its
magnification ratio. The magnification lens
utilizes a 31.7mm(1¼”) diameter sleeve
eyepiece. Depending on the camera used
for photo shooting, an optional T-mount
DX-S must be installed, as well as a digital
single-lens reflex camera. Furthermore,
together with a 31.7(1¼”) eyepiece adapter,
a 31.7(1¼”) sleeve PC camera or CCD
camera can be installed behind the main
body of the TCA-4.
Caution
When taking high magnication lunar
and planetary images, pay careful
attention to balance. Rebalance the
telescope when the object is placed
in the center of the camera, to prevent
the telescope from turning abruptly
and dangerously.
31.7(1¼”) Eyepiece
31.7(1¼”) Eyepiece Adapter
50.8(2") Adapter
(For Refraction)
50.8(2") Extension Tube L
50.8(2") Sleeve
CCD camera
(31.7/1¼” sleeve format)

- 20 -
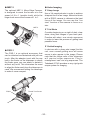
MEF-3
ی
The optional MEF-3, Micro Edge Focuser,
is designed to move the focuser at a fine
speed of 8 to 1 (smaller knob) while the
larger knob moves the focuser at 1 to 1.
FQR-1
ی
The FQR-1 is an optional accessory that
can be attached and detached with just one
touch. After the adapter is set with the cap
bolt to the nder on the telescope in where
the nder goes, you can attach or detach it
without any tools. This eliminates the need
to align the nder each time the telescope is
used. We recommend folding the telescope
to make it more compact.
Astro Imaging
ی
Sharp Image ▼
Use a 3-4 magnitude star in order to achieve
sharpest focus of an image. Make trial shots
with a DSLR camera to determine the best
focus of the image. You can use the “live
view” function of the camera to focus on a
star.
Trial Shots ▼
Consider beginning on a night of dark, clear
skies, doing test images in your back yard.
Practice with short, one minute exposures
in order to learn the process of getting best
possible focus.
Guided Imaging ▼
In devices with a sharp star image like this
unit, even a small guiding error will cause
errors to also appear in the image. Please
note that the longer ratio of this telescope
will require longer exposures. Play or
misalignment can ruin long exposures. The
Takahashi GT-40 provides a very rigid guide
scope system for imaging.
FQR-1
Thumb Turn Screw
MEF-3
Page is loading ...
Page is loading ...
Page is loading ...
Page is loading ...
Page is loading ...
Page is loading ...
Page is loading ...
Page is loading ...
-
 1
1
-
 2
2
-
 3
3
-
 4
4
-
 5
5
-
 6
6
-
 7
7
-
 8
8
-
 9
9
-
 10
10
-
 11
11
-
 12
12
-
 13
13
-
 14
14
-
 15
15
-
 16
16
-
 17
17
-
 18
18
-
 19
19
-
 20
20
-
 21
21
-
 22
22
-
 23
23
-
 24
24
-
 25
25
-
 26
26
-
 27
27
-
 28
28


Ask a question and I''ll find the answer in the document
Finding information in a document is now easier with AI
Related papers

Other documents
-
 Pro Optic PROFH User manual
-
Elenco EDU37439 Owner's manual
-
Seeed Raspberry Pi High Quality Camera – 12.3 Megapixel (Sony IMX477) Operating instructions
-
Celestron 52348 Installation guide
-
 Sky-Watcher Esprit 120 ED User manual
-
 Sky-Watcher Esprit 150 ED User manual
-
Vixen X002398 Owner's manual
-
 Sky-Watcher Esprit 80 ED User manual
-
-
 Walraven 2154108110 Installation guide


