Page is loading ...

ITALIANO FRANÇAIS
CARATTERISTICHE GENERALI.CARATTERISTICHE GENERALI.
CARATTERISTICHE GENERALI.CARATTERISTICHE GENERALI.
CARATTERISTICHE GENERALI.
Prodotto: Prodotto:
Prodotto: Prodotto:
Prodotto: progettato e costruito intera-
mente dalla CAME S.p.A., rispondente
alle vigenti norme di sicurezza . Garantito
12 mesi salvo manomissioni.
Prestazioni:Prestazioni:
Prestazioni:Prestazioni:
Prestazioni: le prestazioni da noi indica-
te, sono valide solo se il montaggio è stato
eseguito correttamente, secondo le no-
stre indicazioni tecniche.
Peso:Peso:
Peso:Peso:
Peso: Kg. 1,1.
Imballo:Imballo:
Imballo:Imballo:
Imballo: cartone.
CARATTERISTICHE TECNICHE.CARATTERISTICHE TECNICHE.
CARATTERISTICHE TECNICHE.CARATTERISTICHE TECNICHE.
CARATTERISTICHE TECNICHE.
Alimentazione: Alimentazione:
Alimentazione: Alimentazione:
Alimentazione: 24V A.C.
Assorbimento:Assorbimento:
Assorbimento:Assorbimento:
Assorbimento: 1 A.
Numero e sezione cavi di collegamentoNumero e sezione cavi di collegamento
Numero e sezione cavi di collegamentoNumero e sezione cavi di collegamento
Numero e sezione cavi di collegamento
del blocco di chiusura:del blocco di chiusura:
del blocco di chiusura:del blocco di chiusura:
del blocco di chiusura: 2 x 1mm
DESCRIZIONE TECNICA:DESCRIZIONE TECNICA:
DESCRIZIONE TECNICA:DESCRIZIONE TECNICA:
DESCRIZIONE TECNICA:
- Gruppo in lamiera con finiture di vernicia-
tura.
- Levarismi in lamiera zincata.
- Blocco serratura in ottone.
- Staffa di fissaggio all' intelaiatura della
porta basculante in lamiera zincata.
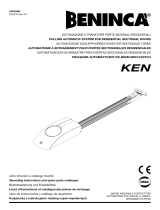
- Possibilità di sblocco manuale a cordino.
- Staffa di supporto per blocco di chiusura
(fig. 1A).
DESCRIZIONE DI MONTAGGIO.DESCRIZIONE DI MONTAGGIO.
DESCRIZIONE DI MONTAGGIO.DESCRIZIONE DI MONTAGGIO.
DESCRIZIONE DI MONTAGGIO.
--
--
-Svitare le 4 viti del coperchio.
- Posizionare il gruppo elettroserratura al
telaio fissando la parte superiore (fori A
fig. 1A) e la parte inferiore mediante
la apposita staffa di supporto (fori B
fig. 1A).
- Fissare la staffa di fissaggio all' intelaia
tura della porta basculante lasciando
uno spazio di 2 - 3 mm dalla staffa
al gruppo elettroserratura (fig. 1A).
- Collegare i cavi della bobina e il cavo di
alimentazione (2 x 1) all'apposito morset-
to (fig. 1B).
- Fissare il coperchio e procedere al mon-
taggio dello sblocco a cordino (fig. 1C).
- Collegare il cavo di alimentazione ai
morsetti "uscita contatto elettroblocco"
del quadro comando.
GENERAL SPECIFICATIONS.GENERAL SPECIFICATIONS.
GENERAL SPECIFICATIONS.GENERAL SPECIFICATIONS.
GENERAL SPECIFICATIONS.
Product:Product:
Product:Product:
Product: designed and constructed
entirely by CAME S.p.A.; conforms to
safety standards. Guaranted for 12
months except in case of tampering.
Performance:Performance:
Performance:Performance:
Performance:the performance indicated
in the specifications in guaranted only if
the unit has been correctly assembled
according to our instructions.
Weight: Weight:
Weight: Weight:
Weight: kg 1,1.
Packing:Packing:
Packing:Packing:
Packing: cardbord box.
TECHNICAL FEATURES.TECHNICAL FEATURES.
TECHNICAL FEATURES.TECHNICAL FEATURES.
TECHNICAL FEATURES.
Power supply: Power supply:
Power supply: Power supply:
Power supply: 24V A.C.
Current: Current:
Current: Current:
Current: 1A
Number and section of cables used toNumber and section of cables used to
Number and section of cables used toNumber and section of cables used to
Number and section of cables used to
wire up the closure locking system:wire up the closure locking system:
wire up the closure locking system:wire up the closure locking system:
wire up the closure locking system:
2 x 1mm
TECHNICAL DESCRIPTION.TECHNICAL DESCRIPTION.
TECHNICAL DESCRIPTION.TECHNICAL DESCRIPTION.
TECHNICAL DESCRIPTION.
- Unit constructed in painted sheet steel.
- Lever mechanisms in galvanized sheet
steel.
- Brass lock.
- Galanized sheet steel fixing bracket
for fastening to the frame of the
overhead door.
- The unit can also be fitted with a
cord-actuated release mechanism.
- Support bracket for locking system
(fig. 1A).
INSTALLATION.INSTALLATION.
INSTALLATION.INSTALLATION.
INSTALLATION.
-Remove the four screws which fasten
the cover of the electrical locking.
- Position the electrical locking unit on the
door frame and fasten the upper
section (holes A fig. 1A) and the
lower section (holes B fig. 1A) with
the support bracket.
- Fasten the fixing bracket to the frame of
the overhead door. Leave a gap of
2 - 3 mm between the bracket and
the electrical locking unit.
- Connect the wires from the coil and the
power supply cable (2 x 1) to the
corresponding terminal (fig. 1B).
- Fit the cover and assemble the cord
release mechanism (fig. 1C).
- Connect the power supply cable to the
terminals ""
""
"electric block contact
output""
""
" on the control panel.
CARACTERISTIQUES GENERALES.CARACTERISTIQUES GENERALES.
CARACTERISTIQUES GENERALES.CARACTERISTIQUES GENERALES.
CARACTERISTIQUES GENERALES.
Produit:Produit:
Produit:Produit:
Produit: il a été éntierement conçu par
CAME, conforméement aus normes de
sécurité en viguer . .
. .
. Il est garanti 12 mois
sauf en case d' altérations.
Les performance:Les performance:
Les performance:Les performance:
Les performance: les performance
indiquées sont valables uniquement si le
montage a été effectué correctment, selon
nos instructions techniques.
Poids:Poids:
Poids:Poids:
Poids: kg. 1,1.
Emballage:Emballage:
Emballage:Emballage:
Emballage: en carton.
CARACTERISTIQUES TECHNIQUES.CARACTERISTIQUES TECHNIQUES.
CARACTERISTIQUES TECHNIQUES.CARACTERISTIQUES TECHNIQUES.
CARACTERISTIQUES TECHNIQUES.
Alimentation:Alimentation:
Alimentation:Alimentation:
Alimentation: 24V A.C.
Absorption: Absorption:
Absorption: Absorption:
Absorption: 1A
Numero et section des câbles deNumero et section des câbles de
Numero et section des câbles deNumero et section des câbles de
Numero et section des câbles de
connexion du bloc de fermeture:connexion du bloc de fermeture:
connexion du bloc de fermeture:connexion du bloc de fermeture:
connexion du bloc de fermeture:
2 x 1mm
DESCRIPTION TECHNIQUE.DESCRIPTION TECHNIQUE.
DESCRIPTION TECHNIQUE.DESCRIPTION TECHNIQUE.
DESCRIPTION TECHNIQUE.
- Groupe en tôle finition vernie.
- Leviers en tôle galvanisée.
- Bloc serrure en laiton.
- Etrier de fixation sur le châssis de la
porte basculante en tôle galvanisée.
- Possibilité de déblocage par cordelette.
- Etrier de support pour le bloc de
fermeture (fig. 1A).
DESCRIPTION DU MONTAGE.DESCRIPTION DU MONTAGE.
DESCRIPTION DU MONTAGE.DESCRIPTION DU MONTAGE.
DESCRIPTION DU MONTAGE.
- Désserer les 4 vis du couvercle de la
serrure électrique.
- Positionner le groupe serrure électrique
sur le châssis en fixant la partie
supérieure (trous A fig. 1A) et la partie
inférieure (trous B fig. 1A), avec l' étrier
de support.
- Fixer l' étrier de fixation sur le châssis de
la porte basculante en laissant un
espace de 2 - 3 mm entre l' étrier de
fixation et le groupe serrure électrique.
- Connecter les câbles de la bobine et du
câble d'alimentation (2 x 1) sur la
borne correspondante (fig. 1B).
- Fixer le couvercle et procéder au
montage du dispositif de déblocage
par cordelette (fig. 1C).
- Connecter le câble d'alimentation sur
les
bornes " sortie contact bloc électrique"
de l'armoire de commande.
ELETTRELETTR
ELETTRELETTR
ELETTROBLOCCO DI CHIUSURAOBLOCCO DI CHIUSURA
OBLOCCO DI CHIUSURAOBLOCCO DI CHIUSURA
OBLOCCO DI CHIUSURA
ELECTRIC BLOCK SYSTEM
BLOC DE FERMETURE ELECTRIQBLOC DE FERMETURE ELECTRIQ
BLOC DE FERMETURE ELECTRIQBLOC DE FERMETURE ELECTRIQ
BLOC DE FERMETURE ELECTRIQUEUE
UEUE
UE
E 881E 881
E 881E 881
E 881
2
22
Tutti i dati sono stati redatti e controllati con la massima
cura.
Non ci assumiamo comunque nessuna responsabilità per
eventuali errori od omissioni.
All the data have been prepared and checked with the
maximum care.
However, we accept no responsibility for any errors or
omissions.
Toutes les données ont été rédigées et vérifiées très
soigneusement.
Nous nassumons de toute façon aucune responsabilité
pour les erreurs ou omissions éventuelles.
ENGLISH
DocumentazioneDocumentazione
DocumentazioneDocumentazione
Documentazione
TecnicaTecnica
TecnicaTecnica
Tecnica
7171
7171
71
rev. rev.
rev. rev.
rev. 1.001.00
1.001.00
1.00
119E71

E 881
Fig. 1
Montaggio - Fitting - Montage
Staffa di supporto
Support bracket
Etrier de support
Cordino
Cord
Cordelette
Fig. 1C
Montaggio sblocco manuale a cordino
Fitting the cord-actuated release
Montage dispositif de déblocage manuel par cordelette
Fig. 1B
Fig. 1A
Fori A
Holes A
Trous A
Collegamento elettrico
Electrical connection
Branchement électrique
2-3 mm Morsetto
Terminal blok
Borne
Cavi di collegamento bobina
Connector wires for coil
Câbles de connexion bobine
Cavo 2 x 1
Cable 2 x 1
Câble 2 x 1
Uscita contatto elettroblocco
Electric block contact output
Sortie contact bloc électrique
Staffa di fissaggio
Fixing bracket
Etrier de fixation
Fori B
Holes B
Trous B
Porta
Door
Porte
Staffa di fissaggio
Fixing bracket
Etrier de fixation
/