Page is loading ...

❑
www.applicaconsumerproductsinc.com

When using electrical appliances, basic safety precautions should always
be followed to reduce the risk of fire, electric shock and/or injury to
persons, including the following:
❑ Read all instructions.
❑ Do not touch hot surfaces. Use handle or knobs.
❑ To protect against electric shock, do not place cord, plug or appliance
in water or other liquids.
❑ Close supervision is necessary when any appliance is used by or near
children.
❑ Unplug from outlet when not in use and before cleaning. Allow to cool
before putting on or taking off parts and before cleaning the appliance.
❑ Do not operate any appliance with a damaged cord or plug or after the
appliance malfunctions, or has been damaged in any manner. Return
the appliance to the nearest authorized service facility for examination,
repair or adjustment. Or, call the appropriate toll-free number on the
cover of this manual.
❑ The use of an accessory not evaluated for use with this appliance may
cause injuries.
❑ Do not use outdoors.
❑ Do not let cord hang over the edge of table or counter, touch with hot
surfaces.
❑ Do not place on or near a hot gas or electric burner or in a heated oven.
❑ To disconnect, turn any control to "OFF" then remove plug from wall
outlet.
❑ Keep the lid on the carafe when in use.
❑ The carafe is designed for use with the appliance. It must never be used
on a range top.
❑ Do not set a hot carafe down on a wet or cold surface.
❑ Do not use the carafe if the glass is cracked or has a loose or weakened
handle.
❑ Do not clean the carafe with abrasive cleansers, steel wool or other
abrasive material.
❑ Do not use this appliance for anything other than intended use.
❑ Scalding may occur if the lid is removed during the brewing cycles.
1. No permita que se evapore toda el agua de la jarra mientras permanece sobre la
placa de calentamiento, y jamás caliente la jarra estando vacía.
2. Deseche la jarra si presenta daño alguno.
3. Para no rallar ni debilitar el vidrio de la jarra, nunca utilice limpiadores fuertes ni
almohadillas abrasivas.
4. Evite el manejo brusco y los golpes.
Los depósitos minerales que provienen del agua dura pueden obstruir la cafetera. Se
recomienda una limpieza cada tres meses. el exceso de vapor o los ciclos de colado
prolongados, indican que la cafetera requiere limpieza. Se recomienda una limpieza
cada 60 ciclos de colado.
1. Vierta vinagre blanco adentro del tanque de agua hasta la marca que indica
7 tazas en el nivel de llenado, y agregue agua fría hasta el nivel que indica
12 tazas.
2. Coloque un filtro permanente en el cesto removible y cierre la tapa de la
cafetera. Coloque la jarra sobre la placa de calentamiento y presione el botón de
funcionamiento (ON/OFF).
La cafetera produce más vapor durante el ciclo de limpieza que durante un
ciclo de colado normal.
3. ENCIENDA LA CAFETERA Y CUELE EL AGUA HASTA LA MITAD, SEGÚN EL
INDICADOR DEL NIVEL DE LLENADO. Presione el botón de funcionamiento
(ON/OFF) para apagar el aparato. Cuando el cesto removible de colar deje de
gotear en la jarra, retire la jarra y déjela enfriar por diez (10) minutos. Una vez
enfriada, vierta el agua en el tanque.
4. Coloque la jarra sobre la placa de calentamiento.
5. Ajuste el control de la cafetera a la posición de encendido (ON) y repita este
proceso, permitiendo vaciar toda la solución de limpieza en la jarra. Al finalizar
el goteo, deseche el contenido de la jarra.
6. Deje enfriar la cafetera por 10 minutos y enjuáguela. Cuele una jarra de agua
limpia y fría. Asegúrese de insertar el filtro permanente.
7. Al finalizar el ciclo de colado, presione el botón de interrupción (ON/OFF).
Deseche el agua de la jarra y el filtro permanente. Lave la jarra, filtro permanente
y el cesto del filtro removible en agua tibia jabonada. Enjuague y seque bien.
8. Una vez que la cafetera se enfríe, limpie las superficies exteriores con un paño
seco.

This appliance has a polarized plug (one blade is wider than the other). To reduce
the risk of electric shock, this plug is intended to fit into a polarized outlet only one
way. If the plug does not fit fully into the outlet, reverse the plug. If it still does not fit,
contact a qualified electrician. Do not attempt to modify the plug in any way.
This appliance is equipped with a tamper-resistant screw to prevent removal
of the outer cover. To reduce the risk of fire or electric shock,
There are no user-serviceable parts inside. Repair should be
done only by authorized service personnel.
a) A short power-supply cord (or detachable power-supply cord) is to be provided
to reduce the risk resulting from becoming entangled in or tripping over
a longer cord.
b) Longer detachable power-supply cords or extension cords are available
and may be used if care is exercised in their use.
c) If a long detachable power-supply cord or extension cord is used,
1) The marked electrical rating of the detachable power-supply cord or
extension cord should be at least as great as the electrical rating of the
appliance,
2) If the appliance is of the grounded type, the extension cord should be
a grounding-type 3-wire cord, and
3) The longer cord should be arranged so that it will not drape over the
countertop or tabletop where it can be pulled on by children or
tripped over.
This appliance generates heat and escaping steam during use.
Proper precautions must be taken to prevent the risk of burns, fires, or
other injury to persons or damage to property.
❑ All users of this appliance must read and understand this Owner’s
Manual before operating or cleaning this appliance.
❑ The cord to this appliance should be plugged into an electrical outlet.
❑ Use in this appliance! Do not put any other liquids or
food products in this appliance. Do not mix or add anything to the
water placed in this appliance, except as instructed in the Care and
Cleaning Instructions to clean the appliance.
❑ DO NOT attempt to move an appliance containing hot liquids. Allow
appliance to cool completely before moving.
❑ Keep appliance at least 4 inches away from walls or other objects
during operation. Do not place any objects on top of appliance while it
is operating. Place the appliance on a surface that is resistant to heat.
❑ If this appliance begins to malfunction during use, immediately unplug
the cord. Do not use or attempt to repair the malfunctioning appliance.
❑ If this appliance falls or accidentally becomes immersed in water or any
other liquid, unplug it immediately. Do not reach into the water!
Contact Consumer Services for examination and repair.
❑ Do not leave this appliance unattended during use.
❑ The appliance must be left to cool down sufficiently before adding more
water, to avoid splattering.
❑ Always use fresh, cool water in your appliance. Warm water or other
liquids, except as listed in cleaning section, may cause damage to the
appliance.
❑ DO NOT put carafe into a microwave.
❑ DO NOT leave empty carafe on warming plate when appliance is
turned ON, as the carafe may crack or become otherwise damaged.
❑ DO NOT lift hinged filter lid until brewing is complete, and all parts
have cooled.
❑ To prevent injury when utilizing Sneak-A-Cup
®
Interrupt
feature, replace carafe within 1 minute of removing during brewing
process.

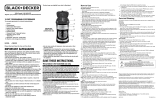
AUTO ON
MIN
PROGRAM
BREW STRENGTH
HOUR
ON/OFF
Use this button to turn the unit on and start the brewing
process. You can also turn the unit off by pressing this button when the brewing
cycle is complete.
Use this button to display the correct hour when setting the time.
Use this button to program your coffeemaker to start brewing at
a specified time.
Use this button to select a stronger strength of brew.
Use this button to display the correct minute when setting the
time.
Use this button to start brewing at the time you have pre-set.
You may also press this button to make the unit turn on at the same pre-set time
the next day.
AU
T
O
ON
M
IN
PR
O
G
RA
M
B
R
E
W ST
R
E
NGTH
HO
U
R
ON
/
O
F
F
MA
X
12
10
8
6
4
2

6. In order to turn unit on, press the ON/OFF button. The red “ON” light will
illuminate and the word “ON” will appear in the upper right hand corner of the
LCD, indicating that the brewing cycle has begun. Hot water will be dispensed
gently and evenly through the coffee grounds.
If you prefer to use the timer to pre-set the coffeemaker, see the "Using the
Timer Control" section.
7. To pour a cup of coffee before the brew cycle is complete, simply remove
the carafe from the warming plate and pour (see “Sneak-A-Cup® Interrupt
Feature”). Brewing will continue but dripping will automatically pause. Return
the carafe to the warming plate within 1 minute; dripping will resume.
8. Upon completion of the brew cycle, wait until dripping has stopped before
removing the carafe. The carafe lid should be kept in place to facilitate safe
serving.
9. To brew another carafe of coffee, turn unit OFF and wait 10 minutes to allow
heating element to cool.
10. When not in use, unplug the base from the wall outlet. Allow the unit to cool
completely before cleaning (see Care and Cleaning Instructions).
As mentioned above, it is recommended that the coffeemaker should be OFF for
10 minutes between cycles, in order to allow unit to cool. While the unit is OFF,
dispose of the used coffee filter and rinse the carafe, permanent filter and the
removable filter basket in water. Then repeat the brewing procedure.
You can pour a cup of coffee while coffee is brewing without leaking from the
brew basket. When finished pouring coffee, place the carafe under brew basket.
The brewing process continues.
Your coffeemaker has a built in multifunction timer. The following sections
describe the proper use of the timer.
To set the clock, simply press the HOUR and MIN buttons. First press the HOUR
button until the desired hour has been reached. Make sure the proper “AM/PM”
indicator is shown on the left side of the LCD display. Press the MIN button until
the desired minutes have been reached. You may press and hold the HOUR or
MIN buttons to display the correct time more rapidly.
Unplugging the unit will reset the clock to 12:00.
This appliance is intended for household use only.
1. Before preparing coffee in your new coffeemaker, thoroughly clean the carafe,
carafe lid and removable filter basket in warm, soapy water.
Rinse and dry. Replace disassembled parts.
The removable filter basket must be placed into the
coffeemaker with the two handles, located on the sides of
the filter basket, aligning with the two notches on the inside
of the unit . Press the filter basket down until it clicks into
place.
2. Clean the inside of the coffeemaker by brewing two full
carafes of tap water (see Brewing Instructions). Do not
place permanent filter or coffee in the removable filter
basket for this initial cleaning.
At the end of the first brewing cycle, turn the coffeemaker off and wait ten
minutes for the appliance to cool. Turn unit on and brew second carafe of cool
water.
The display on the clock will flash when you plug in the unit. You may set
the clock at any time (see “Setting The Clock”) before or after brewing. Setting the
clock will not affect normal brewing operation.
1. Place the coffeemaker on a flat, level surface. Plug the unit into an AC electrical
outlet.
2. Open the lid by using the lip located on top of the coffeemaker.
3. Place a permanent filter into the removable filter basket. Measure one level
tablespoon of drip or regular ground coffee for each cup of coffee desired. For
stronger or milder coffee, adjust amount of grounds to suit your taste.
We recommend using coffee ground specifically for automatic drip
coffeemakers.
4. Fill the carafe with cold water and pour it into the water reservoir to the
desired level. No less than two cups are recommended. Place the carafe on the
warming plate.
The amount of brewed coffee will always be less than the amount of water
placed into the coffeemaker, since about 10% is absorbed by the coffee grounds
and filter.
5. Close the Lid.

• Reheating coffee is not recommended. Coffee is at its peak flavor immediately
after brewing.
• Small oil droplets on the surface of brewed, black coffee is due to the extraction
of oil from the coffee grounds. Oiliness may occur more frequently if heavily
roasted coffees are used. Over extraction may also cause oiliness, indicating a
need to clean your coffeemaker.
This appliance requires little maintenance. It contains no user-serviceable parts.
Any servicing requiring disassembly other than cleaning must be performed by a
qualified appliance repair technician.
1. Always make sure the coffeemaker is unplugged and the warming plate is cool
before attempting to clean.
2. After daily use, the removable filter basket, carafe and carafe lid should be
washed in warm, soapy water.
3. If necessary, wipe the outside of the coffeemaker with a soft, damp cloth and
wipe dry. Do not use abrasive cleansers, scouring pads or steel wool. Never
immerse the coffeemaker in water or any other liquid.
1. Do not allow all liquid to evaporate from the carafe while on the warming
plate, or heat the carafe when empty.
2. Discard the carafe if damaged in any manner.
3. Never use abrasive scouring pads or cleansers; they will scratch the glass.
4. Avoid rough handling and sharp blows.
Mineral deposits left by hard water can clog your coffeemaker. excessive steaming
or a prolonged brewing cycle are signs that a cleaning is needed. Cleaning is
recommended every 60 brewing cycles.
1. Pour white into the carafe up to the 7-cup mark. Add cold water up to the
12-cup mark. Pour the water/vinegar mixture into the water reservoir.
2. Place a permanent filter in the removable filter basket, then close the lid. Place
the carafe on the warming plate. Press the ON/OFF button.
During cleaning, more steam will occur than during normal brewing.
3. KEEP THE COFFEEMAKER ON UNTIL HALF THE WATER HAS CYCLED
THROUGH THE COFFEEMAKER, AS CAN BE VIEWED THROUGH THE
WATER LEVEL INDICATOR. Press the ON/OFF button to turn the power off.
When liquid stops dripping from the removable filter basket into the carafe,
remove the carafe and allow the liquid to cool for 10 minutes. When cooled,
pour liquid back into the water reservoir.
4. Return carafe to the warming plate.
To pre-set your coffeemaker to begin brewing at a later time, first follow steps 1-
5 in the Brewing Instructions section. Check to make sure that the clock is set to
the correct time. If it is not, follow the above instructions to set the clock. Press
the PROGRAM Button once, the LCD Display will flash “PROGRAM”. Press the
HOUR and MIN Buttons until the desired brew time is reached. Make sure the
proper “AM/PM” appears on the left side of the LCD display. Press the AUTO ON
button. The green “AUTO” light will illuminate in the upper right corner and the
pre-set brew time will be displayed momentarily, indicating that the coffeemaker is
now waiting for the pre-set brew time to be reached before it begins the brewing
cycle.
If the AUTO ON button is pressed during the brewing process, the brewing
will stop and the unit will turn off.
Press the AUTO ON button and the green light will shut off.
To re-set the Auto On time so the unit will turn on at the same pre-set time the
next day, press the AUTO ON button and the green “AUTO” light will illuminate.
The Auto On feature will turn off after completing the brewing process at
the pre-set brew time. The AUTO ON button must be pressed after each use in
order for the unit to turn on at the same pre-set time the following day.
In the event of a power outage or if the unit is unplugged, the clock will
reset to 12:00 and the Auto On feature will have to be reprogrammed.
Use the Brew Strength feature when you plan on brewing only a small amount of
coffee. This feature slows down the brewing process so that the smaller amount
of coffee will have the same taste quality as when you brew an entire carafe. The
Brew Strength feature can be activated before the unit is turned ON or during the
brewing process by pressing the BREW STRENGTH button. When this feature is
activated, a coffee cup icon will be displayed in the LCD display.
To deactivate the Brew Strength feature, press the BREW STRENGTH button
again and the coffee cup icon will disappear.
As an added convenience, your coffeemaker has been designed with an Auto
Shut-Off feature. When the brewing cycle is complete, the coffeemaker will
automatically shut off after 2 hours.
• A clean coffeemaker is essential for making great tasting coffee. Regular
cleaning, as specified in Care and Cleaning is highly recommended. Always
use fresh, cool water in your coffeemaker. Finer grinds, such as drip and ADC
coffee, promote fuller extraction and provide rich, full-bodied coffee. Regular
grinds will require slightly more coffee per cup to provide the strength of a finer
grind.
• Store coffee in a cool, dry place. Once coffee has been opened, keep it tightly
sealed in the refrigerator to maintain freshness. For optimum coffee, buy whole
beans and grind them just before brewing.
• Do not re-use coffee grounds since this will greatly impair coffee flavor.

5. Turn the coffeemaker back on and repeat this procedure, allowing all the
cleaning solution to empty into the carafe. After dripping has stopped, discard
contents in the carafe.
6. After allowing the coffeemaker to cool for 10 minutes, rinse it out by brewing
a carafe full of cold water. Make sure to insert the permanent filter into the
removable filter basket before brewing.
7. At the end of the brew cycle, turn OFF the unit by pressing the ON/OFF button.
Discard water in the carafe. Remove the permanent filter and wash the carafe
and removable filter basket in warm, soapy water. Rinse and dry.
8. When the coffeemaker has cooled, wipe exterior with a dry cloth.

For service, repair or any questions regarding your appliance, call the appropriate
"800" number on the cover of this book. return the product to the place
of purchase. mail the product back to the manufacturer nor bring it to a
service center. You may also want to consult the website listed on the cover of this
manual.
• Any defect in material or workmanship; provided; however, Applica’s liability
will not exceed the purchase price of the product.
• One year after the date of original purchase.
• Provide you with a reasonably similar replacement product that is either
new or factory refurbished.
• Save your receipt as proof of the date of sale.
• Check our on-line service site at www.prodprotect.com/applica, or call our
toll-free number, 1-800-231-9786, for general warranty service.
• If you need parts or accessories, please call 1-800-738-0245.
• Damage from commercial use
• Damage from misuse, abuse or neglect
• Products that have been modified in any way
• Products used or serviced outside the country of purchase
• Glass parts and other accessory items that are packed with the unit
• Shipping and handling costs associated with the replacement of the unit
• Consequential or incidental damages (Please note, however, that some states do
not allow the exclusion or limitation of consequential or incidental damages, so
this limitation may not apply to you.)
• This warranty gives you specific legal rights, and you may also have other rights
that vary from state to state or province to province.
Para servicio, reparaciones o preguntas relacionadas al producto, por favor llame
al número del centro de servicio en el país donde usted compró su producto.
NO devuelva el producto al fabricante. Llame o lleve el producto a un centro de
servicio autorizado.
• La garantía cubre cualquier defecto de materiales o de mano de obra. Applica
no se responsabiliza por ningún costo que exceda el valor de compra del
producto.
• Por dos años a partir de la fecha original de compra.
• Conserve el recibo original de compra.
• Por favor llame al número del centro de servicio autorizado.
• Los productos que han sido utilizados en condiciones distintas a las normales
• Los daños ocasionados por el mal uso, el abuso o negligencia
• Los productos que han sido alterados de alguna manera
• Los daños ocasionados por el uso comercial del producto
• Los productos utilizados o reparados fuera del país original de compra
• Las piezas de vidrio y demás accesorios empacados con el aparato
• Los gastos de tramitación y embarque asociados al reemplazo del producto
• Los daños y perjuicios indirectos o incidentales

Copyright © 2007 Applica Consumer Products, Inc.
Fabricado en la República Popular de China
Impreso en la República Popular de China
Av. Juan B Justo 637 Piso 10
(C1425FSA) Ciudad Autonoma de Buenos Aires
Argentina
30-69729892-0
Presidente Mazaryk No111, 1er Piso
Col. Chapultepec Morales, Mexico D.F
Deleg. Miguel Hidalgo
CP 11570
MEXICO
Teléfono: (55) 5263-9900
01 (800) 714 2503
Made in People’s Republic of China
Printed in People’s Republic of China
marca registrada de The Black & Decker Corporation, Towson, Maryland, E.U.
A trademark of The Black & Decker Corporation, Towson, Maryland, USA
2007/7-16-30S/E
CAT. NO . EHB5 00
TYPE 1 1 60 W 12 0 V
AC ONLY 60Hz
CAT. NO . EHB5 00
TYPE 1 1 60 W 12 0 V
AC ONLY 60Hz
El símbolo de un rayo indica voltaje
peligroso. El signo de exclamación
indica importantes instrucciones de
mantenimiento. Consulte a continuación:
Para reducir el riesgo de
incendio o de choque eléctrico, no retire
la cubierta de la cafetera.
No contiene por dentro partes reparables
por el consumidor. Cualquier reparación
deberá ser efectuada únicamente por
personal autorizado.
The lightning symbol refers to “dangerous
voltage”; the exclamation symbol refers
to maintenance instructions. See below.
To reduce the risk of fire
or electric shock, do not remove the
cover of the coffeemaker. There are
no user-serviceable parts inside. Repair
should be done by authorized service
personnel only.
/