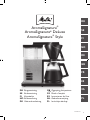
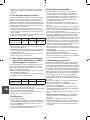
Melitta AROMASIGNATURE® & DeLuxe Operating instructions
- Category
- Coffee makers
- Type
- Operating instructions
This manual is also suitable for

1
DK Brugsanvisning
SE Bruksanvisning
FI Käyttöohje
NO Bruksanvisning
DE Bedienungsanleitung
GB Operating Instructions
FR Mode d`emploi
NL Gebruiksaanwijzing
ES Instruciones de Uso
KR 사용 설명서
RU Руководство по эксплуатации
UA Iнструкцiя
AROMA SIGNATURE
AROMA SIGNATURE DeLuxe
AROMA SIGNATURE Style
Manual_Signature_1013_Layout 1 15.10.13 08:59 Seite 1
1100160-03
AromaSignature
®
AromaSignature
®
DeLuxe
AromaSignature
®
Style
D K
S E
F I
NO
D E
G B
F R
E S
N L
P L
DK Brugsanvisning
SE Bruksanvisning
FI Käyttöohje
NO Bruksanvisning
DE Gebrauchsanleitung
GB Operating Instructions
FR Mode d`emploi
ES Instruciones de Uso
NL Gebruiksaanwijzing
PL Instrukcja obsługi
Page is loading ...
Page is loading ...
Page is loading ...
Page is loading ...
Page is loading ...
Page is loading ...
Page is loading ...
Page is loading ...
Page is loading ...
Page is loading ...
Page is loading ...
Page is loading ...
Page is loading ...
Page is loading ...

16
Dear customer,
Thank you for buying our AromaSignature
®
filter cof-
fee maker. We hope you will be very happy with it.
If you need further information or if you have any
questions please contact Melitta
®
or visit us on the
Internet at www.international.melitta.de
For your safety
The appliance complies with all valid European
guidelines.
The appliance has been tested and certified by an
independent test institute.
Please read the safety notes and the operating manual
in full. To avoid danger you must pay attention to the
safety and operating instructions. Melitta
®
is not liable
for damage caused by ignoring these instructions.
1. Safety notice
This appliance is intended for use
in households and similar areas,
such as -
•inkitchensforemployeesin
shops, oces and other commer-
cial areas
•inagriculturalestablishments
•inmotels,hotelsandotherre-
sidential facilities and bed and
breakfast establishments
Any other use is considered to
be improper use and may result
in personal injury or damage to
property. Melitta
®
is not liable for
damage caused by improper use.
Please observe the following inst-
ructions to avoid injuries in case of
misuse:
•Theappliancemustnotbeplaced
in a cupboard during operation.
•Connecttheapplianceonlytoa
properly installed earthed socket.
•Theappliancemustalwaysbedis-
connected from the power supply
when unsupervised and before
assembly, disassembly or cleaning.
•Duringoperation,partsofthe
appliance such as the steam outlet
at the filter become very hot.
Avoid touching these parts and
avoid contact with hot steam.
•Donotopenthelterholder
during brewing.
•Thehotplatebecomesveryhot
during use and remains hot for a
long time after the brewing pro-
cess. Contact with the hot plate
can cause burns, so avoid touching
it.
•Makesurethatthepowercable
does not touch the hot plate.
•Donotusetheapplianceifthe
power cable is damaged.
•Donotallowthepowercableto
come into contact with liquids.
•Neverimmersetheappliancein
water.
•Donotusethejuginthemicro-
wave
•Donotcleanthepartsthat
come into contact with food
with aggressive cleaning agents or
scouringcream.Removedeter-
gent residues with clean water.
Further information on cleaning
can be found under "Cleaning and
care".
•Thisappliancecanbeusedby
children from 8 years of age or
older if they are supervised or
have been instructed in the safe
use of the equipment and have
understood the potential hazards.
Cleaning and maintenance must
not be carried out by children, un-
less they are 8 years or older and
are supervised. Keep the appliance
GB

17
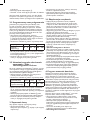
•Setthedesiredwarmingtimebybriey(<2sec.)
pressing the Start & Stop button until the desired
time is displayed.
•Toconrm,presstheStart&Stop button and
hold (> 2 sec.). The warming time is now programmed.
•Thesettingchosenlastremainsactiveevenifthe
power cable is removed from the socket.
2.2 Setting the end of brewing signal
- only AromaSignature
®
DeLuxe
With the AromaSignature
®
DeLuxe the end of brewing
is indicated by a sound signal. There are two volume
settings (loud / quiet) or you can turn the sound o
completely.
•Pressthe2-5Cupsbutton longer than 2 sec. The
LED starts to flash.
•Thetablebelowshowsthesettingsandthenumber
of times the indicator flashes.
•Pressthe2-5cupsbutton repeatedly until the
desired volume is reached. After each press of the
button you will hear the sound signal.
•Pressthe2-5cupsbutton longer than 2 sec to
confirm the chosen volume.
•Thesettingchosenlastremainsactiveevenifthe
power cable is removed from the socket.
3. Coffee preparation
For the best tasting coee
•UseMelitta
®
coee filters 1x4
®
. Fold the coee filter
before use , so that it sits perfectly in the filter.
•Ifyouareusingwholebeans,grindthemfreshas
needed.
•Ifyouusegroundcoee:Keepthepacktightlyclosed
and store it in the fridge.
3.1 Using the appliance
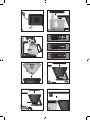
•Removethelidfromthewatertank.Fillthetank
with cold, clean water. Choose the correct amount
of water using the cup or litre level indicators on
the tank . As soon as water is poured into the
tank, it is illuminated making it easier to see the level
indicator marks.
•Removethelterfromtheholderusingtheleverin
the filter handle .Removethelidfromthelter.
•Putacoeelterintothelter.Addenoughground
coee for the desired number of cups.
•Replacethelterlid.Pushthelterbackintothe
holder until you hear it click into place .
•StartbrewingbypressingtheStart&Stopbutton.
The LED illuminates and brewing begins.
•AromaSignature
®
DeLuxe: For the best aroma
when making less than 6 cups, start the appliance in
‘2-5cup’mode.Firstpressthe2-5cupsbutton
and then the Start & Stop button . This extends
the brewing time giving you the best aromatic coee
result even with small amounts of coee.
•Attheendofthebrewingthetankilluminationturns
itself o. After the chosen warm keeping time the
appliance automatically turns o.
•AromaSignature
®
DeLuxe: The end of brewing is
and the power cable away from
children under 8 years of age.
•Theappliancemaybeusedby
persons with reduced physical,
sensory or mental abilities or lack
of experience and/or knowledge if
they are supervised or have been
instructed in the safe use of the
appliance and have understood
the potential hazards.
•Childrenmustnotplaywiththe
appliance
•Replacementofthepowercable
and all other repairs may only be
carried out by Melitta
®
Customer
Service or by an authorised repair
shop.
2. Before using for the rst time
•Rinsetheappliancebeforeusingitforthersttime.
Operate it one time with the full amount of water
but without coee or a coee filter.
•Decidehowlongyouwantthepowercabletobeby
storing the excess cable in the storage on the base
of the appliance. .
•Connecttheappliancetothepowersupply.
•Fillthewatertankwithfresh,coldwateruptothe
highest water level indicator . The tank light will
comeon(seealso‘usingtheappliance’).
•Inserttheglassjugwiththeliton,intotheappliance
under the filter .
•PresstheStart&Stopbutton.
•Allowthewatertoowthroughthelterintothepot.
•Foroptimalcoeeenjoymentandforeaseofuse,
the appliance is equipped with various additional
features. These features can be set individually.
2.1 Setting the hotplate
Keeping coee warm on the hotplate changes the taste
of your coee. To avoid this you should enjoy your
coee fresh, by drinking it as soon after brewing as
possible. Unnecessary warming also uses valuable
energy. The factory settings for the appliance are for
30 minutes of warming. This time can be changed as
needed.
•TochangethewarmkeepingtimepresstheStart&
Stop button for longer than 2 sec. The green LED
starts to flash and the water tank is illuminated.
•Thetablebelowshowsthesettingsandthenumber
of times the indicator flashes.
1514
•
Press the 2-5 cups button repeatedly until the desired
volume is reached. After each press of the button you will
hear the sound signal.
•
Press the 2-5 cups button longer than 2 sec to confirm
the chosen volume.
•
The setting chosen last remains active even if the power
cable is removed from the socket.
4. Coffee preparation
For the best tasting coffee
•
Use Melitta
®
coffee filters 1x4
®
. Fold the coffee filter befo-
re use , so that it sits perfectly in the filter.
•
If you are using whole beans, grind them fresh as needed.
•
If you use ground coffee: Keep the pack tightly closed and
store it in the fridge.
4.1. Using the appliance
•
The appliance has to be in the standby position (Eco-
Switch at position ‘I’) .
•
Remove the lid from the water tank. Fill the tank with cold,
clean water. Choose the correct amount of water using the
cup or litre level indicators on the tank . As soon as
water is poured into the tank, it is illuminated making it
easier to see the level indicator marks.
•
Remove the filter from the holder using the lever in the fil-
ter handle . Remove the lid from the filter.
•
Put a coffee filter into the filter. Add enough ground coffee
for the desired number of cups .
•
Replace the filter lid. Push the filter back into the holder
until you hear it click into place .
•
Start brewing by pressing the Start & Stop button . The
LED illuminates and brewing begins.
•
Aroma Signature DeLuxe: For the best aroma when
making less than 6 cups, start the appliance in ‘2-5 cup’
mode . First press the 2-5 cups button and then the
Start & Stop button . This extends the brewing time
giving you the best aromatic coffee result even with small
amounts of coffee.
•
At the end of the brewing the tank illumination turns itself
off. After the chosen warm keeping time (see point 3.2) the
appliance automatically turns off and goes into stand by
mode.
•
Aroma Signature DeLuxe: The end of brewing is indi-
cated by a sound signal.
•
After brewing you can remove the pot from the appliance.
The drip stop prevents dripping onto the hotplate.
5. Descaling Programme
Only regular descaling ensures that the appliance works per-
fectly and gives an optimal coffee experience. The appliance is
equipped with a descaling programme in order to simplify
this necessary process.
We recommend the use of Melitta
®
Anti Calc Filter Café
Machines.
•
The red LED on the DECALC button illuminates per-
manently as soon as the set number of brewings is reached
which varies depending on the water hardness settings
(see point 3.1). This lets you know that you need to run
the descaling programme soon.
•
To prepare the descaling process fill the water tank with
descaler according to the manufacturer’s instructions.
•
Press the DECALC button . The red LED flashes.
Confirm your programme choice by pressing the Start &
Stop button briefly. The automatic descaling programme
starts, this is shown by the constantly illuminated green
LED and the flashing red LED.
•
Attention: To ensure that the descaling agent has enough
time to take effect, the water will only start flowing into
the pot after several minutes.
•
The descaling process takes about 25 minutes.
•
When the descaling process is complete the red and green
LEDs turn off.
•
Aroma Signature DeLuxe: In addition, a sound signal
notifies you when the descaling programme is finished.
•
The appliance turns off automatically and switches to stand
by mode.
•
After the descaling process the appliance must be rinsed
through twice with clean water and without coffee to
remove residual lime scale and descaler. See point 3.
6. Cleaning and maintenance
•
Before cleaning turn the appliance off using the ECO-
Switch and remove the power cable from the socket.
•
Never immerse the appliance or the power cable in water.
•
Clean the fixed housing parts with a soft damp cloth.
•
Clean the parts, which come into contact with coffee (glass
pot, filter) after each use.
•
Filter, filter lid, glass pot and water tank lid can be cleaned
in the dishwasher.
•
The water overflow is removable and can also be
cleaned in the dishwasher.
7. Disposal instructions
•
Please consult your electrical retailer or local authority
regarding the disposal of electrical appliances
•
Packaging is raw material and can be recycled. Please make
use of recycling facilities.
FRGB
Avant toute utilisation, lire attentivement le mode
d’emploi et les consignes de sécurité !
1. Consignes de sécurité
! Brancher l'appareil conformément aux instructions figu-
rant sur l'étiquette du modèle concerné (voir la base de
l'appareil).
! Lors de l'utilisation, certains éléments de l'appareil sont
susceptibles de devenir très chauds (p. ex. le dispositif
d'écoulement entre le réservoir d'eau et le support-filtre,
la plaque chauffante). Eviter le contact avec ces éléments.
! Ne jamais placer l'appareil sur ou à proximité de surfaces
chaudes.
! Placer l'appareil à la verticale. Toujours utiliser l'appareil
dans cette position.
! S'assurer que le cordon d'alimentation n'entre pas en con-
tact avec la plaque chauffante.
! Avant le nettoyage et en cas d'inutilisation prolongée,
débrancher le cordon d'alimentation du secteur.
! Ne jamais plonger l'appareil dans l'eau.
! La verseuse n'est pas adaptée pour l'utilisation au four à
micro-ondes.
! Toujours utiliser de l'eau claire froide pour le remplissage
du réservoir.
! Ne pas retirer le support-filtre pendant la préparation du
café.
! Garder l'appareil hors de portée des enfants.
! L'appareil ne doit pas être utilisé par des personnes (y
compris des enfants) aux capacités physiques, sensorielles
ou mentales limitées, ou manquant d'expérience et/ou de
connaissances à moins de ne le faire sous la surveillance
d'une personne responsable remove ou après avoir reçu
des instructions de cette personne relatives à l'utilisation
de l'appareil.
! Cet appareil est prévu pour une utilisation domestique ou
similaire, p. ex. les cuisines du personnel dans les bou-
tiques, bureaux et autres locaux commerciaux, ou dans
des propriétés agricoles ou par les clients d'hôtels, de
motels, de bed & breakfasts ou d'autres résidences de ce
type.
! Par mesure de sécurité, le remplacement du cordon d'ali-
mentation ainsi que toute autre réparation ne doit être
effectuée que par le service clients de Melitta ou des
techniciens à la qualification similaire.
2. Eco-Switch
• Cet appareil est équipé d'un interrupteur principal « Eco-
Switch ». Quand l'interrupteur est en position « 0 »,
l'appareil est complètement éteint et ne consomme pas
d'énergie.
• Pour mettre l'appareil en marche, l'interrupteur « Eco-
Switch » doit être en position « I ».
• Pour une consommation de courant optimale, placer l'in-
terrupteur Eco-Switch en position « 0 » lorsque l'appareil
n'est pas utilisé.
3. Avant la première utilisation
•
Rincer l'appareil avant la première utilisation. Faire fonctionner
l'appareil avec un réservoir d'eau plein sans café ni filtre.
• Choisir la longueur du cordon en rangeant le câble en trop
dans la trappe prévue à la base de l'appareil. .
• Brancher l'appareil sur le secteur.
• Placer l'interrupteur Eco-Switch en position I.
• Remplir le réservoir d'eau claire froide jusqu'à l'indicateur
de niveau le plus élevé .
• L'indicateur du réservoir s'allume (voir aussi « Utilisation
de l'appareil »).
• Mettre la verseuse avec son couvercle dans l'appareil sous
le support-filtre .
• Appuyer sur le bouton Start & Stop .
• Attendre que l'eau passe à travers le support-filtre dans la
verseuse.
Pour un résultat gustatif et une simplicité d'utilisation maxi-
mums, l'appareil est équipé de différentes fonctions pouvant
être définies individuellement.
3.1. Réglage de la dureté de l'eau/indica-
teur de tartre
• Selon la dureté de l'eau, du tartre peut s'accumuler dans
l'appareil. Il augmente la consommation de courant de l'ap-
pareil car les dépôts de tartre sur les éléments chauffants
sont susceptibles d'empêcher le transfert optimal de l'éner-
gie à l'eau.
• Pour éviter une augmentation inutile de la consommation
de courant, l'appareil indique quand un détartrage est
nécessaire. La DEL rouge est alors allumée en perma-
nence.
• L'appareil est défini par défaut sur le niveau I correspon-
dant à une eau d'une dureté élevée.
• Si l'eau est plus douce et que la fréquence des détartrages
peut être espacée, il est possible de définir l'indicateur de
détartrage en conséquence.
• Pour ce faire, appuyer sur le bouton DECALC et le
maintenir enfoncé pendant plus de 2 secondes. La DEL
rouge commence à clignoter. Au niveau prédéfini I (dureté
élevée de l'eau), la DEL clignote une fois, puis marque une
pause (
■ ).
• Il est possible de définir la dureté de l'eau sur deux autres
niveaux. Avec une nouvelle pression sur le bouton
DECALC, la DEL de l'indicateur se met à clignoter deux
fois (
■■ ). Encore une pression et la DEL clignote 3 fois
(
■■■ ).
• Le tableau ci-dessous indique les réglages ainsi que le nom-
bre de fois où la DEL clignote.
• Se renseigner auprès du fournisseur d'eau local pour con-
naître la dureté de l'eau ou la mesurer à l'aide d'une bande-
lette de mesure de la dureté de l'eau disponible dans le
commerce.
• Une fois la dureté de l'eau définie sur le niveau adapté,
appuyer une nouvelle fois sur le bouton DECALC et le
maintenir enfoncé pendant plus de 2 secondes. La dureté
de l'eau est à présent correctement programmée.
Attention :
• Il n'est pas possible de programmer ou de modifier le
niveau de dureté de l'eau lors de la préparation du café.
• L'indicateur de détartrage s'allume lorsque l'appareil est mis
sous tension, si l'appareil a été éteint sans être détartré
après la préparation du café. La DEL ne s'éteint qu'une fois
le processus de détartrage effectué (voir le point 5).
• Le dernier niveau de dureté de l'eau choisi reste actif
même si le cordon d'alimentation est débranché de la
prise.
3.2 Réglage de la plaque chauffante
Garder le café au chaud sur la plaque chauffante change le
goût du café. Pour éviter ceci, il est recommandé de le boire
frais juste après la préparation si possible. Un maintien au
chaud inutile consomme également une énergie précieuse. Le
réglage par défaut de l'appareil garde le café au chaud pen-
dant 30 minutes. Ce temps peut être modifié en fonction des
besoins.
• Pour modifier le réglage du maintien au chaud, appuyer sur
le bouton Start & Stop pendant plus de 2 s. La DEL
verte commence à clignoter et le réservoir d'eau s'allume.
Sound Signal loud quiet off
LED flash rhythm
(2-5 cups button)
■■
■■ ■■ ■■■ ■■■
Réglage de la
dureté
I II III
° dH >21°dH 12-20°dH 0-12°dH
Rythme de cligno-
tement de la DEL
(bouton DECALC)
■■
■■ ■■ ■■■ ■■■
Manual_Signature_1013_Layout 1 15.10.13 08:59 Seite 14
1312
•
Stellen Sie die gewünschte Warmhaltezeit ein, in dem Sie
solange kurz (< 2 sec.) auf die Taste Start & Stop
drücken, bis der gewünschte Wert erreicht ist.
•
Zur Bestätigung drücken Sie die Taste Start & Stop noch-
mals lang (> 2 sec.). Die Warmhaltezeit ist nun program-
miert.
•
Die zuletzt gewählte Einstellung bleibt auch nach Ziehen
des Netzsteckers erhalten.
3.3 Einstellung des Brühendsignals –
NUR AROMA SIGNATURE DELUXE
Das Ende des Brühprozesses wird bei Aroma Signature
DeLuxe durch einen Signalton angezeigt. Sie können die
Lautstärke des Signaltons in 2 Stufen verändern (laut / leise)
bzw. den Ton ganz ausschalten.
•
Drücken Sie die Taste 2-5 Tassen länger als 2 sec.
Die LED beginnt zu blinken.
•
Die Einstellungen und Anzeigen entnehmen Sie bitte der
folgenden Tabelle.
•
Drücken Sie die Taste 2-5 Tassen wiederholt kurz, bis
die gewünschte Lautstärke erreicht ist. Nach jedem
Drücken ist der entsprechende Ton kurz zu hören.
•
Drücken Sie die Taste 2-5 Tassen länger als 2 sec um die
gewählte Lautstärke zu programmieren.
•
Die zuletzt gewählte Einstellung bleibt auch nach Ziehen
des Netzsteckers erhalten.
4. Kaffeezubereitung
Für den optimalen Kaffeegeschmack
•
Verwenden Sie Melitta
®
Filtertüten
®
1x4
®
. Falten Sie die
Filtertüte vor Gebrauch , um einen optimalen Sitz im
Filter zu gewährleisten.
•
Wenn Sie ganze Bohnen verwenden, mahlen Sie sie stets
frisch nach Bedarf.
•
Wenn Sie bereits gemahlenen Kaffee verwenden: Halten Sie
die Packung stets gut verschlossen und bewahren Sie sie im
Kühlschrank auf.
4.1. Gerätebetrieb
•
Das Gerät muss sich im Standby-Betrieb befinden (Eco-
Switch auf Position „I“) .
•
Nehmen Sie den Tankdeckel ab. Befüllen Sie den
Wassertank mit kaltem, klarem Wasser. Sie können die not-
wendige Wassermenge an der Tassen- bzw. Liter-Skalierung
des Tanks ablesen . Sobald Wasser in den Tank gefüllt
wird, leuchtet die Tankbeleuchtung auf, dadurch wird das
Abmessen des Wassers anhand der Skalierung erleichtert.
•
Entnehmen Sie den Filter durch Betätigen des Hebels im
Filtergriff aus seiner Halterung . Nehmen Sie den
Filterdeckel ab.
•
Geben Sie eine Filtertüte in den Filter. Fügen Sie gemahle-
nen Kaffee je nach gewünschter Tassenzahl hinzu .
•
Setzen Sie den Filterdeckel wieder auf. Schieben Sie den
Filter zurück auf die Halterung bis er hörbar einrastet .
•
Starten Sie den Brühvorgang durch Druck auf die Taste
Start & Stop . Die LED leuchtet und der Brühvorgang
beginnt.
•
Nur Aroma Signature DeLuxe:
Zur vollen Aroma-Entfaltung auch bei der Zubereitung von
weniger als 6 Tassen können Sie die Brühzeit verlängern.
Drücken Sie hierfür zunächst die Taste 2-5 Tassen und
dann die Taste Start & Stop . Sie erhalten so auch bei
kleineren Zubereitungsmengen ein optimales, aromatisches
Kaffee-Ergebnis.
•
Nach Ende der Brühzeit erlischt die Tankbeleuchtung. Das
Gerät schaltet sich je nach gewählter Warmhaltezeit (siehe
Punkt 3.2) automatisch ab und wechselt in den Stand-by
Betrieb.
•
Aroma Signature DeLuxe: Das Brühende wird Ihnen
durch den Signalton angezeigt.
•
Nach Brühende können Sie die Kanne aus dem Gerät neh-
men. Der Tropfstopp verhindert das Nachtropfen auf
die Warmhalteplatte.
5. Entkalkungsprogramm
Nur regelmäßiges Entkalken sichert die einwandfreie
Funktion des Gerätes und ein optimales Kaffee-Ergebnis. Zur
Vereinfachung dieses notwendigen Vorganges ist dieses Gerät
mit einem Entkalkungsprogramm ausgestattet.
Wir empfehlen die Verwendung von Melitta
®
Anti Calc
Filter Café Machines
•
Sobald die von der Einstellung der Wasserhärte (siehe
Punkt 3.1) abhängige Anzahl von Brühungen erreicht ist,
leuchtet die rote LED an der Taste DECALC permanent
auf. Damit wird angezeigt, dass die Entkalkung kurzfristig
durchgeführt werden sollte.
•
Zur Vorbereitung des Entkalkungsprozesses füllen Sie das
Entkalkungsmittel nach Herstellerangaben in den
Wassertank.
•
Betätigen Sie kurz die Taste DECALC . Die rote LED
blinkt. Jetzt bestätigen Sie Ihre Programmauswahl, indem Sie
die Taste Start & Stop kurz drücken. Das automatische
Entkalkungsprogramm startet, dies wird durch die dauer-
haft leuchtende grüne LED sowie die blinkende rote LED
angezeigt.
•
Achtung: Um die notwendige Einwirkzeit des Entkalkungs -
mittels zu gewährleisten, läuft erst nach einigen Minuten
das erste Wasser in die Kanne.
•
Der Entkalkungsprozess dauert ca. 25 Minuten.
•
Nur nach einem vollständigen Ablauf des
Entkalkungsprozesses erlöschen die rote und grüne LED.
•
Aroma Signature DeLuxe: Das Programm-Ende wird
zusätzlich durch einen Signalton angezeigt.
•
Das Gerät schaltet sich automatisch ab und wechselt in
den Stand-by Betrieb.
•
Nach Beendigung des Entkalkungsprozesses müssen Sie das
Gerät zweimal mit klarem Wasser ohne Kaffee betreiben,
um Entkalkerreste vollständig zu entfernen. (Siehe Punkt 3).
6. Reinigung und Pflege
•
Schalten Sie das Gerät vor dem Reinigen mit dem ECO-
Switch ab und ziehen Sie den Netzstecker.
•
Tauchen Sie das Gerät oder das Netzkabel niemals in
Wasser.
•
Reinigen Sie die festen Gehäuseteile mit einem weichen,
feuchten Tuch.
•
Reinigen Sie die Teile, die mit Kaffee in Berührung kommen
(Glaskanne, Filter) nach jedem Gebrauch.
•
Filter, Filterdeckel, Glaskanne und Tankdeckel können Sie in
der Spülmaschine reinigen.
•
Der Wasserüberlauf ist abnehmbar und kann ebenfalls
in der Spülmaschine gereinigt werden.
7. Entsorgungshinweise
• Bitte informieren Sie sich über Entsorgungswege für
Elektro-Geräte bei Ihrem Fachhändler oder bei Ihrer
Gemeinde.
• Verpackungsmaterialien sind Rohstoffe und recyclebar.
Bitte führen Sie sie in den Rohstoffkreislauf zurück.
13
Please read the complete manual and all safety
instructions before use!
1. Safety Instructions
!
Connect the appliance in accordance with the instructions
on the model label (see base of appliance).
!
During use, parts of the appliance become very hot (e.g.
the overflow from the water tank to the filter, the hot -
plate). Avoid contact with those parts.
!
Never place the appliance on or near hot surfaces.
!
Place the appliance in an upright position. Always use the
appliance in this upright position.
!
Ensure that the power cable does not come into contact
with the hotplate.
!
Before cleaning and when not in use for longer periods
remove the power cable from the socket.
!
Never immerse the appliance in water.
!
The glass pot is not suitable for microwave ovens.
!
Always use fresh, cold water to fill the water tank.
!
Do not remove the filter during the brewing process.
!
Use the appliance out of the reach of children.
!
The appliance is not to be used by people (including
children) with limited physical, sensory or mental aptitude
or lack of experience and /or knowledge unless they are
supervised by a person responsible for their safety or
have received instructions from this person as to how the
appliance is to be used.
!
This appliance is intended for use in households and simi-
lar usage such as kitchens for staff in shops, offices or
other commercial premises, or in agricultural properties
or by customers in hotels, motels, bed and breakfast
establishments or other residential facilities.
!
As a safety measure changing the power cable and all
other repairs should only be carried out by Melitta
customer service or similarly qualified technicians.
2. Eco-Switch
• The appliance is equipped with a main switch - “Eco-
Switch”. () When the switch is in position ‘0’ the
appliance is completely switched off and uses no power.
• To switch the appliance on, the “Eco-Switch” has to be in
position ‘I’.
• For optimal energy consumption put the Eco-Switch in
position ‘0’ when the appliance is not in use.
3. Before using for the first time
•
Rinse the appliance before using it for the first time.
Operate it one time with the full amount of water but
without coffee or a coffee filter.
•
Decide how long you want the power cable to be by sto-
ring the excess cable in the storage on the base of the
appliance.
.
•
Connect the appliance to the power supply.
•
Put the Eco-Switch
in position I.
• Fill the water tank with fresh, cold water up to the highest
water level indicator . The tank light will come on (see
also ‘using the appliance’).
• Insert the glass pot with the lit on, into the appliance under
the filter .
•
Press the Start & Stop button
.
• Allow the water to flow through the filter into the pot.
• For optimal coffee enjoyment and for ease of use, the appli-
ance is equipped with various additional features. These
features can be set individually.
3.1. Set water hardness / calcification
indicator
• Depending on water hardness lime scale may build up in
the appliance. This increases the appliance’s energy con-
sumption as lime scale on the heating element can prevent
the optimal transfer of energy to the water.
• To avoid the unnecessary increase in energy consumption,
the appliance indicates when you need to descale it. The
red LED () is illuminated permanently.
• The appliance is pre set at Level I for water with a high
degree of hardness.
• If you have softer water in your household and therefore
need to descale less often, then the descaling indicator can
be set accordingly.
• To do this, press the button DECALC () and hold it in
for longer than 2 seconds. The red LED starts to flash. At
the pre set level I (high water hardness) the LED flashes
once and then pauses (
■ ).
• You can set the water hardness to 2 other levels. When
you press the button DECALC again the indicator changes
to the LED flashing twice (
■■ ). Press the button again
and the LED flashes 3 times (
■■■ ).
• The table below shows the settings and the number of
times the indicator flashes.
• Ask your local water provider for the hardness level of
your water or measure it yourself with a water hardness
measuring strip available in the shops.
• When you have set the water hardness at the required
level, press the DECALC button again and hold it down for
longer than 2 seconds. Your settings are now correctly pro-
grammed.
Please note:
• You cannot programme or change water hardness levels
while brewing coffee.
• The descaling indicator will illuminate when the appliance is
turned on, if the appliance was switched off without desca-
ling after brewing. The LED will only switch off after the
descaling process is complete. (see point 5)
• The water hardness level chosen last remains active even if
the power cable is removed from the socket.
3.2 Setting the hotplate
Keeping coffee warm on the hotplate changes the taste of
your coffee. To avoid this you should enjoy your coffee fresh,
by drinking it as soon after brewing as possible. Unnecessary
warming also uses valuable energy. The factory settings for
the appliance are for 30 minutes of warming. This time can be
changed as needed.
• To change the warm keeping time press the Start & Stop
button for longer than 2 sec. The green LED starts to
flash and the water tank is illuminated.
• The table below shows the settings and the number of
times the indicator flashes.
• Set the desired warming time by briefly (< 2 sec.) pressing
the Start & Stop button until the desired time is displayed.
• To confirm, press the Start & Stop button and hold
(> 2 sec.). The warming time is now programmed.
• The setting chosen last remains active even if the power
cable is removed from the socket.
3.3 Setting the end of brewing signal –
ONLY AROMA SIGNATURE DELUXE
With the Aroma Signature DeLuxe the end of brewing is
indicated by a sound signal. There are two volume settings
(loud / quiet) or you can turn the sound off completely.
• Press the 2-5 Cups button longer than 2 sec. The LED
starts to flash.
• The table below shows the settings and the number of
times the indicator flashes.
GB
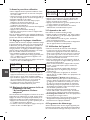
Hardness setting I II III
° dH >21°dH 12-20°dH 0-12°dH
LED flash rhythm
(DECALC button)
■■
■■ ■■ ■■■ ■■■
Warming time 30 Min. 60 Min. 90 Min.
LED flash rhythm
(Start-Button)
■■
■■ ■■ ■■■ ■■■
Signalton laut leise aus
LED Blinkrhythmus
(2-5 Tassen-Taste)
■■
■■ ■■ ■■■ ■■■
DE
Manual_Signature_1013_Layout 1 15.10.13 08:59 Seite 12
G B

18
indicated by a sound signal.
•Afterbrewingyoucanremovethepotfromthe
appliance. The drip stop prevents dripping onto the
hotplate.
4. Descaling Programme
Depending on the regional water hardness the device
can become calcified over time. This leads to an increased
energy consumption caused by limescale in the heating
element which prevent the optimal energy transfer to
the water. Excessive calcification can lead to damage
and aect the proper functioning of the appliance. The
red LED “DECALC” lights up while preparing coee
if there is too much limescale on the heating element
and indicates that the appliance should be descaled as
soon as possible. We recommend the use of Melitta
®
„Anti Calc Liquid for Filter Coffee & Aqua Machines“.
•Topreparethedescalingprocessllthewater
tankwithdescaleraccordingtothemanufacturer’s
instructions.
•PresstheDECALCbutton. The automatic descaling
programm starts, this is shown by the flashing red
LED.
•Attention:Toensurethatthedescalingagenthas
enough time to take eect, the water will only start
flowing into the pot after several minutes.
•Whenthedescalingprocessiscompletetheredand
green LEDs turn o.
•AromaSignature
®
DeLuxe:
In addition, a sound signal notifies you when the
descaling programme is finished.
•Theapplianceturnsoautomatically.
•Afterthedescalingprocesstheappliancemustbe
rinsed through twice with clean water and without
coee to remove residual lime scale and descaler.
5. Cleaning and maintenance
•Beforecleaningturntheapplianceoandremove
the power cable from the socket.
•Neverimmersetheapplianceorthepowercablein
water.
•Cleanthexedhousingpartswithasoftdampcloth.
•Cleantheparts,whichcomeintocontactwithcoee
(glass jug, filter) after each use.
•Filter,lterlid,thermjugandwatertanklidcanbe
cleaned in the dishwasher.
•Thewateroverowisremovableandcanalsobe
cleaned in the dishwasher.
6. Note on disposal
•Applianceslabelledwiththissymbol are subject
to European guidelines for WEEE (Waste Electrical
and Electronic Equipment).
•Electricappliancesdonotgointhehouseholdbin.
Dispose of the appliance in an environmentally
friendly way using suitable collection systems.
•Packagingmaterialsarerawmaterialsandcanbe
recycled. Please recycle them.
Cher client, chère cliente,
Nousvousremercionsd‘avoirchoisinotrecafetière
filtre AromaSignature
®
.Nousvoussouhaitonsentière
satisfaction.
Si vous souhaitez avoir des renseignements
complémentaires ou si vous avez des questions,
veuillez-vous adresser à Melitta
®
ou visitez notre
site Internet www.melitta.fr, www.melitta.be
Pour votre sécurité
L‘appareil est conforme aux normes
européennes en vigueur.
L‘appareil a été contrôlé et certifié par des instituts de
tests indépendants.
Veuillez lire les consignes de sécurité et le mode
d‘emploi dans leur intégralité. Afin d‘éviter tout
danger, respectez les consignes de sécurité ainsi que le
mode d‘emploi. Melitta
®
décline toute responsabilité
en cas de dommages résultant d‘un non-respect des
consignes.
1. Consignes de sécurité
Cet appareil est conçu pour être
utilisé à la maison et pour des
utilisations similaires comme -
•danslescuisinespourlesem-
ployés de magasins, bureaux et
autre zones commerciales
•danslesétablissementsagricoles
•danslesmotels,hôtelsetautres
établissements d'hébergement
Toute autre utilisation est con-
sidérée comme inappropriée
et peut entraîner des blessures
corporelles ou des dommages
matériels. Melitta
®
ne peut pas
être tenue responsable des dom-
mages causés par une utilisation
inappropriée.
Veuillez respecter les instructions
suivantes pour éviter toutes bles-
sures causées par une mauvaise
utilisation :
•Nepasplacerl'appareildansune
armoire pendant l'utilisation.
FR
Page is loading ...
Page is loading ...
Page is loading ...
Page is loading ...
Page is loading ...
Page is loading ...
Page is loading ...
Page is loading ...
Page is loading ...
Page is loading ...
Page is loading ...
Page is loading ...
-
 1
1
-
 2
2
-
 3
3
-
 4
4
-
 5
5
-
 6
6
-
 7
7
-
 8
8
-
 9
9
-
 10
10
-
 11
11
-
 12
12
-
 13
13
-
 14
14
-
 15
15
-
 16
16
-
 17
17
-
 18
18
-
 19
19
-
 20
20
-
 21
21
-
 22
22
-
 23
23
-
 24
24
-
 25
25
-
 26
26
-
 27
27
-
 28
28
-
 29
29
-
 30
30


Melitta AROMASIGNATURE® & DeLuxe Operating instructions
- Category
- Coffee makers
- Type
- Operating instructions
- This manual is also suitable for
Ask a question and I''ll find the answer in the document
Finding information in a document is now easier with AI
in other languages
- français: Melitta AROMASIGNATURE® & DeLuxe Mode d'emploi
- español: Melitta AROMASIGNATURE® & DeLuxe Instrucciones de operación
- Deutsch: Melitta AROMASIGNATURE® & DeLuxe Bedienungsanleitung
- Nederlands: Melitta AROMASIGNATURE® & DeLuxe Handleiding
- dansk: Melitta AROMASIGNATURE® & DeLuxe Betjeningsvejledning
- polski: Melitta AROMASIGNATURE® & DeLuxe Instrukcja obsługi
- svenska: Melitta AROMASIGNATURE® & DeLuxe Bruksanvisningar
- suomi: Melitta AROMASIGNATURE® & DeLuxe Käyttö ohjeet
Related papers
-
Melitta AromaSignature® Therm / AromaSignature® Therm DeLuxe Owner's manual
-
Melitta AROMABOY® 1015 & M25 Operating instructions
-
-
-
Melitta easy Series User manual
-
-
-
-
Melitta AromaSignature Therm User manual
-
Melitta Look Selection Operating instructions
Other documents
-
Princess 249411 Owner's manual
-
Siemens TC80503 User manual
-
-
Menuett Kaffetrakter Operating instructions
-
-
 Russell Hobbs 22000-56 User manual
-
Centurion KE240 User manual
-
Melissa 645-104 User manual
-
-
Aeg-Electrolux EKF 6000 User manual
