
Operating Instructions
USB Connection Kit
Before use, please read these instructions completely.
VQT0K88
EB.book 1 ページ 2005年4月11日 月曜日 午前11時10分

2
Before opening the CD-ROM package, please read the following.
End User License Agreement (for USB Driver, WebCam Driver,
SD Viewer and DV STUDIO)
You (“Licensee”) are granted a license for the Software defined in this End User Soft Agreement
(“Agreement”) on condition that you agree to the terms and conditions of this Agreement. If Licensee does
not agree to the terms and conditions of this Agreement, promptly return the Software to Matsushita
Electric Industrial Co., Ltd. (“Matsushita”), its distributors or dealers from which you made the purchase.
Article 1 License
Licensee is granted the right to use the software, including the information recorded or described on the
CD-ROM, instruction manuals, and any other media provided to Licensee (collectively “Software”), but all
applicable rights to patents, copyrights, trademarks and trade secrets in the Software are not transferred to
Licensee.
Article 2 Use by a Third Party
Licensee may not use, copy, modify, transfer or allow any third party, whether free of charge or not, to use,
copy or modify the Software, except as expressly provided for in this Agreement.
Article 3 Restrictions on Copying the Software
Licensee may make a single copy of the Software in whole or a part solely for back-up purpose.
Article 4 Computer
Licensee may use the Software only on one computer, and may not use it on more than one computer.
Article 5 Reverse Engineering, Decompiling or Disassembly
Licensee may not reverse engineer, decompile, or disassemble the Software, except to the extent either of
them is permitted under law or regulation of the country where Licensee resides. Matsushita, or its
distributors will not be responsible for any defects in the Software or damage to Licensee caused by
Licensee’s reverse engineering, decompiling, or disassembly of the Software.
Article 6 Indemnification
The Software is provided “AS-IS” without warranty of any kind, either expressed or implied, including, but
not limited to, warranties of non-infringement, merchantability and/or fitness for a particular purpose.
Further, Matsushita does not warrant that the operation of the Software will be uninterrupted or error free.
Matsushita or any of its distributors will not be liable for any damage suffered by Licensee arising from or in
connection with Licensee’s use of the Software.
Article 7 Export Control
Licensee agrees not to export or re-export to any country the Software in any form without the appropriate
export licenses under regulations of the country where Licensee resides, if necessary.
Article 8 Termination of License
The right granted to Licensee hereunder will be automatically terminated if Licensee contravenes of any of
the terms and conditions of this Agreement. In the event, Licensee must destroy the Software and related
documentation together with all the copies thereof at Licensee’s own expense.
EB.book 2 ページ 2005年4月11日 月曜日 午前11時10分

3
Before opening the CD-ROM package, please read the following.
G.726 Audio Decoder End User License Agreement
YOU SHOULD CAREFULLY READ THE FOLLOWING TERMS AND CONDITIONS. THIS IS A LEGAL
DOCUMENT WHICH CONSTITUTES YOUR AGREEMENT AS END USER FOR THE USE OF THE
SOFTWARE IN THAT PACKAGE. BY INSTALLING THIS SOFTWARE, YOU INDICATE YOUR
ACCEPTANCE OF THIS LIMITED USE SOFTWARE LICENSE.
IF YOU DO NOT AGREE TO THE TERMS OF THIS AGREEMENT, PROMPTLY RETURN THE DISK
PACKAGE AND THE ACCOMPANYING ITEMS WITH YOUR SALES RECEIPT TO YOUR VENDOR.
LIMITED USE SOFTWARE LICENSE
You, the Licensee, are granted a non-exclusive software license to use the Software and related
documentation supplied herein. The terms of this license are as follows:
1) You may use the Software on a single computer at a single location.
2) As you, the Licensee, own the physical media on which the Software is recorded, the Licensor of the
Software retains title and ownership thereof, regardless of the form or media in or on which the original
and other copies may exist. This License is not a sale of the original Software or any copy thereof.
3) You are required to protect the copyright of the Software. You may NOT distribute or otherwise make
the Software or documentation available to any third party without the prior written consent of the
Licensor. You may be held legally responsible for any copyright infringement that is caused or
encouraged by your failure to abide by the terms of this License.
4) You may NOT modify or alter the Software. Any portion of the Software that is merged into or used in
conjunction with other software will continue to be the property of the Licensor and will be subject to the
terms of this License.
5) You are permitted to copy the Software for exclusive use as your working copy. Any such copy must
contain the same copyright notice and proprietary marking as the original Software.
6) You may not transfer or assign the Software or this License to any other person without the prior written
consent of the Licensor. Any authorized transferee of the Software shall be bound by the same terms
and conditions of this License and, in such case your license is automatically terminated. In no event
may you transfer, assign, rent, sell, or otherwise dispose of the Software on a temporary or permanent
basis except as expressly provided herein.
7) This License is effective until terminated. This License will terminate automatically without notice from
the Licensor if you fail to comply with any provision of this Agreement. Upon termination you will destroy
the Software together with all copies and modifications in any form.
8) The Software has been tested and the documentation has been reviewed. However, THE LICENSOR
MAKES NO WARRANTY OR REPRESENTATION INCLUDING THE IMPLIED WARRANTIES OF
MERCHANTABILITY AND FITNESS FOR USE, ALL OF WHICH ARE EXCLUDED. Some states do
not allow exclusion of implied warranties so the above disclaimer may not apply to you.
9) The Licensor will not be liable or in any way responsible for any incidental or consequential economic
or property damage in connection with the Software or its documentation. Some states do not allow the
exclusion of incidental or consequential damages so the above exclusion may not apply to you.
10) (Notice to U.S. Government End Users) The Software and Documentation are “Commercial Items”, as
that term is defined at 48 C.F.R. 2.101, consisting of “Commercial Computer Software” and
“Commercial Computer Software Documentation”, as such terms are used in 48 C.F.R. 12.212 or 48
C.F.R. 227.7202, as applicable. Consistent with 48 C.F.R. 12.212 or 48 C.F.R. 227.7202-1 through
227.7202-4, as applicable, the Commercial Computer Software and Commercial Computer Software
Documentation are being licensed to U.S. Government end users (A) only as Commercial Items and (B)
with only those rights as are granted to all other end users pursuant to the terms and conditions herein.
EB.book 3 ページ 2005年4月11日 月曜日 午前11時10分

4
Contents
Before Use
Introduction ............................................................. 5
Notes on these instructions .................................... 5
Names and functions of packaged items................ 6
Operating environment ........................................... 7
Install/Connection
Installing USB Driver............................................. 10
Installing WebCam Driver (Windows XP only)...... 11
Installation of SD Viewer 1.1E-SE/DV STUDIO
3.1E-SE.............................................................. 12
Installation of ArcSoft Software Suite ................... 13
Connecting the Movie Camera to Personal
Computer ........................................................... 14
Software
Starting the Software ............................................ 15
Installing G.726 Audio Decoder ............................ 16
Using the Movie Camera as a Web Camera
(Windows XP only)............................................. 17
Others
To disconnect USB cable safely............................ 20
If you no longer need software or driver
(Uninstall) ........................................................... 21
Notes .................................................................... 22
ª
WARNING:
To reduce the risk of fire or shock hazard, do not
expose this equipment to rain or moisture.
ª
CAUTION:
To reduce the risk of fire or shock hazard and
annoying interference, use the recommended
accessories only.
EB.book 4 ページ 2005年4月11日 月曜日 午前11時10分

5
Before Use
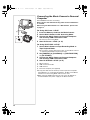
Introduction
This USB Connection Kit lets you connect your
personal computer to a Movie Camera that has a
USB Terminal. You can use the kit to transfer still
images from the video recorded with your Movie
Camera to your personal computer.
By controlling the Movie Camera from the personal
computer, the desired still pictures from tape or
camera can be acquired into the personal computer.
Notes on these instructions
≥Microsoft
®
, Windows
®
, Windows Messenger
®
and
DirectX
®
are either registered trademarks or
trademarks of Microsoft Corporation in the United
States and/or other countries.
≥Intel
®
, Pentium
®
and Celeron
®
are the registered
trademarks or trademarks of the Intel Corporation.
≥All other names, company names, product names,
etc. in these instructions are the trademarks or
registered trademarks of their respective
corporations.
≥The names of the products you are using may
differ from the names given in the text. Depending
on the operating environment and other factors,
the contents of the screens used in these
instructions may not necessarily match what you
will see on your screen.
≥Although the screens in these Operating
Instructions are shown in English for the sake of
example, other languages are supported as well.
≥In this Manual, the Panasonic make digital video
camera with USB Terminal is referred to as Movie
Camera.
≥In this manual, connections between the personal
computer and the Movie Camera NV-GS200 is
referred as the example.
≥These instructions do not cover the basic
operations of the personal computer or define any
terms. For this information, refer to the Operating
Instructions which accompany your personal
computer.
EB.book 5 ページ 2005年4月11日 月曜日 午前11時10分

6
Names and functions of
packaged items
1) USB Connection Cable:
≥This Cable is used to connect a personal
computer with your Movie Camera.
2) CD-ROM:
USB Driver
(
l
10)
WebCam Driver
(
l
11)
SD Viewer 1.1E-SE
(
l
12)
DV STUDIO 3.1E-SE
(
l
12)
G.726 Audio Decoder
(
l
16)
ArcSoft Software Suite
(
l
13)
Windows Media Update
≥USB Driver enables you to use the USB
Connection Cable. Make sure USB Driver is
installed before connecting cable.
≥If the Movie Camera is connected to your
personal computer, you can send video from
the Movie Camera to the other parties via the
network. (The WebCam Driver can only be
used on Windows XP SP1 or later.)
≥The SD Viewer 1.1E-SE software allows
images on a Card to be displayed in a
thumbnail format so that the contents of the
Card can be easily checked.
≥Using the DV STUDIO 3.1E-SE software
allows you to capture still images from the
video recorded on a tape or still images
viewed through the lens of a camera.
≥G.726 Audio Decoder is used when a sound of
MPEG4 moving picture file* recorded in ASF
format is played back with Windows Media
Player.
≥The ArcSoft Software Suite is package
software which is integrated by the ArcSoft
PhotoImpression 4, ArcSoft Panorama Maker
3 and ArcSoft PhotoMontage 2 application
software.
≥ArcSoft PhotoImpression 4 enables you to
use photo editing program to edit, enhance,
retouch or add special effects to any image
easily. Also it offers creative solutions for
making greeting cards and calendars.
≥ArcSoft Panorama Maker 3 allows you to
create a panoramic photo combining several
still images.
≥ArcSoft PhotoMontage 2 allows you to
combine and process many still images to
create a single image.
≥Windows Media Update was provided by
Microsoft Corporation. Run this update in
cases where playback of an MPEG4 moving
picture file* recorded with a Digital Video
Camera is started in Windows Media Player,
but ends with an error message after 3 to 4
minutes.
*MPEG4 moving picture files can be recorded by
NV-GS200.
EB.book 6 ページ 2005年4月11日 月曜日 午前11時10分

7
Operating environment
≥Despite having the operating environment
indicated, it may not be possible to use the
program with some types of personal computer.
≥A CD-ROM drive is required to install this program.
USB Driver
OS:
IBM PC/AT compatible personal computer with pre-
installed;
Microsoft Windows XP Home Edition/Professional
Microsoft Windows 2000 Professional
Microsoft Windows Me (Millennium Edition)
Microsoft Windows 98 Second Edition
CPU:
Intel Pentium II/ Celeron 300 MHz or higher
(including compatible CPU)
RAM:
32 MB or more (64 MB or more recommended)
(128 MB or more required for Windows XP)
Free hard disk space:
At least 30 MB or more
Ports:
USB Terminal
To use the Movie Camera as a Web Camera, the
additional minimum requirements must be met.
OS:
Windows XP SP1 or later
Free hard disk space:
At least 250 MB or more
Graphic display:
High Colour (16 bit) or more
Desktop resolution of 800k600 pixels or more
Communication Speed:
56 kbps or faster is recommended
Necessary software:
Windows Messenger 5.0 or later
Other requirements (to send/receive audio):
Sound card
Speaker or headphones
To use the Movie Camera as a Web Camera, the
following conditions must be met.
≥In the case of Windows XP SP1 or later is needed,
to upgrade Windows XP to SP1, click [Start] >> [All
Programs] >> [Windows Update]. (Requires
internet connection.)
≥You have direct dial-up connection capability to the
internet. Also, you and the other person(s) are in
the same Network (LAN).
≥Install the Windows Messenger 5.0 or later.
≥If the installed version is not latest, update it by
performing the Windows update.
≥If you are connected to the Internet through a
firewall or a router, proper communication will not
be possible.
≥The installer is available only in English but can be
used on operating systems using other languages.
≥The other parties also need to use
Windows Messenger on Windows XP during the
communication.
EB.book 7 ページ 2005年4月11日 月曜日 午前11時10分

8
SD Viewer 1.1E-SE/DV STUDIO 3.1E-SE
OS:
IBM PC/AT compatible personal computer with pre-
installed;
Microsoft Windows XP Home Edition/Professional
Microsoft Windows Me (Millennium Edition)
Microsoft Windows 98 Second Edition
CPU:
Intel Pentium II/ Celeron 300 MHz or higher
(including compatible CPU)
Graphic display:
High Colour (16 bit) or more
Desktop resolution of 800k600 pixels or more
RAM:
32 MB or more (64 MB or more recommended)
(128 MB or more required for Windows XP)
Free hard disk space:
At least 20 MB (for SD Viewer 1.1E-SE)
At least 20 MB (for DV STUDIO 3.1E-SE)
Ports:
USB Terminal
Other requirements:
Mouse
≥When 2 or more USB devices are connected to a
personal computer, or when devices are
connected through USB hubs or by using
extension cables, proper operation is not
guaranteed.
≥When connected to the keyboard USB terminal,
normal function may not be possible.
≥This instruction manual describes only the
procedures for installation, connection and start-
up. Please read the PDF-based instructions for
how to use the SD Viewer 1.1E-SE or the DV
STUDIO 3.1E-SE.
≥To view the installed operating instructions, Adobe
Acrobat Reader 5.0 or higher is required. Please
install Adobe Acrobat Reader from the supplied
CD-ROM.
≥Before using for the first time, select [Readme]
from [Start] >> [All Programs (Programs)] >>
[Panasonic] >> [SD Viewer] or [DV Studio3], and
read any supplementary details or updates.
≥The software is available in English, German and
French.
G.726 Audio Decoder
OS:
Microsoft Windows XP Home Edition/Professional
Microsoft Windows 2000 Professional
Microsoft Windows Me (Millennium Edition)
Microsoft Windows 98 Second Edition
Also, the following software must be correctly
installed.
DirectX 6 or later (Runtime)
DirectX Media 6 Runtime
Windows Media Player 6.1 or later
Graphic display:
High Colour (16 bit) or more
Desktop resolution of 800k600 pixels or more
RAM:
32 MB or more
Free hard disk space:
At least 16 MB
≥The installer is available only in English but can be
used on operating systems using other languages.
EB.book 8 ページ 2005年4月11日 月曜日 午前11時10分

9
ArcSoft Software Suite
OS:
IBM PC/AT compatible personal computer;
Microsoft Windows XP Home Edition/Professional
Microsoft Windows 2000 Professional
Microsoft Windows Me (Millennium Edition)
Microsoft Windows 98 Second Edition
CPU:
Intel Pentium II 300 MHz or higher
Graphic display:
High Colour (16 bit) or more
Desktop resolution of 800k600 pixels or more
RAM:
64 MB or more (128 MB or more recommended)
Free hard disk space:
At least 425 MB
Other requirements:
Mouse
≥This instruction manual describes only the
procedures for installation, connection and start-
up. Please read the Help messages of your
software for how to use the ArcSoft Software Suite.
≥The software is available in English, German,
French, Italian, Spanish and Chinese.
For any information about ArcSoft Software
Suite, please contact the following Web site.
URL http://www.arcsoft.com/
EB.book 9 ページ 2005年4月11日 月曜日 午前11時10分

10
Install/Connection
Installing USB Driver
Please install USB Device Driver first before connecting the Movie
Camera to your Personal Computer with the USB Connection Cable.
1 Turn on the Personal Computer and start up
Windows.
2 Insert the supplied CD-ROM into the personal
computer’s CD-ROM drive.
≥Quit all applications.
≥The [Setup Menu] Screen appears.
3 Click [USB Driver].
≥The set up program starts running.
4 Finish installation by following the on-screen
instructions.
≥Click [Next] and proceed with installation.
≥After completing the installation, Click [Finish].
5 Click [Finish] when the [Restarting Windows]
Dialogue appears.
≥Reboot the computer to finish installing USB driver.
≥Installation continues after the computer reboots if you
selected additional software.
≥A message indicating a conflict between versions may be
displayed during the installation. This will not cause a problem.
Simply click [Yes] to proceed with the installation.
≥Depending on the OS version, illustrations and icon names may
vary.
3
5
EB.book 10 ページ 2005年4月11日 月曜日 午前11時10分

11
Installing WebCam Driver
(Windows XP only)
To upgrade Windows XP to SP1, select [Start] >> [Windows
Update].
(The computer needs to be connected to the Internet.)
Applications which are compatible with older version of DirectX may
not operate properly by installing DirectX 9.0.
1 Insert the supplied CD-ROM into the personal
computer’s CD-ROM drive.
≥Quit all applications.
≥The [Setup Menu] screen appears.
2 Click [WebCam Driver].
≥The set up program starts running.
≥When using an OS except for Windows XP SP1 or later, the
warning indication is displayed and the WebCam Driver can't
be installed.
3 You may be required to install DirectX 9.0 depending
on the environment of the personal computer. In this
case, click [Yes] to install it.
≥Reboot the computer after DirectX is installed.
≥Do not take out the CD-ROM.
4 Finish installation by following the on-screen
instructions.
≥Click [Next] and proceed with installation.
≥After completing the installation, Click [Finish].
5 Click [OK].
2
3
EB.book 11 ページ 2005年4月11日 月曜日 午前11時10分

12
Installation of SD Viewer 1.1E-SE/
DV STUDIO 3.1E-SE
1
Insert the supplied CD-ROM into the personal
computer’s CD-ROM drive.
2
Click [SD Viewer 1.1E-SE] or [DV STUDIO 3.1E-SE].
3
Click [Next].
≥After reading the displayed contents, please carry out the
installation according to instructions.
4
After the completion of setup, click on [Finish].
≥
Installation will be completed.
≥Sample data is installed concurrently with the
DV STUDIO 3.1E-SE software.
2
3
4
EB.book 12 ページ 2005年4月11日 月曜日 午前11時10分

13
Installation of ArcSoft Software Suite
1
Insert the supplied CD-ROM into the personal
computer’s CD-ROM drive.
2
Click [ArcSoft Software Suite].
3
Select the desired language on the
[Choose Setup Language] dialogue, and click [OK].
≥
Installation begins.
≥After reading the displayed contents, please carry out the
installation according to instructions.
≥If a language other than the OS language is selected, the
characters may not be presented correctly.
4
When the component selection screen is displayed,
check the software to be installed and click [Next].
5
After the completion of setup, click on [Finish].
≥
Installation will be completed.
2
3
4
EB.book 13 ページ 2005年4月11日 月曜日 午前11時10分

14
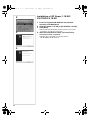
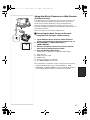
Connecting the Movie Camera to Personal
Computer
Install USB Driver before connecting.
Never connect the USB Connecting Cable until the USB Driver
is installed.
When using the Movie Camera as a Web Camera, please refer
to page 17.
For Using SD Viewer 1.1E-SE
1 Insert the Memory Card into the Movie Camera.
2 Set the Movie Camera to PC Accessing Mode.
3 Connect the Movie Camera to Personal Computer
with auxiliary USB Connection Cable.
≥It enters PC Accessing Mode.
4 Start SD Viewer 1.1E-SE. (l 15)
For Using DV STUDIO 3.1E-SE
1 Set the Movie Camera to Tape Recording Mode or
Tape Playback Mode.
≥If you wish to capture data from a tape, set the Movie Camera
to Tape Playback Mode and insert the tape.
2 Set [CAMERA] or [PLAYBACK] >> [USB FUNCTION]
>> [DV STUDIO].
3 Connect the Movie Camera to Personal Computer
with auxiliary USB Connection Cable.
4 Start DV STUDIO 3.1E-SE. (l 15)
1) Movie Camera
2) USB Connection Cable
3) USB terminal
4) Personal computer (not supplied)
≥To copy the data from the memory card to a personal computer
using Explorer, etc. instead of SD Viewer 1.1E-SE, set the Movie
Camera to PC Accessing Mode and insert the card.
≥When using the USB Connection Kit, use of the AC Adaptor is
recommended for the power supply of the Movie Camera.
3)
2)
1)
4)
EB.book 14 ページ 2005年4月11日 月曜日 午前11時10分

15
Software
Starting the Software
ª To start SD Viewer 1.1E-SE
1
Select [Start] >> [All Programs (Programs)] >>
[Panasonic] >> [SD Viewer] >> [SD Viewer].
≥If a Memory Card is already loaded, images on the Memory
Card are displayed. (If a Card is not inserted, a message is
displayed. Click [OK] to start the software.)
ª To start DV STUDIO 3.1E-SE
1
Select [Start] >> [All Programs (Programs)] >>
[Panasonic] >> [DV Studio3] >> [DV Studio3].
≥If a short-cut icon has been created on the desktop during
installation, it is also possible to start by double-clicking on the
icon.
≥Please read the PDF-based instructions for how to use it. (l 8)
ª To start software in the ArcSoft Software Suite
1
Select [Start] >> [All Programs (Programs)] >>
[ArcSoft Software Suite] >> [Panorama Maker 3] (or
[PhotoImpression 4] or [PhotoMontage 2]).
≥To refer to the HELP, click on the [ ] on the screen.
1
1
1
EB.book 15 ページ 2005年4月11日 月曜日 午前11時10分

16
Installing G.726 Audio Decoder
G.726 Audio Decoder is needed to playback MPEG4 moving picture
files* (ASF files). Install it from enclosed CD-ROM or download from
Internet. If connected to Internet, G.726 Audio Decoder is
automatically downloaded by clicking MPEG4 moving picture file*
when not installed.
*MPEG4 moving picture files can be recorded by NV-GS200.
1 Insert the supplied CD-ROM into the personal
computer’s CD-ROM drive.
2 Click [G.726 Audio Decoder].
≥The set up program starts up.
≥Quit all Windows applications.
3 Install it by following the screen.
≥Carefully read the license agreement on the
[Software License Agreement] window, and if you agree click
[Yes]. Software is not installed if [No] is clicked.
4 Click [Finish] when the [Setup Complete] Dialogue
appears.
≥Finish installing G.726 Audio Decoder by rebooting the
computer.
2
3
4
EB.book 16 ページ 2005年4月11日 月曜日 午前11時10分

17
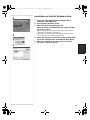
Using the Movie Camera as a Web Camera
(Windows XP only)
If the Movie Camera is connected to your personal computer, you
can send video and sound from the Movie Camera to the other
parties via the network. Audio may also be exchanged if the
personal computer is configured accordingly. (You can use the
microphone equipped with the personal computer instead of the one
on the Movie Camera.)
≥Refer to Page 7 for the minimum requirements.
ª Connecting the Movie Camera to Personal
Computer (For Using as a Web Camera)
1
Install WebCam Driver and then make the Movie
Camera recognized by a personal computer. (l 11)
2 Set [CAMERA] >> [USB FUNCTION] >>
[WEB CAMERA].
3 Connect the Movie Camera to Personal Computer
with auxiliary USB Connection Cable.
4 Start the Windows Messenger.
≥Click [Start] >> [Programs] >> [Windows Messenger].
1) Movie Camera
2) USB Connection Cable
3) USB terminal
4) Personal computer (not supplied)
5) The WEB CAMERA mode screen
≥To send pictures recorded on a tape to other personal computer
using the Windows Messenger, set [PLAYBACK] >> [USB
FUNCTION] >> [WEB CAMERA] on Tape Playback Mode before
connecting the Movie Camera to your personal computer.
WEB
5)
3)
2)
1)
4)
EB.book 17 ページ 2005年4月11日 月曜日 午前11時10分

18
ª Setting up the Windows Messenger
When starting the Windows Messenger for the first time, its setup
screen is displayed. (However, the screen is not displayed if the
Windows Messenger setup has already been done.)
1 Click [Click here to sign in].
2 Select [.NET Messaging Service] and click [OK].
3 After the .NET Passport Wizard is displayed, click
[Next].
≥Please refer to the instruction manual of your personal
computer for how to configure the audio and the microphone.
≥To communicate with persons using Windows in other
languages, setting up using alphabets or numbers is
recommended.
4 According to the procedures displayed on the
screen, continue the setup.
5 After the setup is completed, sign in and start the
Windows Messenger.
≥Windows Messenger is activated.
≥Please refer to the HELP file of the Windows Messenger for
understanding its operation.
≥During set up, if [Primary video capture device] selection
screen is displayed, [Panasonic DVC Web Camera] is
selected.
≥Send the sound by using the microphone attached to the
Personal Computer.
6 Click [Tools] >> [Audio Tuning Wizard...] on the
menu.
≥Select the camera, microphone and speaker for setting.
7 Read the message carefully and then click [Next].
1
2
3
4
7
5
6
EB.book 18 ページ 2005年4月11日 月曜日 午前11時10分

19
8 Select [USB Video Device] on [Camera] and then
click [Next].
9 Check if the video from the Movie Camera is
displayed on the screen and then click [Next].
≥The video from the Movie Camera looks horizontally reversed
on the screen.
10 Read the message carefully and then click [Next].
11 Select [DVC] on [Microphone], the speaker to be used
and then click [Next].
12 Adjust the volume of the speaker and then click
[Next].
≥You can hear the sound by clicking [Click to Test Speakers].
Adjust the adequate volume.
13 Adjust the volume of the microphone as indicated in
the message and then click [Next].
14 Click [Finish].
≥For communication, you need to set the items in [Add a Contact]
on the Windows Messenger. For details, refer to the HELP file of
the Windows Messenger.
8
9
10
11
14
12
13
EB.book 19 ページ 2005年4月11日 月曜日 午前11時10分

20
Others
To disconnect USB cable safely
If USB cable is disconnected while computer is on, error dialogue
may appear. In such case click [OK] and close the dialogue box. By
following the steps below you can disconnect the cable safely.
1 Double click the icon in task tray.
≥Hardware disconnect dialogue appears.
2 Select [Panasonic DVC USB-SERIAL Driver for
Win XX (COM X)]
1 and click [Stop].
3 Verify [Panasonic DVC USB-SERIAL Driver for
Win XX (COM X)] is selected and click [OK].
≥Click [OK], and you can safely disconnect the cable.
Note on the driver name 1 displayed
The driver name displayed will differ depending on your OS,
operating environment and the mode of the Movie Camera.
Windows XP:
(When the Movie Camera is in Tape Recording Mode or Tape
Playback Mode:)
[Panasonic DVC USB-SERIAL Driver for Win XX (COM X)]
(The numeral designation after “Win XX” will differ depending on the
OS. The numeral after “COM” will differ depending on the operating
environment of your personal computer.)
Windows XP/2000:
(When the Movie Camera is in PC Accessing Mode:)
[USB Mass Storage Device]
Windows Me:
[USB Disk]
≥If you use Windows 98SE, the icon is not displayed on the task
tray.
≥Make sure Movie Camera’s function light is off and disconnect the
cable. Please also read the Movie Camera’s Operating
Instructions.
1
2
3
1
EB.book 20 ページ 2005年4月11日 月曜日 午前11時10分
Page is loading ...
Page is loading ...
Page is loading ...
Page is loading ...
-
 1
1
-
 2
2
-
 3
3
-
 4
4
-
 5
5
-
 6
6
-
 7
7
-
 8
8
-
 9
9
-
 10
10
-
 11
11
-
 12
12
-
 13
13
-
 14
14
-
 15
15
-
 16
16
-
 17
17
-
 18
18
-
 19
19
-
 20
20
-
 21
21
-
 22
22
-
 23
23
-
 24
24


Panasonic NVGS120EB Owner's manual
- Category
- Webcams
- Type
- Owner's manual
Ask a question and I''ll find the answer in the document
Finding information in a document is now easier with AI
Related papers
-
Panasonic VWDTA29E Operating instructions
-
-
-
-
-
-
-
Panasonic DMC-LS2 User manual
-
Panasonic VWDTA29 Owner's manual
-
Other documents
-
 Mark Levinson 585 Installation guide
-
Micro Innovations IC435C User manual
-
Quantum Q-EKM User manual
-
Creative Video Blaster WebCam Go User manual
-
Utax CD 1018 Specification
-
Toshiba USB Webcam User manual
-
Philips PV-GS55 User manual
-
Roland DV-7DL G Owner's manual
-
Emprex SP110 User manual
-
D-Link DVC-2000 User manual
