Lexmark T652 Administrator's Manual

Category
Networking
Type
Administrator's Manual
Embedded Web Server — Security
Administrator's Guide
September 2014 www.lexmark.com
Model(s):
C54x, C73x, C746, C748, C792, C925, C950, E260, E360, E46x, T65x, W850, X264, X36x, X46x, X543, X544, X546, X548, X65x, X73x, X74x, X792, X796, X86x, X925, X95x
Contents
Devices covered in this guide.......................................................................4
Simplesecurity devices.............................................................................................................................4
Advancedsecurity devices........................................................................................................................4
Managing authentication and authorization methods..................................5
Understanding the basics..........................................................................................................................5
Simple-security device access controls.....................................................................................................8
Limiting access using basic security setup...............................................................................................10
Advanced-security building blocks..........................................................................................................10
Using a security template to control function access.............................................................................20
Managing certificates and other settings....................................................24
Installing a Certificate Authority certificate on the device......................................................................24
Configuring the device for certificate information..................................................................................24
Managing devices remotely........................................................................28
Using HTTPS for device management.....................................................................................................28
Setting a backup password......................................................................................................................28
Setting up SNMP......................................................................................................................................29
Configuring security audit log settings....................................................................................................30
Updating firmware..................................................................................................................................31
Managing other access functions...............................................................33
Configuring confidential printing............................................................................................................33
Setting login restrictions..........................................................................................................................34
Enabling and disabling USB host ports....................................................................................................34
Enabling the security reset jumper.........................................................................................................35
Enabling holding faxes.............................................................................................................................36
Enabling Operator Panel Lock.................................................................................................................36
Securing network connections....................................................................38
Configuring 802.1X authentication.........................................................................................................38
Configuring IP security settings...............................................................................................................39
Configuring the TCP/IP port access setting.............................................................................................41
Setting the restricted server list..............................................................................................................41
Contents 2
Securing data.............................................................................................42
Physical lock............................................................................................................................................42
Disk encryption........................................................................................................................................43
Checking disk encryption status..............................................................................................................44
Erasing settings (nonvolatile memory)..................................................................................................44
Disk file wiping........................................................................................................................................46
Erasing hard disk data.............................................................................................................................48
Outofservice wiping..............................................................................................................................49
Statement of volatility.............................................................................................................................50
Security solutions.......................................................................................52
Print Release............................................................................................................................................52
Secure Held Print Jobs.............................................................................................................................52
Card Authentication................................................................................................................................52
Smart Card authentication......................................................................................................................52
Security scenarios......................................................................................54
Scenario: Printer in a public place...........................................................................................................54
Scenario: Standalone or small office.......................................................................................................55
Scenario: Network running Active Directory...........................................................................................56
Scenario: More securityaware environment (802.1X) and SNMPv3......................................................57
Scenario: Networkbased usage restrictions using access card..............................................................57
Troubleshooting.........................................................................................59
Login troubleshooting.............................................................................................................................59
LDAP troubleshooting.............................................................................................................................62
Held Jobs/Print Release Lite troubleshooting.........................................................................................63
Appendix....................................................................................................66
Glossary of Security Terms.........................................................................76
Index..........................................................................................................77
Contents 3
Devices covered in this guide
There are two levels of security supported based on the product definition. For a complete list of available functionality,
see
“Authentication and authorization” on page 5.
Simplesecurity devices
C540, C543, C544, C546, C746, E260d, E260dn, E360d, E360dn, X264dn, X363dn, X364dn, X364dw, X543, X544, X546dtn
Advancedsecurity devices
C73x, C748, C792, C925, C950, E460dn, E460dw, E462dtn, T650, T652, T654, T656, W850, X464de, X466, X548de,
X548dte, X65x, X73x, X74x, X792, X796, X86x, X925, X950, X952, X954
Devices covered in this guide 4
Managing authentication and authorization
methods
Understanding the basics
Securing a printer through the Embedded Web Server involves combining one or more components to define who is
allowed to use the printer, and which functions those users are allowed to access. Available components include
Authentication, Authorization, and Groups.
Create a plan that identifies who the users will be and what they will need to do before configuring printer security.
Items to consider might include:
The location of the printer and whether authorized persons have access to that area
Sensitive documents that will be sent to or stored on the printer
Information security policies of your organization
Authentication and authorization
Authentication is the method by which a system securely identifies a user.
Authorization specifies which functions are available to a user who has been authenticated by the system. This set of
authorized functions is also referred to as “permissions.”
There are two levels of security that are supported based on the product definition. Simple security only supports
internal device authentication and authorization methods. More advanced security permits internal and external
authentication and authorization as well as additional restriction capability for management, function, and solution
access. Advanced security is supported for those devices that permit the installation of additional solutions to the
device.
Simple security uses Panel PIN Protect to restrict user access to the printer control panel and Web Page Password
Protect to restrict administrator access to the device. For more information, see
“Creating a PIN and applying access
control restriction” on page 9 and “Creating a Web page password and applying access control restrictions” on
page 8.
Advancedsecurity devices support the following:
PIN and password restrictions in addition to the other authentication and authorization specified
Multiple local authentication functions that support PIN, password, and user namepassword combinations
Standard network authentication through LDAP, LDAP+GSSAPI, Kerberos, and Active Directory
Authorization can be specified individually or by groups (either local or network). Devices that support advanced-level
security are capable of running installed solutions, which permits usage of card readers to provide advanced two-factor
authentication.
Managing authentication and authorization methods 5
Function Simplesecurity devices Advancedsecurity devices
Panel PIN Protect
X
PIN Protection X
Web Page Password Protect X
Password Protection X
Internal Accounts (Username and Username/Password) X
Groups (internal) X
LDAP X
LDAP+GSSAPI X
Kerberos 5 X
Active Directory
*
X
Limited access controls X
Access controls (complete) X
Security Templates X
Basic Security Setup X
= Supported
X = Not supported
*
Available only in some printer models
The device handles authentication and authorization using one or more of the following, also referred to as building
blocks:
PIN or Panel PIN Protect
Password or Web Page Password Protect
Internal Accounts
LDAP
LDAP+GSSAPI
Kerberos 5 (used only with LDAP+GSSAPI and the Smart Card Authentication application)
Active Directory (available only in some printer models)
To provide simple security, use either PIN and Password, or Panel PIN Protect and Web Page Password Protect. This
type of security might be appropriate if a printer is located in a lobby or other public area of a business, so that only
employees who know the password and PIN are able to use the printer. Passwords and PINs are considered less secure
than other building blocks because they do not require a user to be identified or authorized.
Note: The device default settings do not contain any authentication or authorization building blocks, so everyone
has unrestricted access to the device.
Managing authentication and authorization methods 6
Groups
Administrators can designate up to 32 groups to be used in association with either the Internal accounts or LDAP/LDAP
+GSSAPI building blocks. To ensure device security, groups are used to identify sets of users needing access to similar
functions. For example, in Company A, employees in the warehouse do not need to print in color, but employees in
sales and marketing use color every day. In this scenario, you can create a “Warehouse” group and a “Sales and
Marketing” group.
Access Controls
By default, all device menus, settings, and functions come with no security enabled. Access controls (also referred to
in some devices as “Function Access Controls”) are used to manage access to specific menus and functions or to disable
them entirely. Access controls can be set using a password, PIN, or security template. The number of functions that
can be controlled varies depending on the type of device, but in some multifunction printers, over 40 individual menus
and functions can be protected.
Note: For a list of individual access controls and what they do, see
“Appendix C: Access controls” on page 66.
Security Templates
Some scenarios call for only limited security, such as PINprotected access to common device functions, while others
require tighter security and rolebased restrictions. Individually, building blocks, groups, and access controls may not
meet the needs of a complex security environment. In order to accommodate users in different groups needing access
to a common set of functions such as printing, copying, and faxing, administrators must be able to combine these
components in ways that give all users the functions they need, while restricting other functions to only authorized
users.
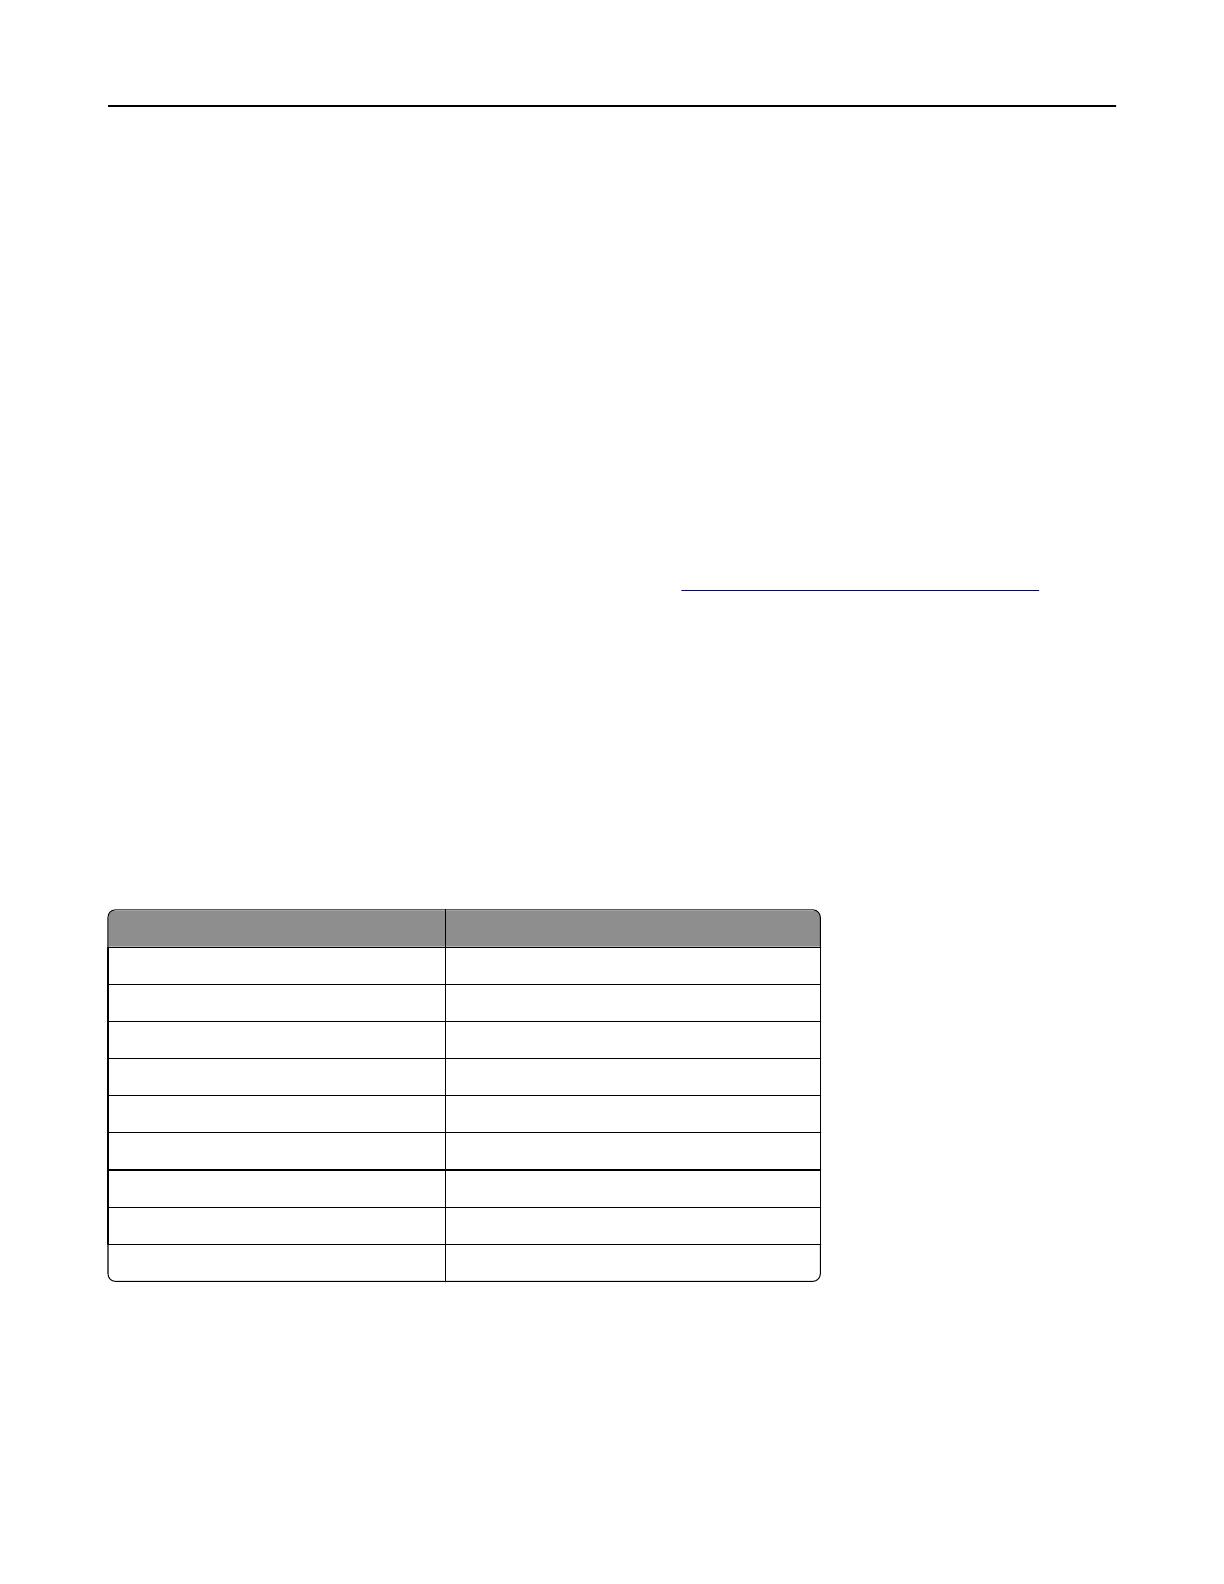
A security template is a profile constructed using a building block, or certain building blocks paired with one or more
groups. How they are combined determines the type of security created:
Building block Type of security
Internal Accounts Authentication only
Internal Accounts with Groups Authentication and authorization
Kerberos 5 Authentication only
LDAP Authentication only
LDAP with Groups Authentication and authorization
LDAP+GSSAPI Authentication only
LDAP+GSSAPI with Groups Authentication and authorization
Password Authorization only
PIN Authorization only
Each device can support up to 140 security templates, allowing administrators to create very specific profiles for each
access control.
Accessing the Embedded Web Server
Open a Web browser, and then type the printer IP address.
Managing authentication and authorization methods 7
To obtain the printer IP address, print a network setup page, and then locate the TCP/IP section. For more information
on printing a network setup page, see the printer User’s Guide.
We recommend using HTTPS when connecting to the Embedded Web Server to prevent network viewing of the data
being entered. For example, type HTTPS://ip_address.
Note: When you access the Embedded Web Server, a warning message may appear. Proceed by continuing to
connect to the device IP address.
Simple-security device access controls
Creating a Web page password and applying access control restrictions
For simplesecurity devices, Web page access control is limited to creating a password and applying access restrictions
through Web Page Password Protect on the device EWS.
Note: This feature is available only in simplesecurity devices.
1 From the Embedded Web Server, click Settings > Security > Web Page Password Protect.
2 Create a user password.
Depending on your printer, do either of the following:
Under “Basic Security Setup: Create User Password,” type a password in the appropriate field, retype the
password to confirm it, and then click Modify.
Select Create User Password, type a password in the appropriate field, retype the password to confirm it, and
then click Submit.
3 Create an administrator password.
Depending on your printer, do either of the following:
Under “Basic Security Setup: Create Admin Password,” type a password in the appropriate field, retype the
password to confirm it, and then click Modify.
Select Create Advanced Password, type a password in the appropriate field, retype the password to confirm it,
and then click Submit.
Notes:
Functions or settings protected by a userlevel password can be accessed using any administratorlevel
password.
To delete a password, click Delete Entry.
4 From the function dropdown menu, select one of the following security template settings:
Admin Password Protected
Admin and User Password Protected
No Security
Disable
Note: This setting is available only in some functions.
5 Click Submit.
Managing authentication and authorization methods 8
Creating a PIN and applying access control restriction
For simplesecurity devices, control panel access control is limited to creating a PIN and applying access restrictions
through the Panel PIN Protect security control.
Typically, personal identification numbers (PINs) are used to control access to a device or specific device menus. PINs
can also be required when retrieving a held print, copy, or fax job.
Note: This feature is available only in simplesecurity devices.
1 From the Embedded Web Server, click Settings > Security > Panel PIN Protect.
2 Depending on your printer, do either of the following:
Creating a user and administrator PIN and applying restrictions
a
Under “Basic Security Setup: Create User PIN,” enter a PIN in the appropriate field, and then reenter the PIN to
confirm it.
b Under “Basic Security Setup: Create Admin PIN,” enter a PIN in the appropriate field, and then reenter the PIN
to confirm it.
Note: Functions or settings protected by a user PIN can be accessed using any administrator PIN.
c Click Modify, and then select one of the following security template settings for each function:
Admin Password Protected
Admin and User Password Protected
No Security
Disable
Note: This setting is available only in some functions.
Creating a PIN and applying restrictions
a
Under Create PIN, enter a PIN in the appropriate field, and then reenter the PIN to confirm it.
b Under Panel PIN Protect, select the functions that you want to protect.
3 Click Submit.
Managing authentication and authorization methods 9
Limiting access using basic security setup
Use Basic Security Setup to limit access to the Embedded Web Server settings and the configuration menus on the
printer control panel. This selection allows the definition of simple internal device security authentication methods.
Notes:
This feature is available only in advancedsecurity printer models as a simplesecurity access restriction method.
The device default settings do not contain any authentication or authorization building blocks, so everyone has
unrestricted access to the Embedded Web Server.
Applying basic security setup
1 From the Embedded Web Server, click Settings > Security > Security Setup.
2 Under Basic Security Setup, from the Authentication Type menu, select one of the following:
PIN—Enter a PIN number. Each PIN must be 4–16 digits in length.
Password—Type the password. Each password must have a unique name containing up to 128 UTF8 characters.
User ID and Password—Type a unique user ID, and then type the password. Each password must have a unique
name containing up to 128 UTF8 characters.
3 Click Apply Basic Security Setup.
Note: Applying this setup may overwrite a previous configuration.
The new settings are submitted. The next time you access Security Setup, you will be required to enter your
authentication credentials.
Modifying or removing basic security setup
1 From the Embedded Web Server, click Settings > Security > Security Setup.
2 Enter your authentication credentials to access Security Setup.
3 Under Modify or Remove Basic Security Setup, enter your new authentication credentials.
4 Click Modify Basic Security Setup to enter your new authentication credentials to access Security Setup, or click
Remove Basic Security Setup to remove all authentication requirements.
Advanced-security building blocks
To define the authentication required when accessing device functions and menus, create and configure a login method
(building blocks) first.
Advancedsecurity building blocks used in security templates are found under “Configure a Building Block.”
Configuring advanced building blocks from the control panel
We recommend configuring security setup using the device Embedded Web Server. These steps in configuring security
setup are the same for all advancedsecurity devices.
Managing authentication and authorization methods 10
When configuring from the control panel, the steps may vary depending on your printer model. For example, for devices
with a large touch screen, you can access the security setup by doing the following:
1 Navigate to the menu screen.
2 Touch Security > Edit Security Setups.
Creating a password building block for advanced security setup
Note: This feature is available only in advancedsecurity devices.
1 From the Embedded Web Server, click Settings > Security > Security Setup.
2 Under Advanced Security Setup, click Password.
3 Under Manage Passwords, select Add a Password.
4 In the Setup Name field, type a name for the password.
Note: Each password must have a unique name containing up to 128 UTF8 characters. For example, “Copy
Lockout Password.”
5 Type a password in the appropriate field, and then retype the password to confirm it.
6 If the password is used as the administrator password, then select Admin Password.
Note: Functions or settings protected by a userlevel password can be accessed using any administratorlevel
password.
7 Click Submit.
Notes:
To edit a password, select a password from the list, and then modify the settings.
To delete a password, select a password from the list, and then click Delete Entry.
To delete all passwords in the list, click Delete List.
Creating a PIN building block for advanced security setup
Note: This feature is available only in advancedsecurity devices.
Personal identification numbers (PINs) are used to control access to specific device menus or to a device itself. PINs can
also be required when retrieving a held print, copy, or fax job.
1 From the Embedded Web Server, click Settings > Security > Security Setup.
2 Under Advanced Security Setup, click PIN > Add a PIN.
3 In the Setup Name field, type the name of the PIN configuration.
Note: Each PIN must have a unique name containing up to 128 UTF8 characters. For example, “Copy Lockout
PIN.
4 Type a PIN in the appropriate field, and then retype the PIN to confirm it.
5 If the PIN is used as the Administrator PIN, then click Admin PIN.
6 Click Submit.
Managing authentication and authorization methods 11
Changing the PIN length
1
Click Settings > Security > Miscellaneous Security Settings.
2 Enter a number in the Minimum PIN Length field.
3 Click Submit.
Setting up internal accounts
Note: This feature is available only in advancedsecurity devices.
Administrators can configure one internal account building block per supported device. Each internal account building
block can include a maximum of 750 user accounts and 32 user groups.
You can use this building block by itself in a security template to provide authenticationlevel security, or with other
groups to provide both authentication and authorization.
Defining user groups
Before you begin, do the following:
Create a list of all the users in the group.
Identify the device functions needed for all users and for specific users.
Note: When a security template is assigned to a group, a role is created. Users can be assigned to more than one
group or role.
Using the Embedded Web Server
1 From the Embedded Web Server, click Settings > Security > Security Setup.
2 Under Advanced Security Setup, click Internal Accounts > Setup groups for use with internal accounts.
3 Type the group name.
Note: Group names can contain up to 128 UTF8 characters.
4 Click Add.
Using the control panel
Note: These instructions apply only in printer models with a touchscreen display.
1 Navigate to the menu screen.
2 Touch Security > Edit Security Setups > Edit Building Blocks > Internal Accounts > General Settings > Groups for
Internal Accounts > Add Entry.
3 In the Name field, type a group name.
4 Touch Done.
Creating user accounts
Note: We recommend creating groups before creating a user account.
Managing authentication and authorization methods 12
Using the Embedded Web Server
1 Click Settings > Security > Security Setup.
2 Under Advanced Security Setup, click Internal Accounts > Add an Internal Account.
3 Provide the information needed for each account:
Account Name—Type the account name of the user. For example, “Jack Smith.” You can use up to 164 UTF8
characters.
User ID—Type an ID for the account. For example, “jsmith.” You can use up to 128 UTF8 characters.
Password—Type a password of between 8 and 128 characters.
Reenter Password—Type the password entered in the preceding field.
Email—Type the e-mail address of the user. For eample, “jsmith@company.com.”
Groups—Select the groups to which the account belongs. Hold down the Ctrl key to select multiple groups for
the account.
4 Click Submit.
Using the control panel
Note: These instructions apply only in printer models with a touchscreen display.
1 Navigate to the menu screen.
2 Touch Security > Edit Security Setups > Edit Building Blocks > Internal Accounts > General Settings.
3 Set Required User Credentials to User ID and password, and then touch Submit.
4 Select Manage Internal Accounts > Add Entry.
5 Type the user account name, and then touch Done.
6 Type a user ID for the account, and then touch Done.
7 Type a password for the account, and then touch Done.
8 Retype the password, and then touch Done.
9 Type the user e-mail address, and then touch Done.
10 From the Set Groups screen, select the groups to which the account belongs.
11 Touch Done.
Specifying settings for internal accounts
Internal account settings determine the information an administrator submits when creating a new internal account
and the information a user submits when authenticating.
Custom Building Block Name—Type a unique name for this building block.
Require Email Address—Select this box to make the e-mail address a required field when creating new internal
accounts.
Required User Credentials—Select either User ID or User ID and password to specify the information a user must
submit when authenticating.
Managing authentication and authorization methods 13
Connecting your printer to an Active Directory domain
Using Active Directory simplifies network authentication and authorization setup, automatically creating and
configuring LDAP+GSSAPI and Kerberos authentication building blocks.
Notes:
This feature is available only in some printer models.
Use HTTPS to protect the credentials that are used to join the printer to the domain.
1 From the Embedded Web Server, click Settings > Security > Security Setup > Active Directory > Join an Active
Directory Domain.
2 Provide the information needed for each account:
Realm—Type the name of the realm that you are using.
Domain Controllers—Type the domain controllers that you are using. Separate each domain controller with a
comma.
User ID—Type the user name of the network administrator or any individual who has rights to add computers
to a network.
Password—Type the password of the network administrator or the individual who has rights to add computers
to a network.
Note: Passwords are casesensitive and are not cached by the device.
Organizational Unit—If necessary, type the name of your organizational unit.
3 Click Submit.
Note: If the configuration is unsuccessful, a big red X mark appears. A message appears if the configuration is
not successful.
4 Click Manage Security Templates to use the Active Directory information to complete your security setup.
If you want to review or make some small modifications to the LDAP+GSSAPI building block, then click Return to
Security Setup and do the following:
a Under Advanced Security Setup, click Kerberos 5.
b Click View File to open the Kerberos Config file that was created using the Active Directory setup.
c Review the file, and then click the back button of the browser.
d Click Return to Security Setup, and then click LDAP+GSSAPI.
e Under LDAP+GSSAPI Setups, click the building block that was created by the Active Directory Setup process.
Note: By default, the building block name is the realm name, and the server address field is the domain
controller name.
f If necessary, change some of the building block settings depending on your environment, including the following:
Server Port—The standard port for LDAP is 389. Another common port is 3268, but this port is used only
for Global Catalog servers in Active Directory. If applicable, change the port to 3268 to speed up the querying
process.
Search Base—This setting indicates the location in the directory tree where the device starts searching. At
the most basic we recommend specifying the root of the directory (such as “dc=company,dc=com”).
Managing authentication and authorization methods 14
Use Kerberos Service Ticket—This advanced setup, otherwise known as SPNEGO, is the session ticket that
a user uses to log in to a computer. We recommend leaving this setting unchanged.
Use Active Directory Device Credentials—This option lets you use the service account that is created in
Active Directory. If you want to use an existing service account or user credential (advanced setup), then
clear this check box.
g If necessary, adjust the following settings:
Group Search Base—This setting indicates the location in the directory tree where the device starts searching
for a particular group. If the environment requires user or groupbased authorization, then leave this field
blank.
Short name for group—This setting is a name that a user can use to associate to a group identifier.
Group Identifier—This setting is a container or organizational unit that a device searches to validate whether
an authenticated user is a member of an authorized group.
h Click Modify.
Using LDAP
Note: This feature is available only in advancedsecurity devices.
Lightweight Directory Access Protocol (LDAP) is a standardsbased, crossplatform, extensible protocol that runs directly
on top of the TCP/IP layer. It is used to access information stored in a specially organized information directory. It can
interact with many different kinds of databases without special integration, making it more flexible than other
authentication methods.
Notes:
Supported devices can store a maximum of five unique LDAP configurations. Each configuration must have a
unique name.
Administrators can create up to 32 userdefined groups that apply to each unique LDAP configuration.
LDAP relies on an external server for authentication. If an outage prevents the printer from communicating with
the server, users will not be able to access protected device functions.
To help prevent unauthorized access, log out from the printer after each session.
Adding an LDAP setup
1
From the Embedded Web Server, click Settings > Security > Security Setup.
2 Under Advanced Security Setup, click LDAP.
3 Click Add an LDAP Setup.
The LDAP Server Setup dialog is divided into four parts:
General Information
Setup Name—This name is used to identify each particular LDAP Server Setup when creating security templates.
Server Address—Type the IP address or the host name of the LDAP server where the authentication is
performed.
Server Port—The Embedded Web Server communicates with the LDAP server using this port. The default LDAP
port is 389.
Use SSL/TLS—From the dropdown menu, select None, SSL/TLS (Secure Sockets Layer/Transport Layer
Security), or TLS.
Managing authentication and authorization methods 15
Userid Attribute—Type either cn (common name), uid, userid, or userdefined.
Mail Attribute—Type a maximum of 48 characters to identify email addresses. The default value is “mail.”
Full Name Attribute—Type a maximum of 48 characters. The default value is “cn.”
Search Base—The node in the LDAP server where user accounts reside. You can enter multiple search bases,
separated by commas.
Note: A search base consists of multiple attributes separated by commas, such as cn (common name), ou
(organizational unit), o (organization), c (country), and dc (domain).
Search Timeout—Enter a value from 5 to 30 seconds or 5 to 300 seconds, depending on your printer model.
Required User Input—Select either User ID and password or User ID to specify which credentials a user must
provide when attempting to access a function protected by the LDAP building block. User ID and password is
the default setting.
Device Credentials
Use Active Directory Device Credentials—Allow user credentials and group designations to be pulled from the
existing network comparable to other network services.
Anonymous LDAP Bind—Bind the Embedded Web Server with the LDAP server anonymously, and make the
Distinguished Name and MFP Password fields unavailable.
Distinguished Name—Type the distinguished name of the print server or servers.
MFP’s Password—Type the password for the print servers.
Search specific object classes
Person—Allow the “person” object class to be searched.
Custom Object Class—Allow the custom search object class to be searched. You can define up to three custom
search object classes.
LDAP Group Names
Administrators can associate as many as 32 named groups stored on the LDAP server by entering identifiers for
those groups under the Group Search Base list. Both the Short name for group and Group Identifier must be
provided.
When creating security templates, you can pick groups from this setup for controlling access to device functions.
4 Click Submit to save the changes, or Cancel to return to previous values.
Editing an LDAP setup
1
From the Embedded Web Server, click Settings > Security > Security Setup.
2 Under Advanced Security Setup, click LDAP.
3 Click a setup from the list.
4 Make any needed changes in the LDAP Configuration dialog.
5 Click Modify to save the changes, or click Cancel to return to previous values.
Deleting an LDAP setup
1
From the Embedded Web Server, click Settings > Security > Security Setup.
2 Under Advanced Security Setup, click LDAP.
Managing authentication and authorization methods 16
3 Select a setup from the list.
4 Click Delete Entry to remove the profile, or Cancel to return to previous values.
Notes:
Click Delete List to delete all LDAP setups in the list.
An LDAP building block cannot be deleted if it is being used as part of a security template.
Validating an LDAP setup
1
From the Embedded Web Server, click Settings > Security > Security Setup.
2 Under Advanced Security Setup, click LDAP.
3 Click Test LDAP Authentication Setup next to the setup you want to test.
Using LDAP+GSSAPI
Note: This feature is available only in advancedsecurity devices.
Some administrators prefer authenticating to an LDAP server using the more secure Generic Security Services
Application Programming Interface (GSSAPI) instead of simple LDAP authentication. Instead of authenticating directly
with the LDAP server, the user first authenticates with a Kerberos server to obtain a Kerberos “ticket.” This ticket is
presented to the LDAP server using the GSSAPI protocol for access. LDAP+GSSAPI is typically used for networks running
Active Directory.
Notes:
LDAP+GSSAPI requires Kerberos 5 to be configured.
Supported devices can store a maximum of five unique LDAP+GSSAPI configurations. Each configuration must
have a unique name.
LDAP relies on an external server for authentication. If an outage prevents the printer from communicating with
the server, users will not be able to access protected device functions.
To help prevent unauthorized access, log out from the printer after each session.
Adding an LDAP+GSSAPI setup
1
From the Embedded Web Server, click Settings > Security > Security Setup.
2 Under Advanced Security Setup, click LDAP+GSSAPI.
3 Click Add an LDAP+GSSAPI Setup. The setup dialog is divided into four parts:
General Information
Setup Name—This name is used to identify each particular LDAP+GSSAPI Server Setup when creating security
templates.
Server Address—Type the IP address or the host name of the LDAP server where the authentication is
performed.
Server Port—The port used by the Embedded Web Server to communicate with the LDAP server. The default
LDAP port is 389.
Use SSL/TLS—From the dropdown menu, select None, SSL/TLS (Secure Sockets Layer/Transport Layer
Security), or TLS.
Managing authentication and authorization methods 17
Userid Attribute—Type either cn (common name), uid, userid, or userdefined.
Mail Attribute—Type a maximum of 48 characters to identify email addresses. The default value is “mail.”
Full Name AttributeType a maximum of 48 characters.
Search Base—The node in the LDAP server where user accounts reside. You can enter multiple search bases,
separated by commas.
Note: A Search Base consists of multiple attributes separated by commas, such as cn (common name), ou
(organizational unit), o (organization), c (country), and dc (domain).
Search Timeout—Enter a value from 5 to 30 seconds.
Use Kerberos Service Ticket—If this is selected, then a Kerberos ticket is presented to the LDAP server using
the GSSAPI protocol to obtain access.
Device Credentials
Use Active Directory Device Credentials—Allow user credentials and group designations to be pulled from the
existing network comparable to other network services.
MFP Kerberos Username—Type the distinguished name of the print server or servers.
MFP’s Password—Type the Kerberos password for the print servers.
Search specific object classes
Person—Allow the “person” object class to be searched.
Custom Object Class—Allow the custom search object class to be searched. You can define up to three custom
search object classes.
LDAP Group Names
Configure Groups—You can associate up to 32 named groups stored on the LDAP server by entering identifiers
for those groups under the Group Search Base list. Both the Short name for group and Group Identifier must
be provided.
When creating security templates, you can pick groups from this setup for controlling access to device functions.
4 Click Submit to save the changes, or Cancel to return to previous values.
Editing an LDAP+GSSAPI setup
1
From the Embedded Web Server, click Settings > Security > Security Setup.
2 Under Advanced Security Setup, click LDAP+GSSAPI.
3 Select a setup from the list.
4 Make any needed changes in the LDAP Configuration dialog.
5 Click Modify to save the changes, or Cancel to return to previous values.
Deleting an LDAP+GSSAPI setup
1
From the Embedded Web Server, click Settings > Security > Security Setup.
2 Under Advanced Security Setup, click LDAP+GSSAPI.
3 Select a setup from the list.
4 Click Delete Entry to remove the profile, or Cancel to return to previous values.
Managing authentication and authorization methods 18
Notes:
Click Delete List to delete all LDAP+GSSAPI setups in the list.
An LDAP+GSSAPI building block cannot be deleted if it is being used as part of a security template.
Configuring Kerberos 5 for use with LDAP+GSSAPI
Note: This feature is available only in advancedsecurity devices.
Kerberos 5 can be used by itself for user authentication, but it is most often used with the LDAP+GSSAPI building block.
While only one Kerberos configuration file (krb5.conf) can be stored on a supported device, that file can apply to multiple
realms and Kerberos Domain Controllers (KDCs). An administrator must anticipate the different types of authentication
requests that the Kerberos server might receive, and configure the krb5.conf file to handle these requests.
Notes:
Because only one krb5.conf file is used, uploading or resubmitting a simple Kerberos file will overwrite the
configuration file.
The krb5.conf file can specify a default realm. But if a realm is not specified in the configuration file, then the
first realm specified is used as the default realm for authentication.
Some types of authentication relies on an external server. If an outage prevents the printer from communicating
with the server, users will not be able to access protected device functions.
To help prevent unauthorized access, log out from the printer after each session.
Creating a simple Kerberos configuration file
1
From the Embedded Web Server, click Settings > Security > Security Setup.
2 Under Advanced Security Setup, click Kerberos 5.
3 Type the KDC (Key Distribution Center) address or host name in the KDC Address field.
4 Enter the number of the port (between 1 and 65535) used by the Kerberos server in the KDC Port field. The default
port number is 88.
5 Type the realm (or domain) used by the Kerberos server in the Realm field.
6 Click Submit to save the information as a krb5.conf file on the selected device, or Reset Form to reset the fields
and start again.
Uploading a Kerberos configuration file
1
From the Embedded Web Server, click Settings > Security > Security Setup.
2 Under Advanced Security Setup, click Kerberos 5.
3 Click Browse, and then select the krb5.conf file.
4 Click Submit to upload the krb5.conf file to the selected device.
The Embedded Web Server automatically tests the krb5.conf file to verify that it is functional.
Notes:
To reset the field and search for a new configuration file, click Reset Form.
To remove the Kerberos configuration file from the selected device, click Delete File.
To view the Kerberos configuration file for the selected device, click View File.
Managing authentication and authorization methods 19
To verify that the Kerberos configuration file for the selected device is functional, click Test Setup.
Setting date and time
Kerberos servers require key requests to have a recent time stamp (usually within 300 seconds). Therefore, the printer
clock must be in sync or closely aligned with the KDC system clock. You can update the printer clock settings manually.
You can also set it to use Network Time Protocol (NTP) to sync automatically with a clock that is also used by the Kerberos
server.
Note: We recommend using an NTP server.
1 Access the date and time settings.
Do either of the following:
From the Embedded Web Server, click Settings > Security > Set Date and Time.
From the home screen, navigate to the menu screen, and then click Security > Set Date and Time.
Note: When accessing the menu screen, log in as an administrator.
2 To manage the settings manually, enter the correct date and time in YYYY-MM-DD HH:MM format, and then select
a time zone from the dropdown menu.
Notes:
Entering manual settings automatically disables the use of NTP.
If you select (UTC+user) Custom from the Time Zone list, then you need to configure more settings under
Custom Time Zone Setup.
3 If daylight saving time (DST) is observed in your area, then select Automatically Observe DST.
4 If you are located in a nonstandard time zone or an area that observes an alternate DST calendar, then adjust the
Custom Time Zone Setup settings.
5 If you want to sync to an NTP server rather than update the clock settings manually, then select Enable NTP. Then
type the IP address or host name of the NTP server.
6 If the NTP server requires authentication, then select the preferred method from the Authentication menu. Then
click Install MD5 key or Install Autokey IFF params to browse to the file containing the matching NTP authentication.
7 Click Submit to save the changes, or click Reset Form to restore the default settings.
Using a security template to control function access
Note: This feature is available only in advancedsecurity devices.
Each access control can be set to require no security (default) or to use any of the building blocks in the dropdown
menu for that function. Only one method of security can be assigned to each access control.
Managing authentication and authorization methods 20
  • Page 1 1
  • Page 2 2
  • Page 3 3
  • Page 4 4
  • Page 5 5
  • Page 6 6
  • Page 7 7
  • Page 8 8
  • Page 9 9
  • Page 10 10
  • Page 11 11
  • Page 12 12
  • Page 13 13
  • Page 14 14
  • Page 15 15
  • Page 16 16
  • Page 17 17
  • Page 18 18
  • Page 19 19
  • Page 20 20
  • Page 21 21
  • Page 22 22
  • Page 23 23
  • Page 24 24
  • Page 25 25
  • Page 26 26
  • Page 27 27
  • Page 28 28
  • Page 29 29
  • Page 30 30
  • Page 31 31
  • Page 32 32
  • Page 33 33
  • Page 34 34
  • Page 35 35
  • Page 36 36
  • Page 37 37
  • Page 38 38
  • Page 39 39
  • Page 40 40
  • Page 41 41
  • Page 42 42
  • Page 43 43
  • Page 44 44
  • Page 45 45
  • Page 46 46
  • Page 47 47
  • Page 48 48
  • Page 49 49
  • Page 50 50
  • Page 51 51
  • Page 52 52
  • Page 53 53
  • Page 54 54
  • Page 55 55
  • Page 56 56
  • Page 57 57
  • Page 58 58
  • Page 59 59
  • Page 60 60
  • Page 61 61
  • Page 62 62
  • Page 63 63
  • Page 64 64
  • Page 65 65
  • Page 66 66
  • Page 67 67
  • Page 68 68
  • Page 69 69
  • Page 70 70
  • Page 71 71
  • Page 72 72
  • Page 73 73
  • Page 74 74
  • Page 75 75
  • Page 76 76
  • Page 77 77
  • Page 78 78
  • Page 79 79

Lexmark T652 Administrator's Manual

Category
Networking
Type
Administrator's Manual

Ask a question and I''ll find the answer in the document

Finding information in a document is now easier with AI