
© Copyright Westomatic Vending Services Limited 2014
All rights reserved. No part of this publication may be reproduced, stored in a retrieval system, or transmitted, in any form or
by any means, electrical, mechanical, photocopying, recording or otherwise, without prior permission from Westomatic
Vending Services Limited.
PAGE 1/44
Sigma Simplicity
Operator & Installation Manual

© Copyright Westomatic Vending Services Limited 2014
All rights reserved. No part of this publication may be reproduced, stored in a retrieval system, or transmitted, in any form or
by any means, electrical, mechanical, photocopying, recording or otherwise, without prior permission from Westomatic
Vending Services Limited.
PAGE 2/44
Sigma Simplicity Operator contents
3 Safety
4 Preface, concepts and definitions
5 Liability & warranty - spare parts
6 Responsibility of the operating company
7 Inspection upon delivery
8 Introduction
9 Sigma Simplicity external layout at a glance
10 Sigma Simplicity description of the internal parts
11 Description of internal door at a glance
12 Cup unit
13 Cleaning external door & daily cleaning summary
14 Weekly cleaning summary & ingredient canisters
15 Whipper assembly & overflow bucket
16 How to dismantle the bean to cup & fresh brew coffee
brewer for cleaning
17 Clean the nylon filter belts every 1250 vends & flush buttons
18 Dispense head & dispense pipes
19 Sanitising the syrup lines
20 Door open software menus
21 Retrieve the audit via USB
22 Door open software menus
Published by:
Westomatic Vending Services Ltd
Units 7-8 Forde Court, Forde Road
Devon TQ12 4BT
United Kingdom
www.westomatic.com
Sales: +44 (0) 1626 323100
Westomatic Vending Services Ltd. reserves the right to change the product specifications at any
time. While every effort has been made to ensure that the information in this publication is
accurate, Westomatic Vending Services Ltd disclaims any liability for any direct or indirect losses
howsoever caused arising out of use or reliance on this information.
Information contained herein is correct at time of print:
4

© Copyright Westomatic Vending Services Limited 2014
All rights reserved. No part of this publication may be reproduced, stored in a retrieval system, or transmitted, in any form or
by any means, electrical, mechanical, photocopying, recording or otherwise, without prior permission from Westomatic
Vending Services Limited.
PAGE 3/44
Safety
This document is intended for use as a reference book for qualified Operators and Service
engineers. It is recommended that any person undertaking installation and/or service activity
on this machine has previously attended a formal Westomatic training course specific to this
vending machine type.
This appliance is not intended for use by persons (including children) with reduced physical,
sensory or mental capabilities, or lack of experience and knowledge, unless they have been
given supervision or instruction concerning use of the appliance by a person responsible for
their safety.
Children under 8 yrs old must be supervised to ensure they do not play with the machine.
Installation and service activity, including replacement of the mains cable, on this vending
machine should only be undertaken by a competent person who is fully conversant with the
potential dangers of working on live electrical equipment and mains pressure water systems.
Extension cables or longer mains leads must not be used to power this vending machine.
The mains lead should be kept away from hot surfaces and sharp edges.
Each new vending machine is supplied with a new mains water inlet hose. Do not reuse an
existing or old water hose.
Prior to any service activity, switch off and isolate the water and electrical supply. If in doubt
refer to BS7671 for safe isolation procedures. Servicing of live equipment must never be
undertaken.
Use insulated tools and insulated probes on test equipment. HSE guidance notes 38 provides
guidance on the selection of suitable test probes, leads, lamps, voltage indicating devices and
other measurement equipment used by electricians when working on or investigating power
circuits.
There are no user serviceable parts inside this vending machine.
The Sigma Simplicity machine must be cleaned on a regular basis (refer to the section within
this document on how to clean your machine). A water jet must not be used.
1

© Copyright Westomatic Vending Services Limited 2014
All rights reserved. No part of this publication may be reproduced, stored in a retrieval system, or transmitted, in any form or
by any means, electrical, mechanical, photocopying, recording or otherwise, without prior permission from Westomatic
Vending Services Limited.
PAGE 4/44
Preface
This document is intended to be used as a reference book for qualified Installation Engineers and
Operators to be able to install, commission, programme, maintain and to carry out basic fault
finding diagnostics on the Sigma Simplicity vending machine.
Information on the operation, the use of and cleaning of the machine can be found in the
operational and cleaning sections of this manual.
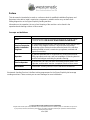
Concepts and definitions
Description
Definition
User
The person who uses the machine exclusively for vending a drink.
The user will have NO access to the inside of the machines.
Service Technician
and/or Installation
Engineer
A competent professional who has been trained on the machine and
is aware of the dangers involved. They must have a thorough
knowledge of the electronics and mechanical parts of the machine
and be qualified to install, commission, programme, maintain and
repair the machines.
Operator
A qualified individual who is responsible for cleaning the machine,
filling ingredients and cups, and has knowledge of removing brewers
and the total whipper assembly for periodic cleaning.
Service Operator
A person who can carry out basic fault finding and the duties of an
Operator, and therefore must be competent in both of these areas.
Westomatic
Westomatic Vending Services Ltd, the machine manufacturer.
Westomatic Vending Services Ltd offers training programmes for the Sigma Simplicity hot beverage
vending machines. Please contact your account manager for more information.
1

© Copyright Westomatic Vending Services Limited 2014
All rights reserved. No part of this publication may be reproduced, stored in a retrieval system, or transmitted, in any form or
by any means, electrical, mechanical, photocopying, recording or otherwise, without prior permission from Westomatic
Vending Services Limited.
PAGE 5/44
Liability & warranty
General
All details and indications for the installation and cleaning of this vending machine have been made
under consideration of our knowledge and experiences collected up to now.
Westomatic Vending Services Ltd. reserves the right to make technical changes to this machine
type without notice as a result of continuous product development.
Text translations are made to the best of Westomatic‟s knowledge. However, we exclude any
liability for translation errors. The English version of the operation instructions shall prevail for
warranty purposes.
The presented texts and drawings do not necessarily correspond to the scope of delivery. The
drawings and graphics are not to scale.
The instructions contained herein must be carefully read before machine installation or operation is
started.
Westomatic Vending Services Ltd does not bear liability for any damage or disturbance resulting
from non-observance of the instructions in this manual.
It is strictly forbidden to make this manual or the operator instructions accessible to any third party.
Non-observance will result in a claim for damages.
Spare parts
Only genuine, original Westomatic spare parts should be used when servicing this machine.
ATTENTION!
Faulty or defective non-Westomatic spare parts may lead to incorrect machine operation or
damage. Where non-Westomatic spare parts are used, all obligations of Westomatic
Vending Services Ltd. such as warranties, service contracts etc. are void without prior
notice and agreement.
Part sales tel: +44 (0) 1626 323100
1

© Copyright Westomatic Vending Services Limited 2014
All rights reserved. No part of this publication may be reproduced, stored in a retrieval system, or transmitted, in any form or
by any means, electrical, mechanical, photocopying, recording or otherwise, without prior permission from Westomatic
Vending Services Limited.
PAGE 6/44
Responsibility of the operating company
In order to avoid faulty machine operation and ensure safe Operator/cleaning practices, this user
manual and the associated operator guide should be stored inside the purpose built document
holder located within the vending machine and be accessible to all persons involved in the machine
installation, operation, maintenance and cleaning at any time.
This vending machine must only be operated within a safe and reliable environment.
The information in this document relating to machine operational safety is based upon the essential
health & safety requirements in force within the European Union at the time of publication. During
the operating life of the machine it is the responsibility of the operating company to assess any
differences in any new legislation and update the operational safety instructions along with their
own safe working practices accordingly. Outside the European Union, the regulations valid at the
place of installation and the regional regulations therein must be observed.
Appropriate use
Westomatic Vending Services Ltd. will only undertake machine operational liability when the
machine is used appropriately and in accordance with the operating instructions to perform
assembly, operational, servicing / maintenance and cleaning activities.
NOTE:
Any machine usage outside of the above scope is forbidden and is defined as ‘not
appropriate’. In this situation, any entitlement to damages against Westomatic Vending
Services Ltd. and / or representatives because of inappropriate use will be excluded. The
operating company alone is liable for all damages arising from inappropriate use.
ATTENTION!
The operating company is obliged to install the necessary safety precautions to ensure the vending
machine can be stopped immediately in the event of danger or disturbance.

© Copyright Westomatic Vending Services Limited 2014
All rights reserved. No part of this publication may be reproduced, stored in a retrieval system, or transmitted, in any form or
by any means, electrical, mechanical, photocopying, recording or otherwise, without prior permission from Westomatic
Vending Services Limited.
PAGE 7/44
Inspection upon delivery
Once your machine has been delivered, please immediately check for completeness and possible
damage caused by transportation.
In case of externally recognisable transport damages, please do not accept delivery or only under
reservation. Note the extent of any damage on the transport documents/delivery note of the
forwarding agent. If required, please contact the Westomatic helpline as soon as possible to
register any product damage as a customer complaint can only be asserted within the currently
valid time limits.
Helpline Tel: +44 (0) 1626 323100

© Copyright Westomatic Vending Services Limited 2014
All rights reserved. No part of this publication may be reproduced, stored in a retrieval system, or transmitted, in any form or
by any means, electrical, mechanical, photocopying, recording or otherwise, without prior permission from Westomatic
Vending Services Limited.
PAGE 8/44
Introduction
The information held within this section has been compiled by the manufacturer to provide
recommended guidelines to operator personnel and is intended to be used in conjunction with any
existing operating procedures your company uses.
Hygiene
In accordance with the food hygiene (Amendment) regulations 1990 (SI 1990 No. 1431) and in
compliance with the local public health authority requirements, it is the responsibility of the machine
Operator to keep this machine maintained in a clean condition to ensure the highest standards of
hygiene needed to prevent the formation of bacteria. A regular, systematic method of cleaning will
help achieve this condition.
A high standard of personal hygiene is essential for a vending machine Operator.
Clothing must be neat and clean and loose hair should be tied back accordingly. Hands and
fingernails must be washed thoroughly before work commences, particularly after each visit to the
toilet area. Jewellery should be kept to a minimum and preferably removed during any cleaning
operations.
An operative who is suffering from cuts, sores or any form of illness must inform their immediate
superior at once and must not come into contact with this vending machine, ingredient products,
cups or any other machine related items. The operative must not resume work until authorised to
do so by their immediate superior.
Important safeguards
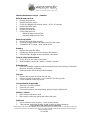
1. Read these instructions before attempting to clean or refill the machine.
2. Do not attempt to operate the machine if any part is damaged. If either damage or a fault is
suspected contact your nearest available Service Engineer for assistance.
3. Never immerse the machine in water or any other liquid.
4. Never clean the machine with a water jet.
5. Always switch off and disconnect the machine from the mains electricity supply before
cleaning and servicing.
2

© Copyright Westomatic Vending Services Limited 2014
All rights reserved. No part of this publication may be reproduced, stored in a retrieval system, or transmitted, in any form or
by any means, electrical, mechanical, photocopying, recording or otherwise, without prior permission from Westomatic
Vending Services Limited.
PAGE 9/44
4
10
l
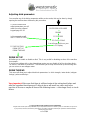
Up scroll button
Down scroll button
Back out,
cancel &
save
Enter
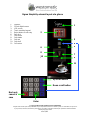
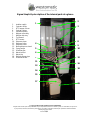
Sigma Simplicity external layout at a glance
1. Graphics
2. 12 inch digital screen
3. LCD screen
4. Touch sensitive keypad
5. Reject button & coin entry
6. Door lock
7. Cup sensor
8. Cup station
9. Cup rest
10. Cup shelf
11. Coin return
1
2
8
3
5
6
7
9
11

© Copyright Westomatic Vending Services Limited 2014
All rights reserved. No part of this publication may be reproduced, stored in a retrieval system, or transmitted, in any form or
by any means, electrical, mechanical, photocopying, recording or otherwise, without prior permission from Westomatic
Vending Services Limited.
PAGE 10/44
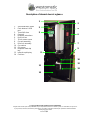
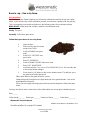
Sigma Simplicity description of the internal parts at a glance
1. Isolation switch
2. Canisters & lids
3. BTC hopper & lever
4. Canister chutes
5. Extraction plates
6. Whipper assembly
7. Whipper drip tray
8. Tea brewer
9. BTC brewer
10. Dispense pipes
11. Dispense strap
12. Dispense head
13. Moving dispense head
14. Syrup pumps
15. Overflow pipe
16. Waste bucket
17. Waste trip
18. Boiler drainage pipe
19. Overflow bucket
2
1
3
4
5
6
7
8
9
10
11
12
13
16
14
15
17
18
19

© Copyright Westomatic Vending Services Limited 2014
All rights reserved. No part of this publication may be reproduced, stored in a retrieval system, or transmitted, in any form or
by any means, electrical, mechanical, photocopying, recording or otherwise, without prior permission from Westomatic
Vending Services Limited.
PAGE 11/44
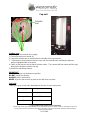
Description of internal door at a glance
1. Vend mode door switch
2. Flush buttons & USB
port
3. Turret lid & claw
4. Carousel
5. Dispense instructions
6. Door lock bar
7. 12 inch menu screen
8. Cup unit assembly
9. Door lock assembly
10. Cup catcher
11. Cup sensor
12. Dispense head drip
tray
13. Internal cup drip tray
14. Cash box
1
2
5
8
3
4
6
7
9
10
11
12
13
14

© Copyright Westomatic Vending Services Limited 2014
All rights reserved. No part of this publication may be reproduced, stored in a retrieval system, or transmitted, in any form or
by any means, electrical, mechanical, photocopying, recording or otherwise, without prior permission from Westomatic
Vending Services Limited.
PAGE 12/44
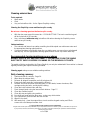
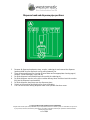
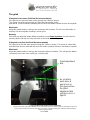
Cup unit
*
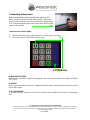
Loading cups
To correctly fill the carousel when empty:-
1. Ensure the machine is turned off.
2. Ensure the actuator arm is positioned on the outside of the cup carousel.
3. * With the door open load one sleeve of cups into the carousel tubes avoiding the dispense
position highlighted with a red arrow.
4. Switch on the machine via the mains isolation switch. The carousel will then rotate until the cups
drop into the dispense position cup ring.
5. Now fill the remaining columns.
IMPORTANT
DO NOT load cups into the dispense position.
DO NOT overfill the columns.
ALWAYS refit the carousel lid.
NEVER try to turn the carousel by hand as this will cause cup jams.
Cup units
There are 3 types of cup units, dependant on the size of cup is being used.
Cup Type
Cup Rim Diameter
7oz tall
70 mm
7oz squat / 9oz
73 mm
12oz
80 mm
3
2
Actuator
arm

© Copyright Westomatic Vending Services Limited 2014
All rights reserved. No part of this publication may be reproduced, stored in a retrieval system, or transmitted, in any form or
by any means, electrical, mechanical, photocopying, recording or otherwise, without prior permission from Westomatic
Vending Services Limited.
PAGE 13/44
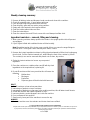
Cleaning external door
Tools required:
Warm water
Cloth
Very soft microfibre cloth - for the Sigma Simplicity overlay.
Cleaning the Simplicity screen and front acrylic overlay
Do not use a cleaning agent on the front acrylic overlay.
With the door open press this menu tab – CLEAN BUTTONS. The touch sensitive keypad
will be locked out for 30 seconds.
Use a soft damp (with water only) microfibre cloth when cleaning the Simplicity screen
and front acrylic overlay.
Cabinet and door
The external and internal cup station moulding should be wiped over with warm water and
the appropriate cleaning agent/sanitiser.
Care must be taken to thoroughly clean the cup station area, cup sensor lens, splashguard
and drip tray. Use the appropriate cleaning agent/sanitiser for the cup station area only.
Recommended cleaning/maintenance procedures
ALWAYS SWITCH OFF AND DISCONNECT THE MACHINE FROM THE MAINS
ELECTRICITY SUPPLY BEFORE CLEANING OR THE REMOVAL OF PARTS.
The quality of drinks produced by the Sigma Simplicity can only be maintained if the machine is cleaned
regularly following the required cleaning schedule.
Cleaning agent: always use a suitable vending sanitiser.
Daily cleaning summary
1. Shake and refill all canisters - Page 14.
2. Wipe down the whipper deck.
3. Remove all whipper assemblies and refit a hygiene kit.
4. Empty and clean waste bin (underneath the brewer).
5. Remove and clean all brewer assembly parts i.e. flexi-bowls, brewer chambers, filter
carriages and nylon belts, and dry before refitting.
6. Clean the inside cabinet sides and floor.
7. Flush through bowls using the internal flush buttons - Page 17.
8. Clean the overflow bucket.
9. Clean drip tray and grille using sanitiser.
10. Run drink test vends with the door open - using every drink station.
11. Run a payvend or freevend with the door closed.
12. Wipe the cup shelf.
13. With water only - clean the external door, touch sensitive keypad overlay and 12inch
screen with a soft damp microfibre cloth.

© Copyright Westomatic Vending Services Limited 2014
All rights reserved. No part of this publication may be reproduced, stored in a retrieval system, or transmitted, in any form or
by any means, electrical, mechanical, photocopying, recording or otherwise, without prior permission from Westomatic
Vending Services Limited.
PAGE 14/44
Weekly cleaning summary
1. Remove all delivery tubes and dispense head nozzles and clean with a sanitiser.
2. Check all assembly parts - if worn replace with new.
3. Flush through bowls using internal flush switches.
4. Clean drip tray, grille and cup catcher using sanitiser.
5. Empty and clean waste bin and overflow bucket.
6. Clean the inside cabinet sides and floor.
7. Clean the internal door.
8. Clean the external door and 12inch screen with a soft damp microfibre cloth.
Ingredient canisters – removal, filling and cleaning.
1. When removing canisters always position the chutes in the upright position this will prevent
any spillages.
2. If your Sigma is fitted with ventilated chutes refit horizontally.
Note! Repetitive turning of the chutes over a period of time can cause the auger fittings to
become loose. Turning the chutes manually also makes a mess.
3. Remove the instant ingredient canisters by tilting them backwards to lift the front locating peg
from its hole. Pull the canister towards you, whilst lifting the front of the canister by 10mm.
The canister(s) can now be removed and placed onto a clean, dry surface.
4. Shake the instant canisters to loosen any compacted
ingredient.
5. Place the canisters on a stable surface and fill with dry fresh
ingredients to the required level, replacing lid.
6. Do not fill canisters whilst in any machine this will cause the
following:
Malfunctions
Blockages
Explosions
Dispense pipes will be blocked with beans etc.
DON’T
1. Overfill canisters on low volume machines.
2. Leave bags of product on top of canisters.
3. Leave bags of product or syrup open in the vending machine; this will attract small insects.
4. Overfill the machine with spare ingredient or cups.
5. Leave any debris, product wrappers etc inside the machine.
6. Force components into position.
7. Stand on any lower part of the machine to access the top.
ALWAYS
1. Flush the machine once the canisters and chutes have been refitted.

© Copyright Westomatic Vending Services Limited 2014
All rights reserved. No part of this publication may be reproduced, stored in a retrieval system, or transmitted, in any form or
by any means, electrical, mechanical, photocopying, recording or otherwise, without prior permission from Westomatic
Vending Services Limited.
PAGE 15/44
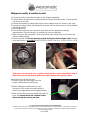
Whipper assembly & overflow bucket
1. Remove the silicon rubber delivery tubes to the whipper assemblies.
2. Remove all the mixing bowls by releasing the base clip anti-clockwise to the 7 o‟clock position
(ref: picture on the left).
3. Remove all impellors by pulling them away from the whipper base (ref: picture on the right).
4: Remove the whipper bases by rotating the clip further anti-clockwise (to the 6 o‟clock position)
and pulling forward.
5. Refit a hygiene kit.
6. Place all removed items into a bucket of warm water and an appropriate cleaning
agent/sanitiser. Clean thoroughly, rinse and dry for your next machine.
7. Make sure you fit the parts/pipes in exactly the same order, failing to do so will result in the
machine malfunctioning.
8. Refit the impellor with the dot marrying up with the flat part of the whipper shaft. Failing to
do so will result in a circuit fault 14-20 or 14-21 or 14-22 or 14-23 or 14-24 or 14-25 or 14-34.
If any parts are scratched, worn, cracked or badly stained, replace immediately. Any of
these can cause the machine to malfunction which leads to an Engineer callout.
Overflow bucket and door drip tray.
1. Remove, empty and thoroughly clean the
brewer overflow bucket and drip tray.
2. Before refitting the overflow bucket, clean
the interior of the cabinet thoroughly with hot
water and an appropriate cleaning agent/sanitiser.
3. Make sure the brass pressure weight along with all
pipes are situated inside the overflow bucket
before leaving the vending machine.

© Copyright Westomatic Vending Services Limited 2014
All rights reserved. No part of this publication may be reproduced, stored in a retrieval system, or transmitted, in any form or
by any means, electrical, mechanical, photocopying, recording or otherwise, without prior permission from Westomatic
Vending Services Limited.
PAGE 16/44
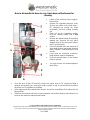
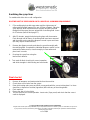
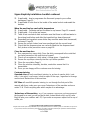
How to dismantle the bean to cup / fresh brew coffee brewer for
cleaning
Switch off the electrical power supply to
the machine.
Remove the ingredient dispense chute
(A) from the outlet of the whole bean /
FB canister(s) by turning the chute
horizontally and then pulling towards
you.
Clean off any dry ingredient residue
from the canister outlets with a dry
scraper.
Remove the dispense pipe (B) by pulling
towards you. Remove the one piece
whipper bowl (D) by turning the release
arm (C) anticlockwise.
Place all removed items into a bucket of
warm water and an appropriate cleaning
agent / sanitiser. Clean thoroughly, rinse
and dry.
If any parts are scratched, cracked or
badly stained, replace immediately.
Re-fit all removed items in the reverse
order to removal.
You must remove all canisters/hoppers
when filling.
Close the shut off flap (E) and then remove the whole bean or FB canister by lifting it
upwards and towards you, ensuring a hand is placed on top of the canister lid to prevent
any beans or FB ingredient from spilling.
Upon replacement of the whole bean canister, ensure the shut off flap (E) is returned to the
open position.
Switch on the machine and test for correct operation via the flush buttons and followed by a
series of test vends for that particular brewer.
F
G
H
I
J

© Copyright Westomatic Vending Services Limited 2014
All rights reserved. No part of this publication may be reproduced, stored in a retrieval system, or transmitted, in any form or
by any means, electrical, mechanical, photocopying, recording or otherwise, without prior permission from Westomatic
Vending Services Limited.
PAGE 17/44
Clean the nylon filter belts and brewer parts every 1250 vends
1. Remove the silicon dispense pipe from the brewer carriage (F) page 16.
2. Unlock the brewer carriage by sliding the lever left (G - behind pipe) page 16, and pull the
whole assembly forward to remove.
3. Remove the air pipe (H) page 16.
4. Tilt the air pinch arm to the 12 o‟clock left-hand position (I) page 16.
5. Remove with great care the brewer cylinder, followed by the flexi-bowl (J) page 16.
6. Clean thoroughly with appropriate cleaning agent/sanitiser, rinse and dry.
7. Remove the nylon filter belt from the brewer carriage by pressing in the belt lever spring (G)
and using the locking plate to hold the lever in place. Remove the nylon belt and clean
thoroughly, rinse and dry.
8. Re-fit all removed items.
9. NOTE: When refitting the brewer carriage, ensure the locking plate is correctly positioned to
ensure the carriage is securely located.
10. Flush machine and check for leaks.
Every 7000 vends you must replace the nylon filter belt, orange gasket and brewer pot o-
ring here’s how:-
This does not apply to an all instant machine.
1. Remove, clean and refit all brewer parts as described above and on page 16.
2. Before refitting the black brewer pot replace the o-ring on the bottom.
3. Remove the brewer carriage as described above.
4. Remove the nylon filter belt from the brewer carriage by pressing in the belt retainer spring
and using the locking plate to hold the lever (G - behind pipe - page 16) in place. Discard the
old belt and also the orange gasket underneath the belt. Now fit a new orange gasket along
with a new nylon belt ensuring that the belt is fitted underneath the scraper.
5. Now reset the nylon filter count by pressing enter twice on either the “BREWER1 BELT
CHANGED” or the “BREWER2 BELT CHANGED” menu in the door open mode, dependent
on the machine model.
How to use the flush buttons
1. With the door open, switch on the machine.
2. Ensure waste bucket is positioned under the dispense nozzles.
3. Flush the machine by pressing the appropriate internal flush button situated on the processor
cover next to the cup carousel.

© Copyright Westomatic Vending Services Limited 2014
All rights reserved. No part of this publication may be reproduced, stored in a retrieval system, or transmitted, in any form or
by any means, electrical, mechanical, photocopying, recording or otherwise, without prior permission from Westomatic
Vending Services Limited.
PAGE 18/44
Dispense head and dispense pipe positions
1. Remove all dispense head parts, strap, nozzles, retaining pin and remove the dispense
head manifold from the dispense arm by pulling towards you.
2. Place all removed items into a bucket of warm water and an appropriate cleaning agent /
sanitiser. Clean thoroughly, rinse and dry.
3. Re-fit the dispense head manifold and secure with the retaining pin.
4. Re-fit the dispense nozzles to the silicon rubber delivery tubes and then insert the nozzles
fully into the dispense head manifold.
5. Re-fit the dispense head strap over the dispense pipes.
6. Switch on the machine flush and test for correct operation.
7. You can also test the moving dispense head in the operator functions menu.

© Copyright Westomatic Vending Services Limited 2014
All rights reserved. No part of this publication may be reproduced, stored in a retrieval system, or transmitted, in any form or
by any means, electrical, mechanical, photocopying, recording or otherwise, without prior permission from Westomatic
Vending Services Limited.
PAGE 19/44
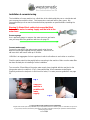
Sanitising the syrup lines
For models with either hot or cold configuration.
ROUTINE MUST BE PERFORMED ONCE A MONTH AS A MINIMUM REQUIREMENT.
1. Fill a sanitising bucket with warm water and the right amount of
milton sterilising fluid (approx 55cc per 4.5 litres of water). Place the
syrup dip tube ends into the bucket of solution and flush the fluid
through until the syrup lines are primed full of sterilising fluid. Leave
for 15 minutes (how to flush page 17).
2. After 15 minutes, empty the bucket and replace with clean water.
Flush through until all traces of sterilising fluid have been removed
and the water coming out of the dispense nozzle is pure and clean
(this may require several flushes).
3. Remove the dispense nozzle and clean the spout thoroughly with
the sterilising fluid. If required the individual dispense spouts can be
removed for better access, rinse thoroughly in clean water and
place back in nozzle.
4. Re-prime the syrup lines using the
internal flush buttons.
6. Test vend all drinks checking for correct operation
and drink strengths in drink testing and vend mode.
Final checks!
1. Remove all wrappers and waste materials from the machine.
2. Check there are no leaks from the syrups.
3. Enter drink testing make sure each drink corresponds with the correct mixing bowl. i.e. there
should be no deposits of residue (ingredient) left inside any of the mixing bowls.
4. Flush machine.
5. Ensure the door is locked tight.
6. Test the machine for correct operation. Insert coins (if pay vend) and check that the correct
credit is displayed.

© Copyright Westomatic Vending Services Limited 2014
All rights reserved. No part of this publication may be reproduced, stored in a retrieval system, or transmitted, in any form or
by any means, electrical, mechanical, photocopying, recording or otherwise, without prior permission from Westomatic
Vending Services Limited.
PAGE 20/44
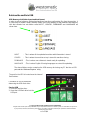
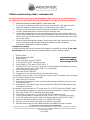
Operator level door open software menu and their meanings
To access the door open Operator menus simply open the machine door.
The menus on the LCD screen allow you to access files such as the audit. Simply press enter
(Page 9) twice and the information will be displayed on the screen.
DISPLAY AUDIT
Audit mode provides the ability to view the overall total drink volume and values dispensed.
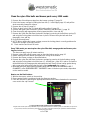
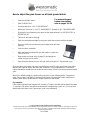
READ AUDIT FROM M/C via USB
Your line manager/supervisor will need to provide you with the
following tool:
1 x USB flash drive (2GB minimum requirement).
The USB flash drive must be preloaded with a Sigma folder and sub-
folders listed below prior to downloading audit information from the
Sigma Simplicity machine.
4
4
Page is loading ...
Page is loading ...
Page is loading ...
Page is loading ...
Page is loading ...
Page is loading ...
Page is loading ...
Page is loading ...
Page is loading ...
Page is loading ...
Page is loading ...
Page is loading ...
Page is loading ...
Page is loading ...
Page is loading ...
Page is loading ...
Page is loading ...
Page is loading ...
Page is loading ...
Page is loading ...
Page is loading ...
Page is loading ...
Page is loading ...
Page is loading ...
-
 1
1
-
 2
2
-
 3
3
-
 4
4
-
 5
5
-
 6
6
-
 7
7
-
 8
8
-
 9
9
-
 10
10
-
 11
11
-
 12
12
-
 13
13
-
 14
14
-
 15
15
-
 16
16
-
 17
17
-
 18
18
-
 19
19
-
 20
20
-
 21
21
-
 22
22
-
 23
23
-
 24
24
-
 25
25
-
 26
26
-
 27
27
-
 28
28
-
 29
29
-
 30
30
-
 31
31
-
 32
32
-
 33
33
-
 34
34
-
 35
35
-
 36
36
-
 37
37
-
 38
38
-
 39
39
-
 40
40
-
 41
41
-
 42
42
-
 43
43
-
 44
44


Westomatic Sigma Operator's & Installation Manual
- Type
- Operator's & Installation Manual
- This manual is also suitable for
Ask a question and I''ll find the answer in the document
Finding information in a document is now easier with AI
Related papers
-
Westomatic Primo Compact Dual Grinder Fresh Milk Coffee Machine User manual
-
Westomatic Primo Compact User manual
-
Westomatic primo MAXI User manual
-
-
 Westomatic Solo Encore Technical Manual
-
 Westomatic Primo Mini/Midi Coffee Machine User manual
-
Westomatic Primo Mini Midi Coffee Machine Operating instructions
-
-
 Westomatic H2O Hydration Station Ultimate Water Bottle Refill System Installation guide
-
 Westomatic primo MIDI User manual


Other documents
-
Maestro MR453 User manual
-
OXO POP Medium Jar Operating instructions
-
-
 de Jong Duke Filter Fresh User manual
-
Coffee Queen Bean to cup User manual
-
 Stentorfield Revive User manual
-
Bartscher 190990 User manual
-
GE GXK285JBL User guide
-
-
 Newco CAP-3 Owner's manual


