Page is loading ...

OWNER’S MANUAL
FOR FENDER
®
ACOUSTIC GUITARS
This manual downloaded from http://www.manualowl.com

Si necesita acceder a los manuales de instrucciones de las guitarras en Español,
visite nuestra página web http://www.fender.com/support
Vous trouverez le mode d’emploi des guitares Fender® en français sur le site
Internet http://www.fender.com/support
Il manuale d’uso delle Chitarre Fender in Italiano è disponibile nel nostro sito web
http://www.fender.com/support
Das Fender Bedienungshandbuch für Gitarren in Deutsch, nden Sie auf unserer
Website http://www.fender.com/support
Se desejar ler o manual do proprietário Fender para guitarras em português, por
favor, visite nosso website em http://www.fender.com/support
日本語のギター用 Fender オーナーズ・マニュアルは、弊社のウェブサイト
http://www.fender.com/support をご参照ください。
Languages
1
This manual downloaded from http://www.manualowl.com

2
This manual downloaded from http://www.manualowl.com

Thank you for choosing a Fender
®
acoustic guitar.
We believe it will give you many years of pleasure.
Please take a few moments to read through this
booklet. In it you will find answers to many of your
questions and other invaluable information about
care and maintenance for your guitar.
Welcome to the Fender
®
Family
3
This manual downloaded from http://www.manualowl.com

4
This manual downloaded from http://www.manualowl.com

18
Fender’s rich acoustic guitar history dates all the way back to the early 1960s, when the company injected
a much-needed and thoroughly modern dose of youthfully exuberant Southern California sun-and-fun
culture into the somewhat stodgy old world of acoustic guitar design.
After the phenomenal success of Fender electric guitars, basses and ampliers, beginning in the late 1940s
and throughout the rocking and rolling ’50s, it seemed only natural that the growing Fender company would
turn its attention to the acoustic guitar world. Folk music was booming in the late 1950s and early 1960s,
and acoustic guitars remained an integral part of rock ‘n’ roll, country and pop records, so Fender’s eventual
involvement with the instrument type seemed a foregone conclusion.
At that time, a Fender acoustic guitar was not one for which you dressed formally or that you displayed as
a valuable relic. It wasn’t for the hushed classical concert stage. A Fender acoustic guitar was one that you
threw in the backseat and headed for the beach to join the gang. They were for the coffee house and the
campre. Fender acoustics were good-sounding, cool-looking instruments that were
a blast to play, as seen in the classic Fender advertisements of the ’60s era. Fender
acoustic guitars were fun.
And back in the day, some pretty heavy hitters used them, from
rock strummers to country pickers—artists such as Johnny
Cash, George Jones, Buck Owens and even the king of rock
‘n’ roll himself, Elvis Presley.
Fender began advertising its acoustic guitar line in 1963 at
the National Association of Music Merchants (NAMM) trade
show. They were attractive at-top instruments with unusual
features such as bolt-on necks (like Fender electric guitars),
The History of Fender
®
Acoustic Guitars …
5
History
This manual downloaded from http://www.manualowl.com

Stratocaster® guitar headstocks, screw-attached pickguards and internal body
trusses that took stress off the top and back, enabling lighter tops with smaller
braces. Earliest models included the King, the Concert, the Classic, the Folk and
the Palomino.
Fender continued to create many new stellar models through the
mid-’60s and was recognized for exceptional innovation with the
development of the Wildwood guitars, which were introduced in 1966.
Based on the earlier King at-top model, it came in a variety of dramatic
dyed-wood colors. The Wildwood colors were created by injecting
colored dyes directly into growing beech trees many years before the
wood was actually harvested. The resulting guitars were striking in their
vibrant colors and depth of tone.
Through the 1970s and 1980s, Fender continued to produce a variety of outstanding acoustic instruments, but it was in the mid-
’80s and through the ’90s that Fender is credited with spawning a wide-ranging and popular resurgence in acoustic guitar playing
that harkens back to those early-’60s sun-and-fun acoustic models. Innovation continued in the 2000s with the creation of the new
California™ and the Classic Design series guitars.
Today, in a direct line with our rich heritage, Fender offers a
comprehensive range of acoustic instruments for everyone from
professionals to hobbyists and beginners, in models that include full-
size dreadnoughts, jumbos, orchestra and concert models; from
nylon-string classical guitars to full-scale acoustic bass guitars; and
from distinctive artist signature models to exotic limited editions.
Fender continues to be a leader in innovation, quality and service.
Thank you again for purchasing a new Fender acoustic guitar.
6
History
This manual downloaded from http://www.manualowl.com

guitar
body
end pin or end
pin jack
(depending on model)
top
side
bridge
saddle
binding
bridge pins
preamp
(depending on model)
soundhole
rosette
pickguard
Whether you know the names of all the parts or not, anatomical
Anatomy 101
7
Anatomy
This manual downloaded from http://www.manualowl.com

headstock
strap button
(depending on model)
nut
fret
ngerboard
tuning machines
(keys)
tuning machine/key
post (shaft/capstan)
position inlay
cutaway
(depending on model)
neck
heel
string
charts are always cool. Here’s the basic anatomy of a guitar:
8
Anatomy
This manual downloaded from http://www.manualowl.com

The Effects of Temperature, Humidity and
Moisture Content in the Wood
Wood is an organic, porous material that either absorbs moisture from the air, or evaporates it out into the air,
depending on the humidity and temperature of the environment surrounding it. Like a sponge, when wood absorbs
moisture, it swells up, and conversely, when it dries out, it shrinks.
Acoustic guitars, with their broad surfaces of relatively thin solid and laminated woods, are extremely sensitive to
environmental changes in temperature and humidity and as such, require ongoing attention to maintain them in their
optimum playing condition.
One of the greatest threats to the integrity of fine wood guitars is a lack of attention to maintaining the instruments in
the appropriate temperature and humidity range that will ensure the ideal moisture content in the wood.
The collective experience of all of the major acoustic guitar manufacturers today, has demonstrated that the ideal
temperature to preserve the integrity of solid wood acoustic guitars is “room temperature”, which is about 70 degrees
F (20.5 C). The ideal relative humidity is between 40% and 50%.
The moisture content of wood is determined by the relative humidity and temperature of the surrounding atmosphere.
Relative humidity is expressed as a percentage of air’s capability to hold moisture. For example, 30% relative humidity
means that the air is holding 30% of the moisture it could possibly hold at a given temperature.
9
Info
This manual downloaded from http://www.manualowl.com

The moisture content for wood and the relative humidity for air are measured quite differently. In wood, a 6% moisture content
is present at 30% relative humidity and 72 degrees F temperature, (about 22.2 degrees C).
If the relative humidity is low and the moisture in the wood is allowed to evaporate out, it can cause shrinkage, splitting and
cracking, no matter how long the wood may have been previously aged. It also can cause the top and back to shrink, making
the string action low.
Conversely, high humidity can cause softening of the glues used in the construction of the instrument which will compromise
the structural integrity of the guitar. Also, as the woods absorb moisture from the air, it can cause the top and back, especially
on flat-top and classical guitars, to expand and rise - making string action high and play difficult.
10
Info
This manual downloaded from http://www.manualowl.com

The most important thing you can do to ensure the structural integrity of your instrument over time, is to maintain the
moisture content of the wood consistently at the appropriate level.
It is 100% certain that an acoustic guitar will be exposed to varied and multiple environmental/climatic conditions from
the time it leaves the maker’s hands until it reaches its ultimate owner. The environment where you live may be a
complete polar opposite from that of the climate where the instrument was produced. It is of paramount importance to
evaluate, measure and stabilize the moisture content in the wood as soon as possible after bringing an instrument into
a new environment.
In the winter, the forced air systems used to heat most homes can drive temperatures up and humidity levels
dangerously low for guitars. Extremely low levels of humidity will result in low moisture content in the wood and
ultimately, damage to the guitar. A good measure of protection against drying out your guitar is to use a room
humidifier to maintain the ideal relative humidity of between 40% and 50%.
When the instrument is not in use, we recommend that you keep it in its case with a hygrometer to monitor the
humidity level and when appropriate, use one of the small guitar humidifiers such as “Dampit”, available from most
instrument dealers. Do not leave the guitar out of the case for long periods near a heating vent, radiator or in direct
sunlight near a window. Do not leave your guitar in the trunk or the cabin of a car for long periods and keep it away
from excessive heat and cold.
Please Note: Damage caused to the guitar as the result of exposure to variations in temperature and/or
humidity will not be covered under the Fender warranty.
Protection from Temperature and Humidity
1311
Info
This manual downloaded from http://www.manualowl.com

Cracks in the Wood
Cracks in the wood are typically caused by changes in temperature and humidity; usually higher temperatures and
low humidity. While a crack may initially be alarming, if it is taken care of promptly it shouldn’t be a cause for undue
concern. Cracks may easily be repaired without compromising structural or tonal integrity.
If the crack is in the top, near the bridge, loosen all the strings to reduce tension, (which could potentially exacerbate
the problem), and have the crack repaired as soon as you can.
Please note: Cracks in the wood, which occur as the result of exposure to temperature or humidity changes,
or excessively low moisture content in the wood will not be covered under the Fender warranty.
12
Info
This manual downloaded from http://www.manualowl.com

Finish checking, (very small splits in the finish), usually occurs in winter and is typically the result of exposing a cold
instrument to the shock of warmer temperatures. For example: transporting an instrument in a cold automobile and then
bringing it inside and opening it up in a much warmer environment.
All of the materials that make up a guitar expand and contract with changes in temperature and humidity, and they do so
at different rates. Wood expands as it warms, and it does so, faster than the finish. When this happens, the finish may
split and fracture in minute lines over the wood.
Although it does not affect the tone of the instrument, finish checking affects the aesthetic appearance. By avoiding sud-
den temperature and humidity changes, you should be able to minimize finish checking problems, however, a certain
amount of checking is natural over the years as an instrument ages.
When an instrument has been brought into a warmer building after it has been out in the cold, always allow plenty of
time for it to become acclimated to the new temperature before you open the case.
Please Note: Finish checking which, occurs as the result of exposure to temperature or humidity changes over
time, will not be covered under the Fender warranty.
Finish Checking
13
Info
This manual downloaded from http://www.manualowl.com

14
This manual downloaded from http://www.manualowl.com

illustration 2
Open-back Tuners
illustration 1
Sealed Die-Cast Tuners
Fender uses only the finest tuning machines. Our die-cast machines
(Illustration 1), are pre-lubricated and sealed, and as such, do not
require periodic oiling for smooth operation. A small tension adjust-
ment screw is located at the end of each die-cast tuner’s button that
also holds the button in place. If the tension is too loose, the machine
may slip and go out of tune easily. If it is too tight, the button may
become very difficult to turn. Make sure that the adjustment is firm,
but not too tight.
Open-back tuners (Illustration 2), do not have a tension adjustment
screw, and will benefit over time with a small drop of lightweight machine
oil on each gear, to ensure smooth positive action.
3-In-Line tuners (Illustration 3), are typically used on classical/nylon
string guitars, and will also benefit from a small drop of lightweight
machine oil from time to time.
Tuning Machines
1515
Set-up
This manual downloaded from http://www.manualowl.com

illustration 3
Nylon String 3-In-Line Tuners
Strings that have not been secured properly to the tuning
machine post and stretched during installation may easily
slip and go out of tune. This problem is commonly misdiag-
nosed as an issue with the tuners. Check your string instal-
lation carefully and stretch the string during installation and
tuning. See illustrations 4, 5, and 6 on pages 22 & 23.
The Nickel, Chrome and Gold plating on Fender tuning ma-
chines may become degraded from environmental humidity
and the acids and oils in that are present finger sweat.
Wipe the machines off with a soft dry cloth after each use
to preserve their appearance and function.
Please Note: Plating degradation, which is caused naturally by humidity and the acids and oils in finger sweat
over time, is considered normal wear and tear and will not be covered under the Fender warranty.
16
Set-up
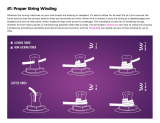
This manual downloaded from http://www.manualowl.com

Something as simple as how you wind the strings onto the tuning machine posts when changing your strings, will
determine tuning stability and even string tension. It’s also a good idea to stretch your strings just a little as you
tune to make sure that each string is seated well and snugged down on the tuning machine post. This will save
you some tuning frustration down the road. Just grab the string in the middle, lightly tug it up and down to remove
slack, and then retune.
There are a couple of different methods for tuning a guitar, depending on whether your guitar is acoustic, or an
acoustic with a pickup and onboard tuner. If your guitar does not have an onboard tuner and you don’t own an
electronic chromatic tuner with a reference tone, you may want to purchase one. It will dramatically simplify tun-
ing your acoustic or electric guitar.
Always tune from below pitch, up to the correct pitch instead of down from a higher pitch. This will help eliminate
string slack from the tuning machine and decrease the possibility of slippage and tuning changes as you play.
If using the onboard tuner on your guitar, simply plug in, activate the tuner, turn the volume up and starting from
the thickest (bottom) string to the thinnest (top), tune the strings to: E, A, D, G, B, E.
Tuning 6-string Guitars
17
Set-up
This manual downloaded from http://www.manualowl.com

If you do not have an onboard or an electronic tuner, use a guitar pitch pipe, an A-440 tuning fork or some other pitch
reference, and begin by:
• Tuning the second string, “A” to pitch.
• Then, depress the second, or “A” string at the 5th fret, to produce a “D”, and tune the “D” string to that same pitch.
• Next, depress the D string at the 5th fret, to produce a “G”, and tune the “G” string until the pitches match.
• Next, depress the “G” string at the 4th fret, to produce a “B”, and tune the “B” string until the pitches match.
• Next, depress the “B” string at the 5th fret, to produce an “E” and tune the thinnest string to a matching “E”.
• Finally, go back and play the thickest “E” string and tune it until the pitch at the 5th fret, an “A”, matches the
“A” on the adjacent string.
18
Set-up
This manual downloaded from http://www.manualowl.com

Due to the tremendous amount of tension exerted on the neck by the 12 strings, we suggest that you use a light
gauge string set, such as the Fender Phosphor Bronze (60-12 L) on your 12-string guitar.
In standard 12-string tuning, the second string in each pair is tuned to the same pitches, E, A, D, G, B, E, and
using the same methods as the six string guitar on the previous page.
For the E, A, D, and G strings, the first smaller string in each pair is tuned to the same note, but an octave higher
in pitch than its partner. For the B and E strings, the first string in each pair is tuned in unison, (exactly the same
pitch), as its partner string.
Many players find it difficult to press the strings down on a 12-string, due to the high tension caused by the extra
strings.
A remedy that some players choose is to tune the entire guitar to a lower relative pitch, such as E-flat or D;
thereby reducing the string tension. You may then use a capo on the first or second fret, to bring it back up to
where it plays at standard pitch.
The guitar will certainly be easier to play, and the reduced tension will put less stress on the neck over time, but
bear in mind that it will also sacrifice a bit of the tone projection of the instrument.
Tuning 12-string Guitars
19
Set-up
This manual downloaded from http://www.manualowl.com
/