LX9000 Version 2.6 September 2011
Page 10 of 130
• Real-time flight optimisation according to FAI and OLC rules.
• Flights stored in IGC format are downloadable using the integrated SD Card.
• Flight recorder functions include an integral pressure transducer based on 1013 mbar
level for altitude recording, engine noise level sensor, memory to store more than 1000
hours of flights and digital and mechanically security devices to ensure high level of
security.
• Integrated FLARM collision avoidance system with graphic, sound and voice (optional)
presentation.
3.1.2 Vario Unit Features
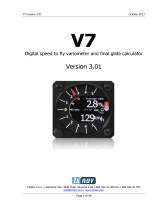
• Mechanical needle driven by stepper motor indicating various data such as netto vertical
speed, relative (super netto) and vertical speed.
• 240x320 pixels colour screen for additional information such as average, thermal vario,
time, speed etc…
• Integrated voice module
• Many custom audio settings
• 100Hz sampling rate for very fast response.
• Speed to fly indication.
• TE compensation can be selected to be either pneumatic TE probe or electronic TE.
3.1.3 Interfaces
• The RS232 interface has NMEA output for external devices.
• An SD Card interface.
• A USB slot for data transfer using USB memory stick.
3.1.4 Options
3.1.4.1 Internal Options
Integrated Flarm electronics can be built into the LX9000 digital unit. All necessary
connectors are available on the rear side of the unit (Flarm external indicator, Flarm
antenna), which guaranties the same comfort as with the original Flarm devices. It is very
important to point out that the whole system uses only one GPS receiver and therefore
offers a low power solution. One bicolour LED Flarm External display is included in the
delivery; extension to a second seat is possible.
3.1.4.2 External Options
By using a RS485 bus system a wide range of optional interfaces can be easily connected to
the basic configuration with minimal installation work. The LX9000 bus system can be
extended easily by use of RS485 splitting units, which allow plug and play connection of
optional devices. The following units can be connected to the LX9000 bus system:
• Second Seat Device (LX9000D, LX8000D or LX8080D): The unit installed in the
rear seat of the glider is powered and receives all necessary data from the main unit.
The communication between both units is exclusively via the RS485 bus system.
• Remote Control: An extremely ergonomic leather-coated handle which includes 8
push buttons to operate the LX9000 and also two additional buttons with open wires.
These two buttons can be used for instance as PTT for radio and SC/Vario changeover
command.
• Electrical Compass Device
• Secondary Vario Indicators
AHRS module can also be used as an external option. However it is connected to USB
interface.