Page is loading ...

Your new Design House faucet will give you years of trouble free performance. Thank you for
choosing our product for your home. Please read all of these instructions carefully before
installing your new faucet.
When installing your new faucet, hand tighten the connector nuts, then use one wrench to
anchor the fitting and a second wrench to tighten the nut one additional turn. Connections that
are too tight will reduce the integrity of the system.
Wrap threaded connections (except aerator thread in spout or where o-ring or rubber sealant
are present) with Teflon tape available from your local hardware or plumbing supply store.
Always wrap in a clockwise direction.
IMPORTANT POINTS
SAFETY TIPS
ALWAYS protect your eyes with safety glasses.
Helpful tools to install this faucet:
Teflon tape
(2) crescent wrenches
basin wrench
flashlight
faucet supply tubes
silicon sealer
5. IMPORTANT: After installation is
complete, remove the aerator to flush
the water lines. If you remove the
gasket (5A) in the aerator, make sure
to replace it after flushing the water
lines. Turn on the water supply and
allow both hot and cold water to run for
at least one minute each. This flushes
away any debris that could cause
damage to internal parts. While the
water is running, check for leaks. Turn
off the water and replace the aerator.
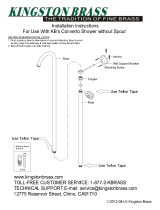
4. Making the waterline connections: Use
1/2 in. I.P.S. faucet connections (4B, not
included), or use the supplied coupling nuts
(4C) with a 3/8 in. O.D. ball-nose riser (4A,
not included). Use wrenches when
tightening. Do not overtighten.
1. Shut off water supplies. Remove the old
faucet. Insert the sprayer support (1A)
through the far right hole on the sink. Screw
the sprayer mounting nut (1B) onto the
sprayer support (1A) shank from underneath
the sink, and hand tighten.
2. Place the gasket (2A) on the bottom of
the faucet assembly (2B). Insert the side
sprayer (2C) hose down through the
sprayer support (2D) and sink. Align the
tabs (2E & 2F) on the quick connects
(2G). Push the quick connector housing
firmly upward and snap it onto the
receiving tube tab. Pull down moderately
to ensure the connection has been made.
If it is necessary to remove the quick
connector, squeeze the tabs on the hose,
and pull down to disconnect.
3. Place the faucet assembly (3A) in
position on the sink. Secure the faucet
assembly (3A) to the sink using the
mounting nuts (3B) provided. Hand tighten
only.
NOTE: If the sink is uneven, use silicone
under the gasket (3C).
1A
1B
4C
4B
4A
2G
2F
2E
2B
2A
2C
2D
3A
3C
3B
5A

o 546135 - Polished Chrome
o 546119 - Satin Nickel
o 546101 - Oil Rubbed Bronze
o 546127 - Brushed Bronze
Problem: Faucet leaks from under handle.
Cause: Bonnet is loose or o-ring on cartridge is
dirty or twisted.
Action:
1. Move handle to OFF position. Remove the index
and unscrew the screw on handle, then remove
the handle and inverter.
2.Tighten the bonnet by turning it clockwise. Move
the cartridge stem to the ON position. The leak
should stop around the cartridge stem.
3. If the leak does not stop, shut off the water supply.
Remove the bonnet by turning it counter-clockwise.
Lift cartridge off body and remove cartridge seal.
Clean cartridge ports and cartridge seal. Place
cartridge seal into cartridge ports or replace if
necessary.
4. Replace the cartridge making sure the wings fit
well into the cuts in the faucet body. Tightly screw
the bonnet onto the faucet body.
5. Reinstall the handle.
Many of these parts come
preassembled. This exploded
diagram is to assist in trouble
shooting.
Keep it looking like new by cleaning it periodically with a mild solution of soapy water. Rinse thoroughly and
then dry with a soft cloth.
Under the Safe Drinking Water Act, the U.S. Environmental Protection Agency restricts the
amount of lead used in brass and solder. Your new faucet is made in strict compliance with
all government standards. The materials used in the manufacture of this faucet are of industry
standard quality and are similar to other plumbing products having brass fittings.
To reduce the amount of lead in your drinking water, allow the water to run for a moment before
filling your glass and remember to always use cold water for drinking purposes.
CONSUMER PROTECTION WARNING
Your new Design House faucet is designed to give you years of trouble free performance. Avoid abrasive
cleaners, steel wool and harsh chemicals that will dull the finish and void your warranty.
Brass finishes are polished, then protected with a PVD or a lacquer coating to help prevent tarnishing.
Clean these surfaces only with a damp, soft cloth.
Problem: Faucet leaks around aerator or an improper
flow pattern.
Cause: Aerator is incorrectly fitted or is dirty.
Action:
1. Unscrew the aerator. Make sure all internal parts
are laying flat.
2. If there is debris, gently flush all parts inside.
3. Reinstall the aerator.
Index
Screw
Handle
Bonnet
Cartridge
Disc spring
Disc
Washer
Gasket
Inverter
Mounting nut
Coupling nut
Aerator
/