SPEAKMAN COMPANY
VS-2954, VS-1001-ADA
Installation, Maintenance & Operation Instructions
ADA / HANDICAP SHOWER AND BAR
DESCRIPTION
Speakman ADA handicap shower system includes hand held shower (VS-100-AF, or VS-100-PC), 5’ stainless steel
hose (VS-152), vacuum breaker (VS-151-PC), shower arm bracket (VS-150-PC), and 24” grab/ slide bar assembly
(VS-153-ADA). Connects to standard shower arm. Shower arm flange (10-0219-PC-P) and 8” shower arm (42-0029-
PC) for VS-2954 model only. Handheld shower puts out 2.5 GPM/9.46 LPM to meet ANSI A112.18.1 Standard. ADA
Compliant.
OPTIONS
SPECIFICATIONS
SUPPLY: ½” NPT FEMALE
◊ -PC: Chrome Hand Held Shower
SHIPPING WEIGHT: 4.9 LBS.
FLOW RATE: 2.5 GPM/9.46 LPM, MAX.,
HAND HELD, VARIABLE
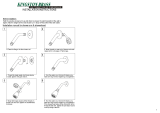
INSTALLATION
For VS-2954 model only. Slip the wall flange onto the shower arm. Apply teflon tape clockwise onto the male
threads and screw arm into supply piping behind wall. Wrench tighten. Slip wall flange to wall. Check for leaks.
Remove (turn counterclockwise) your existing showerhead from the shower arm. Clean the shower arm threads of
any debris and wrap teflon tape in the clockwise direction around threads. Assemble shower arm bracket to the
shower arm. Hand tighten firmly. Then assemble the vacuum breaker to the bottom of the shower arm bracket.
Make sure the washer is inside the connection. Hand tighten. Assemble the 5’ hose to the bottom of the vacuum
breaker. Hand tighten firmly. Then attach the other end of the hose to the hand held shower. Make sure the washer
is in the breaker to hose connection and the hose to hand held connection seals on the o-ring at the bottom of the
hand held to prevent leaks. When installing the bar, the location is optional but limited to the length of the hose. For
installation of the grab/ slide bar, hold the bar against the wall in the chosen location. Using a pencil, mark the drill
hole positions (4 in total) for the lower and upper mounting brackets. If using as a grab bar, be sure to fasten
securely to a wall stud. (Note: upper mounting bracket height is adjustable) To mount the brackets, use a No. 10
(0.1935 inches/5.5mm) masonry drill bit to make a hole approximately 1-3/8 inches (35 mm) deep. Push the plastic
anchors (4 in total) into the drilled holes, unless your mounting to wall studs, where anchors can be omitted. (Note:
plastic anchors may not be suitable for all types of wall construction, seek professional help if in doubt) Fix upper
mounting bracket and then the lower mounting bracket to the wall using four (4) screws provided. Push the bracket
covers over the mounting brackets while paying close attention to cover orientation for proper placement.
OPERATION
To operate the handheld shower, push the pause button to one side to bring the flow down to a trickle, then simply
push it to the other side to turn the flow back on full force.
MAINTENANCE
The finish of your SPEAKMAN VERSATILE® hand held shower and all of the other components can be cleaned by
using mild soap and warm water. Dry immediately with a soft, clean cloth for best results. The flow control device
limits water flow to 2.5 gallons per minute, and is located in the base of the handheld. The small orifice in the flow
regulator, resulting in lower flow and a weaker performance, may become clogged. To clean the flow regulator,
simply remove the hose from the hand shower and clean as necessary.
11/07
REV. 1
92-2681

ROUGH-IN MEASUREMENTS
SPEAKMAN
®
PO Box 191 Wilmington, DE 19899 Phone: 800-537-2107 Fax: 800-977-2747
Visit us on the web at www.speakmancompany.com
11/07
REV. 1
92-2681
/