EuroLite LED KLS-400 RGB DMX LIGHT SET Quick Start
- Category
- Floodlights
- Type
- Quick Start

euroliteeurolite
®
Q
U
I
C
KS
T
A
R
T
L
E
DK
L
S
-
4
0
6R
G
BD
M
XL
I
G
H
TS
E
T
1
2
3
4
5
6
7
8
9
10
11
12
13
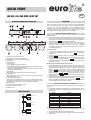
Connector for the foot pedal FP-1
Sensitivity control for the microphone
Microphone for sound-controlled operation
LED display
• button MENU to call the menu items
• button DOWN to switch between sound control and automatic mode
button UP to switch to DMX operation
buttons UP and DOWN to set the speed in automatic mode and to
set the DMX starting address
DMX signal input (3-pin XLR) for connecting a controller
DMX signal input (3-pin XLR) for connection to the DMX input of
another light effect unit
Used to plug the supplied power cord in. Only replace the fuse when
the device is disconnected from mains. Only use fuses of the same
rating and power. The correct value is specified on the device.
Fixation screw
Control buttons
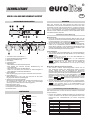
•
•
Jack DMX IN
Jack DMX OUT
Power input with fuse holder
LED spot 1 to 6
Connection cable for the control unit
TV pin for placing on a stand
Fixation screw
EN
After connecting the unit to the mains it requires a short initialization
process and is then ready for operation. It may be controlled via DMX
controller or a foot pedal. Alternatively, it can be operated without
external control in sound-controlled mode or in automatic mode with
processor-controlled color changes. The operating modes can be
selected by means of the display and the control buttons.
Operationwithoutexternalcontrol
Sound control
Automatic mode
Master/slave operation with several light sets
RemotecontrolwiththefootpedalFP-1
1. Via the microphone, which is integrated in the control unit, the rhythm
of the music (sufficient bass provided) can be perfectly reproduced
by the light set. To select sound control press the button MENU so
many times until is indicated in the display.
2. Adjust the microphone sensitivity to the volume of the music with the
control SENSIVITY. If the volume of the music is changed
afterwards, the microphone sensitivity must be readjusted
accordingly. The LEDs do no light if the volume is too low or if there is
no sufficient bass beat.
1. To select the automatic mode with processor-controlled color
changes, press the button so many times until is indicated in
the display.
2. Press the button DOWN to switch to automatic mode. The display
indicates .
3. Once again, press the button MENU to activate menu item speed.
The display indicates the default value . Use the buttons UP
and DOWN to adjust the desired speed in automatic mode from high
(S 00) to low (S 100).
1. When several light sets are interconnected, the slave units can be
synchronized and controlled with the master unit. For this select the
desired operating mode (music control or automatic mode) at the
master unit and set each slave unit to the same DMX starting
address: . Finally, switch each slave unit to the DMX operating
mode. For this press the button MENU so many times until the
display indicates or . Then press the button UP. The
display will indicate and the interconnected light sets will now
operate in sync.
2. When the master unit is to be controlled with the foot pedal FP-1, also
set each slave unit to the DMX starting address and then
switch to the DMX operating mode. The interconnected light sets can
now be operated in sync with the foot pedal.
The foot pedal available as accessory allows convenient control of the
light set.
1. Press pedal 1 PRESETS repeatedly for the desired function. One in
seven preset colors or color change and color fade of the colors can
be selected.
2. Press pedal 2 SOUND CONTROLto select sound control.
3. Press pedal 3 FREEZE to select the freeze function. Then the
current color is kept.
4. Press pedal 4 BLACK OUT to switch off all LEDs.
5. After switching the light set of and on again, the function selected last
is activated.
O
P
E
R
A
T
I
N
GE
L
E
M
E
N
T
SA
N
DC
O
N
N
E
C
T
I
O
N
S
M
E
N
US
T
R
C
U
T
U
R
E
DMXstartadress
Speed
inautomode
Automode
Soundcontrol
DMXcontrol
O
P
E
R
A
T
I
O
N
Number Function
1 white
2red
3 green
4 blue
5cyan
6 yellow
7 purple
8 color change every second
9 color fadeevery 3 seconds
UP
Microphone
DOWN
MENU
DMXIN
DMXOUT
12 13
11
3
2
7
8
9
5
UP
Microphone
DOWN
MENU
DMXIN DMXOUT
1
4
6
10

OperationviaDMXcontroller
Setting the DMX starting address and selecting the DMX operating
mode
DMX protocol
For operation with a controller with DMX512 protocol, the light set is
equipped with 15 control channels.
1. To be able to operate the light set with a DMX controller, the DMX
starting address must be set for the first DMX channel. For this press
the button MENU so many times until is indicated in the
display. Then use the buttons UP and DOWN to set the address.
Note: The starting address depends upon which DMX controller is
being used. Please refer to its user manual.
2. To switch to the DMX operating mode, press the button MENU so
many times until the display indicates or . Then press
the button UP. The display will indicate and after a few seconds
the light set can be operated with the DMX controller.
www.eurolite.de
Subject to change 30.07.2010
00054260.DOC
©CopyrightReproductionprohibited!
Channel 1 – Preset programs, automatic mode, sound
DMX value Function
000 – 009 Off
010 – 029 Program 1
030 –049 Program 2
050 –069 Program 3
070 –089 Program 4
090 –109 Program 5
110 –129 Program 6
130 –149 Program 7
150 –169 Program 8
170 –189 Program 9
190 –209 Program 10
210 –229 Program 11
230 –249 Automaticmode
250 –255 Soundcontrol
Channel 2 – Master control
DMX value Function
000 – 009 Off
010 - 255 Dimming from 0 – 100%
Channel 3 – Strobe control
DMX value Function
0
00 – 009 Off
010 - 069
Strobe slow fast
070 – 139 Strobe from left to right
slow ® fast
140-209 Strobe from rightto left
slow ® fast
210 – 253 Random strobe
slow ® fast
254 - 255 On
Channel 4 – Spot 1: Brightness red
DMX value Function
000 – 255 Dimming from 0 – 100%
Channel5 – Spot 1:Brightnessgreen
DMX value Function
000 – 255 Dimming from 0 – 100%
Channel 6 – Spot 1: Brightness blue
DMX value Function
000 – 255 Dimming from 0 – 100%
Channel 7 – Spot 2: Brightness red
DMX value Function
000 – 255 Dimming from 0 – 100%
Channel8 – Spot 2:Brightnessgreen
DMX value Function
000 – 255 Dimming from 0 – 100%
Channel 9 – Spot 2: Brightness blue
DMX value Function
000 – 255 Dimming from 0 – 100%
Channel 10 – Spot 3: Brightness red
DMX value Function
000 – 255 Dimming from 0 – 100%
Channel11– Spot 3: Brightness green
DMX value Function
000 – 255 Dimming from 0 – 100%
Channel 12 – Spot 3: Brightness blue
DMX value Function
000 – 255 Dimming from 0 – 100%
Channel 13 – Spot 4: Brightness red
DMX value Function
000 – 255 Dimming from 0 – 100%
Channel14– Spot 4: Brightness green
DMX value Function
000 – 255 Dimming from 0 – 100%
Channel 15 – Spot 4: Brightness blue
DMX value Function
000 – 255 Dimming from 0 – 100%
Channel 16 – Spot 5: Brightness red
DMX value Function
000 – 255 Dimming from 0 – 100%
Channel17– Spot 5: Brightness green
DMX value Function
000 – 255 Dimming from 0 – 100%
Channel 18 – Spot 5: Brightness blue
DMX value Function
000 – 255 Dimming from 0 – 100%
Channel 19 – Spot 6: Brightness red
DMX value Function
000 – 255 Dimming from 0 – 100%
Channel20– Spot 6: Brightness green
DMX value Function
000 – 255 Dimming from 0 – 100%
Channel 21 – Spot 6: Brightness blue
DMX value Function
000 – 255 Dimming from 0 – 100%
Page is loading ...
Page is loading ...
-
 1
1
-
 2
2
-
 3
3
-
 4
4


EuroLite LED KLS-400 RGB DMX LIGHT SET Quick Start
- Category
- Floodlights
- Type
- Quick Start
Ask a question and I''ll find the answer in the document
Finding information in a document is now easier with AI
in other languages
Related papers
-
EuroLite LED KLS-400 RGB DMX LIGHT SET Quick Start
-
-
-
EuroLite DMX LED Operator 4 User manual
-
-
-
-
-
-
