Moulinex DJ 1101 Owner's manual
- Category
- Food processors
- Type
- Owner's manual
This manual is also suitable for

FR
EN
AR
FA
p 1 - 6
p 7 - 12
p 17 - 13
p 22 - 18
Réf. 2551033-01
Notice Mini Practic_Mise en page 1 06/09/11 08:43 Page1

FR
EN
AR
FA
www.moulinex.com
Notice Mini Practic_Mise en page 1 06/09/11 08:43 Page2

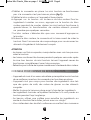
A
C
B
E
F
D
Notice Mini Practic_Mise en page 1 06/09/11 08:43 Page3
Page is loading ...

Notice Mini Practic_Mise en page 1 06/09/11 08:43 Page5
Page is loading ...
Page is loading ...
Page is loading ...
Page is loading ...
Page is loading ...
Page is loading ...

7
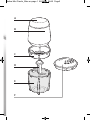
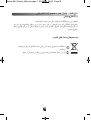
DESCRIPTION
A - Switch
B - Motor unit
C - Lid
D - Chopping blade
E - Chopper bowl
F - Sprinkler lid
SAFETY INSTRUCTIONS
• Read the instructions for use carefully before using your appliance
for the first time: the manufacturer shall accept no liability in the
event of any use that does not comply with the instructions.
• This appliance is not intended for use by persons (including
children) with reduced physical, sensory or mental capabilities, or
lack of experience and knowledge, unless they have been given
supervision or instruction concerning use of the appliance by a
person responsible for their safety.
• Children should not be allowed to play with the appliance.
• This appliance complies with applicable standards and regulations.
• It is designed to work with alternating current only. We would ask you,
before using it for the first time, to check that the voltage of your
mains network corresponds to the voltage given on the rating plate
on the appliance.
• Any connection fault invalidates the warranty.
• Do not operate the appliance when empty or with the accessories
in the bowl.
• Do not place or use this appliance on a hotplate or near to a naked
flame (gas cooker).
• Use the product on flat, stable, heat-resistant surface away from
sources of heat or water splashes. Do not turn the appliance over.
• Never remove the lid before the chopping blade has stopped
completely.
EN
Notice Mini Practic_Mise en page 1 06/09/11 08:43 Page7

8
• The appliance should be unplugged:- before assembly and
disassembly,
- if it fails during operation,
- each time before cleaning or maintenance,
- after use.
• Never disconnect the appliance by pulling on the power cord.
• Only use an electrical extension lead after checking that it is in
perfect condition.
• Household appliances must not be used:
- if dropped,
- if the blade is damaged or incomplete.
• Always unplug the appliance if you are to leave it unattended and
before fitting the blade.
• If the power cord is damaged, it must be replaced by the
manufacturer, its after-sales service or any person with similar
qualifications, in order to avoid any danger.
• Do not leave the supply cable within reach of children.
• The supply cable should never be near to or in contact with hot
surfaces, near to a heat source or sharp edges.
• Do not place the appliance, the supply cable or the plug in water
or any other liquid.
• Your appliance is for domestic use only. In the event of any
commercial use, inappropriate use or failure to comply with the
instructions, the manufacturer accepts no responsibility and the
guarantee will not apply.
• For your own safety, only use the Moulinex accessories and spare
parts suitable for your appliance.
• Do not use the appliance if it is not working properly or if it has been
damaged. In such cases, contact a Moulinex approved service
centre (see the list in the service booklet).
• Any intervention other than normal cleaning and maintenance by
the customer must be carried out by a Moulinex approved service
centre.
• Material damage: the mini chopper is designed to run for short
Notice Mini Practic_Mise en page 1 06/09/11 08:43 Page8

9
periods of time. Do not operate it for more than 15 seconds at a time.
If you want to use it for longer periods of time, turn it off for 5 minutes
to allow the motor unit to cool down.
• For your safety, this appliance complies with applicable standards
and regulations:
- Low Voltage Directive
- Electromagnetic Compatibility
- Environment
- Materials in contact with food
USING FOR THE FIRST TIME
Before using for the first time, wash the accessories (C, D, E, F) in soapy
water. Rinse and dry carefully.
Attention: The blades are very sharp, handle them with caution
when using or cleaning your appliance. Always hold the blade
attachment at the top taking care not to touch the blades.
To remove the lid, press the tabs 1 on both sides and lift it up (Fig. 1).
USING THE APPLIANCE
1. Remove the motor unit and the lid from the chopper and place the
chopper on a stable, clean and dry surface.
2. Make sure that the blades are fitted properly on the shaft in the
middle of the base (Fig. 2).
3. Fill the chopper with ingredients. Do not exceed the maximum
quantity “MAX” marked on the chopper.
If required, cut the ingredients into small pieces before putting them
into the chopper. Larger ingredients like carrots must be sliced
beforehand.
4. Fit the lid in place. The mini-chopper will not work unless the lid has
been properly fitted (Fig. 3).
5. Put the motor unit on the appliance and plug it into the mains
socket.
Notice Mini Practic_Mise en page 1 06/09/11 08:43 Page9

10
6. Press the button on top of the motor unit. For wet or soft ingredients,
press the button for short periods of time. The mini-chopper works at
high speeds; you will need just a few seconds to process some
foodstuffs.
7. The motor unit will turn off as soon as you stop pressing the button.
8. Remove the motor unit, the lid and the blade attachment before
emptying the chopper.
Fit the sprinkler lid to season your food with freshly chopped
ingredients.
ATTENTION
• The blades are very sharp; handle them with caution when you
empty the chopper.
• The blades will continue to rotate for a few seconds after you have
turned off the mini-chopper. Allow the appliance to stop completely
before proceeding.
• Always remove the plug from the wall socket before removing the
motor unit.
USEFUL TIPS FOR BEST RESULTS
• This appliance is equipped with a safety lock that prevents the mini-
chopper from switching on when the lid is not fitted properly.
• The appliance is not designed to chop hard ingredients such as
coffee beans, ice cubes or frozen food.
• Always fit the blade attachment before adding the ingredients.
• Wet ingredients can easily be liquefied when processed too long.
• If necessary, use a spoon to bring the ingredients to the centre of
the chopper. Never do this with your fingers!
• You will obtain uniform results if you use even-sized pieces of food.
• If the ingredients are to be pureed, they must be cooked
beforehand.
• Do not overfill the chopper. Do not exceed the “MAX” line on the
chopper.
Notice Mini Practic_Mise en page 1 06/09/11 08:43 Page10

11
•
D
o
n
o
t
o
p
e
r
a
t
e
t
h
e
m
i
n
i
-
c
h
o
p
p
e
r
e
m
p
t
y
.
•
T
h
i
s
m
i
n
i
-
c
h
o
p
p
e
r
c
a
n
c
h
o
p
,
g
r
i
n
d
a
n
d
p
u
r
e
e
v
e
g
e
t
a
b
l
e
s
,
n
u
t
s
,
c
u
c
u
m
b
e
r
s
,
p
o
t
a
t
o
e
s
,
f
r
u
i
t
s
,
s
p
i
c
e
s
,
e
t
c
.
I
t
i
s
n
o
t
d
e
s
i
g
n
e
d
t
o
w
h
i
s
k
l
i
q
u
i
d
s
.
L
i
q
u
i
d
s
c
a
n
o
v
e
r
f
l
o
w
.
•
T
h
i
s
a
p
p
l
i
a
n
c
e
i
s
d
e
s
i
g
n
e
d
t
o
p
r
o
c
e
s
s
s
m
a
l
l
q
u
a
n
t
i
t
i
e
s
o
f
f
o
o
d
f
o
r
i
m
m
e
d
i
a
t
e
c
o
n
s
u
m
p
t
i
o
n
.
I
t
i
s
n
o
t
d
e
s
i
g
n
e
d
t
o
p
r
e
p
a
r
e
l
a
r
g
e
q
u
a
n
t
i
t
i
e
s
o
f
f
o
o
d
a
t
a
t
i
m
e
.
C
L
E
A
N
I
N
G
Y
O
U
R
A
P
P
L
I
A
N
C
E
C
l
e
a
n
i
n
g
t
h
e
m
o
t
o
r
u
n
i
t
(
B
)
•
T
h
e
m
o
t
o
r
u
n
i
t
s
h
o
u
l
d
n
o
t
b
e
i
m
m
e
r
s
e
d
i
n
w
a
t
e
r
o
r
o
t
h
e
r
l
i
q
u
i
d
s
.
A
l
w
a
y
s
r
e
m
o
v
e
t
h
e
p
l
u
g
f
r
o
m
t
h
e
w
a
l
l
s
o
c
k
e
t
b
e
f
o
r
e
c
l
e
a
n
i
n
g
t
h
e
a
p
p
l
i
a
n
c
e
.
•
I
f
r
e
q
u
i
r
e
d
,
c
l
e
a
n
t
h
e
h
o
u
s
i
n
g
w
i
t
h
a
d
a
m
p
c
l
o
t
h
.
N
e
v
e
r
u
s
e
a
b
r
a
s
i
v
e
c
l
e
a
n
i
n
g
p
r
o
d
u
c
t
s
o
r
r
o
u
g
h
c
l
o
t
h
.
C
l
e
a
n
i
n
g
t
h
e
c
h
o
p
p
e
r
b
o
w
l
(
E
)
,
t
h
e
l
i
d
(
C
)
a
n
d
t
h
e
s
p
r
i
n
k
l
e
r
l
i
d
(
F
)
•
C
l
e
a
n
t
h
e
c
h
o
p
p
e
r
,
t
h
e
l
i
d
a
n
d
t
h
e
s
p
r
i
n
k
l
e
r
l
i
d
i
n
w
a
r
m
w
a
t
e
r
.
•
A
l
l
o
w
t
h
e
p
a
r
t
s
t
o
d
r
y
b
e
f
o
r
e
f
i
t
t
i
n
g
t
h
e
m
b
a
c
k
o
n
t
h
e
a
p
p
l
i
a
n
c
e
.
M
o
i
s
t
u
r
e
c
a
n
l
e
a
d
t
o
m
o
u
l
d
b
u
i
l
d
-
u
p
.
P
r
o
c
e
s
s
i
n
g
b
r
i
g
h
t
l
y
c
o
l
o
u
r
e
d
f
o
o
d
s
u
c
h
a
s
c
a
r
r
o
t
s
c
a
n
d
i
s
c
o
l
o
u
r
p
l
a
s
t
i
c
p
a
r
t
s
.
C
l
e
a
n
i
n
g
t
h
e
m
i
n
i
-
c
h
o
p
p
e
r
i
m
m
e
d
i
a
t
e
l
y
a
f
t
e
r
u
s
e
w
i
l
l
s
i
g
n
i
f
i
c
a
n
t
l
y
r
e
d
u
c
e
d
i
s
c
o
l
o
r
a
t
i
o
n
.
H
a
r
d
a
n
d
r
o
u
g
h
i
n
g
r
e
d
i
e
n
t
s
c
a
n
m
a
k
e
t
h
e
c
h
o
p
p
e
r
’
s
f
i
n
i
s
h
d
u
l
l
o
v
e
r
t
i
m
e
.
T
h
i
s
i
s
n
o
r
m
a
l
a
n
d
d
o
e
s
n
o
t
a
f
f
e
c
t
t
h
e
p
e
r
f
o
r
m
a
n
c
e
o
f
t
h
e
m
i
n
i
-
c
h
o
p
p
e
r
.
C
l
e
a
n
i
n
g
t
h
e
c
h
o
p
p
i
n
g
b
l
a
d
e
(
D
)
•
C
l
e
a
n
t
h
e
b
l
a
d
e
s
i
n
w
a
r
m
s
o
a
p
y
w
a
t
e
r
.
H
a
n
d
l
e
t
h
e
c
h
o
p
p
i
n
g
b
l
a
d
e
a
t
t
a
c
h
m
e
n
t
w
i
t
h
c
a
u
t
i
o
n
a
s
i
t
i
s
v
e
r
y
s
h
a
r
p
.
Notice Mini Practic_Mise en page 1 06/09/11 08:43 Page11

12
RECYCLING - END-OF-LIFE ELECTRIC OR
ELECTRONIC PRODUCTS
Your appliance is expected to last for many years.
However, when the time comes to replace it, do not throw it in the bin
or in a dump, but take it to the recycling centre in your town (or to a
waste reception centre where applicable).
Think of the environment!
Your appliance contains many materials that may be
recycled or recovered.
Leave it at a local civic waste collection point.
Notice Mini Practic_Mise en page 1 06/09/11 08:43 Page12

13
•LU¥W «∞∂OµW √Ëô Î !
≈´Uœ… «∞∑BMOl - ±ÔM∑Z «∞J∑dË≤w √Ë ØNd°Uzw
±ÔM∑Nw «∞Bö•Ot
±s «∞LH∑d÷ √Ê ¥bË «∞LM∑Z ∞b¥p ßMOs ´b¥b….
Ë∞Js ≠w «∞Ou «∞cÍ ¢Id¸ ≠Ot «ùß∑GMU¡ ´Mt Ë«ß∑∂b«∞t , ≠ö ¢d±Ot ≠w ßKW «∞LNLö, Ë∞Js «Ëœ´t
≠w «∞LdØe «∞Lª∑h °S´Uœ… «∞∑BMOl ≠w ±b¥M∑p (√Ë ßKÒLt ∞LdØe ¢πLOl «∞LNLö‹ •OY ¥LJMp –
∞p).
¥∫∑uÍ ≥c« «∞LÔM∑Z ´Kv ±u«œ ÆOÒLW ÅMU´OUΠ˥LJs ≈´Uœ… ¢BMOFNU.
√Ëœ´NU ≠w ±d«Øe ¢πLOl «∞LNLö‹ «∞LÔª∑BW.
Notice Mini Practic_Mise en page 1 06/09/11 08:43 Page13
Page is loading ...
Page is loading ...
Page is loading ...
Page is loading ...
Page is loading ...
Page is loading ...
Page is loading ...
Page is loading ...
Page is loading ...

22
FA
Notice Mini Practic_Mise en page 1 06/09/11 08:43 Page23

Notice Mini Practic_Mise en page 1 06/09/11 08:43 Page24

Notice Mini Practic_Mise en page 1 06/09/11 08:43 Page25
Page is loading ...
Page is loading ...
-
 1
1
-
 2
2
-
 3
3
-
 4
4
-
 5
5
-
 6
6
-
 7
7
-
 8
8
-
 9
9
-
 10
10
-
 11
11
-
 12
12
-
 13
13
-
 14
14
-
 15
15
-
 16
16
-
 17
17
-
 18
18
-
 19
19
-
 20
20
-
 21
21
-
 22
22
-
 23
23
-
 24
24
-
 25
25
-
 26
26
-
 27
27
-
 28
28
-
 29
29
-
 30
30
-
 31
31
-
 32
32


Moulinex DJ 1101 Owner's manual
- Category
- Food processors
- Type
- Owner's manual
- This manual is also suitable for
Ask a question and I''ll find the answer in the document
Finding information in a document is now easier with AI
in other languages
- français: Moulinex DJ 1101 Le manuel du propriétaire
- Deutsch: Moulinex DJ 1101 Bedienungsanleitung
Related papers
-
Moulinex LA MOULINETTE FORCE DP790A27 User manual
-
Tefal BC5118V0 User manual
-
-
-
-
Moulinex QA408D27 Owner's manual
-
-
-
-
Other documents
-
 Alhafidh DHA-78DSR User manual
-
-
-
 Alhafidh DHA-49AUW User manual
-
Hamilton Beach 72950 User manual
-
-
Kenwood FPX930 series User manual
-
KitchenAid KFC3511CU User manual
-
KitchenAid KFC3516ER User manual
-

