Page is loading ...

V1.1 - Published on 04. 2018
FANAWAY CLASSIC
CEILING FAN
• INSTALLATION
• OPERATION
• MAINTENANCE
• WARRANTY INFORMATION
CAUTION
READ INSTRUCTIONS CAREFULLY FOR SAFE
INSTALLATION AND FAN OPERATION.

Fanaway Classic Installation Instructions
2 | P a g e LD- 0003- 1 6 / X X X / 0 1
THANK YOU FOR PURCHASING
Thank you for purchasing this quality Fanaway product. To ensure correct function and safety, please
read and keep all instructions before using the product.
SAFETY PRECAUTIONS
Read and Save These Instructions
This product conforms to UL standard 507.
1. WARNING -To avoid possible electrical shock, before installing or servicing your fan, disconnect the
power by turning off the circuit breaker of the fuse box to the outlet box.
2. WARNING - To reduce the risk of fire, electric shock, or personal injury, mount to outlet box marked
“acceptable for fan support of 35 lbs (15.9 kg) or less” and use the mounting screws provided with
the outlet box and/or support directly from building structure. Most outlet boxes commonly used for
the support of luminares may not be acceptable for fan support and may need to be replaced. Consult
a qualified electrician if in doubt.
3. WARNING - To reduce the risk of fire or electric shock, do not use this fan with any solid-state speed
control device.
4. WARNING - To reduce the risk of personal injury, do not bend the blade brackets when installing the
blade brackets balancing the blades, or cleaning the fan. Do not insert foreign objects in between
rotating fan blades.
5. CAUTIONS - All wiring must be in accordance with the National Electrical Code (ANSI/NFPA 70) and
local electrical codes. Electrical installation should be performed by a qualified licensed electrician.
6. To reduce the risk of injury to person, the fan must be mounted with a minimum of 7 feet clearance
from the bottom edge of the blades to the floor.
7. After marking electrical connections, spliced conductors should be turned upward and pushed
carefully up into the outlet box. The wires should be spread apart with the grounded conductor and
the equipment-grounding conductor on one side of the outlet box.
8. This equipment has been tested and found to comply with the limits for a Class B digital device,
pursuant to part 15 of the FCC rules. These limits are to provide reasonable protection against
harmful interference in a residential installation. This equipment generates, uses and can radiate
radio frequency energy and if not installed and used in accordance with the instructions may cause
harmful interference to radio communications.

Fanaway Classic Installation Instructions
3 | P a g e LD- 0003- 1 6 / X X X / 0 1
PARTS LIST
Unpack your ceiling fan and carefully identify the parts. Please refer to Fig 1.
Fig. 1

Fanaway Classic Installation Instructions
4 | P a g e LD- 0003- 1 6 / X X X / 0 1
1
Mounting bracket x 1
11
Bulb x 3
2
Canopy x 1
12
• Wood screw x 2
3
Down rod with ball joint x 1
• Machine screw x 2
4
Bolt and pin cover x 1
• Flat washer x 2
5
Bolt x 1
• Spring washer x 2
6
Pin x 1
13
Wire nut x 6
7
Fan assembly x 1
14
Balance tape x 4
8
Screw for lamp base x 3
15
Receiver x 1
9
Lamp shade x 1
16
Remote x 1 set
10
Light kit x 1
INSTALLING THE MOUNTING BRACKET
If there isn’t an existing outlet box, then install one using the following instructions:
• Disconnect the power by removing the fuses or turning off the circuit breakers.
• Secure the outlet box (A) (not included) directly to the building structure. Use appropriate fasteners
and materials (not included). The outlet box and its bracing must be able to fully support the weight
of the moving fan (at least 35 lbs). Do not use a plastic outlet box.
• Figures below show three different ways to mount the outlet box (A) (not included).
This fan hanging system supports a maximum 20 degree angled ceiling installation. Fig. 4
NOTE: If you are installing the ceiling fan on a sloped ceiling, you may need a longer downrod to maintain
proper clearance between the tip of the blade and the ceiling.
NOTE: The ceiling fan must be installed in a location so that the blades are spaced 300mm from the tip
of the blade to the nearest objects or walls.
NOTE: For angled ceiling installation, the opening of the mounting bracket (B) must be pointed toward
the peak.
Fig. 2
Fig. 3
Fig. 4
Angled ceiling
Maximum 20°

Fanaway Classic Installation Instructions
5 | P a g e LD- 0003- 1 6 / X X X / 0 1
To hang your fan where there is an existing fixture but no ceiling joist, you may need an installation
hanger bar (C) as shown in Fig.5. Make sure the hanger bar you purchase has been designed for use
with ceiling fans.
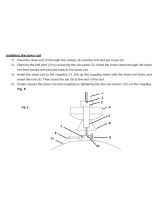
INSTALLING THE FAN
Installing the down rod
1) Feed the down rod (5) through the canopy (4) and the bolt and pin cover (6).
2) Remove the ball joint (2) by loosening the set screw (3), insert the motor wires through the down
rod then secure the ball joint back to the down rod.
3) Insert the down rod to the coupling (7), line up the coupling holes with the down rod holes and
insert the bolt (8). Then insert the pin (9) to the end of the bolt.
4) Finally secure the down rod and coupling by tightening the two set screws (10) on the coupling.
Fig. 6
Fig. 6
Fig. 5

Fanaway Classic Installation Instructions
6 | P a g e LD- 0003- 1 6 / X X X / 0 1
HANGING THE FAN
Pass the power supply wires (C) from the ceiling outlet box (B) through the center of the ceiling
mounting bracket (D). Install the ceiling mounting bracket (D) on the outlet box (B) with the mounting
screws (F) provided with the outlet box and washers (E) provided with fan. Fig. 7
Lift the fan assembly onto the mounting bracket. Ensure the registration slot (A) of the hanger ball is
positioned on the stopper (B) of the mounting bracket (C) to prevent the fan from rotating when in
operation. Fig.8
FAN INSTALLATION
Light kit installation
CAUTION – To reduce the risk of electric shock, disconnect the electrical supply circuit to the fan before
installing light kit. Ligth kit weight: 9.92 lb.
1. Loosen the screw (1) from the lamp shade bracket (3). Align the two slot screws (2) with the keyhole
slots of the lamp shade (4). Fig.9
2. Turn the lamp shade counterclockwise until the slot screws are firmly at the end of the slots.
3. Secure screw 1 back to the lamp shade bracket. Tighten all three screws. Do not over-tighten.
Fig. 9
Fig. 7
Fig. 8

Fanaway Classic Installation Instructions
7 | P a g e LD- 0003- 1 6 / X X X / 0 1
4. Connect the plugs (8) together. Fig.10
5. Loosen the screw (5) from the lamp shade (4). Align the two slot screws (6) with the keyhole slots of
the light kit (7).
6. Turn the light kit counterclockwise until the slot screws are firmly at the end of the slots.
7. Secure screw (5) back to the lamp shade. Tighten all three screws. Do not over-tighten.
8. Install the bulbs to lamp holder (bulbs included)
Fig. 10

Fanaway Classic Installation Instructions
8 | P a g e LD- 0003- 1 6 / X X X / 0 1
ELECTRICAL WIRING DIAGRAM
WARNING: To avoid possible electrical shock, be sure you have turned off the power at the main circuit
panel.
Follow the steps below to connect the fan to your household wiring. Use the wire connecting nuts supplied
with your fan. Secure the connectors with electrical tape. Make sure there are no loose wire strands or
connections.
1. Connect the household live supply wire
(black) to receiver input wire (black, AC IN L) as
shown in Fig. 11.
2. Connect the household neutral supply wire
(white) to the receiver input wire (white, AC IN N).
3. Connect the household ground wire to the
fan bracket ground wire (green) and fan body
ground wire.
4. Connect the reveiver output wire (black, TO
MOTOR L) to motor live input wire (black, TO
MOTOR L).
5. Connect the receiver output wire (white, TO
MOTOR N) to motor neutral input wire (white, TO
MOTOR N)
6. Connect the receiver output wire (blue, FOR
LIGHT) to fan light live input wire (blue, FOR
LIGHT)
7. After connecting the wires, spread them
apart so that the green and white wires are on one
side of the outlet box and the black and blue wires
are on the other side.
8. Turn the connecting nuts upward and push
the wiring into the outlet box.
Fig. 11

Fanaway Classic Installation Instructions
9 | P a g e LD- 0003- 1 6 / X X X / 0 1
FINISHING THE INSTALLATION
Slide and align the canopy up to the mounting bracket. Ensure all electrical wiring is tucked inside the
canopy and that the wires are not damaged during this step. Secure the canopy to the hanger bracket
using the screws provided.
USING YOUR CEILING FAN
SETTING DIP SWITCHES
When two or more fans are located near each other, you may desire to have the receiver/transmitter for
each fan set to a different code, so that the operation of one fan does not affect the operation of the other
fans.
The DIP switches for the receiver are located on the flat surface of the receiver. The DIP switches for the
transmitter are in the battery compartment. Fig. 13.
NOTE: Ensure that the power to the supply wires has been turned off before setting the code.
Change the position of the DIP switches in the remote transmitter and the receiver. Make sure that the
DIP switches match in the remote receiver and transmitter. If they don’t match, the transmitter will not
function. Fig. 14
Fig. 12
Fig. 14
Fig. 13

Fanaway Classic Installation Instructions
10 | P a g e LD- 0003- 1 6 / X X X / 0 1
INSTALLING THE REMOTE BATTERY
2 x AAA 1.5V (size) batteries are required to operate the remote control. Remove the battery cover from
the back of the remote and insert 2 x AAA batteries. Ensure the polarities are correct as shown in the
battery compartment. (Batteries included.)
OPERATING THE REMOTE:
Before you start using the remote, take the time to read through this section and get
familiar with the buttons and function of each button.
LED Indicator
The red LED indicator on the top of the transmitter will flash when the buttons are active.
BUTTONS ON THE REMOTE
HI: Press the button to set fan running at High speed.
MED: Press the button to set fan running at Medium speed.
LOW: Press the button to set fan running at Low speed.
OFF: Press the button to turn OFF the fan.
LIGHT CONTROL BUTTON:
Press the button to turn the light ON/OFF.
Press and hold the button to access the light dimming function.
D / ON SWITCH:
This switch marked D/ON controls the dimming function of the lights. If using
non-dimmable bulbs, use a ballpoint pen or small screwdriver to set the
switch to “D” to disable the dimming function. If using dimmable halogen
bulbs, set the switch to “ON” to enable the dimming function. Fig. 16
The remote has memory function. If the fan or light is turned off by the isolating switch, it will memorise
and recover the last status when turned on next.
Fig. 15
Fig. 16

Fanaway Classic Installation Instructions
11 | P a g e LD- 0003- 1 6 / X X X / 0 1
INSTALLING THE TRANSMITTER HOLDER
Install the holder to the wall with two screws provided, hang up the transmitter by the holder.
AFTER INSTALLATION
WOBBLE:
NOTE: ceiling fans tend to move during operation due to the fact that they are mounted on a rubber
grommet. If the fan was mounted rigidly to the ceiling it would cause excessive vibration. Movement of a
few centimetres is quite acceptable and DOES NOT suggest any problem.
TO REDUCE THE FAN WOBBLE: Please check that all screws which fix the mounting bracket and down
rod are secure.
BALANCING A WOBBLING CEILING FAN:
For your convenience, a Balancing Kit is included; please follow this procedure when balancing the fan:
1) Install the fan without the light kit before balancing the fan.
2) Define the base plate into four areas (point A, B, C and D).
Use one weight from the balance kit to lightly stick on the
edge of the base plate (point A), if the wobble worsens, then
take off the balance kit and lightly stick it on the opposite side
(point C); if the wobble is worse, then go to the adjacent point
B or D, if the wobble gets lessens, then securely stick on the
weight at this location on the base plate.
3) After balancing the fan, assemble the light kit to the light base.
NOISE:
When it is quiet (especially at night) you may hear occasional small noises. Slight power fluctuations and
frequency signals superimposed in the electricity for off-peak hot water control, may cause a change in
fan motor noise. This is normal. Please allow a 24-hour “breaking -in” period, most noises associated
with a new fan disappear during this time. All electric motors are audible to some extent. Please note that
this is not a product fault, and as such is not covered under warranty.
Fig. 17

Fanaway Classic Installation Instructions
12 | P a g e LD- 0003- 1 6 / X X X / 0 1
CARE AND CLEANING
1) Periodic cleaning of your ceiling fan is the only maintenance required. Use a soft brush or lint free
cloth to avoid scratching the paint finish. Please turn OFF electricity power when you do so.
2) Do not use water when cleaning your ceiling fan. It could damage the motor or the blades and create
the possibility of an electrical shock.
3) The motor has a permanently lubricated ball bearing so there is no need to oil.
NOTE: Always turn OFF the power before attempting to clean your fan.
TECHNICAL INFORMATION
Fan Size
Speed
Volts
(V)
Amps
(A)
Watts
(W)
RPM
CFM
CFM/
W
N.W.
(lbs)
G.W.
(lbs)
C.F.
48”
LD-0003-
16/XXX/01
Extra-High
120
0.48
55.12W
230
4252.49
77.14
28.2
34.4
4.1
Medium
High
120
0.40
28.78W
175
2858.96
99.33
28.2
34.4
4.1
Low
120
0.28
12.38W
125
1594.14
128.76
28.2
34.4
4.1
These are approximate measurements. They do not include data for any lamps or fixtures attached to
the ceiling fan.
WARRANTY
2 year warranty covers the entire fan. Please refer to warranty card for the details.

Fanaway Classic Installation Instructions
13 | P a g e LD- 0003- 1 6 / X X X / 0 1
GRACIAS POR SU COMPRA
Gracias por adquirir este producto de calidad Fanaway. Para garantizar un funcionamiento correcto y
seguro, lea y respete todas las instrucciones antes de usar el producto.
MEDIDAS DE SEGURIDAD
Lea y guarde estas instrucciones
Este producto cumple con la norma 507 de UL.
1. ADVERTENCIA - Para evitar posibles descargas eléctricas, corte la corriente que va a la caja
eléctrica desde el disyuntor o la caja de fusibles.
2. ADVERTENCIA - Para reducir el riesgo de incendio, descarga eléctrica o lesión, móntelo en una
caja eléctrica clasificada como «Apropiada para sostener ventiladores de 35 lb (15,9 kg) o menos»,
y utilice los tornillos de montaje suministrados con la caja eléctrica y/o fíjelo directamente a la
estructura del edificio. La mayoría de las cajas eléctricas utilizadas comúnmente para el soporte de
alumbrados puede que no sean apropiadas para sostener el ventilador y deban ser reemplazadas.
Consulte con un electricista cualificado en caso de duda.
3. ADVERTENCIA - Para reducir el riesgo de incendio o electrocución, evite utilizar el ventilador con
un dispositivo semiconductor para el control de la velocidad.
4. ADVERTENCIA - Para reducir el riesgo de lesión, no doble los soportes de las aspas cuando los
instale en el que equilibran las aspas, o cuando limpie el ventilador. No inserte objetos entre las
aspas en rotación.
5. PRECAUCIÓN - Todo el cableado debe realizarse cumpliendo con el Código Eléctrico Nacional
(ANSI/NFPA 70) y los reglamentos de electricidad locales. La instalación eléctrica debería efectuarla
un electricista acreditado.
6. Para reducir el riesgo de lesiones a personas, el ventilador debe montarse dejando un espacio
mínimo de 2,13 m desde el lado inferior de las aspas hasta el suelo.
7. Después de realizar las conexiones eléctricas, los conductores empalmados deben reorientarse
hacia arriba y empujarse con cuidado hacia el interior de la caja eléctrica. Los cables deben quedar
apartados, con el conductor de tierra y el conductor de tierra del dispositivo a un lado de la caja
eléctrica.
8. Tras someterlo a una serie de pruebas, se ha constatado que este aparato cumple los límites
exigidos para dispositivos digitales pertenecientes a la Categoría B, según lo establecido en la
sección 15 de la legislación de la FCC. Estos límites están diseñados para proporcionar una
protección razonable contra interferencias en instalaciones residenciales. Este aparato genera, usa
y puede irradiar energía en forma de radiofrecuencia. En caso de no ser instalado y utilizado de
acuerdo con las instrucciones, podría causar interferencias en las comunicaciones de radio.

Fanaway Classic Installation Instructions
14 | P a g e LD- 0003- 1 6 / X X X / 0 1
LISTA DE PIEZAS
Desembale su ventilador de techo e identifique perfectamente sus componentes. Consulte la Fig. 1.
Fig. 1

Fanaway Classic Installation Instructions
15 | P a g e LD- 0003- 1 6 / X X X / 0 1
1
Soporte mural x 1
11
Bombilla x 3
2
Florón x 1
12
• Tornillo para madera x 2
3
Tija con junta esférica x 1
• Tornillo para metal x 2
4
Tapa de perno y pasador x 1
• Arandela plana x 2
5
Perno x 1
• Arandela de resorte x 2
6
Pasador x 1
13
Tuerca de alambre x 6
7
Unidad del ventilador x 1
14
Cinta de equilibrado x 4
8
Tornillo para base de la lámpara x 3
15
Receptor x 1
9
Pantalla de lámpara x 1
16
Mando a distancia x 1 set
10
Kit de luz x 1
INSTALACIÓN DEL SOPORTE MURAL
Si no hay una caja eléctrica ya instalada, instale una siguiendo estas instrucciones:
• Corte la corriente quitando los fusibles o bajando los disyuntores.
• Asegure la caja eléctrica (A) (no incluida) directamente a la estructura del edifico. Utilice los
elementos y materiales de fijación apropiados (no incluidos). La caja eléctrica y su apuntalamiento
deben ser capaces de soportar el peso del ventilador en movimiento (15,9 kg como mínimo). No
utilice una caja eléctrica de plástico.
• Las imágenes más abajo muestran tres maneras diferentes de montar la caja eléctrica (A) (no
incluida).
Este ventilador con sistema colgante puede ser instalado en un techo con una inclinación máxima de
20 grados. Img. 4
NOTA: Si está instalando el ventilador en un techo inclinado, puede que sea necesario utilizar una tija
más larga para mantener el espacio necesario entre el extremo del aspa y el techo.
NOTA: El ventilador de techo debe instalarse en un lugar donde los extremos de las aspas queden a
Img. 2
Img. 3
Img. 4
Techo inclinado
Máximo 20°

Fanaway Classic Installation Instructions
16 | P a g e LD- 0003- 1 6 / X X X / 0 1
300 mm como mínimo de las paredes y otros objetos.
NOTA: Para la instalación en techos inclinados, la abertura del soporte del ventilador (B) debe apuntar
hacia el pico del techo.
Para colgar su ventilador donde ya haya un elemento de instalación pero sin vigas, puede que necesite
instalar una barra para colgar (C) como la mostrada en la imagen 5. Asegúrese de que la barra de
colgar que adquiera haya sido diseñada para usarse con ventiladores de techo.
INSTALACIÓN DEL VENTILADOR
Instalación de la tija
1) Pase la tija (5) a través del florón (4) y de la tapa del perno y el pasador (6).
2) Retire la junta esférica (2) aflojando el tornillo de fijación (3), inserte los cables del motor a través
de la tija y, a continuación, vuelva a fijar la junta esférica a la tija.
3) Inserte la tija en el acoplamiento (7), alinee los orificios del acoplamiento con los orificios de la
tija e inserte el perno (8). A continuación, inserte el pasador (9) en el extremo del perno.
4) Por último, fije la tija y el acoplamiento apretando los dos tornillos de fijación (10) del
acoplamiento. Img. 6
Img. 6
Img. 5

Fanaway Classic Installation Instructions
17 | P a g e LD- 0003- 1 6 / X X X / 0 1
CÓMO COLGAR EL VENTILADOR
Pase los cables de corriente (C) de la caja eléctrica del techo (B) por el centro del soporte mural del
techo (D). Instale el soporte mural del techo (D) en la caja eléctrica (B) con los tornillos de montaje (F)
incluidos con la caja eléctrica y las arandelas (E) incluidas con el ventilador. Img. 7
Levante el conjunto del ventilador y móntelo en el soporte mural. Asegúrese de que la ranura de
registro (A) de la bola de la tija esté posicionada sobre el tope (B) del soporte mural (C) para que el
ventilador no pueda girar cuando esté funcionando. Img. 8
INSTALACIÓN DEL VENTILADOR
Instalación del kit de luz
1. Afloje el tornillo (1) del soporte de la pantalla de la lámpara (3). Alinee los dos tornillos de ranura (2)
con las ranuras de los orificios de la pantalla de la lámpara (4). Img. 9
2. Gire la pantalla de la lámpara en el sentido contrario de las agujas del reloj hasta que los tornillos de
ranura estén firmemente fijados en el extremo de las ranuras.
3. Vuelva a fijar el tornillo 1 al soporte de la pantalla de la lámpara. Apriete los tres tornillos. No apriete
en exceso.
Img. 9
Img. 7
Img. 8

Fanaway Classic Installation Instructions
18 | P a g e LD- 0003- 1 6 / X X X / 0 1
4. Conecte las clavijas (8) juntas. Img. 10
5. Afloje el tornillo (5) de la pantalla de la lámpara (4). Alinee los dos tornillos de ranura (6) con las
ranuras del kit de luz (7).
6. Gire el kit de luz en el sentido contrario de las agujas del reloj hasta que los tornillos de ranura estén
firmemente fijados en el extremo de las ranuras.
7. Vuelva a fijar el tornillo 5 a la pantalla de la lámpara. Apriete los tres tornillos. No apriete en exceso.
8. Instale las bombillas en el portalámparas (bombillas incluidas).
Img. 10

Fanaway Classic Installation Instructions
19 | P a g e LD- 0003- 1 6 / X X X / 0 1
DIAGRAMA DE CONEXIONES ELÉCTRICAS
ADVERTENCIA: Para evitar posibles descargas eléctricas, asegúrese de que la corriente esté cortada
en el cuadro de distribución.
Siga los pasos siguientes para conectar el ventilador al cableado doméstico. Utilice las tuercas de
conexión de alambre suministradas con su ventilador. Asegure los conectores con cinta aislante.
Asegúrese de que no haya hilos de cable o conexiones sueltos.
1. Conecte el cable de fase doméstico (negro)
al cable de entrada del receptor (negro, CA EN
L) como muestra la Img. 11.
2. Conecte el cable neutro doméstico (blanco)
al cable de entrada del receptor (blanco, CA EN
N).
3. Conecte el cable de tierra doméstico al
cable de tierra del soporte del ventilador (verde)
y al cable de tierra del cuerpo del ventilador.
4. Conecte el cable de salida del receptor
(negro, A MOTOR L) al cable de entrada de
fase del motor (negro, A MOTOR L).
5. Conecte el cable de salida del receptor
(blanco, A MOTOR N) al cable de entrada de
neutro del motor (blanco, A MOTOR N).
6. Conecte el cable de salida del receptor (azul,
PARA LUZ) al cable de entrada de fase de la
luz del ventilador (azul, PARA LUZ).
7. Tras conectar los cables, apártelos unos de
otros de manera que los cables verdes y
blancos queden a un lado de la caja eléctrica y
los cables negro y azul queden al otro lado.
8. Oriente las tuercas de alambre hacia arriba
y empuje los cables hacia el interior de la caja
eléctrica.
Img. 11

Fanaway Classic Installation Instructions
20 | P a g e LD- 0003- 1 6 / X X X / 0 1
CÓMO FINALIZAR LA INSTALACIÓN
Deslice hacia arriba y alinee el florón con el soporte mural. Asegúrese de que todo el cableado eléctrico
quede insertado dentro del florón y de que los cables no se dañen durante este paso. Fije el florón al
soporte del colgador utilizando los tornillos suministrados.
MODO DE EMPLEO DEL VENTILADOR DE TECHO
COLOCACIÓN DE LOS INTERRUPTORES DIP
Cuando haya dos o más ventiladores próximos, tal vez desee ajustar el transmisor/receptor de cada
ventilador con un código diferente, de manera que el funcionamiento de un ventilador no afecte al de
otro.
Los interruptores DIP del receptor se encuentran ubicados sobre la superficie plana del receptor. Los
interruptores DIP del transmisor se encuentran en el compartimento de la batería. Img. 13.
NOTA: Asegúrese de que se haya desconectado la alimentación a los cables de corriente antes de
establecer el código.
Cambie la posición de los interruptores DIP en el transmisor remoto y el receptor. Asegúrese de que los
interruptores DIP coincidan en el receptor remoto y en el transmisor. Si no coincidieran, el transmisor no
funcionará. Img. 14
Img. 12
Img. 14
Img. 13
Interruptores DIP
Interruptores DIP
/