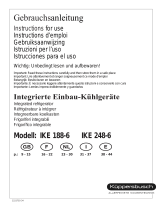
AEG OEKOS.S.2573-6KA User manual

Category
Fridges
Type
User manual

This manual is also suitable for

…KO SANTO SUPER
2573-6 KA
KŸhlautomat
Refrigerator
Gebrauchsanweisung
Operating Instructions
AEG HausgerŠte GmbH
Postfach 1036
D-90327 NŸrnberg
http://www.aeg.hausgeraete.de
2222 016-43
2
Sehr geehrte Kundin, sehr geehrter Kunde,
bevor Sie Ihr neues KŠltegerŠt in Betrieb nehmen, lesen Sie bitte die-
se Gebrauchsanweisung aufmerksam durch. Sie enthŠlt wichtige
Informationen zum sicheren Gebrauch, zum Aufstellen und zur Pfle-
ge des GerŠtes.
Bewahren Sie bitte die Gebrauchsanweisung zum spŠteren Nach-
schlagen auf. Geben Sie sie an eventuelle Nachbesitzer des GerŠtes
weiter.
Mit dem Warndreieck und/oder durch Signalwšrter (Warnung!, Vor-
sicht!, Achtung!) sind Hinweise hervorgehoben, die fŸr Ihre
Sicherheit oder fŸr die FunktionsfŠhigkeit des GerŠtes wichtig sind.
Bitte unbedingt beachten.
Nach diesem Zeichen erhalten Sie ergŠnzende Informationen zur
Bedienung und praktischen Anwendung des GerŠtes.
Mit der Blumesind Tips und Hinweise zum wirtschaftlichen und
umweltschonenden Einsatz des GerŠtes gekennzeichnet.
FŸr evtl. auftretende Stšrungen enthŠlt die Gebrauchsanweisung
Hinweise zur selbstŠndigen Behebung, siehe Abschnitt "Was tun,
wenn ...". Sollten diese Hinweise nicht ausreichen, steht Ihnen unser
Kundendienst jederzeit zur VerfŸgung.
Gedruckt auf umweltschonend hergestelltem Papier
Ð wer škologisch denkt, handelt auch so ...
Inhalt
Sicherheit . . . . . . . . . . . . . . . . . . . . . . . . . . . . . . . . . . ....... 4
Entsorgung . . . . . . . . . . . . . . . . . . . . . . . . . . . . . . . . . . . . . . . 5
Information zur GerŠteverpackung . . . . . . . . . . . . . . . . . . . . . . . 5
Entsorgung von AltgerŠten . . . . . . . . . . . . . . . . . . . . . . . . . . . . . 6
Transportschutz entfernen . . . . . . . ..................... 6
Aufstellen . . . . . . . . . . . . . . . . . . . . . . . . . . . . . . . . . . . . . . . . . 6
Aufstellort . . . . . . . . . . . . . . . . . . . . . . . . . . . . . . . . . . . . . . . . . 6
Ihr KŸhlgerŠt braucht Luft . . . . . . . . . . . . . . . . . . . . . . . . . . . . . 7
Hintere AbstandstŸcke ................................. 8
TŸranschlag wechseln . . . . . . . . . . . . . . . . . . . . . . . . . . . . . . . . 8
Vor Inbetriebnahme...................................9
Elektrischer Anschlu§ . . . . . . . . . . . . . . . . . . . . . . . . . . . . .... 9
Bedienblende ................................... .... 10
Inbetriebnahme und Temperaturregelung . . . . . . . . . . . . . . . 10
Innenausstattung .................................... 11
AbstellflŠchen . . . . . . . . . . . . . . . . . . . . . . . . ...............11
T
Ÿrabsteller
. . . . . . . .................................. 11
Richtig lagern. . . . . . . . . . . . ........................... 11
Abtauen . . . . . . . . . . . . . . . . . . . . . . . . . . . . . . . . . . ........ 12
GerŠt abschalten . . . . . . . . . . . ... . . . . . . . . . . . . . . . . . . . . . . 13
Reinigung und Pflege . . . . . . . . . . . . . . . . . . . . . . ..........13
Tips zur Energie-Einsparung . . . . . . . . . . . . . . . . . . . . ......14
Was tun, wenn . . . . . . . . . . . . . . . . . . . . . . . . . . . . . . . . .....14
Abhilfe bei Stšrungen . . . . . . . . . . . . . . . . . . . . . . . . . . . . . . . . .14
Lampe auswechseln . . . . . . . . . . . . . . . . . . . . . . . . . . . . . . . . . 16
Kundendienst . . . . . . . . . . . . . . . . . . . . . . . . . . . . . . . . . .....17
Bestimmungen, Normen, Richtlinien . . . . . . . . . . . . . . . . . . . 17
3
2222 016-43
34
Regulations, Standards, Guidelines
This appliance was designed for household use and was manufactu-
red in accordance with the appropriate standards. The necessary
measures in accordance with appliance safety legislation regulations
(GSG), accident prevention regulations for refrigeration appliances
(VBG 20) and the regulations of the German Society of Electrical
Engineers (VDE) were observed in the manufacture of this appliance.
The refrigerant circuit has been checked for leaks.
This appliance is in accordance with the following EU guidelines:
Ð 73/23/EWG dated 19 February 1973 - low voltage guidelines.
Ð 89/336/EWG dated 3 May 1989
(including guideline change notice 92/31/EWG) - EMV guideline
Customer Service
If you cannot find the remedy for a malfunction in these operating
instructions, please contact your dealer or our customer service
department. Addresses and telephone numbers are listed in the
accompanying booklet "Guarantee Conditions/Customer Service
Locations".
Selective ordering of replacement parts can save unnecessary travel
and costs. For this reason always provide the following appliance
information:
This information can be found on the serial plate in the interior at the
left of the appliance.
¥ Model Name
¥ Model Number (PNC)
¥ Serial Number (S-No.)
We recommend that you enter this information here, so that it is handy
if needed.
Note: The customer bears the costs of unjustified customer service
calls even during the guarantee period.
4
Sicherheit
Die Sicherheit unserer KŠltegerŠte entspricht den anerkannten
Regeln der Technik und dem GerŠtesicherheitsgesetz. Dennoch
sehen wir uns veranla§t, Sie mit folgenden Sicherheitshinweisen ver-
traut zu machen:
BestimmungsgemŠ§e Verwendung
¥ Das KŠltegerŠt ist fŸr die Verwendung im Haushalt bestimmt. Es
eignet sich zum KŸhlen von Lebensmitteln. Wird das GerŠt
zweckentfremdet oder falsch bedient, kann vom Hersteller keine
Haftung fŸr eventuelle SchŠden Ÿbernommen werden.
¥ Umbauten oder VerŠnderungen am KŠltegerŠt sind aus Sicherheits-
grŸnden nicht zulŠssig.
¥ Sollten Sie das KŠltegerŠt gewerblich oder fŸr andere Zwecke als
zum KŸhlen von Lebensmitteln benutzen, beachten Sie bitte die fŸr
Ihren Bereich gŸltigen gesetzlichen Bestimmungen.
Vor der ersten Inbetriebnahme
¥ †berprŸfen Sie das KŠltegerŠt auf TransportschŠden. Ein beschŠ-
digtes GerŠt auf keinen Fall anschlie§en! Wenden Sie sich im Scha-
densfall bitte an den Lieferanten.
KŠltemittel
Das GerŠt enthŠlt im KŠltemittelkreislauf das KŠltemittel Isobutan
(R600a), ein Naturgas mit hoher UmweltvertrŠglichkeit, das jedoch
brennbar ist.
¥ Achten Sie beim Transportieren und Aufstellen des GerŠtes darauf,
da§ keine Teile des KŠltemittelkreislaufs beschŠdigt werden.
¥ Bei BeschŠdigung des KŠltemittelkreislaufs:
Ð offenes Feuer und ZŸndquellen unbedingt vermeiden;
Ð den Raum, in dem das GerŠt steht, gut durchlŸften.
Sicherheit von Kindern
¥ Verpackungsteile (z. B. Folien, Styropor) kšnnen fŸr Kinder gefŠhrlich
sein. Erstickungsgefahr! Verpackungsmaterial von Kindern fernhal-
ten!
¥ Ausgediente AltgerŠte bitte vor der Entsorgung unbrauchbar
machen. Netzstecker ziehen, Netzkabel durchtrennen, eventuell
vorhandene Schnapp- oder Riegelschlšsser entfernen oder zerstš-
ren. Dadurch verhindern Sie, da§ sich spielende Kinder im GerŠt
33
Changing the light bulb
Warning! There is a risk of electric shocks! Before changing the light
bulb, switch off the appliance and unplug it, or pull the fuse or the cir-
cuit breaker. Light bulb data: 220-240 V, max. 15 W
1. To switch off the appliance, turn the
temperature regulator to position "0".
2. Unplug the mains plug.
3. To change the light bulb, undo the
screw.
4. Press the light bulb cover as shown
and slide it backwards.
5. Change the defective light bulb.
6. Refit the light bulb cover and the
screw.
7. Put the refrigerator back into opera-
tion.
D613
5
einsperren (Erstickungsgefahr!) oder in andere lebensgefŠhrliche
Situationen geraten.
¥ Kinder kšnnen Gefahren, die im Umgang mit HaushaltsgerŠten lie-
gen, oft nicht erkennen. Sorgen Sie deshalb fŸr die notwendige Auf-
sicht und lassen Sie Kinder nicht mit dem GerŠt spielen!
Im Alltagsbetrieb
¥ BehŠlter mit brennbaren Gasen oder FlŸssigkeiten kšnnen durch
KŠlteeinwirkung undicht werden. Explosionsgefahr! Lagern Sie kei-
ne BehŠlter mit brennbaren Stoffen, wie z.B. Spraydosen, Feuer-
zeug-NachfŸllkartuschen etc. im KŠltegerŠt.
¥ Keine ElektrogerŠte (z. B. elektrische Eismaschinen, RŸhrgerŠte
etc.) im KŠltegerŠt betreiben.
¥ Vor Reinigungsarbeiten das GerŠt grundsŠtzlich abschalten und den
Netzstecker ziehen oder Sicherung in der Wohnung abschalten
bzw. herausdrehen.
¥ Netzstecker immer am Stecker aus der Steckdose ziehen, nie am
Kabel.
Im Stšrungsfall
¥ Sollte einmal eine Stšrung am GerŠt auftreten, sehen Sie bitte
zuerst in dieser Gebrauchsanweisung unter "Was tun, wenn ..."
nach. Falls die dort aufgefŸhrten Hinweise nicht weiterhelfen, fŸh-
ren Sie bitte keine weiteren Arbeiten selbst aus.
¥ KŠltegerŠte dŸrfen nur von FachkrŠften repariert werden. Durch
unsachgemŠ§e Reparaturen kšnnen erhebliche Gefahren ent-
stehen. Wenden Sie sich im Reparaturfall bitte an Ihren FachhŠnd-
ler oder an unseren Kundendienst.
Entsorgung
Information zur GerŠteverpackung
Alle verwendeten Werkstoffe sind umweltvertrŠglich! Sie kšnnen gefahr-
los deponiert oder in der MŸllverbrennungsanlage verbrannt werden!
Zu den Werkstoffen: Die Kunststoffe kšnnen auch wiederverwertet
werden und sind folgenderma§en gekennzeichnet:
>PE< fŸr PolyŠthylen, z. B. bei der Šu§eren HŸlle und den Beuteln im
Innern.
>PS< fŸr geschŠumtes Polystyrol, z. B. bei den Polsterteilen, grund-
sŠtzlich FCKW-frei.
32
Heavy build up of frost, pos-
sibly also on the door seal.
Door seal is not air tight
(possibly after changing
over the hinges).
Carefully warm the leaking
sections of the door seal
with a hair dryer (not hotter
than approx. 50 ¡C). At the
same time shape the war-
med door seal by hand such
that it sits correctly.
Unusual noises.
The appliance is touching
the wall or other objects.
Appliance is not level.
A component, e.g. a pipe,
on the rear of the appliance
is touching another part of
the appliance or the wall.
The compressor starts after
a period of time.
See the "Cleaning and
Care" section.
This is normal, no error has
occurred.
The compressor does not
start immediately after chan-
ging the temperature set-
ting.
Water on the floor or on sto-
rage shelves.
Water drain hole is blocked.
If necessary, carefully bend
the component out of the
way.
Move the appliance slightly.
Readjust the feet.
The food is too warm.
Interior lighting does not
work.
The appliance is near a heat
source.
Temperature is not properly
adjusted.
Please look in the "Initial
Start Up" section.
Light bulb is defective. Please look in the "Chan-
ging the Light Bulb" section.
Turn the temperature regu-
lator to a colder setting tem-
porarily.
Door was open for an exten-
ded period.
Please look in the "Installa-
tion location" section.
A large quantity of warm
food was placed in the
appliance within the last 24
hours.
Open the door only as long
as necessary.
Appliance cools too much. Temperature is set too cold. Turn the temperature regu-
lator to a warmer setting
temporarily..
Malfunction
Possible Cause
Remedy
6
Transportschutz entfernen
Das GerŠt sowie Teile der Innenausstattung sind fŸr den Transport
geschŸtzt.
¥ Alle KlebebŠnder sowie Polsterteile aus dem GerŠteinnenraum ent-
fernen.
Eventuelle KleberŸckstŠnde kšnnen Sie mit Reinigungs- oder Wasch-
benzin entfernen.
Aufstellen
Aufstellort
Das GerŠt soll in einem gut belŸfteten und trockenen Raum stehen.
Die Umgebungstemperatur wirkt sich auf den Stromverbrauch aus.
Daher sollte das GerŠt
Ð nicht direkter Sonneneinstrahlung ausgesetzt sein;
Die Kartonteile werden aus Altpapier hergestellt und sollten auch wie-
der zur Altpapiersammlung gegeben werden.
Entsorgung von AltgerŠten
Aus UmweltschutzgrŸnden mŸssen KŠltegerŠte fachgerecht entsorgt
werden. Dies gilt fŸr Ihr bisheriges GerŠt und - nachdem es eines
Tages ausgedient hat - auch fŸr Ihr neues GerŠt.
Warnung! Ausgediente AltgerŠte bitte vor der Entsorgung unbrauch-
bar machen. Netzstecker ziehen, Netzkabel durchtrennen, eventuell
vorhandene Schnapp- oder Riegelschlšsser entfernen oder zerstš-
ren. Dadurch verhindern Sie, da§ sich spielende Kinder im GerŠt ein-
sperren (Erstickungsgefahr!) oder in andere lebensgefŠhrliche Situa-
tionen geraten.
Entsorgungshinweise:
¥ Das GerŠt darf nicht mit dem Haus- oder SperrmŸll entsorgt werden.
¥ Der KŠltemittelkreislauf, insbesondere der WŠrmetauscher an der
GerŠterŸckseite, darf nicht beschŠdigt werden.
¥ Auskunft Ÿber Abholtermine oder SammelplŠtze erhalten Sie bei der
šrtlichen Stadtreinigung oder der Gemeindeverwaltung.
31
Energy Saving Tips
¥ Do not install the appliance near cookers, radiators or other sources
of warmth. High ambient temperatures cause longer, more frequent
operation of the compressor.
¥ Ensure sufficient air circulation and exhaust at the appliance base and
at the back wall of the appliance. Never cover air vent openings.
¥ Do not place warm foods into the appliance. Allow warm foods to
cool first.
¥ Only leave door open as long as necessary.
¥ Do not set temperature any colder than necessary.
¥ Put frozen food in the fridge to defrost. The cold in the frozen food
will then be used to cool the fridge.
¥ Keep the heat emitting condenser, the metall grille on the rear wall
of your appliance, always clean.
What to do if ...
Correcting Malfunctions
A malfunction may be caused by only a minor fault that you can rec-
tify yourself using the following instructions. Do not perform any other
work on the appliance if the following information does not provide
assistance in your specific case.
Warning! Repairs to refrigerators/freezers may only be performed by
qualified service engineers. Improper repairs can give rise to signifi-
cant hazards for the user. If your appliance needs repairing, please
contact your specialist dealer or our Customer Service.
Malfunction
Possible Cause
Remedy
Appliance does not work.
Appliance is not switched on Switch on the appliance.
Mains plug is not plugged in
or is loose.
Insert mains plug.
Fuse has blown or is defec-
tive.
Check fuse, replace if
necessary.
Socket is defective. Mains malfunctions are to
be corrected by an electri-
cian.
7
Klimaklasse fŸr Umgebungstemperatur von
SN +10 bis +32 ¡C
N +16 bis +32 ¡C
ST +18 bis +38 ¡C
T +18 bis +43 ¡C
Ist die Aufstellung neben einer WŠrmequelle unvermeidbar, sind fol-
gende seitliche MindestabstŠnde einzuhalten:
Ð zu Elektroherden 3 cm;
Ð zu …l- und Kohleherden 30 cm.
Kšnnen diese AbstŠnde nicht eingehalten werden, ist eine WŠrme-
schutzplatte zwischen Herd und KŠltegerŠt erforderlich.
Steht das KŠltegerŠt neben einem anderen KŸhl- oder GefriergerŠt,
ist ein seitlicher Abstand von 5 cm erforderlich, damit sich an den
GerŠte-Au§enseiten kein Schwitzwasser bildet.
Ð nicht an Heizkšrpern, neben einem Herd oder sonstigen WŠrme-
quellen stehen;
Ð nur an einem Ort stehen, dessen Umgebungstemperatur der Klima-
klasse entspricht, fŸr die das GerŠt ausgelegt ist.
Die Klimaklasse finden Sie auf dem Typschild, das sich links im
Innenraum des GerŠtes befindet.
Nachstehende Tabelle zeigt, welche Umgebungstemperatur welcher
Klimaklasse zugeordnet ist:
100 mm10 mm
10 mm
NP007
Ihr KŸhlgerŠt braucht Luft
Aus GrŸnden der Betriebs-
sicherheit mu§ eine MindestbelŸf-
tung gewŠhrleistet sein, wie aus der
Abb. hervorgeht:
Achtung:
Die LŸftungs-…ffnungen mŸssen
immer saubergehalten werden.
Damit die Luft zirkulieren kann,
die LŸftungsšffnungen niemals
abdecken oder verstellen.
3030
Cleaning and Care
For hygienic reasons the appliance interior, including interior acces-
sories, should be cleaned regularly.
Warning!
¥ The appliance may not be connected to the mains during cleaning.
Danger of electrical shock! Before cleaning switch the appliance
offand rem ve the plug from the mains, or switch off or turn out the cir-
cuit breaker or fuse.
¥ Never clean the appliance with a steam cleaner. Moisture could
accumulate in electrical components, danger of electrical shock!
Hot vapours can lead to the damage of plastic parts.
¥ The appliance must be dry before it is placed back into service.
Attention!
¥ Ethereal oils and organic solvents can attack plastic parts, e.g.
Ð lemon juice or the juice from orange peals;
Ð butyric acid;
Ð cleansers which contain acetic acid.
Do not allow such substances to come into contact with appliance
parts.
¥ Do not use any abrasive cleansers.
1. Remove the food from the refrigerator.
2. Switch the appliance off and remove the plug from the mains, or swit-
ch off or turn out the circuit breaker or fuse.
2. Clean the appliance and the interior accessories with a cloth and
lukewarm water. Commercially available dish washing detergents
may also be used.
4. After cleaning wipe with fresh water and rub dry.
Accumulation of dust at the condenser increases energy consump-
tion. For this reason carefully clean the condenser at the back of the
appliance once a year with a soft brush or a vacuum cleaner.
5. Check the water drain hole on the rear wall of the fridge. Clear a
blocked drain hole with the aid of the green peg .
6. After everything is dry place appliance back into service.
8
TŸranschlag wechseln
Der TŸranschlag kann von rechts (Lieferzustand) nach links gewech-
selt werden, falls der Aufstellort dies erfordert.
Warnung! WŠhrend des TŸranschlagwechsels darf das GerŠt nicht
am Stromnetz angeschlossen sein. Vorher Netzstecker ziehen.
Vorgehensweise
1. Sockelblende (D) nach vorn
abziehen.
2. TŸrlagerabdeckung (F) von
links nach rechts umsetzen.
3. Unteres TŸrlager (E) ab-
schrauben.
4. KŸhlraumtŸr nach unten
abnehmen.
5. Oberen TŸrlagerzapfen (5)
abschrauben und auf gegen-
Ÿberliegenden Seite montieren.
6. Abdeckstšpsel fŸr die Bohr-
lšcher von links nach rechts
umsetzen.
7. KŸhlraumtŸr auf oberes TŸr-
lager aufsetzen und schlie§en.
8. Unteres TŸrlager (E) unten
links in die KŸhlraumtŸr einset-
zen und am GehŠuse
festschrauben.
Hintere AbstandsstŸcke
Im Beipack sind 2 Distanz-
stŸcke enthalten, die wie in
der Abbildung gezeigt mon-
tiert werden mŸssen.
Lšsen sie dazu etwas die
Schrauben gemŠ§ Abbildung.
Schieben Sie das DistanzstŸck
unter den Schraubenkopf und
ziehen Sie die Schraube wieder
fest.
D594
D
D590
E
F
D
F
F
F
29
Defrosting
Refrigerator
Frost is automatically eliminat-
ed from the evaporator of the
refrigerator compartment
every time the motor compres-
sor stops, during normal use.
The defrost water drains out
through a trough into a special
container at the back of the
appliance, over the motor
compressor, where it evapo-
rates.
We particulary recommend that you peridically clean the
defrost-water drainage outlet, located in the center of the
drainage groove in the refrigerator compartment, to prevent the
defrost water form overflowing on to foods stored in the com-
partment. Use a special cleaner provided, which you will find
already inserted into the discharge hole.
D037
Switching off the appliance
To switch off the appliance, turn the temperature regulator to position
"0".
If the appliance is not going to be used for an extended period:
1. Remove all refrigerated packages as well as ice trays.
2. Switch off the appliance by turning the temperature regulator to posi-
tion "0".
3. Remove the mains plug or switch off or turn out the circuit breaker or
fuse.
4. Clean thoroughly (see section: ÒCleaning and CareÓ).
5. Leave the door open to avoid the build up of odours.
9
9. Sockelblende (D) aufsetzen.
10. TŸrgriff abnehmen und auf
gegenŸberliegender Seite
befestigen. Mit einem Senkstift
die Plastikstšpsel auf der
gegenŸberliegenden Seite des
TŸrgriffs durchlšchern. Mit den
im Beipack enthaltenen Plas-
tikstšpseln, die freigebliebe-
nen Lšcher abdecken.
Achtung:
Vergewissern Sie sich nach AusfŸhrung des TŸranschlagwechsels,
da§ alle Schrauben fest angezogzen sind und die TŸrdichtung ein-
wandfrei am GehŠuse anliegt.
Gegenfalls die TŸrdichtung vorsichtig mit einem Fšn erwŠrmen
(max.50¡C) und von Hand in Form ziehen.
PR228
Vor Inbetriebnahme
¥ Das GerŠteinnere und alle Ausstattungsteile bitte vor Erstinbetrieb-
nahme reinigen (siehe Abschnitt "Reinigung und Pflege").
Elektrischer Anschlu§
FŸr den elektrischen Anschlu§ ist eine vorschriftsmŠ§ig installierte
Schutzkontakt-Steckdose erforderlich. Sie sollte so gesetzt sein, da§
ein Ziehen des Netzsteckers mšglich ist.
Die elektrische Absicherung mu§ mindestens 10/16 Ampere betragen.
Ist die Steckdose bei eingebautem GerŠt nicht mehr zugŠnglich, mu§
eine geeignete Ma§nahme in der Elektroinstallation sicherstellen, da§
das GerŠt vom Netz getrennt werden kann (z. B. Sicherung, LS-
Schalter, Fehlerstrom-Schutzschalter oder dergleichen mit einer Kon-
taktšffnungsweite von mindestens 3 mm).
¥ Vor Inbetriebnahme am Typschild des GerŠtes ŸberprŸfen, ob
Anschlu§spannung und Stromart mit den Werten des Stromnetzes
am Aufstellort Ÿbereinstimmen.
Z. B.: AC 220 ... 240 V 50 Hz oder
220 ... 240 V~ 50 Hz
(d. h. 220 bis 240 Volt Wechselstrom, 50 Hertz)
Das Typschild befindet sich links im Innenraum des GerŠtes.
Adjusting the upper door rack
¥ Depending on the food sto-
red, the upper door racks
can be changed to other hol-
ders or removed. Take out
the refrigerators food, press
the door racks digonally
upwards at their edges,
reposition them, and press
them back into place.
28
PR270/1
Fresh food refrigeration
To obtain the best performance:
¥ do not store warm food or evaporating liquide in the refrigeator
¥ do cover or wrap the food, particularly if it has a strong flavour.
¥ Position food so that air can circuiate freely round it.
Useful hints:
Meat (all types): wrap in polythene bags and place on the glass shelf
above the vegetable drawer(s)For safety, store in this way only one
or two days at the most.
Cooked foods, cold dishes, etc: these should be covered and may
be placed on any shelf.
Fruit and vegetables: these should be thoroughly cleaned and
placed in the special drawer(s) provided.
Butter and cheese: these should be placed in special airtight con-
tainers or wapped in aluminium foil or polythene bags to exclude as
much air as possible.
Milk bootles: these should have a cap and should be stored in the
bottle rack on the door.
Bananas, potatoes, onions and garlic, if not packed, must not be
kept in the refrigerator.
10
Inbetriebnahme und Temperaturrege-
lung
¥ Netzstecker in die Steckdose stecken. Den Temperaturegler (B) im
Uhrzeigersinn aus der Stellung ÇOÈ (STOP) drehen. Die Kontrol-
lampe (A) leuchtet auf.
Stellung ã0Ò bedeutet: aus.
Stellung ã1Ò bedeutet: Hšchste Innentemperatur (wŠrmste Einstel-
lung).
Stellung ã4Ò (Endanschlag) bedeutet: Tiefste Innentemperatur (kŠl-
teste Einstellung).
Folgende EinflŸsse sind ausschlaggebend fŸr die Innentemperatur:
Ð Umgebungstemperatur;
Ð Menge und Temperatur der eingelagerten Lebensmittel;
Ð HŠufiges oder langes …ffnen der TŸr.
Wichtig!
Hohe Umgebungstemperatur (z. B. an hei§en Sommertagen) und
kalte Einstellung des Temperaturreglers (Stellung ã4Ò) kann zu Dauer-
betrieb des Kompressors fŸhren.
In diesem Fall den Temperaturregler auf eine wŠrmere Einstellung
zurŸckdrehen (Stellung ã2Ò bis ã3Ò). Bei dieser Einstellung wird der
Kompressor geregelt und der Abtauvorgang wieder automatisch ein-
geleitet.
Bedienblende
AB
4
32
1
0
A - Netzkontrollampe
B - Temperaturregler
27
Setting ã4Ò (end-stop) means: Lowest temperature, (coldest setting).
However, the exact setting should be chosen keeping in the mind that the
temperature inside the refrigerator depends on:
-the quantity of food stored
-how often the door is opened
Important!
High ambient temperatures (e.g. on hot summer days) and a cold setting
on the temperature regulator (position"5" to "6") can cause the compres-
sor to run continuously.
If this happens, turn the temperature regulator back to a warmer setting
(position "3" to "4"). At this setting the compressor will be switched on
and off as usual and automatic defrosting recommenced.
Interior Accessories
Storage shelves
¥ You should always slide one of the full size glass storage shelf into
the lowest set of guides, above the fruit and the vegetable contai-
ners, and keep it in this position.
¥ The height of the storage shelves can be adjusted:
¥ To do this pull the storage
shelf forward until it can be
swivelledupwards or
downwards and removed.
¥ Please do the same in rever-
se to insert the shelf at a dif-
ferent height.Slide the front
half of the Vario storage shelf
in another level to the rear.
By this means you will gain
space to place tall items on
the storage shelf below.
D338
11
Innenausstattung
Verstellung der AbstellflŠchen
¥ Eine geschlossene AbstellflŠ-
che bitte in die untersten FŸh-
rungen Ÿber die Obst- und
GemŸseschalen einschieben.
Sie mu§ immer in dieser Stel-
lung verbleiben.
Die AbstellflŠchen sind
hšhenverstellbar:
¥ Dazu die AbstellflŠche soweit nach vorne ziehen, bis sie sich nach
oben oder unten abschwenken und heraus-nehmen lŠ§t.
¥ Das Einsetzen in eine andere Hšhe bitte in umgekehrter Reihenfol-
ge vornehmen.
¥ Die vordere HŠlfte der VARIO-GlasabstellflŠche auf einer anderen
Ebene nach hinten schieben. Dadurch gewinnen Sie Raum, um auf
der darunterliegenden AbstellflŠche hohes KŸhlgut abzustellen.
Verstellung der TŸrabsteller
¥ Je nach Lagergut kšnnen die
TŸrabsteller in andere Aufnah-
men umgesetzt oder herau-
sgenommen werden. KŸhlgut
herausnehmen, TŸrabsteller
nach oben drŸcken, umsetzen
und wieder eindrŸcken.
D338
PR270/1
Richtig lagern
Um die besten Leistungen des KŸhlschrankes zu erreichen, beach-
ten Sie bitte folgendes:
¥ Keine warmen Speisen oder FlŸssigkeiten in den KŸhlschrank ein-
stellen.
¥ Geruchverbreitende Lebensmittel sollten abgedeckt oder ein-
gewickelt werden.
26
Starting up and temperature regulation
¥ Insert the plug of the connection lead into the plug socket with pro-
tective earth contact. Turn the thermostat knob (B), clockwise,
beyond the ÇOÈ(STOP) position. The pilot light (A) will light up, indi-
cating that the appliance is in operation.
Setting ã0Ò means: Off.
Setting ã1Ò means: Hightest temperature, (warmest setting).
Control panel
AB
4
32
1
0
A- Mains control light
B- Thermostat button (Temperature selector)
Green and Yellow Earth
Blue Neutral
Brown Live
As the colours of the wires in the mains lead of this appliance may not
correspond with the coloured markings indentifying the terminals in
your plug, proceed as follows:
1. The wire coloured green and yellow must be connected to the termi-
nal marked with the letter ãEÒ or by the earth symbol or coloured green
and yellow.
2. The wire coloured blue must be connected to the terminal ãNÒ or
coloured black.
3. The wire coloured brown must be connected to the terminal marked
ãLÒ or coloured red.
4. Upon completion there must be not cut, or stray strands of wire pre-
sent and the cord clamp must be secure over the outer sheat.
Warning! A cut-off plug inserted into a 13 amp socket is a serious
safety (shock) hazard. Ensure that the cut-off plug is disposed of
safely.
12
Abtauen
KŸhlraum
Die sich auf dem Verdampfer
des KŸhlschrankes bildende
Reifschicht taut jedesmal in
den Stillstandzeiten des Kom-
pressors von selbst ab. Das
Tauwasser lŠuft durch eine
Rinne in eine Plastikschale auf
der RŸckseite des GerŠtes
und verdunstet dort.
Wir empfehlen, das in der Mitte der Abtauwasserrinne des KŸhl-
raumes befindliche Ablaufloch fŸr das Abtauwasser regelmŠ§ig
zu reinigen, um zu vermeiden, da§ das Abtauwasser auf Lebens-
mittel tropft.
Verwenden Sie den dafŸr vorgesehenen Reiniger, der sich schon
im Ablaufloch befindet.
D037
¥ Die Lebensmittel mŸssen so eingelagert werden, da§ die Luft frei
zirkulieren kann.
Nachstehend einige praktische RatschlŠge:
Fleisch (alle Sorten) in Plastikfolie einpacken und auf die Glasplat-
te, die sich Ÿber der GemŸseschale (Ÿber den GemŸseschalen)
befindet, legen.
In dieser Lage kann das Fleisch lŠngstens 1-2 Tage aufbewahrt
werden.
Gekochte Nahrungsmittel, kalte Platten, usw. zugedeckt aufbe-
wahren. Sie kšnnen auf jede beliebige Ablage gelegt werden.
Obst und GemŸse: nach vorherigem SŠubern und Waschen in der
GemŸseschale aufbewahren
Butter und KŠse: in speziellen BehŠltern aufbewahren oder in Alu-
bzw. Plastikfolie einpacken, um den Kontakt mit der Luft zu vermei-
den.
Milch in Flaschen: gut verschlossen in das Flaschenfach der
InnentŸr stellen
Bananen, Kartoffeln, Zwiebeln und Knoblauch sollten nicht
unverpackt im KŸhlschrank aufbewahrt werden.
25
PR228
8. Refit ventilation grille (D), clip-
ping it into place.
9. Unscrew the handle. Refit it on
opposite side after having pier-
ced the plugs with a punch.
Cover the holes left open with
the plugs contained in the
documentation pack.
Attention:
After having reversed the ope-
ning direction of the doors
check that all the screws are
properly tightened and that the
magnetic seal adheres to the
cabinet.
If the ambient temperature is cold (i.e. in Winter), the gasket may not
fit perfectly to the cabinet. in that case, wait for the natural fitting of the
gasket or accelerate this process by heating up the part involved with a
normal hairdrier.
Prior to Initial StartÐUp
¥ Please clean the appliance interior and all accessories prior to initial
start-up (see section: ÒCleaning and CareÓ).
Electrical Connection
Any electrical work required to install this appliance should be carried
out by a qualified electrician or competent person.
WARNING Ð THIS APPLIANCE MUST BE EARTHED
The manufacturer declines any liability should these safety mea-
sures not be observed.
Before switching on, make sure the electricity supply voltage is the
same as that indicated on the appliance rating plate. The rating plate
is inside, on the left.
The appliance is supplied with a 13 amp plug fitted. In the event of
having to change the fuse in the plug supplied, a 13 amp ASTA appro-
ved (BS 1362) fuse must be used.
Important!
The wires in the mains lead are coloured in accordance with the fol-
lowing code:
13
GerŠt abschalten
Soll das GerŠt fŸr lŠngere Zeit au§er Betrieb genommen werden:
1. KŸhlgut herausnehmen.
2. GerŠt abschalten, dazu Temperaturregler auf Stellung ã0Ò drehen.
3. Netzstecker ziehen oder Sicherung abschalten bzw. herausdrehen.
4. GrŸndlich reinigen (siehe Abschnitt "Reinigung und Pflege").
5. TŸr offen lassen, um Geruchsbildung zu vermeiden.
Reinigung und Pflege
Aus hygienischen GrŸnden sollte das GerŠteinnere, einschlie§lich
Innenausstattung, regelmŠ§ig gereinigt werden.
Warnung!
¥ Das GerŠt darf wŠhrend der Reinigung nicht am Stromnetz ange-
schlossen sein. Stromschlaggefahr! Vor Reinigungsarbeiten GerŠt
abschalten und Netzstecker ziehen oder Sicherung abschalten bzw.
herausdrehen.
¥ Das GerŠt nie mit DampfreinigungsgerŠten reinigen. Feuchtigkeit
kšnnte in elektrische Bauteile gelangen, Stromschlaggefahr! Hei§er
Dampf kann zu SchŠden an Kunststoffteilen fŸhren.
¥ Das GerŠt mu§ trocken sein, bevor Sie es wieder in Betrieb nehmen.
Achtung!
¥ €therische …le und organische Lšsungsmittel kšnnen Kunststofftei-
le angreifen, z. B.
Ð Saft von Zitronen- oder Apfelsinenschalen;
Ð ButtersŠure;
Ð Reinigungsmittel, die EssigsŠure enthalten.
Solche Substanzen nicht mit den GerŠteteilen in Kontakt bringen.
¥ Keine scheuernden Reinigungsmittel verwenden.
1. KŸhlgut herausnehmen.
2. GerŠt abschalten und den Netzstecker ziehen oder Sicherung
abschalten bzw. herausdrehen.
3. GerŠt einschlie§lich Innenausstattung mit einem Lappen und lauwar-
mem Wasser reinigen. Eventuell etwas handelsŸbliches Geschirr-
spŸlmittel beigeben.
Rehingeing the door
The side at which the door opens can be changed from the right side
(factory adjustment) to the left side, if the installation site requires.
Warning! When changing the side at which the door opens, the
appliance may not be connected to the mains. Remove plug from the
mains beforehand.
Procced as follow:
1. Remove the clip-in ventilation
grille (D).
2. Remove the bottom hinge (E)
by unscrewing the two fixing
screws.
3. Unscrew pin (D) and refit it on
the opposite side.
5. Remove the two plugs, to
reveal the holes for the hinge
pivots, and remount them on
the other side.
6. Refit the door .
6. Refit bottom hinge (E) on the
opposite side, using the two
screws previously removed.
7. Remove blanking cover (F) from
ventilation grille (D) by pushing it
in the direction of the arrow and
refit it on the opposite side.
24
D
D590
E
F
D
F
F
F
Rear spacers
In the bag with the documenta-
tion, there are two spacers
which must be fitted.
slacken the screws and insert
the spacer under the screw
head, then re-tighten the
screws.
D594
14
Was tun, wenn ...
Abhilfe bei Stšrungen
Mšglicherweise handelt es sich bei einer Stšrung nur um einen klei-
nen Fehler, den Sie anhand nachfolgender Hinweise selbst beheben
kšnnen. FŸhren Sie keine weiteren Arbeiten selbst aus, wenn nach-
stehende Informationen im konkreten Fall nicht weiterhelfen.
Warnung! Reparaturen am KŠltegerŠt dŸrfen nur von FachkrŠften
durchgefŸhrt werden. Durch unsachgemŠ§e Reparaturen kšnnen
erhebliche Gefahren fŸr den Benutzer entstehen. Wenden Sie sich im
Reparaturfall an Ihren FachhŠndler oder an unseren Kundendienst.
Tips zur Energie-Einsparung
¥ Das GerŠt nicht in der NŠhe von Herden, Heizkšrpern oder anderen
WŠrmequellen aufstellen. Bei hoher Umgebungstemperatur lŠuft
der Kompressor hŠufiger und lŠnger.
¥ Ausreichende Be- und EntlŸftung des GerŠtes gewŠhrleisten. LŸf-
tungsšffnungen niemals abdecken.
¥ Keine warmen Speisen in das GerŠt stellen. Warme Speisen erst
abkŸhlen lassen.
¥ TŸr nur so lange wie nštig gešffnet lassen.
¥ Die Temperatur nicht kŠlter als nštig einstellen.
¥ TiefkŸhlgut zum Auftauen in den KŸhlraum legen. Die KŠlte im Tief-
kŸhlgut wird so zur KŸhlung im KŸhlraum genutzt.
¥ Den VerflŸssiger, das Metallgitter an der GerŠterŸckseite, immer
sauber halten.
4. Anschlie§end mit klarem Wasser nachwischen und trockenreiben.
Staubablagerungen am VerflŸssiger erhšhen den Energieverbrauch.
Deshalb einmal im Jahr den VerflŸssiger an der GerŠterŸckseite mit
einer weichen BŸrste oder mit dem Staubsauger vorsichtig reinigen.
5. Die Ablaufšffnung der Tropfrinne an der RŸckwand des KŸhlraumes
kontrollieren. Bei Verstopfung diese mit Hilfe des grŸnen Stšpsels frei
machen.
6. Nachdem alles trocken ist, Lebensmittel wieder einlagern und GerŠt
wieder in Betrieb nehmen.
23
Climate classification ffor an ambient temperature of
SN +10 bis +32 ¡C
N +16 bis +32 ¡C
ST +18 bis +38 ¡C
T +18 bis +43 ¡C
If installation next to a source of heat is unavoidable, the following
minimum clearances must be maintained at the sides of the applian-
ce:
Ð for electric cookers 3 cm;
Ð for oil and coal fired ranges 30 cm.
If these clearances cannot be maintained a heat insulating pad is
required between the cooker and the refrigeration appliance.
If the refrigeration appliance is installed next to another refrigerator or
freezer a clearance of 5 cm at the sides is required, in order to pre-
vent the formation of condensation on the outside of the appliance.
The climate classification can be found on the serial plate, which is
located at the left on the inside of the appliance.
The following table shows which ambient temperature is correct for
each climate classification: each climate classification:
Your appliance needs air
For safety reasons, minimum
ventilationmust be as shown
Fig.
Attention: keep ventilation
openings clear of obstruc-
tion;
100 mm10 mm
10 mm
NP007
15
Stšrung Mšgliche Ursache Abhilfe
GerŠt arbeitet nicht
GerŠt ist nicht eingeschaltet GerŠt einschalten.
Netzstecker ist nicht einge-
steckt oder lose.
Netzstecker einstecken.
Sicherung hat ausgelšst
oder ist defekt.
Sicherung ŸberprŸfen,
gegebenenfalls erneuern.
Steckdose ist defekt. Stšrungen am Stromnetz
behebt Ihr Elektrofachmann.
Die Lebensmittel sind zu
warm.
Innenbeleuchtung funktio-
niert nicht
Das GerŠt steht neben einer
WŠrmequelle.
Temperatur ist nicht richtig
eingestellt.
Bitte im Abschnitt "Inbe-
triebnahme" nachsehen.
Lampe ist defekt. Bitte im Abschnitt "Lampe
auswechseln" nachsehen.
Temperaturregler vorŸber-
gehend auf kŠltere Einstel-
lung drehen.
TŸr war lŠngere Zeit gešff-
net.
Bitte im Abschnitt "Aufstell-
ort" nachsehen.
Innerhalb der letzten 24
Stunden wurden grš§ere
Mengen warmer Lebens-
mittel eingelagert.
TŸr nur so lange wie nštig
gešffnet lassen.
Starke Reifbildung im GerŠt,
evtl. auch an der TŸrdich-
tung.
TŸrdichtung ist undicht
(evtl. nach TŸranschlag-
wechsel).
An den undichten Stellen
TŸrdichtung vorsichtig mit
einem Foen¨ erwŠrmen
(nicht wŠrmer als ca. 50
¡C). Gleichzeitig die
erwŠrmte TŸrdichtung von
Hand so in Form ziehen,
da§ sie wieder einwandfrei
anliegt.
GerŠt kŸhlt zu stark. Temperatur ist zu kalt ein-
gestellt.
Temperaturregler vorŸber-
gehend auf wŠrmere Ein-
stellung drehen.
Ungewšhnliche GerŠusche.
GerŠt hat Kontakt mit der
Wand oder mit anderen
GegenstŠnden.
GerŠt steht nicht gerade.
Ein Teil, z. B. ein Rohr, an
der GerŠterŸckseite berŸhrt
ein anderes GerŠteteil oder
die Wand.
Gegebenenfalls dieses Teil
vorsichtig wegbiegen.
GerŠt etwas wegrŸcken.
Verstellf٤e nachjustieren.
22
Installation
Installation Location
The appliance should be set up in a well ventilated, dry room.
Energy use is affected by the ambient temperature. The appliance
should therefore
Ð not be exposed to direct sunlight;
Ð not be installed next to radiators, cookers or other sources of heat;
Ð only be installed at a location whose ambient temperature corre-
sponds to the climate classification, for which the appliance is desi-
gned.
Remove transport safeguard
The appliance and the interior fittings are protected for transport.
¥ Remove all adhesive tape and packing pieces from the interior of
the appliance.
You can remove any remnants of adhesive using white spirit.
Disposal of old Appliances
For environmental reasons, refrigeration appliances must be dispo-
sed of properly. This applies to your old appliance, and - at the end of
its service life - for your new appliance as well.
Warning! Before disposing of old appliances make them inoperable.
Remove plug from mains, sever the power cable, remove or destroy
any snap or latch closures. This eliminates the danger that playing
children lock themselves into the appliance (danger of suffocation!) or
place themselves into other life-endangering situations.
Disposal:
¥ The appliance may not be disposed of with domestic waste or bulky
refuse.
¥ The refrigerant circuit, especially the heat exchanger at the back of
the appliance, may not be damaged.
¥ Information concerning collection schedules or locations can be
obtained from the local disposal authorities or town hall.
16
Lampe auswechseln
Warnung! Stromschlaggefahr! Vor dem Lampenwechsel GerŠt
abschalten und den Netzstecker ziehen oder Sicherung abschalten
bzw. herausdrehen.
Lampendaten: 220-240 V, max. 15 W, Fassung: E 14
1. Zum Abschalten des GerŠtes Tempe-
raturregler auf Stellung ã0Ò drehen.
2. Netzstecker ziehen.
3. Zum Auswechseln der Lampe Befe-
stigungsschraube herausdrehen.
4. GemŠ§ Abbildung auf die Lampen-
abdeckung drŸcken und diese nach
hinten abschieben.
5. Defekte Lampe auswechseln.
6. Lampenabdeckung wieder einsetzen
und Befestigungsschraube ein-
drehen.
7. GerŠt wieder in Betrieb nehmen.
D613
Der Kompressor lŠuft nach
einiger Zeit selbsttŠtig an.
Siehe Abschnitt ãReinigung
und PflegeÒ
Dies ist normal, es liegt kei-
ne Stšrung vor.
Nach €nderung der Tem-
peratureinstellung lŠuf der
Kompressor nicht sofort an.
Wasser am KŸhlraumboden
oder auf AbstellflŠchen.
Tauwasser-Ablaufloch ist
verstopft.
Stšrung Mšgliche Ursache Abhilfe
21
themselves in the fridge when playing (there is risk of suffocation!)or
get themselves into other dangerous situations.
¥ Often children cannot recognise the hazards present in household
appliances. It is therefore important that you ensure adequate
supervision and never let children play with the appliance!
Daily Operation
¥ Containers with flammable gases or liquids can leak at low tempe-
ratures. There is a risk of an explosion! Do not store any containers
with flammable materials such as, for example, spray cans, fire
extinguisher refill cartridges etc in the refrigerator/freezer.
¥ Do not operate any electrical appliances in the refrigerator/freezer
(e.g. electric ice cream makers, mixers etc.).
¥ Before cleaning the appliance, always switch off the appliance and
unplug it, or pull the house fuse or switch off the circuit breaker.
¥ When unplugging always pull the plug from the mains socket, do not
pull on the cable.
In case of malfunction
¥ If the a malfunction occurs on the appliance, please look first in the
"What to do if ..." section of these instructions. If the information given
there does not help, please do not perform any further repairs yourself.
¥ Refrigerators/freezers may only be repaired by qualified service
engineers. Improper repairs can give rise to significant hazards. If
your appliance needs repairing, please contact your specialist dea-
ler or our Customer Service.
Disposal
Appliance Packaging Information
All materials are environmentally sound! They can be dumped or bur-
ned at an incinerating plant without danger!
About the materials: The plastics can be recycled and are identified
as follows:
>PE< for polyethylene, e.g. the outer covering and the bags in the
interior.
>PS< for polystyrene foam, e.g. the pads, which are all free of chlo-
rofluorocarbon.
The carton parts are made from recycled paper and should be dispo-
sed of at a waste-paper recycling collection location.
17
Kundendienst
Wenn Sie bei einer Stšrung keine Abhilfe in dieser Gebrauchsanwei-
sung finden, wenden Sie sich bitte an Ihren FachhŠndler oder an
unseren Kundendienst. Anschriften bzw. Telefonnummern sind im bei-
liegenden Heft ãGarantiebedingungen/Kundendienststellen" auf-
gefŸhrt.
Gezielte Ersatzteilvorbereitung kann unnštige Wege und Kosten
ersparen. Geben Sie deshalb bitte folgende Daten Ihres GerŠtes an:
¥ Modellbezeichnung
¥ Erzeugnis-Nummer (PNC)
¥ Fertigungs-Nummer (S-No.)
Diese Angaben finden Sie auf dem Typschild links an der Innenseite
des GerŠtes. Damit Sie die Daten schnell bei der Hand haben, emp-
fehlen wir, sie hier einzutragen.
Hinweis: Ungerechtfertigter Kundendienstruf ist auch wŠhrend der
Garantiezeit kostenpflichtig.
Bestimmungen, Normen, Richtlinien
Das KŠltegerŠt ist fŸr den Haushalt bestimmt und wurde unter Beach-
tung der fŸr diese GerŠte geltenden Normen hergestellt.
Bei der Fertigung wurden insbesondere die nach dem GerŠtesicher-
heitsgesetz (GSG), der UnfallverhŸtungsvorschrift fŸr KŠlteanlagen
(VBG 20) und den Bestimmungen des Verbandes Deutscher Elektro-
techniker (VDE) notwendigen Ma§nahmen getroffen. Der KŠltekreis-
lauf wurde auf Dichtheit geprŸft.
Dieses GerŠt entspricht den folgenden EG-Richtlinien:
Ð 73/23/EWG vom 19.2.1973 - Niederspannungsrichtlinie
Ð 89/336/EWG vom 3.5.1989
(einschlie§lich €nderungsrichtlinie 92/31/EWG) - EMV-Richtlinie
20
Safety
The safety aspects of our refrigerators/freezers comply with accepted
technical standards and the German Appliance Safety Law. Neverthe-
less, we consider it our obligation to make you aware of the following
safety information:
Intended use
¥ The refrigerator is intended for use in the home. It is suitable for the
cooling. If the appliance is used for purposes other than those inten-
ded or used incorrectly, no liability can be accepted by the manu-
facturer for any damage that may be caused.
¥ Alterations or changes to the freezer are not permitted for reasons
of safety.
¥ If you use the refrigerator in a commercial application or forpurposes
other than the cooling please observe all valid legal regulations for
your application.
Prior to initial startÐup
¥ Check the refrigerator for transport damage. Under no circumstance
should a damaged appliance be plugged in! In the event of damage,
please contact the vendor.
Refrigerant
The refrigerant isobutane (R600a) is contained within the refrigerant
circuit of the appliance, a natural gas with a high level of environ-
mental compatibility, which is nevertheless flammable.
¥ During transportation and installation of the appliance, be certain that
none of the components of the refrigerant circuit become damaged.
¥ If the refrigerant circuit should become damaged:
Ð avoid open flames and sources of ignition;
Ð thoroughly ventilate the room in which the appliance is situated.
Safety of children
¥ Packaging (e.g. wraps, polystyrene) can be dangerous for children.
There is a risk of suffocation! Keep packaging material away from
children!
¥ Please make old appliances unusable prior to disposal. Pull out the
mains plug, cut off the mains cable, break or remove spring or bolt-
catches, if fitted. By doing this you ensure that children cannot lock
18
Dear customer,
Before placing your new refrigerator/freezer into operation please
read these operating instructions carefully. They contain important
information for safe use, for installation and for care of the appliance.
Please keep these operating instructions for future reference. Pass
them on to possible new owners of the appliance.
Notes which are important for your safety or for the proper functioning
of the appliance are stressed with a warning triangle and/or with
signal words (Warning!, Caution!, Attention!). Please observe the fol-
lowing carefully.
Supplementary information regarding operation and practical applica-
tions of the appliance appear after this symbol.
Tips and notes concerning economical and environmentally sound
use of the appliance are marked with the cloverleaf.
The operating instructions contain instructions for the correction of
possible malfunctions by the user in the section "What to do if ...". If
these instructions should not be sufficient, our customer service
department is always available to you.
Printed on paper manufactured with environmentally sound processes.
who thinks ecologically acts accordingly ...
19
Contents
Safety . . . . . . . . . . . . . . . . . . . . . . . . . . . . . . . . . . . . . . . . . . . . 20
Disposal . . . . . . . . . . . . . . . . . . . . . . . . . . . . . . . . . . . . . . . . . . 21
Appliance Packaging Information . . . . . . . . . . . . . . . . . . . . . . . . 21
Disposal of old Appliances . . . . . . . . . . . . . . . . . . . . . . . . . . . . . 22
Remove transport safeguard . . . . . . . . . . . . . . . . . . . . . . . . . . 22
Installation . . . . . . . . . . . . . . . . . . . . . . . . . . . . . . . . . . . . . . . . 22
Installation Location . . . . . . . . . . . . . . . . . . . . . . . . . . . . . . ....22
Your refrigerator needs air . . . . . . . . . . . . . . . . . . . . . . . . . . . . . 23
Rear spacers . ........................................24
Rehingeing the door . . . . . . . . . . . . . . . . . . . . . . . . . . . . . . . . . 24
Prior to Initial StartÐUp . . . . . . . . . . . . . . . . . . . . . . . . . . . . . . 25
Electrical Connection . . . . . . . . . . . . . . . . . . . . . . . . . . . . . . . . . 25
Control panel ....................................... 26
Starting up and temperature regulation . . . . . . . . . . . . ..... 26
Interior Accessories . . . . . . . . . . . . . . . . . . . . . . . . . . . . . . . . 27
Storage shelves . . . . .................................. 27
Door rack . . . . . . . . . . . . . . . . . . . . . . . . . . . . . . ............28
Fresh food refrigeration . . . . . . . . . . . . . . . . . . . . . . . . . . . . . 28
Defrosting . . . . . . . . . . . . . . . . . . . . . . . . . . . ..............29
Switching off the appliance . . . . . . ..................... 29
Cleaning and Care . . . . . . . . . . . . . . . . . . . . . . . . . . . . . . . . . . 30
Energy Saving Tips . . . . . . . . . . . . . . . . . . . . . . . . . . . . . . . . . 31
What to do if . . . . . . . . . . . . . . . . . . . . . . . . . . . . . . .........31
Correcting Malfunctions . . . . . . . . . . . . . . . . . . . . . . . . . . . . . . . 31
Changing the light bulb . . . . . . . . . . . . . . . . . . . . . . . . . . . . . . . 33
Customer Service . . . . . . . . . . . . . . . . . . . . . . . . . . . . . . . . . . 34
Regulations, Standards, Guidelines . . . . . . . . . . . . . . . . . . . . 34
1 / 1

AEG OEKOS.S.2573-6KA User manual

Category
Fridges
Type
User manual
This manual is also suitable for

Ask a question and I''ll find the answer in the document

Finding information in a document is now easier with AI

Ask the document

in other languages