Bona Belt User manual

Type
User manual

Bona Belt, your newly purchased floor sanding machine, is designed to make your floor sanding projects a breeze. With its powerful motor, variable speed control, and easy-to-maneuver design, you can effortlessly sand and refinish your wood floors to a smooth, professional-looking finish. Bona Belt is also equipped with a dust collection system to keep your work area clean and free of debris. Whether you're a DIY enthusiast or a professional contractor, Bona Belt is the perfect tool for your next flooring project.

Bona Belt, your newly purchased floor sanding machine, is designed to make your floor sanding projects a breeze. With its powerful motor, variable speed control, and easy-to-maneuver design, you can effortlessly sand and refinish your wood floors to a smooth, professional-looking finish. Bona Belt is also equipped with a dust collection system to keep your work area clean and free of debris. Whether you're a DIY enthusiast or a professional contractor, Bona Belt is the perfect tool for your next flooring project.

SERVICE INSTRUCTIONS
Bona Service Kit for Bona Belt
Bona.com
EN
DE
FR
ES
TABLE OF CONTENTS
HOW TO CHANGE ABRASIVE WITH THE ARBOR WRENCH ............................... 3
HOW TO ATTACH THE CABLE HOLDER .............................................................. 4
HOW TO ATTACH THE DUSTBAG ........................................................................ 5
HOW TO ATTACH THE HINGE FOR SIDECOVER ................................................ 6
HOW TO REPLACE THE POLY-V BELTS ............................................................... 8
Watch the instruction
videos here!
3 | BONA SERVICE KIT - SERVICE INSTRUCTIONS
HOW TO CHANGE ABRASIVE WITH THE ARBOR WRENCH
Tools you need: Arbor wrench
STEP 1
EN
DE
FR
ES
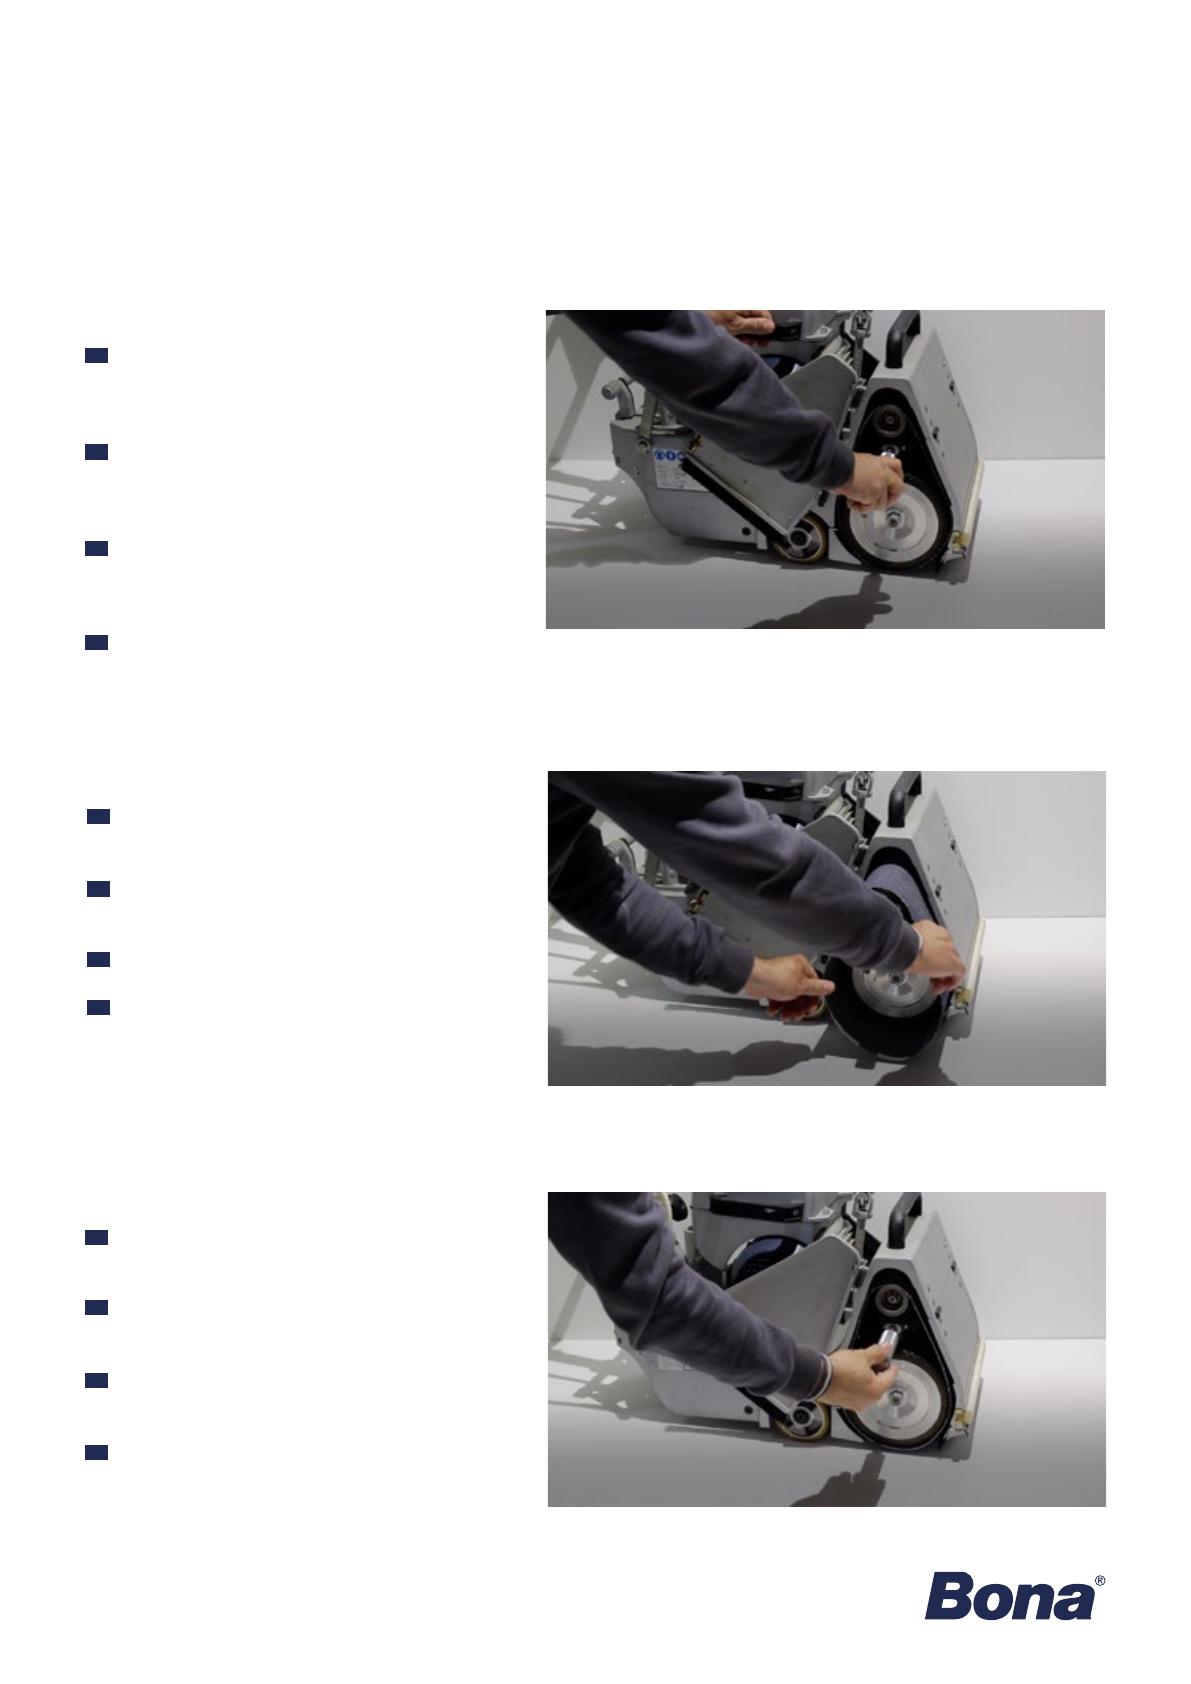
Insert the arbor wrench into the hole below the ten-
sion roller and press it down to reduce the tension
of the abrasive.
Den Wellenschlüssel in das Loch unterhalb der
Spannwalze einführen und eindrücken, um die
Spannung des Schleifbands zu reduzieren.
Insérez la clé de tension dans l’orice situé sous
le rouleau tendeur et poussez-la vers le bas pour
réduire la tension de l’abrasif.
Inserte la llave de husillo en el oricio que hay de-
bajo del rodillo de tensión y empújelo hacia abajo
para reducir la tensión del abrasivo.
STEP 2
EN
DE
FR
ES
Pull out the old abrasive and replace it with a new
one.
Das alte Schleifmittel herausziehen und durch ein
neues ersetzen.
Retirez l’ancien abrasif et remplacez-le.
Saque el abrasivo antiguo y sustitúyalo por uno
nuevo.
STEP 3
EN
DE
FR
ES
Remove the arbor wrench to increase the tension
of the new abrasive.
Den Wellenschlüssel entfernen, um das neue
Schleifband zu spannen.
Retirez la clé de tension pour augmenter la tension
du nouvel abrasif.
Retire la llave de husillo para aumentar la tensión
del nuevo abrasivo.
Before starting, make sure that the machine is switched off and the power cord disconnected from the socket.
4 | BONA SERVICE KIT - SERVICE INSTRUCTIONS
HOW TO ATTACH THE CABLE HOLDER
Tools you need: No tools needed
STEP 1
EN
DE
FR
ES
Insert the cable holder in the center hole on the
handle.
Die Kabelhalterung in das mittlere Loch an der
Griffstange einführen.
Insérez le support de câble dans l’orice central de
la poignée.
Inserte el soporte del cable en el oricio central del
mango.
STEP 2
EN
DE
FR
ES
Fold down the cable holder and insert the cable
into the holder.
Die Kabelhalterung nach unten klappen und das
Kabel einführen.
Rabattez le support de câble et insérez le câble
dans le support.
Doble hacia abajo el soporte del cable e inserte el
cable en el soporte.
Before starting, make sure that the machine is switched off and the power cord disconnected from the socket.
5 | BONA SERVICE KIT - SERVICE INSTRUCTIONS
HOW TO ATTACH THE DUSTBAG
STEP 1
EN
DE
FR
ES
Slide the dustbag over the tube.
Den Staubsack über das Rohr ziehen.
Faites glisser le sac à poussière sur le tube.
Coloque la bolsa para el polvo sobre el tubo.
STEP 2
EN
DE
FR
ES
Tie it to the tube using the strings on the dustbag.
Den Staubsack mithilfe des integrierten Binde-
bands festbinden.
Attachez le sac à poussière à l’aide du lien prévu à
cet effet.
Ate la bolsa para el polvo utilizando la cuerda de la
bolsa.
Tools you need: No tools needed
Before starting, make sure that the machine is switched off and the power cord disconnected from the socket.
6 | BONA SERVICE KIT - SERVICE INSTRUCTIONS
HOW TO ATTACH THE HINGE FOR SIDECOVER
Tools you need: Wrench
STEP 1
EN
DE
FR
ES
Remove the old hinge.
Das alte Scharnier abbauen.
Retirez l’ancienne charnière.
Retire la bisagra antigua
STEP 2
EN
DE
FR
ES
Install the new hinge on the machine.
Das neue Scharnier an der Maschine befestigen.
Installez la nouvelle charnière sur la machine.
Instale la bisagra nueva en la máquina.
STEP 3
EN
DE
FR
ES
Install the new hinge on the sidecover and adjust
the length of the screw.
Das neue Scharnier an der seitlichen Abdeckung
befestigen und die Länge der Schraube anpassen.
Installez la nouvelle charnière sur le cache latéral et
réglez la longueur de la vis.
Instale la bisagra nueva en la cubierta lateral y
ajuste la longitud del tornillo.
Before starting, make sure that the machine is switched off and the power cord disconnected from the socket.
7 | BONA SERVICE KIT - SERVICE INSTRUCTIONS
STEP 4
EN
DE
FR
ES
Mount the sidecover on the machine.
Die neue seitliche Abdeckung an der Maschine
montieren.
Montez le nouveau cache latéral sur la machine
Monte la nueva cubierta lateral en la máquina.
STEP 5
EN
DE
FR
ES
Check that the sidecover sits correctly on the
machine.
Den korrekten Sitz der seitlichen Abdeckung an der
Maschine überprüfen.
Vériez que le cache latéral est installé correcte-
ment sur la machine.
Compruebe que la cubierta lateral se asienta cor-
rectamente en la máquina.
8 | BONA SERVICE KIT - SERVICE INSTRUCTIONS
HOW TO REPLACE THE POLY-V BELTS
STEP 1
EN
DE
FR
ES
Insert the arbor wrench into hole of the belt ten-
sion.
Den korrekten Sitz der seitlichen Abdeckung an der
Maschine überprüfen.
Insérez la clé de tension dans l’orice du mé-
canisme de tension de la courroie.
Inserte la llave de husillo en el oricio de tensión de
la correa
STEP 2
EN
DE
FR
ES
Pull it upwards to lower the motor and reduce the
tension of the belt.
Nach oben ziehen, um den Motor abzusenken und
die Riemenspannung zu verringern.
Tirez-la vers le haut pour abaisser le moteur et
réduire la tension de la courroie.
Tire de ella hacia arriba para bajar el motor y redu-
cir la tensión de la correa
STEP 3
EN
DE
FR
ES
Remove the old Poly-V belts.
Die alten Poly-V-Riemen entfernen.
Retirez les anciennes courroies Poly-V.
Retire las correas Poly-V antiguas.
Tools you need: Arbor wrench
Before starting, make sure that the machine is switched off and the power cord disconnected from the socket.
9 | BONA SERVICE KIT - SERVICE INSTRUCTIONS
STEP 4
EN
DE
FR
ES
Install the new belts.
Die neuen Riemen einsetzen.
Installez les nouvelles courroies.
Instale las correas nuevas.
STEP 5
EN
DE
FR
ES
Increase the tension of the Poly-V belts by raising
the motor back into position.
Die Spannung der Poly-V-Riemen erhöhen, indem
der Motor wieder in seine ursprüngliche Position
gehoben wird.
Remettez le moteur en place pour augmenter la
tension des courroies Poly-V.
Aumente la tensión de las correas Poly-V elevando
el motor de nuevo a su posición.
STEP 6
EN
DE
FR
ES
Remove the arbor wrench and place it back in the
arbor wrench holder.
Den Wellenschlüssel entnehmen und wieder in die
entsprechende Halterung einsetzen.
Retirez la clé de tension et replacez-la dans son
support.
Retire la llave de husillo y vuelva a colocarla en su
soporte.
  • Page 1 1
  • Page 2 2
  • Page 3 3
  • Page 4 4
  • Page 5 5
  • Page 6 6
  • Page 7 7
  • Page 8 8
  • Page 9 9

Bona Belt User manual

Type
User manual

Bona Belt, your newly purchased floor sanding machine, is designed to make your floor sanding projects a breeze. With its powerful motor, variable speed control, and easy-to-maneuver design, you can effortlessly sand and refinish your wood floors to a smooth, professional-looking finish. Bona Belt is also equipped with a dust collection system to keep your work area clean and free of debris. Whether you're a DIY enthusiast or a professional contractor, Bona Belt is the perfect tool for your next flooring project.

Ask a question and I''ll find the answer in the document

Finding information in a document is now easier with AI

in other languages