Garmin Swim 2 User manual

Category
Activity trackers
Type
User manual

This manual is also suitable for

GARMIN SWIM
2
Owner’s Manual
© 2019 Garmin Ltd. or its subsidiaries
All rights reserved. Under the copyright laws, this manual may not be copied, in whole or in part, without the written consent of Garmin. Garmin reserves the right to change or improve its
products and to make changes in the content of this manual without obligation to notify any person or organization of such changes or improvements. Go to www.garmin.com for current updates
and supplemental information concerning the use of this product.
Garmin
®
, the Garmin logo, ANT+
®
, Auto Lap
®
, Auto Pause
®
, Edge
®
, and VIRB
®
are trademarks of Garmin Ltd. or its subsidiaries, registered in the USA and other countries. Body Battery
, Connect
IQ
, Garmin Connect
, Garmin Express
, Garmin Move IQ
, Garmin Swim
, HRM-Tri
, HRM-Swim
, and TrueUp
are trademarks of Garmin Ltd. or its subsidiaries. These trademarks may not
be used without the express permission of Garmin.
Android
is a trademark of Google Inc. Apple
®
, iPhone
®
, and Mac
®
are trademarks of Apple Inc., registered in the U.S. and other countries. The BLUETOOTH
®
word mark and logos are owned by
the Bluetooth SIG, Inc. and any use of such marks by Garmin is under license. Advance heartbeat analytics by Firstbeat. Windows
®
and Windows NT
®
are registered trademarks of Microsoft
Corporation in the United States and other countries. Other trademarks and trade names are those of their respective owners.
This product is ANT+
®
certified. Visit www.thisisant.com/directory for a list of compatible products and apps.
Table of Contents
Introduction.....................................................................1
Device Overview......................................................................... 1
GPS Status and Status Icons..................................................... 1
Pairing Your Smartphone with Your Device............................... 1
Training........................................................................... 1
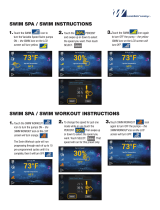
Going for a Pool Swim................................................................ 1
Auto Rest............................................................................... 1
Distance Recording................................................................2
Training with the Drill Log...................................................... 2
Setting a Swim Pace Alert..................................................... 2
Editing a Pace Alert During Pool Swimming.......................... 2
Workouts.....................................................................................2
Following a Pool Swim Workout............................................ 2
Recording a Critical Swim Speed Test.................................. 2
Editing Your Critical Swim Speed Result............................... 3
About the Training Calendar.................................................. 3
Personal Swim Records............................................................. 3
Viewing Your Personal Records............................................ 3
Restoring a Personal Record................................................. 3
Clearing a Personal Record................................................... 3
Clearing All Personal Records............................................... 3
Swimming in Open Water........................................................... 3
Swim Information........................................................................ 3
Swim Terminology................................................................. 3
Stroke Types.......................................................................... 3
Starting an Activity...................................................................... 3
Tips for Recording Activities.................................................. 4
Stopping an Activity.................................................................... 4
Training Indoors.......................................................................... 4
Activity Tracking............................................................ 4
Auto Goal.................................................................................... 4
Using the Move Alert.................................................................. 4
Turning on the Move Alert......................................................4
Intensity Minutes......................................................................... 4
Earning Intensity Minutes.......................................................4
Sleep Tracking............................................................................ 4
Using Automated Sleep Tracking.......................................... 4
Using Do Not Disturb Mode................................................... 4
Smart Features............................................................... 4
Bluetooth Connected Features................................................... 4
Manually Syncing Data with Garmin Connect........................5
Widgets....................................................................................... 5
Viewing the Widgets.............................................................. 5
Viewing the Controls Menu......................................................... 5
Locating a Lost Mobile Device.................................................... 5
Controlling Music Playback on a Connected Smartphone......... 5
Enabling Bluetooth Notifications................................................. 6
Viewing Notifications.............................................................. 6
Managing Notifications...........................................................6
Turning Off the Bluetooth Smartphone Connection............... 6
Turning On and Off Smartphone Connection Alerts.............. 6
Syncing Activities........................................................................ 6
Heart Rate Features....................................................... 6
Wrist-based Heart Rate.............................................................. 6
Heart Rate While Swimming.................................................. 6
Wearing the Device................................................................6
Tips for Erratic Heart Rate Data.............................................6
Viewing the Heart Rate Widget.............................................. 6
Broadcasting Heart Rate Data to Garmin Devices................ 7
Setting an Abnormal Heart Rate Alert....................................7
Turning Off the Wrist-based Heart Rate Monitor................... 7
About Heart Rate Zones............................................................. 7
Fitness Goals......................................................................... 7
Setting Your Maximum Heart Rate
........................................ 7
Customizing Your Heart Rate Zones and Maximum Heart
Rate....................................................................................... 7
Heart Rate Zone Calculations................................................ 7
Training Effect.............................................................................8
Heart Rate Variability and Stress Level...................................... 8
Using the Stress Level Widget............................................... 8
Body Battery............................................................................... 8
Viewing the Body Battery Widget...........................................8
Tips for Improved Body Battery Data..................................... 9
History............................................................................. 9
Swim History............................................................................... 9
Viewing History........................................................................... 9
Deleting History.......................................................................... 9
Viewing Data Totals.................................................................... 9
Data Management...................................................................... 9
Deleting Files......................................................................... 9
Disconnecting the USB Cable................................................9
Garmin Connect..........................................................................9
Syncing Your Data with the Garmin Connect App................. 9
Using Garmin Connect on Your Computer............................ 9
Customizing Your Device............................................ 10
Setting Up Your User Profile.....................................................10
Activity Options......................................................................... 10
Customizing Your Swim Options......................................... 10
Customizing Your Activity Options....................................... 10
Changing Your Displayed Activities..................................... 10
Setting a Recurring Alert...................................................... 10
Setting the Pool Size............................................................10
Setting a Countdown Start................................................... 10
Customizing the Data Fields................................................ 10
Turning on the Lap Key....................................................... 10
Marking Laps by Distance....................................................11
Using the Auto Pause® Feature.......................................... 11
Changing the GPS Setting................................................... 11
Customizing the Widget Loop................................................... 11
Activity Tracking Settings..........................................................11
Turning Off Activity Tracking................................................ 11
Watch Face Settings.................................................................11
Customizing the Watch Face............................................... 11
Downloading Connect IQ Features...................................... 11
Downloading Connect IQ Features Using Your Computer.. 11
System Settings........................................................................ 11
Time Settings....................................................................... 12
Time Zones.......................................................................... 12
Changing the Backlight Settings.......................................... 12
Setting the Device Sounds.................................................. 12
Locking and Unlocking the Device....................................... 12
Displaying Pace or Speed....................................................12
Changing the Units of Measure........................................... 12
Clock......................................................................................... 12
Setting the Time Manually................................................... 12
Syncing the Time with GPS................................................. 12
Setting an Alarm.................................................................. 12
Deleting an Alarm................................................................ 12
Starting the Countdown Timer............................................. 12
Using the Stopwatch............................................................ 13
Device Information....................................................... 13
Charging the Device................................................................. 13
Tips for Charging the Device............................................... 13
Wearing the Device.................................................................. 13
Device Care.............................................................................. 13
Cleaning the Device............................................................. 13
Changing the Bands............................................................ 13
Specifications............................................................................14
Table of Contents i
Viewing Device Information...................................................... 14
Troubleshooting........................................................... 14
Product Updates....................................................................... 14
Updating the Software Using the Garmin Connect App...... 14
Setting Up Garmin Express................................................. 14
Updating the Software Using Garmin Express.................... 14
Getting More Information.......................................................... 14
Activity Tracking........................................................................14
My daily step count does not appear................................... 14
My step count does not seem accurate............................... 14
The step counts on my device and my Garmin Connect
account don't match............................................................. 14
My intensity minutes are flashing......................................... 14
Acquiring Satellite Signals........................................................ 14
Improving GPS Satellite Reception......................................14
Restarting the Device............................................................... 15
Resetting All Default Settings................................................... 15
My device is in the wrong language......................................... 15
Is my smartphone compatible with my device?........................ 15
My phone will not connect to the device................................... 15
Can I use the cardio activity outdoors?.................................... 15
Tips for Existing Garmin Connect Users...................................15
Maximizing Battery Life.............................................................15
Appendix....................................................................... 15
Data Fields................................................................................15
ANT+ Heart Rate Monitor......................................................... 16
Pairing Your External Heart Rate Monitor............................16
Fitness Goals............................................................................ 16
About Heart Rate Zones...................................................... 17
Heart Rate Zone Calculations.............................................. 17
Index.............................................................................. 18
ii Table of Contents
Introduction
WARNING
See the Important Safety and Product Information guide in the
product box for product warnings and other important
information.
Always consult your physician before you begin or modify any
exercise program.
Device Overview
LIGHT Select to turn the device on.
Select to turn the backlight on and off.
Hold to view the controls menu.
START
STOP
Select to start and stop the timer.
Select to choose an option or to acknowledge a message.
BACK
LAP
Select to return to the previous screen.
Select to record a lap during an activity.
DOWN Select to scroll through the widgets, data screens, options,
and settings.
Hold to open the music controls.
UP Select to scroll through the widgets, data screens, options,
and settings.
Hold to view the menu.
GPS Status and Status Icons
For outdoor activities, the status bar turns green when GPS is
ready. A flashing icon means the device is searching for a signal
or connected device. A solid icon means the signal was found or
the device is connected.
GPS GPS status
Battery status
Smartphone connection status
Heart rate status
Pairing Your Smartphone with Your Device
To use the connected features of the Garmin Swim 2 device, it
must be paired directly through the Garmin Connect
app,
instead of from the Bluetooth
®
settings on your smartphone.
1
From the app store on your smartphone, install and open the
Garmin Connect app.
2
Bring your smartphone within 10 m (33 ft.) of your device.
3
Select LIGHT to turn on the device.
The first time you turn on the device, it is in pairing mode.
TIP: You can hold LIGHT, and select to manually enter
pairing mode.
4
Select an option to add your device to your Garmin Connect
account:
If this is the first time you are pairing a device with the
Garmin Connect app, follow the on-screen instructions.
If you already paired another device with the Garmin
Connect app, from the or menu, select Garmin
Devices > Add Device, and follow the on-screen
instructions.
Training
Going for a Pool Swim
1
From the watch face, select START > Pool Swim.
2
Select your pool size, or enter a custom size.
3
Select START.
4
Start swimming.
The device automatically records swim intervals and lengths.
5
If resting, select LAP to create a rest interval.
The display reverses to white text on a black background,
and the rest screen appears.
6
From resting, select LAP to resume swimming and create a
new swim interval.
NOTE: You can also use the auto rest feature to have the
device automatically create rest intervals (Auto Rest,
page 1).
7
Select UP or DOWN to view additional data pages (optional).
8
After you complete your swim, select STOP to stop the
activity timer.
9
Select an option:
Select Resume to restart the activity timer.
Select Save to save the swim and reset the activity timer.
You can view a summary, or select DOWN to view more
data.
Select Discard > Yes to delete the swim.
Auto Rest
The auto rest feature is available only for pool swimming. Your
device automatically detects when you are resting, and the rest
screen appears. If you rest for more than 15 seconds, the device
automatically creates a rest interval. When you resume
swimming, the device automatically starts a new swim interval.
Introduction 1
You can turn on the auto rest feature in the activity options
(Customizing Your Swim Options, page 10).
TIP: For best results using the auto rest feature, minimize your
arm motions while resting.
If you do not want to use the auto rest feature, you can select
LAP to manually mark the beginning and end of each rest
interval.
Distance Recording
The Garmin Swim 2 device measures and records distance by
completed lengths. The pool size must be correct to display
accurate distance (Setting the Pool Size, page 10).
TIP: For accurate results, swim the entire length, and use one
stroke type for the entire length. Pause the timer when resting.
TIP: To help the device count your lengths, use a strong push
off the wall and glide before your first stroke.
TIP: When doing drills, you must either pause the timer or use
the drill logging feature (Training with the Drill Log, page 2).
Training with the Drill Log
The drill log feature is available only for pool swimming. You can
use the drill log feature to manually record kick sets, one-arm
swimming, or any type of swimming that is not one of the four
major strokes.
1
During your pool swim activity, select UP or DOWN to view
the drill log screen.
2
Select LAP to start the drill timer.
3
After you complete a drill interval, select LAP.
The drill timer stops, but the activity timer continues to record
the entire swim session.
4
Select a distance for the completed drill.
Distance increments are based on the pool size selected for
the activity profile.
5
Select an option:
To start another drill interval, select LAP.
To start a swim interval, select UP or DOWN to return to
the swim training screens.
Setting a Swim Pace Alert
You can set a target pace for your pool swim. An alert notifies
you each time you should turn at the pool wall. For example, if
you set a pace target of 2 minutes per 100 m, with a pool length
of 25 m, the alert will sound every 30 seconds.
NOTE: Pacing alerts require precise interval timing. For more
accurate results when swimming with a pace alert, use the LAP
key for rest intervals instead of the auto rest feature.
1
From the watch face, select START > Pool Swim > Options
> Alerts > Add New > Pacing.
2
Set the units to meters or yards.
3
Enter the time.
The target pace time appears at the top of the screen.
4
Select START.
A screen appears indicating how frequently the pacing alert
sounds based on the selected pool size.
5
Select BACK twice to return to the timer page.
Editing a Pace Alert During Pool Swimming
1
During your pool swim, hold UP.
2
Select Pacing Alert.
3
Select UP or DOWN to adjust the pace.
4
Select .
The updated pace time appears.
TIP: To mute the pacing alert, hold UP, and select Mute
Pacing Alert.
Workouts
Your device can guide you through multiple-step workouts that
include goals for each workout step, such as distance, reps,
stroke type, or other metrics. You can create custom pool swim
workouts using Garmin Connect and transfer them to your
device.
You can create a scheduled training plan using the calendar in
Garmin Connect and send the scheduled workouts to your
device.
Following a Pool Swim Workout
Your device can guide you through multiple steps in a workout.
NOTE: Before you can download and use a workout, you must
have a Garmin Connect account (Pairing Your Smartphone with
Your Device, page 1).
1
From the watch face, select START > Pool Swim > Options
> Workouts.
2
Select an option:
Select My Workouts to do workouts downloaded from
Garmin Connect.
Select Critical Swim Speed to determine your anaerobic
threshold speed.
Select Training Calendar to do or view your scheduled
workouts.
3
Follow the on-screen instructions.
Creating a Custom Swim Workout on Garmin Connect
Before you can create a workout on the Garmin Connect app,
you must have a Garmin Connect account (Garmin Connect,
page 9).
1
From the Garmin Connect app, select or .
2
Select Training > Workouts > Create a Workout.
3
Select Pool Swim.
4
Create your custom workout.
5
Select Save.
6
Enter a name for your workout, and select Save.
The new workout appears in your list of workouts.
NOTE: You can send this workout to your device (Sending a
Custom Workout to Your Device, page 2).
Sending a Custom Workout to Your Device
You can send a custom workout you created using the Garmin
Connect app to your device (Creating a Custom Swim Workout
on Garmin Connect, page 2).
1
From the Garmin Connect app, select or .
2
Select Training > Workouts.
3
Select a workout from the list.
4
Select .
5
Select your compatible device.
6
Follow the on-screen instructions..
Recording a Critical Swim Speed Test
Your Critical Swim Speed (CSS) value is the result of a time-
trial-based test. Your CSS is the theoretical speed you can
maintain continuously without exhaustion. You can use your
CSS to guide your training pace and monitor your improvement.
1
From the watch face. select START > Pool Swim > Options
> Workouts > Critical Swim Speed > Do Critical Swim
Speed Test.
2
Select DOWN to preview the workout steps.
3
Select Do Test > START.
4
Follow the on-screen instructions.
A screen appears with your CSS result.
5
Select Accept or Decline.
2 Training
Editing Your Critical Swim Speed Result
You can manually edit or enter a new time for your CSS value.
1
From the watch face, select START > Pool Swim > Options
> Workouts > Critical Swim Speed > CSS.
2
Enter the minutes.
3
Select START.
4
Enter the seconds.
5
Select START.
Your new CSS time appears at the top of the screen.
About the Training Calendar
The training calendar on your device is an extension of the
training calendar or schedule you set up in Garmin Connect.
After you have added a few workouts to the Garmin Connect
calendar, you can send them to your device. All scheduled
workouts sent to the device appear in the calendar widget.
When you select a day in the calendar, you can view or do the
workout. The scheduled workout stays on your device whether
you complete it or skip it. When you send scheduled workouts
from Garmin Connect, they overwrite the existing training
calendar.
Viewing Scheduled Workouts
You can view swim workouts scheduled in your training calendar
and start a workout.
1
From the watch face, select START > Pool Swim >
Workouts > Training Calendar.
Your scheduled workouts appear, sorted by date.
2
Select a workout.
3
Select an option:
To view the steps for the workout, select View.
To start the workout, select Do Workout.
Personal Swim Records
When you complete a swim, the device displays any new
personal records you achieved during that activity. Personal
records include your fastest time over several typical race
distances and longest swim.
Viewing Your Personal Records
1
From the watch face, hold UP.
2
Select History > Records.
3
Select a record.
4
Select View Record.
Restoring a Personal Record
You can set each personal record back to the one previously
recorded.
1
From the watch face, hold UP.
2
Select History > Records.
3
Select a record to restore.
4
Select Previous > Yes.
NOTE: This does not delete any saved activities.
Clearing a Personal Record
1
From the watch face, hold UP.
2
Select History > Records.
3
Select a record to delete.
4
Select Clear Record > Yes.
NOTE: This does not delete any saved activities.
Clearing All Personal Records
1
From the watch face, hold UP.
2
Select History > Records.
3
Select Clear All Records > Yes.
NOTE: This does not delete any saved activities.
Swimming in Open Water
You can record swim data including distance, pace, and stroke
rate. You can add data screens to the default open water
swimming activity (Customizing the Data Fields, page 10).
1
Select START > Open Water.
2
Go outside and wait while the device locates satellites.
3
Select START to start the activity timer.
4
Start swimming.
5
Select UP or DOWN to view additional data pages (optional).
6
After you finish the activity, select STOP > Save.
Swim Information
Swim Terminology
Length: One trip down the pool.
Interval: One or more consecutive lengths. A new interval starts
after a rest.
Stroke: A stroke is counted every time your arm wearing the
device completes a full cycle.
Swolf: Your swolf score is the sum of the time for one pool
length and the number of strokes for that length. For
example, 30 seconds plus 15 strokes equals a swolf score of
45. For open water swimming, swolf is calculated over 25
meters. Swolf is a measurement of swimming efficiency and,
like golf, a lower score is better.
Critical swim speed (CSS): Your CSS is the theoretical speed
that you can maintain continuously without exhaustion. You
can use your CSS to guide your training pace and monitor
your improvement.
Stroke Types
Stroke type identification is available only for pool swimming.
Your stroke type is identified at the end of a length. Stroke types
appear in your swimming history and in your Garmin Connect
account. You can also select stroke type as a custom data field
(Customizing the Data Fields, page 10).
Free Freestyle
Back Backstroke
Breast Breaststroke
Fly Butterfly
Mixed More than one stroke type in an interval
Drill Used with drill logging (Training with the Drill Log, page 2)
Starting an Activity
When you start an activity, GPS turns on automatically (if
required). If you have an optional wireless sensor, you can pair it
to the Garmin Swim 2 device (Pairing Your External Heart Rate
Monitor, page 16).
1
From the watch face, select START.
2
Select an activity.
3
If the activity requires GPS signals, go outside to an area with
a clear view of the sky.
4
Wait until the green status bar appears.
The device is ready after it establishes your heart rate,
acquires GPS signals (if required), and connects to your
wireless sensors (if required).
5
Select START to start the activity timer.
TIP: You can hold DOWN while in an activity to open the
music controls (Controlling Music Playback on a Connected
Smartphone, page 5).
Training 3
Tips for Recording Activities
Charge the device before starting an activity (Charging the
Device, page 13).
Select LAP to record laps.
Select UP or DOWN to view additional data pages.
Stopping an Activity
1
Select STOP.
2
Select an option:
To resume your activity, select Resume.
To save the activity, select Save.
To discard the activity, select Discard > Yes.
Training Indoors
You can turn off GPS when you are training indoors or to save
battery life. When running or walking with GPS turned off, speed
and distance are calculated using the accelerometer in the
device. The accelerometer is self-calibrating. The accuracy of
the speed and distance data improves after a few outdoor runs
using GPS.
1
From the watch face, select START.
2
Select an activity.
3
Select Options > GPS > Off.
NOTE: If you select an activity that is typically done indoors,
GPS is automatically turned off.
Activity Tracking
The activity tracking feature records your daily step count,
distance traveled, intensity minutes, calories burned, and sleep
statistics for each recorded day. Your calories burned includes
your base metabolism plus activity calories.
The number of steps taken during the day appears on the steps
widget. The step count is updated periodically.
For more information about activity tracking and fitness metric
accuracy, go to garmin.com/ataccuracy.
Auto Goal
Your device creates a daily step goal automatically, based on
your previous activity levels. As you move during the day, the
device shows your progress toward your daily goal. Each
segment on the step bar represents five percent of your daily
goal. You can sync your data with the Garmin Connect Mobile
app to view your current step count.
If you choose not to use the auto goal feature, you can set a
personalized step goal on your Garmin Connect account.
Using the Move Alert
Sitting for prolonged periods of time can trigger undesirable
metabolic state changes. The move alert reminds you to keep
moving. After one hour of inactivity, Move! and the red bar
appear. Additional segments appear after every 15 minutes of
inactivity. The device also beeps or vibrates if audible tones are
turned on (Setting the Device Sounds, page 12).
Go for a short walk (at least a couple of minutes) to reset the
move alert.
Turning on the Move Alert
1
From the watch face, hold UP.
2
Select > Activity Tracking > Move Alert > On.
Intensity Minutes
To improve your health, organizations such as the World Health
Organization recommend at least 150 minutes per week of
moderate intensity activity, such as brisk walking, or 75 minutes
per week of vigorous intensity activity, such as running.
The device monitors your activity intensity and tracks your time
spent participating in moderate to vigorous intensity activities
(heart rate data is required to quantify vigorous intensity). You
can work toward achieving your weekly intensity minutes goal by
participating in at least 10 consecutive minutes of moderate to
vigorous intensity activities. The device adds the amount of
moderate activity minutes with the amount of vigorous activity
minutes. Your total vigorous intensity minutes are doubled when
added.
Earning Intensity Minutes
Your Garmin Swim 2 device calculates intensity minutes by
comparing your heart rate data to your average resting heart
rate. If heart rate is turned off, the device calculates moderate
intensity minutes by analyzing your steps per minute.
Start a timed activity for the most accurate calculation of
intensity minutes.
Exercise for at least 10 consecutive minutes at a moderate or
vigorous intensity level.
Wear your device all day and night for the most accurate
resting heart rate.
Sleep Tracking
While you are sleeping, the device automatically detects your
sleep and monitors your movement during your normal sleep
hours. You can set your normal sleep hours in the user settings
on your Garmin Connect account. Sleep statistics include total
hours of sleep, sleep levels, and sleep movement. You can view
your sleep statistics on your Garmin Connect account.
NOTE: Naps are not added to your sleep statistics. You can use
do not disturb mode to turn off notifications and alerts, with the
exception of alarms (Using Do Not Disturb Mode, page 4).
Using Automated Sleep Tracking
1
Wear your device while sleeping.
2
Upload your sleep tracking data to the Garmin Connect site
(Garmin Connect, page 9).
You can view your sleep statistics on your Garmin Connect
account.
Using Do Not Disturb Mode
You can use do not disturb mode to turn off the backlight, tone
alerts, and vibration alerts. For example, you can use this mode
while sleeping or watching a movie.
NOTE: You can set your normal sleep hours in the user settings
on your Garmin Connect account. You can enable the During
Sleep option in the system settings to automatically enter do not
disturb mode during your normal sleep hours (System Settings,
page 11).
1
Hold LIGHT.
2
Select Do Not Disturb.
Smart Features
Bluetooth Connected Features
The Garmin Swim 2 device has several Bluetooth connected
features for your compatible smartphone using the Garmin
Connect app.
Activity uploads: Automatically sends your activity to the
Garmin Connect app as soon as you finish recording the
activity.
Find my phone: Locates your lost smartphone that is paired
with your Garmin Swim 2 device and currently within range.
Find my watch: Locates your lost Garmin Swim 2 device that is
paired with your smartphone and currently within range.
4 Activity Tracking
Music controls: Allows you to control the music player on your
smartphone.
Phone notifications: Displays phone notifications and
messages on your Garmin Swim 2 device.
Social media interactions: Allows you to post an update to
your favorite social media website when you upload an
activity to the Garmin Connect app.
Software updates: Allows you to update your device software.
Weather updates: Sends real-time weather conditions and
notifications to your device.
Workout downloads: Allows you to browse for workouts in the
Garmin Connect app and wirelessly send them to your
device.
Manually Syncing Data with Garmin Connect
1
Hold LIGHT to view the controls menu.
2
Select .
Widgets
Your device comes preloaded with widgets that provide at-a-
glance information. Some widgets require a Bluetooth
connection to a compatible smartphone.
Some widgets are not visible by default. You can add them to
the widget loop manually (Customizing the Widget Loop,
page 11).
Body Battery
: Displays your current Body Battery level and a
graph of your Body Battery levels for the last several hours.
Calendar: Displays upcoming meetings from your smartphone
calendar.
Calories: Displays your calorie information for the current day.
Health stats: Displays a dynamic summary of your current
health statistics. The measurements includes heart rate,
Body Battery level, stress, and more.
Heart rate: Displays your current heart rate in beats per minute
(bpm) and a graph of your heart rate.
History: Displays your activity history and a graph of your
recorded activities.
Intensity minutes: Tracks your time spent participating in
moderate to vigorous activities, your weekly intensity minutes
goal, and progress toward your goal.
Last activity: Displays a brief summary of your last recorded
activity, such as your last run, last ride, or last swim.
Music controls: Provides music player controls for your
smartphone.
My day: Displays a dynamic summary of your activity today. The
metrics include timed activities, intensity minutes, steps,
calories burned, and more.
Notifications: Alerts you to incoming calls, texts, social network
updates, and more, based on your smartphone notification
settings.
Steps: Tracks your daily step count, step goal, and data for
previous days.
Stress: Displays your current stress level and a graph of your
stress level. You can do a breathing activity to help you relax.
Weather: Displays the current temperature and weather
forecast.
Viewing the Widgets
Your device comes preloaded with widgets that provide at-a-
glance information. Some widgets require a Bluetooth
connection to a compatible smartphone.
From the watch face, select UP or DOWN to view the
widgets.
Available widgets include heart rate and activity tracking.
Select START to view additional options and functions for a
widget.
About My Day
The My Day widget is a daily snapshot of your activity. This is a
dynamic summary that updates throughout the day. The metrics
include your last recorded sport, intensity minutes for the week,
steps, calories burned, and more. You can select START to
view additional metrics.
Health Stats Widget
The Health Stats widget provides an at-a-glance view of your
health data. This is a dynamic summary that updates throughout
the day. The metrics include your heart rate, stress level, and
Body Battery level. You can select START to view additional
metrics.
Viewing the Weather Widget
Weather requires a Bluetooth connection to a compatible
smartphone.
1
From the watch face, select UP or DOWN to view the
weather widget.
2
Select START to view hourly weather data.
3
Select DOWN to view daily weather data.
Viewing the Controls Menu
The controls menu contains options, such as turning on do not
disturb mode, locking the keys, and turning the device off.
1
From any screen, hold LIGHT.
2
Select UP or DOWN to scroll through the options.
Locating a Lost Mobile Device
You can use this feature to help locate a lost mobile device that
is paired using Bluetooth wireless technology and currently
within range.
1
Hold LIGHT to view the controls menu.
2
Select .
The Garmin Swim 2 device begins searching for your paired
mobile device. An audible alert sounds on your mobile
device, and the Bluetooth signal strength displays on the
Garmin Swim 2 device screen. The Bluetooth signal strength
increases as you move closer to your mobile device.
3
Select BACK to stop searching.
Controlling Music Playback on a Connected
Smartphone
1
On your smartphone, start playing a song or playlist.
2
Hold DOWN from any screen to open the music controls.
3
Select an option:
Select to play and pause the current music track.
Select to skip to the next music track.
Select to open more music controls, such as volume and
previous track.
Smart Features 5
Enabling Bluetooth Notifications
Before you can enable notifications, you must pair the Garmin
Swim 2 device with a compatible mobile device (Pairing Your
Smartphone with Your Device, page 1).
1
From the watch face, hold UP.
2
Select > Phone > Notifications > Status > On.
3
Select During Activity.
4
Select a notification preference.
5
Select a sound preference.
6
Select Not During Activity.
7
Select a notification preference.
8
Select a sound preference.
Viewing Notifications
1
From the watch face, select UP or DOWN to view the
notifications widget.
2
Select START.
3
Select a notification.
4
Select DOWN for more options.
5
Select BACK to return to the previous screen.
Managing Notifications
You can use your compatible smartphone to manage
notifications that appear on your Garmin Swim 2 device.
Select an option:
If you are using an iPhone
®
device, go to the notifications
settings to select the items to show on the device.
If you are using an Android
smartphone, from the Garmin
Connect app, select Settings > Smart Notifications.
Turning Off the Bluetooth Smartphone Connection
1
Hold LIGHT to view the controls menu.
2
Select to turn off the Bluetooth smartphone connection on
your Garmin Swim 2 device.
Refer to the owner's manual for your mobile device to turn off
Bluetooth wireless technology on your mobile device.
Turning On and Off Smartphone Connection Alerts
You can set the Garmin Swim 2 device to alert you when your
paired smartphone connects and disconnects using Bluetooth
technology.
NOTE: Smartphone connection alerts are turned off by default.
1
From the watch face, hold UP.
2
Select > Phone > Connected Alerts > On.
Syncing Activities
You can sync activities from other Garmin
®
devices to your
Garmin Swim 2 device using your Garmin Connect account.
This allows your device to more accurately reflect your training
status and fitness. For example, you can record a ride with an
Edge
®
device, and view your activity details on your Garmin
Swim 2 device.
1
From the watch face, hold UP.
2
Select > User Profile > Physio TrueUp.
When you sync your device with your smartphone, recent
activities from your other Garmin devices appear on your
Garmin Swim 2 device.
Heart Rate Features
The Garmin Swim 2 device has wrist-based heart rate
monitoring, and there are several heart rate-related features
available in the default widget loop.
Your current heart rate in beats per minute (bpm). The widget also
displays a graph of your heart rate for the last four hours,
highlighting your highest and lowest heart rate.
Your current stress level. The device measures your heart rate
variability while you are inactive to estimate your stress level. A
lower number indicates a lower stress level.
Your current Body Battery energy level. The device calculates your
current energy reserves based on sleep, stress, and activity data. A
higher number indicates a higher energy reserve.
Wrist-based Heart Rate
Heart Rate While Swimming
NOTICE
The device is intended for surface swimming. Scuba diving with
the device may damage the product and will void the warranty.
The device has wrist-based heart rate enabled for swim
activities. The device is also compatible with the HRM-Tri
accessory and the HRM-Swim
accessory. If both wrist-based
heart rate and chest heart rate data are available, your device
uses the chest heart rate data.
Wearing the Device
Wear the device above your wrist bone.
NOTE: The device should be snug but comfortable. For more
accurate heart rate readings, the device should not move
while swimming or exercising.
NOTE: The optical sensor is located on the back of the
device.
See Tips for Erratic Heart Rate Data, page 6 for more
information about wrist-based heart rate.
For more information about accuracy, go to garmin.com
/ataccuracy.
Tips for Erratic Heart Rate Data
If the heart rate data is erratic or does not appear, you can try
these tips.
Clean and dry your arm before putting on the device.
Avoid wearing sunscreen, lotion, and insect repellent under
the device.
Avoid scratching the heart rate sensor on the back of the
device.
Wear the device above your wrist bone. The device should
be snug but comfortable.
Wait until the icon is solid before starting your activity.
Warm up for 5 to 10 minutes and get a heart rate reading
before starting your activity.
NOTE: In cold environments, warm up indoors.
Rinse the device with fresh water after each workout.
Viewing the Heart Rate Widget
The widget displays your current heart rate in beats per minute
(bpm) and a graph of your heart rate for the last 4 hours.
1
From the watch face, select UP or DOWN to view the heart
rate widget.
NOTE: You may need to add the widget to your widget loop
(Customizing the Widget Loop, page 11).
6 Heart Rate Features
2
Select START to view your average resting heart rate values
for the last 7 days.
Broadcasting Heart Rate Data to Garmin Devices
You can broadcast your heart rate data from your Garmin Swim
2 device and view it on paired Garmin devices.
NOTE: Broadcasting heart rate data decreases battery life.
1
From the heart rate widget, hold UP.
2
Select Options > Broadcast Heart Rate.
The Garmin Swim 2 device starts broadcasting your heart
rate data, and appears.
NOTE: You can view only the heart rate widget while
broadcasting heart rate data from the heart rate widget.
3
Pair your Garmin Swim 2 device with your Garmin ANT+
®
compatible device.
NOTE: The pairing instructions differ for each Garmin
compatible device. See your owner's manual.
TIP: To stop broadcasting your heart rate data, select any
key, and select Yes.
Broadcasting Heart Rate Data During an Activity
You can set up your Garmin Swim 2 device to broadcast your
heart rate data automatically when you begin an activity. For
example, you can broadcast your heart rate data to an Edge
device while cycling, or to a VIRB
®
action camera during an
activity.
NOTE: Broadcasting heart rate data decreases battery life.
1
From the heart rate widget, hold UP.
2
Select Options > Broadcast During Activity.
3
Begin an activity (Starting an Activity, page 3).
The Garmin Swim 2 device starts broadcasting your heart
rate data in the background.
NOTE: There is no indication that the device is broadcasting
your heart rate data during an activity.
4
If necessary, pair your Garmin Swim 2 device with your
Garmin ANT+ compatible device.
NOTE: The pairing instructions differ for each Garmin
compatible device. See your owner's manual.
TIP: To stop broadcasting your heart rate data, stop the
activity (Stopping an Activity, page 4).
Setting an Abnormal Heart Rate Alert
You can set the device to alert you when your heart rate
exceeds a certain number of beats per minute (bpm) after a
period of inactivity.
1
From the heart rate widget, hold UP.
2
Select Options > Abnormal HR Alert > Status > On.
3
Select Alert Threshold.
4
Select a heart rate threshold value.
Each time you exceed the threshold value, a message appears
and the device vibrates.
Turning Off the Wrist-based Heart Rate Monitor
The default value for the Wrist Heart Rate setting is Auto. The
device automatically uses the wrist-based heart rate monitor
unless you pair an ANT+ heart rate monitor to the device.
1
From the heart rate widget, hold UP.
2
Select Options > Status > Off.
About Heart Rate Zones
Many athletes use heart rate zones to measure and increase
their cardiovascular strength and improve their level of fitness. A
heart rate zone is a set range of heartbeats per minute. The five
commonly accepted heart rate zones are numbered from 1 to 5
according to increasing intensity. Generally, heart rate zones are
calculated based on percentages of your maximum heart rate.
Fitness Goals
Knowing your heart rate zones can help you measure and
improve your fitness by understanding and applying these
principles.
Your heart rate is a good measure of exercise intensity.
Training in certain heart rate zones can help you improve
cardiovascular capacity and strength.
If you know your maximum heart rate, you can use the table
(Heart Rate Zone Calculations, page 7) to determine the best
heart rate zone for your fitness objectives.
If you do not know your maximum heart rate, use one of the
calculators available on the Internet. Some gyms and health
centers can provide a test that measures maximum heart rate.
The default maximum heart rate is 220 minus your age.
Setting Your Maximum Heart Rate
The device uses your user profile information from the initial
setup to estimate your maximum heart rate and determine your
default heart rate zones. The default maximum heart rate is 220
minus your age. For the most accurate calorie data during your
activity, you should set your maximum heart rate (if known).
1
From the watch face, hold UP.
2
Select > User Profile > Max. HR.
3
Enter your maximum heart rate.
Customizing Your Heart Rate Zones and Maximum
Heart Rate
You can customize your heart rate zones based on your training
goals. The device uses your user profile information from the
initial setup to estimate your maximum heart rate and determine
your default heart rate zones. The default maximum heart rate is
220 minus your age. For the most accurate calorie data during
your activity, you should set your maximum heart rate (if known).
1
From the Garmin Connect app, select or .
2
Select Garmin Devices.
3
Select your device.
4
Select User Settings > Heart Rate Zones.
5
Enter your heart rate values for each zone.
6
Enter your maximum heart rate.
7
Select Save.
Heart Rate Zone Calculations
Zone % of
Maximum
Heart Rate
Perceived Exertion Benefits
1 50–60% Relaxed, easy pace,
rhythmic breathing
Beginning-level
aerobic training,
reduces stress
2 60–70% Comfortable pace,
slightly deeper
breathing, conversation
possible
Basic cardiovascular
training, good
recovery pace
3 70–80% Moderate pace, more
difficult to hold
conversation
Improved aerobic
capacity, optimal
cardiovascular training
Heart Rate Features 7
Zone % of
Maximum
Heart Rate
Perceived Exertion Benefits
4 80–90% Fast pace and a bit
uncomfortable, breathing
forceful
Improved anaerobic
capacity and
threshold, improved
speed
5 90–100% Sprinting pace,
unsustainable for long
period of time, labored
breathing
Anaerobic and
muscular endurance,
increased power
Training Effect
Training Effect measures the impact of an activity on your
aerobic and anaerobic fitness. Training Effect accumulates
during the activity. As the activity progresses, the Training Effect
value increases. Training Effect is determined by your user
profile information and training history, and heart rate, duration,
and intensity of your activity.
Aerobic Training Effect uses your heart rate to measure how the
accumulated intensity of an exercise affects your aerobic fitness
and indicates if the workout had a maintaining or improving
effect on your fitness level. Your excess post-exercise oxygen
consumption (EPOC) accumulated during exercise is mapped to
a range of values that account for your fitness level and training
habits. Steady workouts at moderate effort or workouts involving
longer intervals (>180 sec) have a positive impact on your
aerobic metabolism and result in an improved aerobic Training
Effect.
Anaerobic Training Effect uses heart rate and speed (or power)
to determine how a workout affects your ability to perform at
very high intensity. You receive a value based on the anaerobic
contribution to EPOC and the type of activity. Repeated high-
intensity intervals of 10 to 120 seconds have a highly beneficial
impact on your anaerobic capability and result in an improved
anaerobic Training Effect.
You can add Aerobic Training Effect and Anaerobic Training
Effect as data fields to one of your training screens to monitor
your numbers throughout the activity.
Training Effect Aerobic Benefit Anaerobic Benefit
From 0.0 to 0.9 No benefit. No benefit.
From 1.0 to 1.9 Minor benefit. Minor benefit.
From 2.0 to 2.9 Maintains your aerobic
fitness.
Maintains your anaerobic
fitness.
From 3.0 to 3.9 Impacts your aerobic
fitness.
Impacts your anaerobic
fitness.
From 4.0 to 4.9 Highly impacts your
aerobic fitness.
Highly impacts your
anaerobic fitness.
5.0 Overreaching and
potentially harmful without
enough recovery time.
Overreaching and
potentially harmful without
enough recovery time.
Training Effect technology is provided and supported by
Firstbeat Technologies Ltd. For more information, go to
www.firstbeat.com.
Heart Rate Variability and Stress Level
Stress level is the result of a three-minute test performed while
standing still, where the Garmin Swim 2 device analyzes heart
rate variability to determine your overall stress. Training, sleep,
nutrition, and general life stress all impact how an athlete
performs. The stress level range is from 1 to 100, where 1 is a
very low stress state and 100 is a very high stress state.
Knowing your stress level can help you decide if your body is
ready for a tough training session or yoga.
Using the Stress Level Widget
The stress level widget displays your current stress level and a
graph of your stress level for the last several hours. It can also
guide you through a breathing activity to help you relax.
1
While you are sitting or inactive, select UP or DOWN to view
the stress level widget.
2
Select START.
If your stress level is in the low or medium range, a graph
appears showing your stress level for the last four hours.
TIP: To start a relaxation activity from the graph, select
DOWN > START, and enter a duration in minutes.
If your stress level is in the high range, a message
appears asking you to begin a relaxation activity.
3
Select an option:
View your stress level graph.
NOTE: Blue bars indicate periods of rest. Yellow bars
indicate periods of stress. Gray bars indicate times when
you were too active to determine your stress level.
Select Yes to start the relaxation activity, and enter a
duration in minutes.
Select No to bypass the relaxation activity and view the
stress level graph.
Body Battery
Your device analyzes your heart rate variability, stress level,
sleep quality, and activity data to determine your overall Body
Battery level. Like a gas gauge on a car, it indicates your
amount of available reserve energy. The Body Battery level
range is from 0 to 100, where 0 to 25 is low reserve energy, 26
to 50 is medium reserve energy, 51 to 75 is high reserve energy,
and 76 to 100 is very high reserve energy.
You can sync your device with your Garmin Connect account to
view your most up-to-date Body Battery level, long-term trends,
and additional details (Tips for Improved Body Battery Data,
page 9).
Viewing the Body Battery Widget
The Body Battery widget displays your current Body Battery
level and a graph of your Body Battery level for the last several
hours.
1
Select UP or DOWN to view the Body Battery widget.
NOTE: You may need to add the widget to your widget loop
(Customizing the Widget Loop, page 11).
2
Select START to view a combined graph of your Body
Battery and stress level.
Blue bars indicate periods of rest. Orange bars indicate
periods of stress. Gray bars indicate times that you were too
active to determine your stress level.
8 Heart Rate Features
3
Select DOWN to see your Body Battery data since midnight.
Tips for Improved Body Battery Data
Your Body Battery level updates when you sync your device
with your Garmin Connect account.
For more accurate results, wear the device while sleeping.
Rest and good sleep charge your Body Battery.
Strenuous activity, high stress, and poor sleep can cause
your Body Battery to drain.
Food intake, as well as stimulants like caffeine, has no
impact on your Body Battery.
History
History includes time, distance, calories, average pace or speed,
lap data, and optional sensor information.
NOTE: When the device memory is full, your oldest data is
overwritten.
Swim History
Your device stores the swim summary and details for each
interval or lap. The pool swim history displays the distance, time,
pace, calories, strokes per length, stroke rate, and swolf score.
The open water swim history displays the distance, time, pace,
calories, stroke distance, and stroke rate.
Viewing History
History contains previous activities you have saved on your
device.
The device has a history widget for quick access to your activity
data (Customizing the Widget Loop, page 11).
1
From the watch face, hold UP.
2
Select History.
3
Select This Week or Previous Weeks.
4
Select an activity.
5
Select DOWN to view additional details about the activity.
Deleting History
1
From the watch face, hold UP.
2
Select History > Options.
3
Select an option:
Select Delete All Activities to delete all activities from the
history.
Select Reset Totals to reset all distance and time totals.
NOTE: This does not delete any saved activities.
Viewing Data Totals
You can view the accumulated distance and time data saved to
your device.
1
From the watch face, hold UP.
2
Select History > Totals.
3
If necessary, select an activity.
4
Select an option to view weekly or monthly totals.
Data Management
NOTE: The device is not compatible with Windows
®
95, 98, Me,
Windows NT
®
, and Mac
®
OS 10.3 and earlier.
Deleting Files
NOTICE
If you do not know the purpose of a file, do not delete it. Your
device memory contains important system files that should not
be deleted.
1
Open the Garmin drive or volume.
2
If necessary, open a folder or volume.
3
Select a file.
4
Press the Delete key on your keyboard.
NOTE: If you are using an Apple
®
computer, you must empty
the Trash folder to completely remove the files.
Disconnecting the USB Cable
If your device is connected to your computer as a removable
drive or volume, you must safely disconnect your device from
your computer to avoid data loss. If your device is connected to
your Windows computer as a portable device, it is not necessary
to safely disconnect the device.
1
Complete an action:
For Windows computers, select the Safely Remove
Hardware icon in the system tray, and select your device.
For Apple computers, select the device, and select File >
Eject.
2
Disconnect the cable from your computer.
Garmin Connect
Your Garmin Connect account gives you the tools to track and
store your swims, analyze your activity data, and download
software updates. You can also customize your device settings,
including watch faces, visible widgets, workouts, and much
more.
Syncing Your Data with the Garmin Connect App
Your device periodically syncs data with the Garmin Connect
app automatically. You can also manually sync your data at any
time.
1
Bring the device within 3 m (10 ft.) of your smartphone.
2
From any screen, hold LIGHT to view the controls menu.
3
Select .
4
View your current data in the Garmin Connect app.
Using Garmin Connect on Your Computer
The Garmin Express
application connects your device to your
Garmin Connect account using a computer. You can use the
Garmin Express application to upload your activity data to your
Garmin Connect account and to send data, such as workouts or
training plans, from the Garmin Connect website to your device.
1
Connect the device to your computer using the USB cable.
2
Go to www.garmin.com/express.
3
Download and install the Garmin Express application.
History 9
4
Open the Garmin Express application, and select Add
Device.
5
Follow the on-screen instructions.
Customizing Your Device
Setting Up Your User Profile
You can update your height, weight, birth year, gender, and
maximum heart rate settings (Setting Your Maximum Heart
Rate, page 7). The device uses this information to calculate
training data.
1
From the watch face, hold UP.
2
Select > User Profile.
3
Select an option.
Activity Options
Activity options are a collection of settings that optimize your
device based on how you are using it. For example, the settings
and data screens are different when you are using the device for
running than for riding your bike.
When you are using an activity and you change settings such as
data fields or alerts, the changes are saved automatically as part
of the activity.
Customizing Your Swim Options
You can customize your settings, data fields, and more for a
swim activity.
1
From the watch face, select START.
2
Select a swim activity.
3
Select Options.
4
Select an option:
NOTE: Not all options are available for all activities.
Select Workouts to do, view, or edit a workout (Following
a Pool Swim Workout, page 2).
Select Data Screens to customize the data screens and
data fields (Customizing the Data Fields, page 10).
Select Alerts to customize your training alerts (Setting a
Recurring Alert, page 10).
Select Pool Size to select a size or enter a custom pool
size (Setting the Pool Size, page 10).
Select Stroke Detection to enable the device to
automatically detect your swimming stroke during a pool
swim.
Select Countdown Start to begin the swim activity with a
three-second countdown (Setting a Countdown Start,
page 10).
Select Auto Rest to enable the device to automatically
detect when you are resting and create a rest interval
(Auto Rest, page 1).
Select Laps to set how laps are triggered (Marking Laps
by Distance, page 11).
Select GPS to turn off GPS (Training Indoors, page 4) or
change the satellite setting (Changing the GPS Setting,
page 11).
All changes are saved to the swim activity.
Customizing Your Activity Options
You can customize your settings, data fields, and more for a
particular activity.
1
From the watch face, select START.
2
Select Run, Bike, or Cardio.
3
Select Options.
4
Select an option:
Select Data Screens to customize the data screens and
data fields (Customizing the Data Fields, page 10).
Select Laps to set how laps are triggered (Marking Laps
by Distance, page 11).
Select Auto Pause to change when the activity timer
automatically pauses (Using the Auto Pause
®
Feature,
page 11).
Select GPS to turn off GPS (Training Indoors, page 4) or
change the satellite setting (Changing the GPS Setting,
page 11).
All changes are saved to the activity.
Changing Your Displayed Activities
Your device has default activities, such as Run and Bike. You
can select additional activities to display on the device.
1
From the Garmin Connect app, select or .
2
Select Garmin Devices.
3
Select your device.
4
Select Activity Options > Displayed Activities > Edit.
5
Select the activities to display on your device.
6
Select Done.
Sync your device with the Garmin Connect app to view the
updated activities (Manually Syncing Data with Garmin Connect,
page 5).
Setting a Recurring Alert
A recurring alert notifies you each time the device records a
specified value or interval. For example, you can set the device
to alert you every 4 lengths (100 m in a 25 m pool).
1
From the watch face, select START.
2
Select a swim activity.
3
Select Options > Alerts > Add New.
4
Select Time, Distance, Pacing or Stroke Rate.
5
Turn on the alert.
6
Select or enter a value.
Each time you reach the alert value, a message appears. The
device also beeps or vibrates if audible tones are turned on
(Setting the Device Sounds, page 12).
Setting the Pool Size
1
From the watch face, select START > Pool Swim > Options
> Pool Size.
2
Select your pool size, or enter a custom size.
Setting a Countdown Start
You can customize your pool swim activity to begin with a three-
second countdown.
From the watch face, select START > Pool Swim > Options
> Countdown Start > On.
TIP: For more accurate interval timing with the countdown
start, use the LAP key for rest intervals instead of the auto
rest feature.
Customizing the Data Fields
You can customize data fields based on your training goals or
optional accessories. For example, you can customize data
fields to display your lap pace and heart rate zone.
1
Select START, and select an activity profile.
2
Select Options > Data Screens.
3
Select a page.
4
Select a data field to change it.
Turning on the Lap Key
You can customize BACK to function as a lap key during timed
activities.
10 Customizing Your Device
1
Select START, and select an activity profile.
2
Select Options > Laps > Lap Key.
The lap key stays on for the selected activity profile until you
turn off the lap key.
Marking Laps by Distance
You can set your device to use the Auto Lap
®
feature, which
marks a lap automatically at every kilometer or mile. You can
also mark laps manually. This feature is helpful for comparing
your performance during different parts of an activity.
1
From the watch face, select START.
2
Select an activity.
3
Select Options > Laps > Auto Lap.
Each time you complete a lap, a message appears that displays
the time for that lap. The device also beeps or vibrates if audible
tones are turned on (Setting the Device Sounds, page 12). The
Auto Lap feature stays on for the selected activity profile until
you turn it off.
If necessary, you can customize the data screens to display
additional lap data (Customizing the Data Fields, page 10).
Using the Auto Pause
®
Feature
You can use the Auto Pause feature to pause the activity timer
automatically when you stop moving. This feature is helpful if
your activity includes stop lights or other places where you need
to stop.
NOTE: History is not recorded while the timer is stopped or
paused.
1
From the watch face, select START.
2
Select an activity.
3
Select Options > Auto Pause > When Stopped.
The Auto Pause feature stays on for the selected activity until
you turn it off.
Changing the GPS Setting
By default, the device uses GPS to locate satellites. For more
information about GPS, go to www.garmin.com/aboutGPS.
1
From the watch face, select START.
2
Select an activity.
3
Select Options > GPS.
4
Select an option:
Select GPS Only to enable the GPS satellite system.
Select GPS + GLONASS (Russian satellite system) for
more accurate position information in situations with poor
sky visibility.
Select GPS + GALILEO (European Union satellite
system) for more accurate position information in
situations with poor sky visibility.
NOTE: Using GPS and another satellite together can reduce
battery life more quickly than using GPS only (GPS and
Other Satellite Systems, page 11).
GPS and Other Satellite Systems
The GPS + GLONASS or GPS + GALILEO options offer
increased performance in challenging environments and faster
position acquisition than using GPS only. However, using GPS
and another satellite system together can reduce battery life
more quickly than using GPS only.
Customizing the Widget Loop
You can change the order of widgets in the widget loop, remove
widgets, and add new widgets.
1
From the watch face, hold UP.
2
Select > Widgets.
3
Select a widget.
4
Select an option:
Select Reorder to change the location of the widget in the
widget loop.
Select Remove to remove the widget from the widget
loop.
5
Select Add Widgets.
6
Select a widget.
The widget is added to the widget loop.
Activity Tracking Settings
From the watch face, hold UP, and select > Activity
Tracking.
Status: Turns off the activity tracking features.
Move Alert: Displays a message and the move bar on the
digital watch face and steps screen. The device also beeps
or vibrates if audible tones are turned on (Setting the Device
Sounds, page 12).
Goal Alerts: Allows you to turn on and off goal alerts, or turn
them off only during activities. Goal alerts appear for your
daily steps goal and weekly intensity minutes goal.
Move IQ: Allows your device to automatically start and save a
timed walking or running activity when the Move IQ feature
detects familiar movement patterns.
Turning Off Activity Tracking
When you turn off activity tracking, your steps, intensity minutes,
sleep tracking, and Move IQ events are not recorded.
1
From the watch face, hold UP.
2
Select > Activity Tracking > Status > Off.
Watch Face Settings
You can customize the appearance of the watch face by
selecting the layout and accent color. You can also download
custom watch faces from the Connect IQ
store.
Customizing the Watch Face
You can customize the watch face information and appearance.
1
From the watch face, hold UP.
2
Select Watch Face.
3
Select UP or DOWN to preview the watch face options.
4
Select START.
5
Select Accent Color to change the accent color (optional).
6
Select Apply.
Downloading Connect IQ Features
Before you can download features from the Connect IQ app, you
must pair your Garmin Swim 2 device with your smartphone
(Pairing Your Smartphone with Your Device, page 1).
1
From the app store on your smartphone, install and open the
Connect IQ app.
2
If necessary, select your device.
3
Select a Connect IQ feature.
4
Follow the on-screen instructions.
Downloading Connect IQ Features Using Your
Computer
1
Connect the device to your computer using a USB cable.
2
Go to apps.garmin.com, and sign in.
3
Select a Connect IQ feature, and download it.
4
Follow the on-screen instructions.
System Settings
Hold UP, and select > System.
Customizing Your Device 11
Language: Sets the language displayed on the device.
Time: Adjusts the time settings (Time Settings, page 12).
Backlight: Adjusts the backlight settings (Changing the
Backlight Settings, page 12).
Sounds: Sets the device sounds, such as key tones, alerts, and
vibrations (Setting the Device Sounds, page 12).
Do Not Disturb: Turns on or off do not disturb mode. You can
use the During Sleep option to turn on do not disturb mode
automatically during your normal sleep hours. You can set
your normal sleep hours on your Garmin Connect account
(Using Do Not Disturb Mode, page 4).
Auto Lock: Allows you to lock the device automatically to
prevent accidental key presses (Locking and Unlocking the
Device, page 12).
Pace/Speed Preference: Sets the device to display speed or
pace for running, cycling, or other activities. This preference
affects several training options, history, and alerts (Displaying
Pace or Speed, page 12).
Units: Sets the units of measure used on the device (Changing
the Units of Measure, page 12).
Software Update: Allows you to install software updates
downloaded using Garmin Express or the Garmin Connect
app (Updating the Software Using the Garmin Connect App,
page 14).
Reset: Allows you to reset user data and settings (Resetting All
Default Settings, page 15).
Time Settings
From the watch face, hold UP, and select > System > Time.
Time Format: Sets the device to show time in a 12-hour or a
24-hour format.
Set Time: Allows you to set the time manually or automatically
based on your paired mobile device or GPS location.
Sync with GPS: Allows you to manually sync the time when you
change time zones, or to update for daylight saving time.
Time Zones
Each time you turn on the device and acquire satellites or sync
with your smartphone, the device automatically detects your
time zone and the current time of day.
Changing the Backlight Settings
1
From the watch face, hold UP.
2
Select > System > Backlight.
3
Select an option:
Select During Activity.
Select Not During Activity.
4
Select an option:
Select Keys to turn on the backlight for key presses.
Select Alerts to turn on the backlight for alerts.
Select Gesture to turn on the backlight by raising and
turning your arm to look at your wrist.
Select Timeout to set the length of time before the
backlight turns off.
Setting the Device Sounds
You can set the device to sound a tone or vibration when keys
are selected or when an alert is triggered.
1
From the watch face, hold UP.
2
Select > System > Sounds.
3
Select an option:
Select Key Tones to turn the key tones on and off.
Select Alert Tones to enable the alert tones settings.
Select Vibration to turn device vibration on and off.
Select Key Vibe to enable vibration when you select a
key.
Locking and Unlocking the Device
You can enable the Auto Lock option to automatically lock the
device to prevent accidental key presses.
1
From the watch face, hold UP.
2
Select > System > Auto Lock.
3
Select an option.
4
Hold any key to unlock the device.
Displaying Pace or Speed
You can change the type of information that appears in the pace
or speed data field.
1
From the watch face, hold UP.
2
Select > System > Pace/Speed Preference.
3
Select an activity.
Changing the Units of Measure
You can customize units of measure for distance.
1
From the watch face, hold UP.
2
Select > System > Units.
3
Select Statute or Metric.
Clock
Setting the Time Manually
1
From the watch face, hold UP.
2
Select > System > Time > Set Time > Manual.
3
Select Time, and enter the time of day.
Syncing the Time with GPS
Each time you turn on the device and acquire satellites, the
device automatically detects your time zones and the current
time of day. You can also manually sync the time with GPS
when you change time zones, and to update for daylight saving
time.
1
From the watch face, hold UP.
2
Select > System > Time > Sync with GPS.
3
Wait while the device locates satellites (Acquiring Satellite
Signals, page 14).
Setting an Alarm
You can set multiple alarms. You can set each alarm to sound
once or to repeat regularly.
1
From the watch face, hold UP.
2
Select Alarm Clock > Add Alarm.
3
Select Time, and enter the alarm time.
4
Select Repeat, and select when the alarm should repeat
(optional).
5
Select Sounds, and select a type of notification (optional).
6
Select Backlight > On to turn on the backlight with the alarm.
7
Select Label, and select a description for the alarm
(optional).
Deleting an Alarm
1
From the watch face, hold UP.
2
Select Alarm Clock.
3
Select an alarm.
4
Select Delete.
Starting the Countdown Timer
1
From any screen, hold LIGHT.
2
Select Timer.
12 Customizing Your Device
3
Enter the time.
4
If necessary, select Restart > On to automatically restart the
timer after it expires.
5
If necessary, select Sounds, and select a type of notification.
6
Select Start Timer.
Using the Stopwatch
1
From any screen, hold LIGHT.
2
Select Stopwatch.
3
Select START to start the timer.
4
Select LAP to restart the lap timer .
The total stopwatch time continues running.
5
Select START to stop both timers.
6
Select an option.
7
Save the recorded time as an activity in your history
(optional).
Device Information
Charging the Device
WARNING
This device contains a lithium-ion battery. See the Important
Safety and Product Information guide in the product box for
product warnings and other important information.
NOTICE
To prevent corrosion, thoroughly clean and dry the contacts and
the surrounding area before charging or connecting to a
computer. Refer to the cleaning instructions in the appendix.
1
Plug the small end of the USB cable into the charging port on
your device.
2
Plug the large end of the USB cable into a USB charging
port.
3
Charge the device completely.
Tips for Charging the Device
1
Connect the charger securely to the device to charge it using
the USB cable (Charging the Device, page 13).
You can charge the device by plugging the USB cable into a
Garmin approved AC adapter with a standard wall outlet or a
USB port on your computer. Charging a fully depleted battery
takes up to two hours.
2
Remove the charger from the device after the battery charge
level reaches 100%.
Wearing the Device
Wear the device above your wrist bone.
NOTE: The device should be snug but comfortable. For more
accurate heart rate readings, the device should not move
while swimming or exercising.
NOTE: The optical sensor is located on the back of the
device.
See Tips for Erratic Heart Rate Data, page 6 for more
information about wrist-based heart rate.
For more information about accuracy, go to garmin.com
/ataccuracy.
Device Care
NOTICE
Avoid extreme shock and harsh treatment, because it can
degrade the life of the product.
Thoroughly rinse the device with fresh water after exposure to
chlorinated or salt water environments.
Do not use a sharp object to clean the device.
Avoid chemical cleaners, solvents, and insect repellents that can
damage plastic components and finishes.
Always wipe the device dry after cleaning.
Do not store the device where prolonged exposure to extreme
temperatures can occur, because it can cause permanent
damage.
Cleaning the Device
1
Wipe the device using a cloth dampened with a mild
detergent solution.
2
Wipe it dry.
After cleaning, allow the device to dry completely.
TIP: For more information, go to www.garmin.com/fitandcare.
Changing the Bands
You can replace the bands with new Garmin Swim 2 bands.
1
Use a screwdriver to loosen the screws.
2
Remove the screws.
3
Gently remove the bands.
4
Align the new bands.
5
Replace the screws using the screwdriver.
Device Information 13
Specifications
Battery type Rechargeable, built-in lithium-ion battery
Battery life Up to 7 days for watch mode with smart
notifications, activity tracking, and wrist heart
rate
Up to 14 hr. in GPS mode with wrist heart rate
Operating
temperature range
From -20º to 60ºC (from -4º to 140ºF)
Charging
temperature range
From 0º to 45ºC (from 32º to 113ºF)
Wireless frequency 2.4 GHz @ +6 dBm nominal
Water rating Swim, 5 ATM
1
Viewing Device Information
You can view device information, such as the unit ID, software
version, regulatory information, and license agreement.
1
From the watch face, hold UP.
2
Select > About.
Troubleshooting
Product Updates
On your computer, install Garmin Express (www.garmin.com
/express). On your smartphone, install the Garmin Connect app.
This provides easy access to these services for Garmin devices:
Software updates
Data uploads to Garmin Connect
Product registration
Updating the Software Using the Garmin Connect App
Before you can update your device software using the Garmin
Connect app, you must have a Garmin Connect account, and
you must pair the device with a compatible smartphone (Pairing
Your Smartphone with Your Device, page 1).
Sync your device with the Garmin Connect app (Manually
Syncing Data with Garmin Connect, page 5).
When new software is available, the Garmin Connect app
automatically sends the update to your device. The update is
applied when you are not actively using the device. When the
update is complete, your device restarts.
Setting Up Garmin Express
1
Connect the device to your computer using a USB cable.
2
Go to www.garmin.com/express.
3
Follow the on-screen instructions.
Updating the Software Using Garmin Express
Before you can update your device software, you must have a
Garmin Connect account, and you must download the Garmin
Express application.
1
Connect the device to your computer using the USB cable.
When new software is available, Garmin Express sends it to
your device.
2
Follow the on-screen instructions.
3
Do not disconnect your device from the computer during the
update process.
Getting More Information
Go to support.garmin.com for additional manuals, articles,
and software updates.
Go to buy.garmin.com, or contact your Garmin dealer for
information about optional accessories and replacement
parts.
Activity Tracking
For more information about activity tracking accuracy, go to
garmin.com/ataccuracy.
My daily step count does not appear
The daily step count is reset every night at midnight.
If dashes appear instead of your step count, allow the device
to acquire satellite signals and set the time automatically.
My step count does not seem accurate
If your step count does not seem accurate, you can try these
tips.
Wear the device on your non-dominant wrist.
Carry the device in your pocket when pushing a stroller or
lawn mower.
Carry the device in your pocket when actively using your
hands or arms only.
NOTE: The device may interpret some repetitive motions,
such as washing dishes, folding laundry, or clapping your
hands, as steps.
The step counts on my device and my Garmin
Connect account don't match
The step count on your Garmin Connect account updates when
you sync your device.
1
Select an option:
Sync your step count with the Garmin Connect application
(Using Garmin Connect on Your Computer, page 9).
Sync your step count with the Garmin Connect app
(Manually Syncing Data with Garmin Connect, page 5).
2
Wait while the device syncs your data.
Syncing can take several minutes.
NOTE: Refreshing the Garmin Connect app or the Garmin
Connect application does not sync your data or update your
step count.
My intensity minutes are flashing
When you exercise at an intensity level that qualifies toward
your intensity minutes goal, the intensity minutes flash.
Exercise for at least 10 consecutive minutes at a moderate or
vigorous intensity level.
Acquiring Satellite Signals
The device may need a clear view of the sky to acquire satellite
signals. The time and date are set automatically based on the
GPS position.
TIP: For more information about GPS, go to www.garmin.com
/aboutGPS.
1
Go outdoors to an open area.
The front of the device should be oriented toward the sky.
2
Wait while the device locates satellites.
It may take 30–60 seconds to locate satellite signals.
Improving GPS Satellite Reception
Frequently sync the device to your Garmin Connect account:
Connect your device to a computer using the USB cable
and the Garmin Express application.
Sync your device to the Garmin Connect app using your
Bluetooth enabled smartphone.
1
The device withstands pressure equivalent to a depth of 50 m. For more information, go to www.garmin.com/waterrating.
14 Troubleshooting
While connected to your Garmin Connect account, the device
downloads several days of satellite data, allowing it to quickly
locate satellite signals.
Take your device outside to an open area away from tall
buildings and trees.
Remain stationary for a few minutes.
Restarting the Device
If the device stops responding, you may need to restart it.
NOTE: Restarting the device may erase your data or settings.
1
Hold LIGHT for 15 seconds.
The device turns off.
2
Hold LIGHT for one second to turn on the device.
Resetting All Default Settings
NOTE: This deletes all user-entered information and activity
history.
1
From the watch face, hold UP.
2
Select > System > Reset.
3
Select an option:
To reset all of the device settings to the factory default
values and save all activity information, select Reset
Settings.
To delete all activities from your history, select Delete All.
My device is in the wrong language
1
From the watch face, hold UP.
2
Scroll down to the second-to-last item in the list, and select it.
3
Select the first item in the list.
4
Select your language.
Is my smartphone compatible with my
device?
The Garmin Swim 2 device is compatible with smartphones
using Bluetooth wireless technology.
Go to www.garmin.com/ble for compatibility information.
My phone will not connect to the device
If your phone will not connect to the device, you can try these
tips.
Turn off your smartphone and your device, and turn them
back on again.
Enable Bluetooth technology on your smartphone.
Update the Garmin Connect app to the latest version.
Remove your device from the Garmin Connect app and
theBluetooth settings on your smartphone to retry the pairing
process.
If you bought a new smartphone, remove your device from
the Garmin Connect app on the smartphone you intend to
stop using.
Bring your smartphone within 10 m (33 ft.) of the device.
On your smartphone, open the Garmin Connect app, select
or , and select Garmin Devices > Add Device to enter
pairing mode.
On your device, select UP > > Phone > Pair Phone.
Can I use the cardio activity outdoors?
You can use the cardio activity and turn on GPS for outdoor use.
1
Select START > Cardio > Options > GPS.
2
Select an option.
3
Go outside, and wait while the device locates satellites.
4
Select START to start the activity timer.
GPS stays on for the selected activity until you turn it off.
Tips for Existing Garmin Connect Users
1
From the Garmin Connect app, select or .
2
Select Garmin Devices > Add Device.
Maximizing Battery Life
You can do several things to extend the life of the battery.
Reduce the backlight timeout (Changing the Backlight
Settings, page 12).
Turn off Bluetooth wireless technology when you are not
using connected features (Turning Off the Bluetooth
Smartphone Connection, page 6).
Turn off activity tracking (Activity Tracking Settings, page 11).
Use a watch face that is not updated every second.
For example, use a watch face without a second hand
(Customizing the Watch Face, page 11).
Limit the smartphone notifications the device displays
(Managing Notifications, page 6).
Stop broadcasting heart rate data to paired Garmin devices
(Broadcasting Heart Rate Data to Garmin Devices, page 7).
Turn off wrist-based heart rate monitoring (Turning Off the
Wrist-based Heart Rate Monitor, page 7).
NOTE: Wrist-based heart rate monitoring is used to calculate
vigorous intensity minutes and calories burned.
Appendix
Data Fields
Some data fields require ANT+ accessories to display data.
% Heart Rate Reserve: The percentage of heart rate reserve
(maximum heart rate minus resting heart rate).
Aerobic Training Effect: The impact of the current activity on
your aerobic fitness level.
Anaerobic Training Effect: The impact of the current activity on
your anaerobic fitness level.
Average Distance Per Stroke: Swimming. The average
distance traveled per stroke during the current activity.
Average HR: The average heart rate for the current activity.
Average Pace: The average pace for the current activity.
Average Speed: The average speed for the current activity.
Average Stroke Rate: Swimming. The average number of
strokes per minute (spm) during the current activity.
Average Strokes Per Length: The average number of strokes
per pool length during the current activity.
Average Swolf: The average swolf score for the current activity.
Your swolf score is the sum of the time for one length plus
the number of strokes for that length (Swim Terminology,
page 3). In open water swimming, 25 meters is used to
calculate your swolf score.
Avg. %HRR: The average percentage of heart rate reserve
(maximum heart rate minus resting heart rate) for the current
activity.
Avg. HR %Max.: The average percentage of maximum heart
rate for the current activity.
Calories: The amount of total calories burned.
Distance: The distance traveled for the current track or activity.
Elapsed Time: The total time recorded. For example, if you start
the timer and swim for 10 minutes, then stop the timer for 5
minutes, then start the timer and swim for 20 minutes, your
elapsed time is 35 minutes.
Appendix 15
Heart Rate: Your heart rate in beats per minute (bpm). Your
device must have wrist-based heart rate or be connected to a
compatible heart rate monitor.
HR %Max.: The percentage of maximum heart rate.
HR Zone: The current range of your heart rate (1 to 5). The
default zones are based on your user profile and maximum
heart rate (220 minus your age).
Int. Avg. %HRR: The average percentage of heart rate reserve
(maximum heart rate minus resting heart rate) for the current
swim interval.
Int. Avg. %Max.: The average percentage of maximum heart
rate for the current swim interval.
Int. Avg. HR: The average heart rate for the current swim
interval.
Int. Distance: The distance traveled for the current interval.
Int. Max. %HRR: The maximum percentage of heart rate
reserve (maximum heart rate minus resting heart rate) for the
current swim interval.
Int. Max. %Max.: The maximum percentage of maximum heart
rate for the current swim interval.
Int. Max. HR: The maximum heart rate for the current swim
interval.
Int. Pace: The average pace for the current interval.
Interval Lengths: The number of pool lengths completed during
the current interval.
Intervals: The number of intervals completed in the current
activity.
Interval Strokes Per Length: The average number of strokes
per pool length during the current interval.
Interval Stroke Type: The current stroke type for the interval.
Interval Swolf: The average swolf score for the current interval.
Interval Time: The stopwatch time for the current interval.
L. Lap HR %Max.: The average percentage of maximum heart
rate for the last completed lap.
Lap %HRR: The average percentage of heart rate reserve
(maximum heart rate minus resting heart rate) for the current
lap.
Lap Distance: The distance traveled for the current lap.
Lap Distance Per Stroke: Swimming. The average distance
traveled per stroke during the current lap.
Lap HR: The average heart rate for the current lap.
Lap HR %Max.: The average percentage of maximum heart
rate for the current lap.
Lap Pace: The average pace for the current lap.
Laps: The number of laps completed for the current activity.
Lap Stroke Rate: Swimming. The average number of strokes
per minute (spm) during the current lap.
Lap Strokes: Swimming. The total number of strokes for the
current lap.
Lap Swolf: The swolf score for the current lap.
Lap Time: The stopwatch time for the current lap.
Last Lap %HRR: The average percentage of heart rate reserve
(maximum heart rate minus resting heart rate) for the last
completed lap.
Last Lap Dist.: The distance traveled for the last completed lap.
Last Lap Distance Per Stroke: Swimming. The average
distance traveled per stroke during the last completed lap.
Last Lap HR: The average heart rate for the last completed lap.
Last Lap Pace: The average pace for the last completed lap.
Last Lap Stroke Rate: Swimming. The average number of
strokes per minute (spm) during the last completed lap.
Last Lap Strokes: Swimming. The total number of strokes for
the last completed lap.
Last Lap Swolf: The swolf score for the last completed lap.
Last Lap Time: The stopwatch time for the last completed lap.
Last Len. Pace: The average pace for your last completed pool
length.
Last Length Strokes: The total number of strokes for the last
completed pool length.
Last Length Stroke Type: The stroke type used during the last
completed pool length.
Last Length Swolf: The swolf score for the last completed pool
length.
Lengths: The number of pool lengths completed during the
current activity.
Pace: The current pace.
Repeat On: The timer for the last interval plus the current rest
(pool swimming).
Rest Timer: The timer for the current rest (pool swimming).
Speed: The current rate of travel.
Steps: The number of steps during the current activity.
Stroke Rate: Swimming. The number of strokes per minute
(spm).
Strokes: Swimming. The total number of strokes for the current
activity.
Swim Time: The swimming time for the current activity, not
including rest time.
Time in Zone: The time elapsed in each heart rate or power
zone.
Time of Day: The time of day based on your current location
and time settings (format, time zone, daylight saving time).
Timer: The stopwatch time for the current activity.
ANT+ Heart Rate Monitor
Your device can be used with wireless ANT+ sensors. For more
information about compatibility and purchasing optional sensors,
go to http://buy.garmin.com.
Pairing Your External Heart Rate Monitor
The first time you connect a wireless sensor to your device
using ANT+ technology, you must pair the device and sensor.
After they are paired, the device connects to the sensor
automatically when you start an activity and the sensor is active
and within range.
1
Put on the heart rate monitor.
The heart rate monitor does not send or receive data until
you put it on.
2
Bring the device within 3 m (10 ft.) of the sensor.
NOTE: Stay 10 m (33 ft.) away from other ANT+ sensors
while pairing.
3
From the watch face, hold UP.
4
Select > Sensors & Accessories > Add External HR.
When the sensor is paired with your device, a message
appears. Sensor data appears in the data screen loop or a
custom data field.
Fitness Goals
Knowing your heart rate zones can help you measure and
improve your fitness by understanding and applying these
principles.
Your heart rate is a good measure of exercise intensity.
Training in certain heart rate zones can help you improve
cardiovascular capacity and strength.
16 Appendix
  • Page 1 1
  • Page 2 2
  • Page 3 3
  • Page 4 4
  • Page 5 5
  • Page 6 6
  • Page 7 7
  • Page 8 8
  • Page 9 9
  • Page 10 10
  • Page 11 11
  • Page 12 12
  • Page 13 13
  • Page 14 14
  • Page 15 15
  • Page 16 16
  • Page 17 17
  • Page 18 18
  • Page 19 19
  • Page 20 20
  • Page 21 21
  • Page 22 22
  • Page 23 23
  • Page 24 24

Garmin Swim 2 User manual

Category
Activity trackers
Type
User manual
This manual is also suitable for

Ask a question and I''ll find the answer in the document

Finding information in a document is now easier with AI