Page is loading ...

Dear Customer,
CONGRATULATIONS.
The VRPD7 Portable DVD Player, when used as described, will enable you to
enjoy DVD Video, JPEG Photos, and CD Audio any place and any time. We have
taken numerous measures in quality control to ensure that your product arrives
in top condition and will perform to your satisfaction.
In the rare event that your VRPD7 Portable DVD Player contains a damaged
or missing item, does not perform as specified, requires warranty service or
you have an installation problem,
DO NOT RETURN THIS PRODUCT TO THE
STORE. PLEASE CALL OUR TOLL-FREE NUMBER 1-800-445-1797 and ask
to speak with a member of our technical service team, or submit your ques
-
tions by e-mail to [email protected] and a member of our technical
service team will respond by e-mail to your questions. Our in-house technical
service team will expedite delivery of your part, advise you on installation, or help
troubleshoot a problem with you. If your product needs warranty service, our
technical service team representatives will help you obtain the fastest remedy
possible under the warranty.

TABLE OF CONTENTS
Safety Precautions .............................................................................................. 1-2
Safety Information ............................................................................................... 3-6
Introduction .............................................................................................................
7
Package Contents ..................................................................................................8
Location of Controls ...............................................................................................
9
Quick Start Guide ........................................................................................... 10-11
Connecting to a TV ..............................................................................................12
Connecting to Optional Equipment ................................................................ 13-14
Basic Operation .............................................................................................. 15-16
Slow Motion ..........................................................................................................17
Playing Back a KODAK Picture CD/JPEG ............................................................
18
Audio CD Operation ..............................................................................................19
Remote Control for Audio CD ...............................................................................
20
Title Menu - Locating a Specific Title, Chapter, or Track ......................................
21
Repeat Feature .....................................................................................................
22
Programmed Playback ...................................................................................
23-24
Zoom Feature ........................................................................................................
25
Subtitle Feature .....................................................................................................
26
On-Screen Display ...............................................................................................
27
Camera Angle Feature .........................................................................................
28
Parental Lock Feature .....................................................................................
29-30
Function Settings ............................................................................................ 31-32
Troubleshooting ....................................................................................................
33
Specifications .......................................................................................................
34

SAFETY PRECAUTIONS
The lightning flash with an arrowhead symbol within an equilateral triangle is in-
tended to alert the user of the presence of uninsulated “DANGEROUS VOLTAGE”
within the product’s enclosure that may be of sufficient magnitude to constitute a
risk of electric shock to persons.
The exclamation point within an equilateral triangle is intended to alert the user of
the presence of important operating and maintenance (servicing) instructions in the
literature accompanying the appliance.
RISK OF ELECTRIC SHOCK - DO NOT OPEN!
WARNING: DO NOT EXPOSE THIS APPLIANCE TO RAIN OR MOISTURE. DUE TO
THE HIGH RISK OF FIRE OR ELECTRIC SHOCK; DO NOT OPEN THE CABINET - DAN
-
GEROUS HIGH VOLTAGES ARE PRESENT INSIDE THE ENCLOSURE. ONLY QUALI-
FIED SERVICE PERSONNEL SHOULD ATTEMPT THIS.
CAUTION: DURING PLAYBACK, THE DISC SPINS AT HIGH SPEED. DO NOT LIFT OR
MOVE THE PLAYER; DOING SO MAY DAMAGE THE DISC.
CAUTION: THIS DIGITAL VIDEO DISC PLAYER EMPLOYS A LASER SYSTEM. MAKE
SURE THE DEVICE IS SHUT DOWN PRIOR TO OPENING PLAYER LID. LASER RA
-
DIATION WILL BE PRESENT AND VISIBLE WHEN THE DEVICE IS OPEN AND INTER
-
LOCKS ARE DEFEATED. USE OF CONTROLS, ADJUSTMENTS, OR PERFORMANCE
OF PROCEDURES OTHER THAN THOSE SPECIFIED HEREIN MAY RESULT IN HAZ
-
ARDOUS RADIATION EXPOSURE.
1
THIS DEVICE COMPLIES WITH PART
15 OF THE FCC RULES. OPERATION IS
SUBJECT TO THE FOLLOWING TWO
CONDITIONS:
1. THIS DEVICE MAY NOT CAUSE
HARMFUL INTERFERENCE
2. THIS DEVICE MUST ACCEPT ANY
INTERFERENCE RECEIVED. INCLUD
-
ING INTERFERENCE THAT MAY CAUSE
UNDESIRED OPERATION .
CLASS 1
LASER PRODUCT

DO NOT STARE INTO BEAM.
To ensure proper use of this product, please read this owner’s manual carefully and retain
for future reference. Should the unit require maintenance, contact an authorized service
location, or contact us. Only qualified service personnel should remove the cover.
FCC NOTICE: This equipment has been tested and found to comply with the limits for a
Class B digital device, pursuant with the FCC Rules, Part 15. These limits are designed to
provide reasonable protection against harmful interference in a residential installation.
This equipment generates, uses, and can radiate radio frequency energy and, if not in
-
stalled and used in accordance with the instructions, may cause harmful interference to
radio communication. However, this is no guarantee that interference will not occur in a
particular installation. If this equipment does cause harmful interference to radio or televi
-
sion reception, which can be determined by turning the equipment off and on, the user is
encouraged to try to correct the interference by one of the following measures:
• Reorient or relocate the receiving antenna.
• Increase the separation between the equipment and receiver.
• Connect the equipment into an outlet on a circuit different from
that to which the receiver is connected.
•
Consult the dealer or an experienced radio/TV technician for help.
FCC CAUTION: To assure continued compliance, (example-use only shielded interface
cables when connecting to computer or peripheral devices) Do not modify or alter this
device. FCC and DHHS Certification is granted only to the manufacturer of this design.
SAFETY PRECAUTIONS
(Continued)
2

SAFETY INFORMATION
3
CAUTION: Use of controls, adjustments, or performance of procedures other than
those specified herein may result in hazardous radiation exposure.
Please carefully study this manual and always keep it available. There are some in
-
stallation and operation precautions which you should be aware of.
1. Read Instructions - All the safety and operating instructions should be read before the
product is operated.
2. Retain Instructions - The safety and operating instructions should be retained for
future reference.
3. Heed Warnings - All warnings on the product and in the operating instructions should
be adhered to.
4. Follow Instructions - All operating and use instructions should be followed.
5. Cleaning - Unplug the power supply from this unit before cleaning. Do not use liquid
cleaners or aerosol cleaners. Use a damp cloth for cleaning.
6.
Attachments
- Do not use attachments not recommended by the product manufacturer
as they may cause hazards.
7.
Water and Moisture - Do not use this product near water - for example, near a bath tub, wash
bowl, kitchen sink, or laundry tub; in a wet basement; or near a swimming pool; and the
like.
8. Accessories - Do not place this product on an unstable cart, stand, tripod, bracket, or
table. The product may fall, causing serious injury to a child or adult, and serious dam
-
age to the product. Use only with a cart, stand, tripod, bracket, or table recommended
by the manufacturer, or sold with the product. Any mounting of the product should
follow the manufacturer’s instructions and should use a mounting accessory recom-
mended by the manufacturer.
9. A product and cart combination should be moved with care. Quick stops, excessive
force, and uneven surfaces may cause the product and cart combination to overturn.

SAFETY INFORMATION
(Continued)
4
10. Ventilation - Slots and openings in the cabinet are provided for ventilation, to ensure
reliable operation of the product, and to protect from overheating. These openings
must not be blocked or covered. The openings should never be blocked by placing the
product on a bed, sofa, rug, or other similar surface. This product should not be placed
in a built-in installation such as a bookcase or rack unless proper ventilation is provided
or the manufacturer’s instructions have been adhered to.
11.
Power Sources
- This product should be operated only from the type of power supply
indicated on the marking label. If you are not sure of what type of power supply to use
consult your product dealer or distributor.
12.
Grounding or Polarization
- This product may be equipped with a polarized alternating
current line plug (a plug having one blade wider than the other). This plug will fit into
the power outlet only one way. This is a safety feature. If you are unable to insert the
plug fully into the outlet, try reversing the plug. If the plug should still fail to fit, contact
your electrician to replace your obsolete outlet. Do not defeat the safety purpose of the
polarized plug.
13. Power-Cord Protection - Power-supply cords should be routed so that they are not
likely to be walked on or pinched by items placed upon or against them. Pay particular
attention to the physical condition of electrical cords at the plugs, sockets, power out
-
lets, and the point where they exit from the product. If any damage is found at any of
these areas, consult a licensed electrician.

SAFETY INFORMATION
(Continued)
5
14.
Protective Attachment Plug
- The product is equipped with an attachment plug having
overload protection. This is a safety feature. See Instruction Manual for replacement or
resetting of protective device. If replacement of the plug is required, be sure the service
technician uses a replacement plug specified by the manufacturer that has the same
overload protection as the original plug.
15. Outdoor Antenna Grounding - If an outside antenna or cable system is connected to
the product, be sure the antenna or cable system is grounded so as to provide some
protection against voltage surges and built-up static charges. Article 810 of the Nation
-
al Electrical Code, ANSI/NFPA 70, provides information with regard to proper ground-
ing of the mast and supporting structure, grounding of the lead-in wire to an antenna
discharge unit, size or grounding conductors, location of antenna-discharge unit, con
-
nection to grounding electrodes, and requirements for the grounding electrode.
16. Lightning - For added protection of this product during a lightning storm, or when it
is left unattended and unused for long periods of time, unplug it from the wall outlet and
disconnect the antenna or cable system. This will prevent damage to the product due
to lightning and power-line surges.
17.
Power Lines -
An outside antenna system should not be located near overhead power lines
or other electric light or power circuits, or where it can fall into such power lines or
circuits. When installing an outside antenna system, extreme care should be taken to
keep from touching such power lines or circuits as contact with them might be fatal.
18. Overloading - Do not overload wall outlets, extension cords, or integral convenience
receptacles as this can result in a risk of fire or electric shock.
19. Object and Liquid Entry -
Never push objects of any kind into this product through open-
ings as they may touch dangerous voltage points or short-out parts that could result in a fire.
Children should always be supervised when handling this product to ensure their safety.

SAFETY INFORMATION
(Continued)
6
20.
Servicing - Do not attempt to service this product yourself as opening or removing covers
may expose you to dangerous voltage or other hazards. Refer all servicing to qualified
service personnel.
21.
Damage Requiring Service
- Unplug this product from the wall outlet and refer servicing
to qualified service personnel under the following conditions:
a. When the power-supply cord or plug is damaged.
b.
If liquid has been spilled, or objects have fallen into the product.
c. If the product has been exposed to rain or water.
d.
If the product does not operate normally by following the operating
instructions. Adjust only those controls that are covered by the oper-
ating instructions as an improper adjustment of other controls may
result in damage and will often require extensive work by a qualified
technician to restore the product to its normal operation.
e. If the product has been dropped or damaged in any way.
f. When the product exhibits a distinct change in performance, this
indicates a need for service.
22.
Replacement Parts
- When replacement parts are required, be sure the service technician
has used replacement parts specified by the manufacturer or have the same character-
istics as the original part. Unauthorized substitutions may result in fire, electric shock,
or other hazards.
23. Safety Check - Upon completion of any service or repairs to this product, ask the
service technician to perform safety checks to determine that the product is in proper
operating condition.
24.
Wall or Ceiling Mounting
- The product should be mounted to a wall or ceiling only as
recommended by the manufacturer.
25. Heat - The product should be situated away from heat sources such as radiators,
heat registers, stoves or other products (including amplifiers) that produce heat.

INTRODUCTION
7
Your new portable DVD player is designed for you
to enjoy all forms of disc media. Its slim shape al
-
lows you to easily carry it with you and enjoy mov
-
ies and music anywhere. Your player incorporates
the latest digital audio/video (AV) technologies to
give you the ultimate in listening and viewing plea
-
sure.
Your new player also supports CD, and JPEG. Your
player has several unique features; large active LCD
screen, multi-angle and multi language, Parental
Control (to prevent children from viewing inappro
-
priate content), and Kodak Picture CD compatibility
(so you can show photos on your DVD player). This
is a truly multimedia machine designed for the mul
-
timedia world to enjoy.
DIGITAL AUDIO
COMPACT
This product incorporates copyright protection technology that is protected
by method claims of certain U.S. patents and other intellectual property rights
owned by Macrovision Corporation and other rights owners.
Use of this copyright protection technology must be authorized by Macrovi
-
sion Corporation, and is intended for home and other limited viewing uses
only unless otherwise authorized by Macrovision Corporation. Reverse engi
-
neering or disassembly is prohibited.
It is forbidden by law to copy, broadcast, show, play in public, and rent copy
-
righted material without permission. DVD video discs are copy protected,
and any recordings made from these discs will be distorted.
Manufactured under license from Dolby Laboratories. “Dolby” and the dou
-
ble-D symbol are trademarks of Dolby Laboratories. Confidential Unpub
-
lished works. 1992-1997 Dolby Laboratories, Inc. All rights reserved.

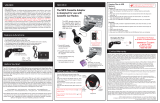
PACKAGE CONTENTS
8
UNPACKING
First, inventory the contents of your Portable DVD player package.
In the rare event that your VRPD7 Portable DVD Player contains a damaged or missing
item, does not perform as specified, requires warranty service or you have an installation
problem,
DO NOT RETURN THIS PRODUCT TO THE STORE. PLEASE CALL OUR TOLL-
FREE NUMBER 1-800-445-1797
and ask to speak with a member of our technical service
team, or submit your questions by e-mail to [email protected] and a member of
our technical service team will respond by e-mail to your questions. Keep the packaging
materials, you may need them to transport your player in the future.
WARNING: Changes or modifications made to this equipment, not expressly approved by
us, or parties authorized by us will void all manufacture warranties.
Portable DVD Player
12 Volt Adaptor
120V Power Supply
MUTE
DISPLAY
ANGLE
AUDIO
MENU
STOPSLOWZOOM
SETUP TITLE
SUB-T PLAY
|| /STEP
STANDBY
ENTER
REPEAT
A-B
PRGM
1 2 3 4
8
7
6
5
9
0
+10
GO TO
Remote Control
Audio/Video Cable

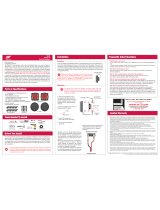
LOCATION OF CONTROLS
9
VRPD7 Controls
MUTE
DISPLAY
ANGLE
AUDIO
MENU
STOPSLOWZOOM
SETUP TITLE
SUB-T PLAY
||/ STEP
STANDBY
ENT ER
REP EAT
A-B
PRG M
1 2 3 4
8
7
6
5
9
0
+10
GO T O
1
2
3
4
5
6
7
8
9
10
11
12
13
14
15
16
17
18
19
20
21
22
23
24
1. LCD Monitor
2. Previous
3. Power
4. Menu
5. Next
6. Play/ Pause
7. Stop
8. Speakers
9. Remote Sensor
1. Mute
2. Display
3. Angle
4. Zoom
5. Slow
6. Setup
7. Title
8. Previous
9. Cursor
(Up/down/
Right/left)
10.
Fast Reverse
11. Numbers
12. Repeat
13. A-B
14. Standby
15. Menu
16. Audio
17. Stop
18. Pause/Step
19. Play
20. Subtitle
21. Next
22.
Fast Forward
23. Go To
24. Program
VRPD7 Remote Control Buttons
2
1
3
4
5
6
7
8
9
8

QUICK START GUIDE
10
1. Connecting to an External Power Source
Connect the power adapter (supplied with the player) to the side input plug (DC IN 9-
12V) and to a wall outlet. Do not use any other device to power the VRPD7.
Note: The DC 9-12V OUT jack
allows you to connect to
an external monitor.
2. Open the Disc Cover
Slide the OPEN/CLOSE
latch on the front to the left
while opening the disc cover.
3. Inserting a DVD disc.
Align the center of the DVD disc with the center of the
disc guide. Press gently down on the DVD to snap the
disc into place, then close the disc cover.
4. Turning the Unit On.
Press the power button on the
left side of the panel to switch
on the player.
5. Navigate the DVD’s Menu
After the DVD’s menu loads you
can use the PREVIOUS and NEXT
buttons to navigate the menu
selections available.
Highlight the Menu item you wish
to view and push the Play Button.
VOLUME
1-PHONE-2 AUDIO VIDEO
DC IN 9-12V DC OUT 9-12V
Power
Previous
Next

QUICK START GUIDE
(Continued)
11
6. Play/Pause
Highlight the Menu item you wish
to view and press the PLAY/PAUSE
button to start playback. If there is a
DVD already in the player, then the
VRPD7 will start reading the disc
automatically when power is turned on.
7. Stop
When you want to stop, press
the STOP button, it will return
to the power-on logo.
To power off the unit, press POWER button.
PLAY/PAUSE
STOP
The DVD player will automatically power off in
three minutes after entering screensaver mode.

CONNECTING TO A TV
12
Connecting the Audio and Video Cables
Audio Cable
1. Insert the end of the cable with the single plug into the AUDIO OUT jack on the side of
the DVD player.
2.
Insert the plugs on the other end, the left & right audio, into the AUDIO IN jacks on the TV.
3. Connect the yellow Video Cable to the VIDEO jack on the side of your player.
4. Connect the other end of the Video Cable to the VIDEO IN jack on the TV.
Note: Do not connect the Video cable to the Antenna Input jack of a TV set.
VOLUME
1-PHONE-2 AUDIO VIDEO DC IN 9-12V
DC OUT 9-12V
TV Audio Left & Right Inputs
Audio/Video Cable
• When connecting to a TV with PAL system, at first you should set the
video output to TV from the setup menu (press SETUP; select TV un-
der Component/Video) then press PLAY on the remote to set PAL for
the default system is NTSC.
TV Video Input, Not Antenna Input

CONNECTING OPTIONAL EQUIPMENT
13
Connecting the Ear Buds
Any headphones with a 1/8”/3.5 mm stereo plug can be connected to the VRPD7.
If you have headphones with a 1/4”/6.35 mm stereo plug, you will need an adaptor.
Two sets of headphones may be used at the same time with the VRPD7.
1. Before connecting the headphones, turn down the volume on the VRPD7.
2. Insert the 1/8”/3.5 mm stereo plug into the PHONE 1 Jack or the PHONE 2 jack on the
side of the DVD player.
VOLUME
1-PHONE-2

CONNECTING OPTIONAL EQUIPMENT
(Continued)
14
Enjoying Dolby Pro Logic Surround Sound Dolby Pro Logic Surround
Enjoy the dynamic, realistic sound of Dolby Pro Logic Surround Sound by connecting the
VRPD7 to an amplifier equipped with Dolby Pro Logic Surround and speaker system (right
and left front speakers, a center speaker, and one or two rear speakers).
Adjust the volume of your receiver to a comfortable listening level to avoid any
speaker damage.
VOLUME
1-PHONE-2 AUDIO VIDEO
DC IN 9-12V
Video Out to TV
To Video Input of TV
Audio Out to Amp
To Audio Input of Amp
Front Left Speaker
Front Right Speaker
Rear Left Speaker Rear Right Speaker
Center Speaker
Amplifier Equipped with
Dolby Pro Logic Surround Sound
DC OUT 9-12V

BASIC OPERATION
15
Playing a Disc from It’s The Menu Screen
Usually every disc’s menu will have a different menu screen, sometimes icons are used, but
they are navigated in the same way.
Title 1
Title 2
Title 3
Title 4
Title 5
Starting Playback
1. Press the TITLE or MENU button to
access the menu screen.
2. Use the ARROW buttons to highlight
a title.
3. Press the ENTER or PLAY button to
start playback of the selected title.
Note: You can input the number of the
title that you wish to play by-
directly using the number but
-
tons.
Pausing Playback
1. Press the ||
/
STEP button once to
pause playback.
2.
Pressing it again will advance
the picture
one frame each time it is
pressed.
3. Press the PLAY button to resume
normal playback.
Note: The sound will be muted when
playback is paused.
MUTE
DISPLAY
ANGLE
AUDIO
MENU
STOPSLOWZOOM
SETUP TITLE
SUB-T PLAY
||/ STEP
STANDBY
ENT ER
REP EAT
A-B
PRG M
1 2 3 4
8
7
6
5
9
0
+10
GO T O
Step
Title
Play
ENTER

BASIC OPERATION
(Continued)
16
MUTE
DISPLAY
ANGLE
AUDIO
MENU
STOPSLOWZOOM
SETUP TITLE
SUB-T PLAY
||/ STEP
STANDBY
ENT ER
REP EAT
A-B
PRG M
1 2 3 4
8
7
6
5
9
0
+10
GO T O
Stopping Playback
1. Press the STOP button to stop playback.
2.
Press the PLAY button to resume playback.
Fast Forward & Reverse
You can fast forward or reverse a disc at
speeds of 2x, 4x, 8x, or 16x.
Press the REV or FWD button during play-
back. The first time the button is pressed
the speed becomes double the normal
speed, then each time the button is pressed
the speed is doubled again until 16x which
is normal fast forward speed.
The sound is muted during Fast Forward &
Reverse.
Press the PLAY button to resume normal
playback.
Note: The Fast Forward & Reverse function
is disabled on some DVD discs.
STOP
PLAY
FWDREV

SLOW MOTION
17
Slow Motion
Most discs can be played back in slow motion.
Press the SLOW button during playback to use
the slow motion feature.
You can play a disc at
speeds of 1/2, 1/4, 1/8, 1/16.
When you press the SLOW button the playback
speed becomes 1/2 normal playback speed.
Pressing the SLOW button again will decrease
the playback speed by half.
Press PLAY to resume normal Playback.
The sound is muted while using the Slow Mo
-
tion feature.
Note: This feature is disabled on some DVDs.
MUTE
DISPLAY
ANGLE
AUDIO
MENU
STOPSLOWZOOM
SETUP TITLE
SUB-T PLAY
||/ STEP
STANDBY
ENT ER
REP EAT
A-B
PRG M
1 2 3 4
8
7
6
5
9
0
+10
GO T O
PLAY
SLOW

KODAK PICTURE DISC & JPEG PLAYBACK
18
REPEAT
Kodak Picture CD Playback
1. When a Kodak Picture CD is loaded,
playback will automatically start.
2. Select a folder on the disc and a menu will
appear on the screen. Press UP or DOWN to
select a folder, then press ENTER or PLAY to
view the folder contents.
3. You can select a playback mode of “Repeat
One” or “Repeat All” by pressing the RE
-
PEAT button. Press UP or DOWN to choose
the picture you wish to view.
4. Start Playback by pressing ENTER or PLAY.
JPEG & CD Playback
1. Load a JPEG CD into the VRPD7.
2. Press the STOP or MENU button to view
the contents.
3.
Select a folder on the disc. Press UP or
DOWN to select a folder, then press ENTER
or PLAY to view the folder contents.
4. You can select a playback mode of “Repeat
One” or “Repeat All” by pressing the RE-
PEAT button. Press UP or DOWN to choose
the picture you wish to view or CD track to
play.
5. Start Playback by pressing ENTER or PLAY.
Creating Your Own Picture CDs
Using your computer you can save
your digital photos in JPEG format,
then burn them on a CD-R disc.
MUTE
DISPLAY
ANGLE
AUDIO
MENU
STOPSLOWZOOM
SETUP TITLE
SUB-T PLAY
||/ STEP
STANDBY
ENT ER
REP EAT
A-B
PRG M
1 2 3 4
8
7
6
5
9
0
+10
GO T O
PLAY
STOP
MENU
UP
DOWN
PLAY
/