Sony RSX-GS9 Owner's manual

Category
Car media receivers
Type
Owner's manual
2
GB
Made in Thailand
The nameplate indicating operating voltage, etc., is
located on the bottom of the chassis.
Hereby, Sony Corporation, declares that this
equipment is in compliance with Directive
2014/53/EU.
The full text of the EU declaration of conformity is
available at the following internet address:
http://www.compliance.sony.de/
This radio equipment is intended to be used with
the approved version(s) of software that are
indicated in the EU Declaration of Conformity.
The software loaded on this radio equipment is
verified to comply with the essential requirements
of the Directive 2014/53/EU.
Software version: 1_
The software version can be checked in the
firmware setup item of the general setup menu.
Notice for customers: the following
information is only applicable to equipment
sold in countries applying EU Directives
Manufacturer: Sony Corporation, 1-7-1 Konan
Minato-ku Tokyo, 108-0075 Japan
For EU product compliance: Sony Belgium,
bijkantoor van Sony Europe Limited, Da Vincilaan
7-D1, 1935 Zaventem, Belgium
Disposal of waste batteries and
electrical and electronic
equipment (applicable in the
European Union and other
European countries with separate
collection systems)
This symbol on the product, the battery or on the
packaging indicates that the product and the
battery shall not be treated as household waste.
On certain batteries this symbol might be used in
combination with a chemical symbol. The chemical
symbols for mercury (Hg) or lead (Pb) are added if
the battery contains more than 0.0005% mercury or
0.004% lead.
By ensuring these products and batteries are
disposed of correctly, you will help prevent
potentially negative consequences for the
environment and human health which could
otherwise be caused by inappropriate waste
handling. The recycling of the materials will help to
conserve natural resources.
In case of products that for safety, performance or
data integrity reasons require a permanent
connection with an incorporated battery, this
battery should be replaced by qualified service staff
only.
To ensure that the battery and the electrical and
electronic equipment will be treated properly, hand
over these products at end-of-life to the applicable
collection point for the recycling of electrical and
electronic equipment.
For all other batteries, please view the section on
how to remove the battery from the product safely.
Hand the battery over to the applicable collection
point for the recycling of waste batteries.
For more detailed information about recycling of
this product or battery, please contact your local
Civic Office, your household waste disposal service
or the shop where you purchased the product or
battery.
WARNING: Do not ingest battery,
Chemical Burn Hazard.
The remote commander contains a coin/
button cell battery. If the coin/button cell battery is
swallowed, it can cause severe internal burns in just
2 hours and can lead to death.
Keep new and used batteries away from children. If
the battery compartment does not close securely,
stop using the product and keep it away from
children.
If you think batteries might have been swallowed or
placed inside any part of the body, seek immediate
medical attention.
Note on the lithium battery
Do not expose the battery to excessive heat such as
direct sunlight, fire or the like.
Disclaimer regarding services offered by
third parties
Services offered by third parties may be changed,
suspended, or terminated without prior notice.
Sony does not bear any responsibility in these sorts
of situations.
For safety, be sure to install this unit in the
dashboard of the car as the top of the unit
becomes hot during use.
For details, see “Connection/Installation”
(page 29).
3
GB
Caution
IN NO EVENT SHALL SONY BE LIABLE FOR ANY
INCIDENTAL, INDIRECT OR CONSEQUENTIAL
DAMAGES OR OTHER DAMAGES INCLUDING,
WITHOUT LIMITATION, LOSS OF PROFITS, LOSS OF
REVENUE, LOSS OF DATA, LOSS OF USE OF THE
PRODUCT OR ANY ASSOCIATED EQUIPMENT,
DOWNTIME, AND PURCHASER’S TIME RELATED TO
OR ARISING OUT OF THE USE OF THIS PRODUCT, ITS
HARDWARE AND/OR ITS SOFTWARE.
Dear customer, this product includes a radio
transmitter.
According to UNECE Regulation no. 10, a vehicle
manufacturers may impose specific conditions for
installation of radio transmitters into vehicles.
Please check your vehicle operation manual or
contact the manufacturer of your vehicle or your
vehicle dealer, before you install this product into
your vehicle.
Emergency calls
This BLUETOOTH car handsfree and the electronic
device connected to the handsfree operate using
radio signals, cellular, and landline networks as well
as user-programmed function, which cannot
guarantee connection under all conditions.
Therefore do not rely solely upon any electronic
device for essential communications (such as
medical emergencies).
On BLUETOOTH communication
Microwaves emitting from a BLUETOOTH device
may affect the operation of electronic medical
devices. Turn off this unit and other BLUETOOTH
devices in the following locations, as it may cause
an accident.
where inflammable gas is present, in a hospital,
train, airplane, or petrol station
near automatic doors or a fire alarm
This unit supports security capabilities that
comply with the BLUETOOTH standard to provide
a secure connection when the BLUETOOTH
wireless technology is used, but security may not
be enough depending on the setting. Be careful
when communicating using BLUETOOTH wireless
technology.
We do not take any responsibility for the leakage
of information during BLUETOOTH
communication.
If you have any questions or problems concerning
your unit that are not covered in this manual,
consult your nearest Sony dealer.
Important notice
4
GB
Table of Contents
Guide to Parts and Controls . . . . . . . . . . . . . . . . . . . 5
Guide to Audio Device Connection . . . . . . . . . . . . . 7
Getting Started
Resetting the Unit . . . . . . . . . . . . . . . . . . . . . . . . . . . 9
Setting the Clock . . . . . . . . . . . . . . . . . . . . . . . . . . . . 9
Preparing a BLUETOOTH Device. . . . . . . . . . . . . . . . 9
Connecting a USB Device . . . . . . . . . . . . . . . . . . . . 11
Connecting a High-Resolution USB Audio
Supported Device . . . . . . . . . . . . . . . . . . . . . . . 11
Connecting Other Portable Audio Device . . . . . . . 11
Listening to the Radio
Listening to the Radio. . . . . . . . . . . . . . . . . . . . . . . 12
Using Radio Data System (RDS) . . . . . . . . . . . . . . . 12
Playback
Playing a USB Device . . . . . . . . . . . . . . . . . . . . . . . 13
Playing a High-Resolution USB Audio Supported
Device. . . . . . . . . . . . . . . . . . . . . . . . . . . . . . . . . 13
Playing a BLUETOOTH Device. . . . . . . . . . . . . . . . . 14
Searching and Playing Tracks. . . . . . . . . . . . . . . . . 14
Handsfree Calling (via BLUETOOTH
only)
Receiving a Call . . . . . . . . . . . . . . . . . . . . . . . . . . . . 15
Making a Call . . . . . . . . . . . . . . . . . . . . . . . . . . . . . . 15
Available Operations during Call . . . . . . . . . . . . . . 15
Useful Functions
Sony | Music Center with iPhone/Android
smartphone . . . . . . . . . . . . . . . . . . . . . . . . . . . . 16
Settings
Basic Setting Operation . . . . . . . . . . . . . . . . . . . . . 17
General Setup (General) . . . . . . . . . . . . . . . . . . . . . 17
Sound Setup (Sound) . . . . . . . . . . . . . . . . . . . . . . . 17
BLUETOOTH Setup (BT Setting) . . . . . . . . . . . . . . . 18
Sony | Music Center Setup (Sony APP) . . . . . . . . . 19
Additional Information
Updating the Firmware. . . . . . . . . . . . . . . . . . . . . . 21
Precautions . . . . . . . . . . . . . . . . . . . . . . . . . . . . . . . 21
Maintenance . . . . . . . . . . . . . . . . . . . . . . . . . . . . . . 22
Specifications . . . . . . . . . . . . . . . . . . . . . . . . . . . . . 22
Troubleshooting . . . . . . . . . . . . . . . . . . . . . . . . . . . 24
Connection/Installation
Cautions . . . . . . . . . . . . . . . . . . . . . . . . . . . . . . . . . 29
Parts List for Installation . . . . . . . . . . . . . . . . . . . . 29
Connection . . . . . . . . . . . . . . . . . . . . . . . . . . . . . . . 30
Installation . . . . . . . . . . . . . . . . . . . . . . . . . . . . . . . 33
For details on the software used by this unit, see
Important information on software” on the
pages at the end of these operating instructions.
5
GB
Guide to Parts and Controls
Receptor for the remote commander
Display window
Volume dial
Rotate to adjust the volume.
N-Mark
Touch with an NFC compatible smartphone to
make a Bluetooth® connection.
SRC (source)
Turn on the power.
Change the source.
OFF
Press and hold for 1 second to turn the source
off and display the clock.
Press and hold for more than 2 seconds to turn
off the power and the display.
If the unit is turned off and the display
disappears, operation by the remote
commander is not available.
/ (prev/next)
USB1/USB2: Skip tracks.
Tuner: Receive stored radio stations.
/ (album –/+)
USB1/USB2: Press and hold to skip albums.
Tuner: Press and hold to tune in radio station
automatically.
 (play/pause)
USB1/USB2: Start/pause playback. While
playback is paused, the illumination of the unit
flashes.
Tuner: Change the band.
PAIRING (page 10)
Press and hold for 2 seconds to enter the
BLUETOOTH pairing standby mode.
BLUETOOTH indicator
Reset button (page 9)
AUX input jack
USB micro-B port (for USB-DAC)
USB type-A port (for USB1)
Charging the connected device (USB High-
charge) is also supported.
Main unit
In this manual, procedures are explained
mainly for the remote commander unless
otherwise specified.
Available buttons light up depending on the
selected source.
6
GB
The VOL (volume) + button has a tactile dot.
(back)
Return to the previous display.
AF (alternative frequencies)
Turn on/off the AF function.
TA (traffic announcement)
Turn on/off the TA function.
ATT (attenuate)
Attenuate the sound. Press again to cancel the
attenuation.
MODE (page 12)
SOUND*
1
*
2
Open the sound menu directly.
MENU*
1
Press and hold to open the setup menu.
*1 Not available when the BT phone is selected.
*2 Not available while the optical output is enabled,
or the source is off and the clock is displayed.
DSPL (display)
Change display items.
///
Select a setup item, etc.
ENTER
Enter the selected item.
/ (prev/next)
USB1/USB2: Skip tracks.
Tuner: Tune in the radio station automatically.
Press and hold to tune manually.
+/– (album +/–)
USB1/USB2: Skip albums.
Tuner: Receive stored radio stations.
Number buttons (1 to 6)
Receive stored radio stations.
Press and hold to store stations.
REP (repeat)
SHUF (shuffle)
PAUSE
Remove the insulation film before use.
RM-X262 Remote commander
7
GB
Guide to Audio Device Connection
For your safety
To prevent a traffic accident, make sure that the
connected cables do not interfere with the air-bag
system or driving operation.
*1 Audio device with a stereo mini jack. When
connecting, a stereo mini plug (not supplied) is
required. Do not use any type of plug that interferes
with the instrument panel of the car.
*2 Only a smartphone in MSC mode is available. When
connecting a smartphone, an appropriate USB cable
(not supplied) is required.
*3 When connecting an iPod/iPhone, a USB connection
cable for iPod/iPhone (not supplied) is required.
*4 Use the USB extension cable (supplied).
*5 Use an appropriate USB cable (USB-A plug to USB
micro B plug) (not supplied).
*6 To play High-Resolution Audio files, using the audio
playback software “Hi-Res Audio Player” or “Media
Go” is recommended.
When using “Hi-Res Audio Player”:
For Windows, installing the dedicated driver to your
computer is required. For Mac OS, no driver is
required.
When using “Media Go”:
For Windows, installing the dedicated driver to your
computer is required. For Mac OS, “Media Go” is not
supported.
For further details, visit the support site on the back
cover.
*7 When connecting an Android smartphone, a USB
OTG cable (not supplied) is required. Depending on
the smartphone, downloading the dedicated app for
playing High-Resolution Audio files is required.
*8 When connecting an iPhone/iPod, an exclusive cable
(not supplied) is required. This cable may not be
available in your country or region.
*9 Only a WALKMAN® supporting digital output is
available. When connecting the WALKMAN®, a USB
conversion cable WMC-NWH10 (not supplied) is
required. These may not be available in your country
or region.
Design and specifications are subject to change
without notice.
Audio device*
1
(e.g.,
WALKMAN®, digital media
player, smartphone)
Smartphone*
2
, iPod/iPhone*
3
,
WALKMAN®, USB storage
device
Smartphone*
7
(e.g., Android
smartphone, iPhone*
8
,
WALKMA*
9
)
Computer*
6
(e.g., with
Windows, with Mac OS)
*
5
*
2
*
3
*
1
*
5
*
7
*
8
*
4
8
GB
Playable file formats, sampling frequencies and bit depths differ depending on whether the USB type-A port
or the USB micro-B port is used.
* Playable only via a WALKMAN® supporting digital output. This WALKMAN® may not be available in your country or
region.
Playable High-Resolution Audio file formats
USB-DAC (USB micro-B port) USB1 (USB type-A port, Front) USB2 (USB type-A port, Rear)
DSD
ASIO Native: 2.8 MHz/1 bit,
5.6 MHz/1 bit, 11.2 MHz/1 bit*
DoP: 2.8 MHz/1 bit, 5.6 MHz/
1bit
––
PCM Max. 192 kHz/24 bit
DSF
2.8 MHz/1 bit (PCM convert),
5.6 MHz/1 bit (PCM convert)
2.8 MHz/1 bit (PCM convert),
5.6 MHz/1 bit (PCM convert)
DSDIFF
2.8 MHz/1 bit (PCM convert),
5.6 MHz/1 bit (PCM convert)
2.8 MHz/1 bit (PCM convert),
5.6 MHz/1 bit (PCM convert)
WAV
192/176.4/96/88.2/48/44.1 kHz
(24 bit),
192/176.4/96/88.2 kHz (16 bit)
192/176.4/96/88.2/48/44.1 kHz
(24 bit),
192/176.4/96/88.2 kHz (16 bit)
AIFF
192/176.4/96/88.2/48/44.1 kHz
(24 bit),
192/176.4/96/88.2 kHz (16 bit)
192/176.4/96/88.2/48/44.1 kHz
(24 bit),
192/176.4/96/88.2 kHz (16 bit)
FLAC
192/176.4/96/88.2/48/44.1 kHz
(24 bit),
192/176.4/96/88.2 kHz (16 bit)
192/176.4/96/88.2/48/44.1 kHz
(24 bit),
192/176.4/96/88.2 kHz (16 bit)
ALAC
192/176.4/96/88.2/48/44.1 kHz
(24 bit),
192/176.4/96/88.2 kHz (16 bit)
192/176.4/96/88.2/48/44.1 kHz
(24 bit),
192/176.4/96/88.2 kHz (16 bit)
9
GB
Resetting the Unit
Before operating the unit for the first time, after
replacing the car battery, or changing the
connections, you must reset the unit.
Note
Pressing the reset button will erase the clock setting
and some stored contents.
Setting the Clock
Use the remote commander to perform the
following.
1 Press and hold MENU, press or to
select [General], then press ENTER.
2 Press or to select [Clock Adjust],
then press ENTER.
The hour indication flashes.
3 Press or to set the hour and minute.
To move the digital indication, press or .
4 After setting the minute, press ENTER.
The setup is complete and the clock starts.
To display the clock
Press DSPL.
Preparing a BLUETOOTH Device
You can enjoy music, or perform handsfree calling
depending on the BLUETOOTH compatible device
such as a smartphone, cellular phone and audio
device (hereafter “BLUETOOTH device” if not
otherwise specified). For details on connecting,
refer to the operating instructions supplied with the
device.
There are two ways for connecting the BLUETOOTH
device:
One-touch connection for the NFC compatible
BLUETOOTH device.
Manual connection.
Before connecting the device, turn down the
volume of this unit; otherwise, loud sound may
result.
By touching the N-Mark on the unit with an NFC*
compatible smartphone, the unit is paired and
connected with the smartphone automatically.
* NFC (Near Field Communication) is a technology
enabling short-range wireless communication
between various devices, such as mobile phones and
IC tags. Thanks to the NFC function, data
communication can be achieved easily just by
touching the relevant symbol or designated location
on NFC compatible devices.
For a smartphone with Android™ OS 4.0 or lower
installed, downloading the app “NFC Easy Connect”
available at Google Play™ is required. The app may
not be downloadable in some countries/regions.
1 Activate the NFC function on the
smartphone.
For details, refer to the operating instructions
supplied with the smartphone.
2 Touch the N-Mark part of the unit with
the N-Mark part of the smartphone.
Make sure the BLUETOOTH indicator on the unit
lights up.
To disconnect by One touch
Touch the N-Mark part of the unit with the N-Mark
part of the smartphone again.
Notes
When making the connection, handle the
smartphone carefully to prevent scratches.
One touch connection is not possible when the unit is
already connected to another NFC compatible device.
In this case, disconnect the other device, and make
connection with the smartphone again.
Getting Started
Connecting with a Smartphone by One
touch (NFC)
10
GB
When connecting a BLUETOOTH device for the first
time, mutual registration (called “pairing”) is
required. Pairing enables this unit and other devices
to recognize each other.
1 Place the BLUETOOTH device within 1 m
(3 ft) of this unit.
2 Press and hold on the unit for more
than 2 seconds.
Alternatively, press and hold MENU on the
remote commander, select [BT Setting]
[Pairing], then press ENTER.
The BLUETOOTH indicator on the unit flashes
(while the unit is in pairing standby mode).
3 Perform pairing on the BLUETOOTH
device so it detects this unit.
4 Select [RSX-GS9] shown in the display of
the BLUETOOTH device.
If your model name does not appear, repeat
from step 2.
5 If passkey* input is required on the
BLUETOOTH device, input [0000].
* Passkey may be called “Passcode,” “PIN code,
“PIN number” or “Password,” etc., depending on
the device.
When paired, the BLUETOOTH indicator on the
unit stays lit.
6 Select this unit on the BLUETOOTH device
to establish the BLUETOOTH connection.
Note
While connecting to a BLUETOOTH device, this unit
cannot be detected from another device. To enable
detection, enter the pairing mode and search for this
unit from another device.
To start playback
For details, see “Playing a BLUETOOTH Device”
(page 14).
To cancel pairing
Perform step 2 to cancel the pairing mode after this
unit and the BLUETOOTH device are paired.
To use a paired device, connection with this unit is
required. Some paired devices will connect
automatically.
1 Press and hold MENU on the remote
commander, select [BT Setting] [BT
Signal], then press ENTER.
Make sure the BLUETOOTH indicator on the unit
lights up.
2 Activate the BLUETOOTH function on the
BLUETOOTH device.
3 Operate the BLUETOOTH device to
connect to this unit.
To connect the last-connected device from
this unit
Activate the BLUETOOTH function on the
BLUETOOTH device.
Press SOURCE (SRC), then select [BT Phone]* or [BT
Audio].
Press ENTER to connect with the cellular phone, or
PAUSE to connect with the audio device.
* Available only when the “Sony | Music Center
connection is established.
Note
While streaming BLUETOOTH audio, you cannot
connect from this unit to the cellular phone. Connect
from the cellular phone to this unit instead.
Tip
With BLUETOOTH signal on: when the ignition is turned
to on, this unit reconnects automatically to the last-
connected cellular phone.
To install the microphone
For details, see “Installing the microphone”
(page 33).
Pairing and connecting with a
BLUETOOTH device
[0000]
Input passkey
Connecting with a paired BLUETOOTH
device
11
GB
Connecting a USB Device
1 Turn down the volume on the unit.
2 Connect the USB device to the USB type-
A port.
To connect an iPod/iPhone, use the USB
connection cable for iPod/iPhone (not
supplied).
Connecting a High-Resolution
USB Audio Supported Device
1 Turn down the volume on the unit.
2 Connect a High-Resolution USB Audio
supported computer, smartphone or
digital media player to the USB micro-B
port.
For details, see “Guide to Audio Device
Connection” (page 7).
Connecting Other Portable
Audio Device
1 Turn down the volume on the unit.
2 Connect the portable audio device to the
AUX input jack (stereo mini jack) on the
unit with a connecting cord (not
supplied)*.
* Do not use any type of plug that interferes with
the instrument panel of the car.
When making the high level input connection,
see “AUX2” in “Connection” for details (page 30).
3 Press SRC to select [AUX1].
Alternatively, select [AUX2] for the high level
input connection.
To match the volume level of the connected
device to other sources
Start playback of the portable audio device at a
moderate volume, and set your usual listening
volume on the unit.
Press and hold MENU, then select [Sound] [AUX
Level] (page 18).
12
GB
Listening to the Radio
To listen to the radio, press SOURCE (SRC) to select
[Tuner].
Use the remote commander to perform the
following.
1 Press MODE to change the band (FM1,
FM2, FM3, MW or LW).
Alternatively, press on the unit to change
the band.
2 Press and hold MENU, press or to
select [General], then press ENTER.
3 Press or to select [BTM], then press
ENTER.
The unit stores stations in order of frequency on
the number buttons.
1 Press MODE to change the band (FM1,
FM2, FM3, MW or LW).
Alternatively, press on the unit to change
the band.
2 Perform tuning.
To tune manually
Press and hold or to locate the
approximate frequency, then press or
repeatedly to fine adjust to the desired
frequency.
To tune automatically
Press or . (Alternatively, press and hold
or on the unit for more than 1 second.)
Scanning stops when the unit receives a station.
1 While receiving the station that you want
to store, press and hold a number button
(1 to 6) until [MEM] appears.
1 Select the band, then press a number
button (1 to 6).
Alternatively, press or on the unit.
Using Radio Data System (RDS)
Use the remote commander to perform the
following.
AF continuously retunes the station to the strongest
signal in a network, and TA provides current traffic
information or traffic programs (TP) if received.
1 Press AF to select [AF ON] or [AF OFF];
press TA to select [TA ON] or [TA OFF].
To store RDS stations with the AF and TA
setting
You can preset RDS stations along with an AF/TA
setting. Set AF/TA, then store the station with BTM
or manually. If you preset manually, you can also
preset non-RDS stations.
To receive emergency announcements
With AF or TA on, emergency announcements will
automatically interrupt the currently selected
source.
To adjust the volume level during a traffic
announcement
Level will be stored into memory for subsequent
traffic announcements, independently from the
regular volume level.
To stay with one regional program
(REGIONAL)
When the AF and REGIONAL functions are on, you
will not be switched to another regional station
with a stronger frequency. If you leave this regional
program’s reception area, set [Regional] to [OFF] in
[General] during FM reception (page 17).
This function does not work in the UK and some
other areas.
Local Link function (UK only)
This function enables you to select other local
stations in the area, even if they are not stored on
your number buttons.
During FM reception, press a number button (1 to 6)
on which a local station is stored. Within 5 seconds,
press again a number button of the local station.
Repeat this procedure until the local station is
received.
To display the PS (program service) name
Press DSPL.
Listening to the Radio
Storing automatically (BTM)
Tuning
Storing manually
Receiving the stored stations
Setting alternative frequencies (AF) and
traffic announcement (TA)
13
GB
Playing a USB Device
In these Operating Instructions, “iPod” is used as a
general reference for the iPod functions on an iPod
and iPhone, unless otherwise specified by the text
or illustrations.
For details on the compatibility of your iPod, see
About iPod” (page 21) or visit the support site on
the back cover.
MSC (Mass Storage Class)-type USB devices (such as
a USB flash drive, digital media player, Android
smartphone) compliant with the USB standard can
be used.
Depending on the digital media player or Android
smartphone, setting the USB connection mode to
MSC is required. (A USB device in MTP mode is not
available.)
“Music” folder and its location (when
connecting the USB device)
Be sure to store audio files in a folder named
“Music”, and organize the folder directly under the
root directory of the USB device. Otherwise the unit
will not recognize audio files on the device.
Notes
For details on the compatibility of your USB device,
visit the support site on the back cover.
During USB playback, fast-forward/fast-reverse
operation is not supported.
The unit starts reading the file structure of the
connected device when playback is performed.
[*] appears on the display while the unit is reading the
file structure of the connected device. While [*] is
displayed, a track or album (folder) cannot be
skipped.
During USB playback via the USB type-A port, a DSD
file on the connected device is converted into PCM
format.
Playback of the following files is not supported.
WMA/AAC:
copyright-protected files
DRM (Digital Rights Management) files
WMA:
lossless compression files
multi-channel audio files
As a guide, recognizing a total of 2,000 audio files in
200 folders on the USB device takes about 150
seconds.
The unit may take some time to recognize the USB
device if its file organization has been updated.
Before connecting the USB device, be sure to select
USB1 or USB2. If a USB device with updated file
structure is connected while the unit and the display
are off, or without selecting USB1 or USB2, the unit will
not recognize the latest file organization of the
device.
1 Connect a USB device to the USB type-A
port (page 11).
Playback starts. (Depending on the file
organization, playback may take time to start.)
2 Adjust the volume on this unit.
To pause playback
Press .
To remove the device
Stop playback, then remove the device.
To display the sampling frequency and bit
depth of the audio file being played
Press DSPL during playback.
Notes
When DSD playback is performed via USB1 or USB2,
the sampling frequency and bit depth before
converting to PCM format are displayed.
When an iPod/iPhone is connected to USB1 or USB2,
the sampling frequency and bit depth are not
displayed.
In the track name display, only alphanumeric
characters are displayed.
Caution for iPhone
When you connect an iPhone via USB, phone call
volume is controlled by the iPhone, not the unit. Do
not inadvertently increase the volume on the unit
during a call, as a sudden loud sound may result
when the call ends.
Playing a High-Resolution USB
Audio Supported Device
For details on the compatibility of your High-
Resolution USB Audio device and the DSD
supported audio playback software or app, see the
support site on the back cover.
For your safety
Do not operate the High-Resolution USB Audio
supported device while driving.
Before driving your car, make sure the High-
Resolution USB Audio supported device will not
play loudly during playback (especially during
native DSD playback).
1 Connect a High-Resolution USB Audio
supported device to the USB micro-B
port (page 11).
2 Operate the device to start playback.
3 Adjust the volume on this unit.
To stop playback
Operate the device to stop playback.
The controls on the unit or the remote commander
do not work.
Playback
14
GB
To remove the device
Stop playback, then remove the device.
To display the sampling frequency and bit
depth of the audio file being played
Press DSPL during playback.
For example, the information appears as follows:
[192/24]: 192 kHz/24 bit
[DSD 11.2MHz]: 11.2 MHz/1 bit
Notes
Gapless playback is performed when the sampling
frequency and bit depth are identical to those of the
next or previous track.
If the displayed sampling frequency and bit depth are
not appropriate, check the settings of the device and
its connection.
For a DSD file on the device connected via the USB
micro-B port, native DSD playback is performed.
During playback, make sure that the native DSD
playback on the High-Resolution USB Audio
supported device performs properly.
Corresponding data interface, sampling frequency
and bit depth:
PCM:
Max. 192 kHz/24 bit
DSD:
ASIO Native: 2.8 MHz/1 bit, 5.6 MHz/1 bit,
11.2 MHz/1 bit*
DoP: 2.8 MHz/1 bit, 5.6 MHz/1 bit
* Playable only via a WALKMAN® supporting digital
output.
Playing a BLUETOOTH Device
You can play contents on a connected device that
supports BLUETOOTH A2DP (Advanced Audio
Distribution Profile). Using an LDAC-supported
device is recommended.
1 Make BLUETOOTH connection with the
audio device (page 9).
2 Press SRC to select [BT Audio].
Alternatively, press SOURCE on the remote
commander.
3 Operate the audio device to start
playback.
4 Adjust the volume on this unit.
Notes
Even if the source is changed on this unit, playback of
the audio device does not stop.
[BT Audio] does not appear in the display while
running the “Sony | Music Center” application via the
BLUETOOTH function.
To match the volume level of the BLUETOOTH
device to other sources
Start playback of the BLUETOOTH audio device at a
moderate volume, and set your usual listening
volume on the unit.
Press and hold MENU, then select [BT Setting]
[BTA Level] (page 18).
To apply the SBC codec only
Press and hold MENU on the remote commander,
then set [Audio Codec] in [BT Setting] to [SBC]
(page 18).
Searching and Playing Tracks
Use the remote commander to perform the
following.
For the iPod, repeat play and shuffle play are not
available.
1 During USB1 or USB2 playback, press REP
or SHUF repeatedly to select the desired
play mode.
Playback in the selected play mode may take
time to start.
Repeat play mode:
[Repeat Track] plays the track repeatedly.
[Repeat Album] plays tracks in the album
(folder) repeatedly.
[Repeat OFF] cancels repeat play.
Shuffle play mode:
[Shuffle Device] plays all tracks in the “Music”
folder in random order.
[Shuffle OFF] cancels shuffle play.
Notes
During repeat play, shuffle play mode cannot be
selected. During shuffle play, only [Repeat Track]
can be selected, and [Repeat Album] cannot be
selected.
[Shuffle Device] is only available when repeat play
is off.
When shuffle play is performed or canceled,
playback starts from the first track in the “Music”
folder.
While shuffle play is performed with [Repeat
Track] selected, pressing will cancel [Repeat
Track] and restart shuffle play from the first track
in the “Music” folder.
During shuffle play, the list display on “Sony |
Music Center” is not available. To enable the list
display, cancel shuffle play mode.
Repeat play and shuffle play
15
GB
To use a cellular phone, connect it with this unit. For
details, see “Preparing a BLUETOOTH Device”
(page 9). Only while the “Sony | Music Center”
connection is established, [BT Phone] becomes
available when selecting the source.
Use the controls on the unit to perform the
following.
Receiving a Call
1 Press any button when a call is received
with a ringtone.
The phone call starts.
Note
The ringtone and talker’s voice are output only from the
audio device connected to FRONT AUDIO OUT.
To reject the call
Press and hold the following button:
any button other than SRC for 2 seconds.
SRC for 1 to 2 seconds.
To end the call
Press SRC.
Making a Call
You can make a call via “Sony | Music Center” only.
For details, see “Sony | Music Center with iPhone/
Android smartphone” (page 16).
Available Operations during
Call
To adjust the ringtone volume
Rotate the volume dial while receiving a call.
To adjust the talker’s voice volume
Rotate the volume dial during a call.
To adjust the volume for the other party (Mic
gain adjustment)
Press during a call.
Adjustable volume levels: [MIC High], [MIC Low],
[MIC Middle].
To reduce echo and noise (Echo Canceler/
Noise Canceler Mode)
Press during a call.
Settable mode: [ECNC 1], [ECNC 2].
To switch between hands-free mode and
handheld mode
During a call, press to switch the phone call
audio between the unit and cellular phone.
Notes
Depending on the cellular phone, this operation may
not be available.
In the caller name display, only alphanumeric
characters are displayed.
Handsfree Calling (via BLUETOOTH
only)
16
GB
Sony | Music Center with
iPhone/Android smartphone
Downloading the latest version of “Sony | Music
Center” application is required from the App Store
for iPhone or from Google Play for Android
smartphone.
Notes
For your safety, follow your local traffic laws and
regulations, and do not operate the application while
driving.
“Sony | Music Center” is an app for controlling Sony
audio devices which are compatible with “Sony |
Music Center”, by your iPhone/Android smartphone.
What you can control with “Sony | Music Center”
varies depending on the connected device.
To make use of “Sony | Music Center” features, see
the details on your iPhone/Android smartphone.
For further details on “Sony | Music Center,” visit the
following URL:
http://vssupport.sony.net/en_ww/help/
Visit the website below and check the compatible
iPhone/Android smartphone models.
For iPhone: visit the App Store
For Android smartphone: visit Google Play
1 Make the BLUETOOTH connection with
iPhone/Android smartphone (page 9).
2 Launch the “Sony | Music Center
application.
Connection to iPhone/Android smartphone
starts.
For details on the operations on iPhone/
Android smartphone, see the help of the
application.
If the device number appears
Make sure that the number is displayed (e.g.,
123456), then select [Yes] on the iPhone/Android
smartphone.
Selecting the source or application
You can operate to select the desired source or
application on iPhone/Android smartphone.
To select the source
Press SOURCE repeatedly.
Note
While “Settings” is selected, the controls except for the
volume on the unit and remote commander do not
work. Operate your iPhone/Android smartphone.
To display the source list
Tap the source list icon on the “Sony | Music
Center” application.
Announcement of various information by
voice guide (Android smartphone only)
When SMS, Twitter/Facebook/Calendar
notifications, etc., are received, they are
automatically announced through the audio device
connected to FRONT AUDIO OUT.
For details on settings, refer to the help of the
application.
Replying a message of SMS (Android
smartphone only)
You can reply a message.
1
Tap the reply icon on the “Sony | Music Center”
application.
The message input display appears.
2
Input a reply message by voice recognition.
The list of message candidates appears.
3
Tap the desired message.
The message is sent out.
For details, refer to the help of the application.
Making sound and display settings
You can adjust the settings relating to sound and
display via iPhone/Android smartphone.
For details on settings, refer to the help of the
application.
Useful Functions
Establishing the Sony | Music Center
connection
17
GB
Basic Setting Operation
You can set items in the following setup categories:
General setup (General), Sound setup (Sound),
BLUETOOTH setup (BT Setting), Sony | Music Center
setup (Sony APP)
(While the BT phone is selected, only the
BLUETOOTH setup is available.)
Use the remote commander to perform the
following.
1 Press and hold MENU, press or to
select the setup category, then press
ENTER.
The items that can be set differ depending on
the source and settings.
2 Press or to select the options, then
press ENTER.
To return to the previous display
Press .
General Setup (General)
Clock Adjust (page 9)
Dimmer
Dims the display: [ON], [OFF], [Auto].
([Auto] is available only when the illumination
control lead is connected, and turn on the head
light).
Brightness
Adjusts the display brightness. The brightness
level is adjustable: [1] – [10].
The brightness setting is stored and applied
when the dimmer function is activated or
deactivated.
Optical Out
Selects the optical output setting: [OFF],
[48kHz], [96kHz].
(The volume control on the unit does not work
when set to [48kHz] or [96kHz].)
BTM (best tuning memory) (page 12)
(Available only when the tuner is selected.)
Regional
Restricts reception to a specific region: [ON],
[OFF]. (Available only when FM is received.)
Firmware
(Available only while the source is off and the
clock is displayed.)
Checks/updates the firmware version. For
details, visit the support site on the back cover.
Version
Displays current firmware version.
Update
Enters firmware update process: [NO], [YES].
Updating the firmware takes a few minutes to
complete. During the update, do not turn the
ignition to the OFF position.
Sound Setup (Sound)
This setup menu can also be opened by pressing
SOUND. If [Optical Out] is set to [48kHz] or [96kHz],
this setup menu is not available.
Subwoofer
(Automatically set to [OFF] when [Optical Out] is
set to [48kHz] or [96kHz].) (Not available during
native DSD playback while USB-DAC is selected.)
Sub Level* (subwoofer level)
Adjusts the subwoofer volume level: [+10dB] –
[0dB] – [-10dB].
Sub Phase (subwoofer phase)
Selects the subwoofer phase: [Normal],
[Reverse].
LPF Freq (low pass filter frequency)
Selects the subwoofer cut-off frequency: [OFF],
[50Hz], [63Hz], [79Hz], [99Hz], [125Hz], [158Hz],
[198Hz], [250Hz].
LPF Slope (low pass filter slope)
Selects the LPF slope (effective only when [LPF
Freq] is set to other than [OFF]): [SLP1] (-12dB/
oct), [SLP2] (-24dB/oct), [SLP3] (-36dB/oct),
[SLP4] (-48dB/oct).
LPF Mode (low pass filter mode)
Sets the filter mode: [Mono], [Stereo].
HPF Freq (high pass filter frequency)
Selects the front/rear speaker cut-off frequency:
[OFF], [50Hz], [63Hz], [79Hz], [99Hz], [125Hz],
[158Hz], [198Hz], [250Hz].
HPF Slope (high pass filter slope)
Selects the HPF slope (effective only when [HPF
Freq] is set to other than [OFF]): [SLP1] (-12dB/
oct), [SLP2] (-24dB/oct), [SLP3] (-36dB/oct),
[SLP4] (-48dB/oct).
* Available even if [Optical Out] is set.
Sub DSD (subwoofer DSD)
(Available during native DSD playback while
USB-DAC is selected.)
LPF Freq (low pass filter frequency)
Selects the subwoofer cut-off frequency: [OFF],
[150Hz].
LPF Mode (low pass filter mode)
Sets the filter mode: [Mono], [Stereo].
Settings
18
GB
Pos Custom (position custom)
Sets [Custom] of [Pos Preset].
(Available when any source except for BT phone
is selected.) (Automatically set to [OFF] when
[Optical Out] is set to [48kHz] or [96kHz].)
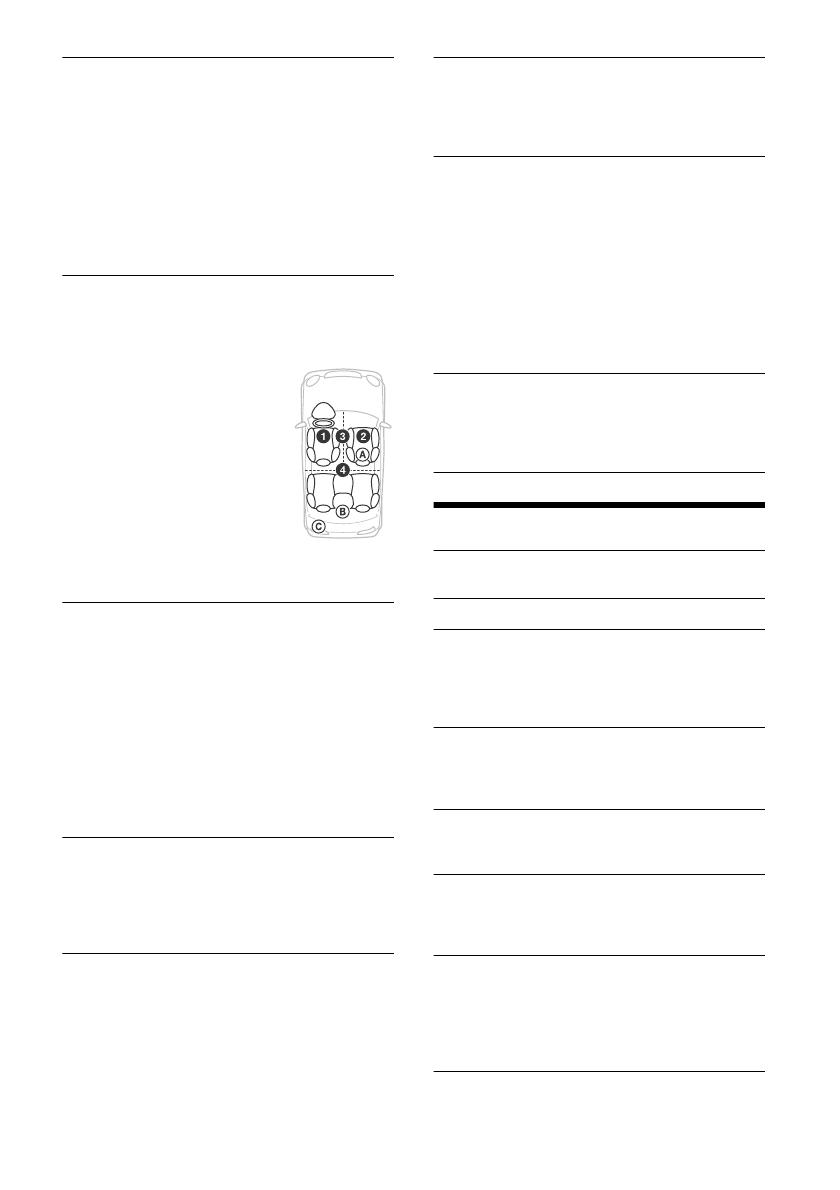
Front Left, Front Right, Rear Left, Rear Right,
Subwoofer
Sets the distance from your desired position to
the speaker.
Adjustable range: [0] – [350] cm (0 – 11.5 ft)
([Subwoofer] is not available during native DSD
playback while USB-DAC is selected.)
Pos Preset (position preset)
F/R Pos (front/rear position)
Simulates a natural sound field by delaying the
sound output from speakers to suit your
position:
[Front Left], [Front Right],
[Center Front], [ALL]
(center of your car), [Custom]*
1
(position set in [Pos Custom]),
[OFF] (no position set)
Adjust Pos*
2
(adjust position)
Fine-tunes the listening position
setting: [+3] – [0] – [-3].
Subwoofer*
2
(subwoofer
position)
[Near], [Normal], [Far]
*1 Available when [Pos Custom] is set.
*2 Does not appear when [F/R Pos] is set to [OFF].
EQ10 Preset
Selects an equalizer curve from 10 equalizer
curves or off: [OFF], [R & B], [Rock], [Pop],
[Dance], [Hip-Hop], [Electronica], [Jazz], [Soul],
[Country], [Custom] (equalizer curve set by
“Sony | Music Center”).
The equalizer curve setting can be memorized
for each source.
(Available when any source except for BT phone
is selected.) (Automatically set to [OFF] when
[Optical Out] is set to [48kHz] or [96kHz].)
(Not available during native DSD playback while
USB-DAC is selected.)
Balance
Adjusts the sound balance: [R-15] – [Center] –
[L-15].
(Available when any source except for BT phone
is selected.) (Automatically set to [OFF] when
[Optical Out] is set to [48kHz] or [96kHz].)
Fader
Adjusts the relative level: [F-15] – [Center]
[R-15].
(Available when any source except for BT phone
is selected.) (Automatically set to [OFF] when
[Optical Out] is set to [48kHz] or [96kHz].)
Loudness
Reinforces bass and treble for clear sound at low
volume levels: [OFF], [ON].
(Not available during native DSD playback while
USB-DAC is selected.)
DSEE HX (digital sound enhancement engine HX)
Improves digitally compressed sound by
restoring high frequencies lost in the
compression process.
This setting can be memorized for each source
other than the tuner or AUX.
Selects the DSEE HX mode: [OFF], [ON].
(Available only when USB1, USB2, USB-DAC or BT
Audio is selected.) (Automatically set to [OFF]
when [Optical Out] is set except for [OFF].) (Not
available during native DSD playback while USB-
DAC is selected.)
AUX Level
Adjusts the volume level for each connected
auxiliary device: [+18dB] – [0dB] – [-8dB].
This setting negates the need to adjust the
volume level between sources.
BLUETOOTH Setup (BT Setting)
BT Signal (BLUETOOTH signal) (page 10)
Activates/deactivates the BLUETOOTH function.
Pairing (BLUETOOTH pairing) (page 10)
BTA Level (BLUETOOTH audio level)
Adjusts the volume level for each connected
BLUETOOTH device: [+6dB] – [0dB] – [-6dB]. This
setting negates the need to adjust the volume
level between sources.
Audio Codec
Selects the BLUETOOTH audio codec type:
[AUTO] (LDAC, AAC, SBC), [SBC].
(Not available via “Sony | Music Center”.)
Auto Answer
Sets this unit to answer an incoming call
automatically: [OFF], [3sec], [10sec].
Ring Tone
Selects whether this unit or the connected
cellular phone outputs the ringtone: [TONE 1]
(this unit), [TONE 2] (cellular phone).
BT Initialize
Initializes all the BLUETOOTH related settings
(pairing information, device information, etc.):
[NO], [YES].
When disposing the unit, initialize all the
settings.
19
GB
Sony | Music Center Setup
(Sony APP)
Auto Launch
Activates the “Sony | Music Center” auto launch:
[ON], [OFF].
When [ON] is selected, “Sony | Music Center”
will automatically connect after the BLUETOOTH
connection is complete.
Connect (page 16)
Establish and terminate “Sony | Music Center”
function (connection).
20
GB
Optical output setting and available sound settings
Available sound settings differ depending on the optical output setting and the selected source.
* Only [Subwoofer] in [Pos Custom] is not available.
Optical
Out
Tuner
USB1 (front),
USB2 (rear)
USB-DAC
(PCM)
USB-DAC
(DSD)
AUX1
(front)
AUX2 (High
level input)
BT Audio
BT
Phone
Subwoofer
OFF
 
48 kHz,
96 kHz
–– ––
Sub DSD
OFF
––
(OFF,
150 Hz)
––
48 kHz,
96 kHz
–– ––
Pos Custom
OFF
 * 
48 kHz,
96 kHz
–– ––
Pos Preset
OFF
 
48 kHz,
96 kHz
–– ––
EQ10 Preset
OFF
 
48 kHz,
96 kHz
–– ––
Balance
OFF
 
48 kHz,
96 kHz
–– ––
Fader
OFF
 
48 kHz,
96 kHz
–– ––
Loudness
OFF
 
48 kHz,
96 kHz
–– ––
DSEE HX
OFF
Max.
48 kHz
Max.
48 kHz
––
Max.
48 kHz
48 kHz,
96 kHz
–– ––
21
GB
Updating the Firmware
To update the firmware, visit the support site on the
back cover, then follow the online instructions.
Updating the firmware takes a few minutes to
complete. During the update, do not turn the
ignition to the OFF position.
Note
Using a USB device (not supplied) is required for
updating the firmware. Store the updater in the USB
device, and connect the device to the USB1 (front) port,
then perform the update operation. The USB2 (rear)
port cannot be used for the update.
Precautions
Cool off the unit beforehand if your car has been
parked in direct sunlight.
Do not leave audio devices brought in inside the
car, or it may cause malfunction due to high
temperature in direct sunlight.
Power antenna (aerial) extends automatically
depending on the type of car.
When using the unit in a cold area, the rotation of
the volume dial may feel a little heavy.
To maintain high sound quality
Do not splash liquid onto the unit.
* For the name of “Music” folder under the root
directory, there are no restrictions for using upper or
lower case letters. (“Music”, “music” and “MUSIC” are
valid.)
You can connect to the following iPod models.
Update your iPod devices to the latest software
before use.
Compatible iPhone/iPod models
Use of the Made for Apple badge means that an
accessory has been designed to connect
specifically to the Apple product(s) identified in
the badge, and has been certified by the
developer to meet Apple performance standards.
Apple is not responsible for the operation of this
device or its compliance with safety and
regulatory standards.
Please note that the use of this accessory with an
Apple product may affect wireless performance.
If you have any questions or problems concerning
your unit that are not covered in this manual,
consult your nearest Sony dealer.
Additional Information
Playback order of audio files
Music*
Folder (album)
Audio file (track)
USB device (Root)
About iPod
Compatible Model Bluetooth® USB
iPhone 6 
iPhone 6 Plus 
iPhone 5s 
iPhone 5c 
iPhone 5 
iPhone 4s 
iPhone 4 
iPhone 3GS 
iPhone 3G
iPod touch
(5th generation)

iPod touch
(4th generation)

iPod touch
(3rd generation)
iPod touch
(2nd generation)
iPod classic
iPod nano
(7th generation)
iPod nano
(6th generation)
iPod nano
(5th generation)
iPod nano
(4th generation)
iPod nano
(3rd generation)
  • Page 1 1
  • Page 2 2
  • Page 3 3
  • Page 4 4
  • Page 5 5
  • Page 6 6
  • Page 7 7
  • Page 8 8
  • Page 9 9
  • Page 10 10
  • Page 11 11
  • Page 12 12
  • Page 13 13
  • Page 14 14
  • Page 15 15
  • Page 16 16
  • Page 17 17
  • Page 18 18
  • Page 19 19
  • Page 20 20
  • Page 21 21
  • Page 22 22
  • Page 23 23
  • Page 24 24
  • Page 25 25
  • Page 26 26
  • Page 27 27
  • Page 28 28
  • Page 29 29
  • Page 30 30
  • Page 31 31
  • Page 32 32
  • Page 33 33
  • Page 34 34
  • Page 35 35
  • Page 36 36
  • Page 37 37
  • Page 38 38
  • Page 39 39
  • Page 40 40
  • Page 41 41
  • Page 42 42
  • Page 43 43
  • Page 44 44
  • Page 45 45
  • Page 46 46
  • Page 47 47
  • Page 48 48
  • Page 49 49
  • Page 50 50
  • Page 51 51
  • Page 52 52
  • Page 53 53
  • Page 54 54
  • Page 55 55
  • Page 56 56
  • Page 57 57
  • Page 58 58
  • Page 59 59
  • Page 60 60
  • Page 61 61
  • Page 62 62
  • Page 63 63
  • Page 64 64
  • Page 65 65
  • Page 66 66
  • Page 67 67
  • Page 68 68
  • Page 69 69
  • Page 70 70
  • Page 71 71
  • Page 72 72
  • Page 73 73
  • Page 74 74
  • Page 75 75
  • Page 76 76
  • Page 77 77
  • Page 78 78
  • Page 79 79
  • Page 80 80
  • Page 81 81
  • Page 82 82
  • Page 83 83
  • Page 84 84
  • Page 85 85
  • Page 86 86
  • Page 87 87
  • Page 88 88
  • Page 89 89
  • Page 90 90
  • Page 91 91
  • Page 92 92
  • Page 93 93
  • Page 94 94
  • Page 95 95
  • Page 96 96
  • Page 97 97
  • Page 98 98
  • Page 99 99
  • Page 100 100
  • Page 101 101
  • Page 102 102
  • Page 103 103
  • Page 104 104
  • Page 105 105
  • Page 106 106
  • Page 107 107
  • Page 108 108
  • Page 109 109
  • Page 110 110
  • Page 111 111
  • Page 112 112
  • Page 113 113
  • Page 114 114
  • Page 115 115
  • Page 116 116
  • Page 117 117
  • Page 118 118
  • Page 119 119
  • Page 120 120
  • Page 121 121
  • Page 122 122
  • Page 123 123
  • Page 124 124
  • Page 125 125
  • Page 126 126
  • Page 127 127
  • Page 128 128
  • Page 129 129
  • Page 130 130
  • Page 131 131
  • Page 132 132
  • Page 133 133
  • Page 134 134
  • Page 135 135
  • Page 136 136
  • Page 137 137
  • Page 138 138
  • Page 139 139
  • Page 140 140
  • Page 141 141
  • Page 142 142
  • Page 143 143
  • Page 144 144
  • Page 145 145
  • Page 146 146
  • Page 147 147
  • Page 148 148
  • Page 149 149
  • Page 150 150
  • Page 151 151
  • Page 152 152
  • Page 153 153
  • Page 154 154
  • Page 155 155
  • Page 156 156
  • Page 157 157
  • Page 158 158
  • Page 159 159
  • Page 160 160
  • Page 161 161
  • Page 162 162
  • Page 163 163
  • Page 164 164
  • Page 165 165
  • Page 166 166
  • Page 167 167
  • Page 168 168
  • Page 169 169
  • Page 170 170
  • Page 171 171
  • Page 172 172
  • Page 173 173
  • Page 174 174
  • Page 175 175
  • Page 176 176
  • Page 177 177
  • Page 178 178
  • Page 179 179
  • Page 180 180
  • Page 181 181
  • Page 182 182
  • Page 183 183
  • Page 184 184
  • Page 185 185
  • Page 186 186
  • Page 187 187
  • Page 188 188
  • Page 189 189
  • Page 190 190
  • Page 191 191
  • Page 192 192
  • Page 193 193
  • Page 194 194
  • Page 195 195
  • Page 196 196
  • Page 197 197
  • Page 198 198
  • Page 199 199
  • Page 200 200

Sony RSX-GS9 Owner's manual

Category
Car media receivers
Type
Owner's manual

Ask a question and I''ll find the answer in the document

Finding information in a document is now easier with AI