Page is loading ...

PWC – 400
PureWaterCooler
Copyright 2008 Vertex Water Products
SERVICE MANUAL
for
PureWaterCooler™
by Vertex
Model PWC-400
P/N man-xxxx

PWC – 400
PureWaterCooler
Copyright 2008 Vertex Water Products
Table of Contents
1. Introduction
2. Cooler Set-up
3. Remove Top Cover/Side Cover
4. Remove/Replace Float
5. Remove/Replace Hot Tank
6. Dispensing Solenoid – Remove/Replace
7. Circuit Board – Remove/Replace
8. Front Panel – Remove/Replace
9. Hot Tank Reset Button
10. Remove/Replace Hot Tank Thermal Sensors
11. Cold Temperature Adjustment
12. Sanitization Procedure
13. Trouble Shooting
14. Specifications
15. Cooler Exploded View
16. Parts List

PWC – 400
PureWaterCooler
Copyright 2008 Vertex Water Products
PWC-400 Cooler
1. Introduction
The PWC-400 line of point of use counter-top coolers are designed to give years of reliable
Service. The cooler has a single spigot that dispenses filtered water at 2 different temperature
levels – hot and cold temperature water. The main (cold-temp) tank holds 3/4 gallons of water
and is constructed of FDA approved plastic. The cold tank can be accessed for servicing
the float mechanism and for cleaning by removing the cooler main top cover (see section 4).
The hot tank is made of stainless steel and holds 1/4 gallon of hot water. It is important not
to turn on the hot tank when there is no water in it as this will damage the heating element.
The compressor is a sealed unit and is not serviceable in the field. The compressor can be
replaced by a qualified refrigeration technician with proper tools and equipment.
Please consult the factory if the compressor needs servicing.
CAUTION: If the compressor has been stopped by switching it off or unplugging power,
WAIT 10 MINUTES before turning the compressor on again. The compressor may stall
and burnout if powered back on without waiting.
The cooler makes clean water by filtration or by the reverse osmosis process. Water enters the
back of the cooler and then passes through the filtration system. A feed water ball valve is
Located near the filters and must be turned to the on position to allow the unit to make water.
Electrical power is required for the cooler to make purified water. CAUTION: The carbon
filtration versions of the cooler (PWC-400F) should not be used with water hardness over
7 grains because of lime scale build up on the heating element. If hardness is higher than
7 grains, softening of the feed water is recommended or another option is to install
a “phosphate” filter to the filter system.

PWC – 400
PureWaterCooler
Copyright 2008 Vertex Water Products
Feedwater/Drain Connections
-Feed Connection
2.1 Remove 2 screws on back of right side panel
and remove right side panel.
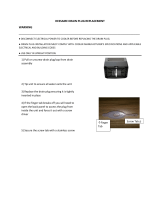
2.2 Remove feed water plug (orange) from back
of cooler.
2. Cooler Set-Up
(for new cooler installation)

PWC – 400
PureWaterCooler
Copyright 2008 Vertex Water Products
2.3 Connect supplied orange feed water tubing to
feed connector on back of cooler.
2.4 Make feed water connection to cold water line.
A self piercing saddle valve is provided.
2.5 Flushing carbon fines from carbon filter
.
Most carbon filters have fine particles of
carbon material in the filter that will be
swept into the water stream when the first
water flows through the filter. Although not
harmful, these carbon fines in the water are
unsightly. Flush the carbon fines out of the
filter before filling cooler tanks with the
following procedure
2.6 Remove outlet line of carbon filter (bottom)
2. Cooler Set-Up cont.
Use supplied self piercing saddle valve.
Connect to water inlet on cooler using 1/4”
tubing. Clamp saddle valve over copper feed
water line (cold water line only). Tighten
needle valve until tube is pierced. Retract
needle 1 -2 turns to start water flow.
Feedwater connection (RO & filtration coolers
(For use on copper tubing)
)

PWC – 400
PureWaterCooler
Copyright 2008 Vertex Water Products
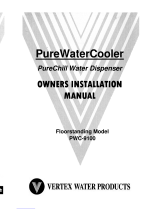
Drain saddle connection method
Drain connection required only for cooler with reverse osmosis filtration
Figure 1
2. Cooler Set-Up cont.
Figure 2.7
2.7 Attach 3 feet of ¼” tubing to the carbon filter
outlet port (flush tubing)
2.8 Place flush tubing in bucket to catch water
carbon fines
2.9 Turn on feed water at source and turn ball valve
at filter to “on” to let the water flush the filter.
2.10 Flush until water flows clear (1 – 2 gallons)
2.11 Remove flush line. Reconnect tank line to
outlet of carbon filter
2.12 WARNING: Do not turn on cooler hot power
until cooler tanks are full of water.
Drain Connection (for units equipped with RO)
2.13 Remove drain plug (black) from back of cooler
2.14 Connect supplied black water tubing to
drain connector on back of cooler
2.15 Attach supplied drain saddle to a
standard 1 ½” drain pipe see fig. 1 below

PWC – 400
PureWaterCooler
Copyright 2008 Vertex Water Products
3.1 Remove (2) screws on back of cooler top cover
3.2 Slide cover back and lift off.
3.3 Cold tank is now accessible for cleaning
and servicing other parts of the cooler.
3.4 Reinstall in reverse order
3. Top Cover/Side Panel Removal

PWC – 400
PureWaterCooler
Copyright 2008 Vertex Water Products
3.5 Remove (2) screws on back of cooler side cover
3.6 Slide side cover back about half way off until
tab in side cover lines up with slot in cooler
frame.
3.7 Once slot and tab are lined up, pull side cover
away from cooler.
3.8 Reinstall in reverse order
3. Top Cover/Side Panel Removal
Cont.

PWC – 400
PureWaterCooler
Copyright 2008 Vertex Water Products
4. Remove/Replace Electro/Mechanical Float Assembly
4.1 Remove top cover (See section 3)
4.2 Remove tubing from top of cold tank
4.3 Remove screws from lid of cold tank. (6 plcs)
4.4 Remove outer lid of cold tank

PWC – 400
PureWaterCooler
Copyright 2008 Vertex Water Products
4. Remove/Replace Electro/Mechanical Float Assembly
4.5 Disconnect electrical connector
4.6 Lift off inner lid of cold tank
4.7 To remove float, remove nut from float stem
4.8 Remove float assembly from inner lid.
4.9 Reinstall in reverse order.
cont.

PWC – 400
PureWaterCooler
Copyright 2008 Vertex Water Products
5.0 Unplug power from wall
5.1 Drain water from cooler using front spigots
and by removing bottom drain plug.
5.2 Remove top cover and left and right side covers (sec. 3)
5.3 To gain access to the hot tank, the
filter bracket must be moved:
5.4 Remove water line from top of sediment filter
5.5 Put cooler on its’ left side
5.6 Remove 4 screws holding filter bracket to base
5.7 Set filter bracket aside to allow access to hot tank
5. Removing/Replacing Hot Tank.

PWC – 400
PureWaterCooler
Copyright 2008 Vertex Water Products
5. Removing/Replacing Hot Tank
Cont.
5.8 Remove wire from thermal sensors (4 places)
5.9 Remove inlet tubing (Access from right side of
cooler)
5.10 Remove outlet tubing (Access from left side of
cooler)

PWC – 400
PureWaterCooler
Copyright 2008 Vertex Water Products
5.11 Remove vent tubing (top of hot tank)
5.12 Remove the 2 screws that hold the tank from the
bottom of the cooler
5.13 Remove the hot tank from cooler
5.14 Remove (2) heating coil leads from hot tank
5.14 Remove Thermal sensors from hot tank. Save an
d
install on new hot tank.
5.16 Assemble hot tank in reverse order.
5. Removing/Replacing Hot Tank
Cont.

PWC – 400
PureWaterCooler
Copyright 2008 Vertex Water Products
6.1 Remove top and side covers of cooler (section 3)
6.2 Remove the control panel by grasping the bottom
of the panel and pulling out sharply.
6.3 Remove (4) electrical connectors from back of the
control panel. Set control panel aside.
6. Dispensing Faucet Repair

PWC – 400
PureWaterCooler
Copyright 2008 Vertex Water Products
6. Faucet Repair
Cont.
6.4 Remove hot water tubing from the left (hot) solenoid.
6.5 Remove screw holding solenoid/manifold assembly
to the front panel.
6.6 Remove solenoid/manifold assembly by lifting it
out of cooler. Disconnect cold water tubing from
cold water solenoid (right side).

PWC – 400
PureWaterCooler
Copyright 2008 Vertex Water Products
6.7 Remove screw holding solenoid to manifold and
bracket. Slide solenoid off of manifold.
6.8 Reassemble in reverse order.
Make note of the following:
a. Water flow through the solenoid is
directional. There is an arrow molded in
the side of the solenoid body showing
water flow direction. Make sure the solenoid
is oriented correctly. Water can leak from
the solenoid if not installed correctly
b. When installing electrical connectors into
the circuit board please note: the left
solenoids’ connector plugs into the left
socket on the circuit board (when you are
facing the circuit board). The right solenoid
plugs into the right
6. Faucet Repair
Cont.

PWC – 400
PureWaterCooler
Copyright 2008 Vertex Water Products
7.1 Remove dispensing control panel (section 6)
7.2 Remove circuit board cover
7.3 Remove (3) screws holding circuit board to panel
7.4 Re-assemble in reverse order
7. Remove/Replace Circuit Board

PWC – 400
PureWaterCooler
Copyright 2008 Vertex Water Products
8. Remove Front Panel
8.1 Remove top and side covers of cooler (section 3)
8.2 Remove the control panel and dispensing solenoid
assembly (section 6.2)
8.3 Remove (2) screws from the top of the front panel. The
lower part of the front panel sets on two pins.
8.4 Lift front panel off of the two pins. Remove cover
8.5 Re-assemble in reverse order

PWC – 400
PureWaterCooler
Copyright 2008 Vertex Water Products
9.0 To access the hot tank, remove the left side cover
per section 3.3
9.1 Observe that there are two circular sensors
attached to the hot tank. The upper one is the
main controller at 82 ºC and the lower sensor
is the over-temp cut off.
The power switch for the hot tank (at the back
of the cooler) should not be turned on until
water can be dispensed from the hot spigot. If
the hot power is turned on without water in the
hot tank the heating element will over heat. To
prevent this, the lower thermal sensor on the
hot tank will cut power to the heating element
before any damage takes place. If this happens
the switch on the thermal sensor can be reset to
operational mode manually by the following
procedure.
9.2 Make sure the power cord is unplugged.
9.3 Find the lower thermal sensor on the hot tank
9.4 Using a long thin object such as a screw driver
or a pen, depress the small button at the
center of the lower thermal switch. You should
feel a click when you depress the button. This
action resets the over-temp sensor.
9. Hot Tank Reset Button

PWC – 400
PureWaterCooler
Copyright 2008 Vertex Water Products
10. Remove/Replace Thermal Sensor
10.0 The hot tank thermal sensors are located
on the outside of the hot tank. There are
two thermal sensors. The sensor located
higher on the hot tank controls the daily
operation of the heating element. The
lower thermal sensor is an overheat
safety switch and cuts power to the hot
tank should a malfunction occur and
the tank starts to overheat.
10.1 Unplug cooler from power source for
this operation.
10.2 Remove left side cover per sec. 3.3
10.4 There are (2) thermal sensors attached with
screws to the hot tank. The upper sensor auto-
matically turns the heating element on and off
to maintain the water at 180 ºF. The lower
sensor is the over temperature sensor. This
sensor activates if the temperature on the tank
goes over 212 ºF. If this sensor is activated due
to a overheat condition, it will cut the power to
the heating element. If this happens, it can be
reset by pressing the button at the center of
the sensor.
To check if either thermal sensor is good, use a
continuity tester (ohm meter) to check for
continuity across the thermal sensor. Make
sure the thermal sensor is at ambient temperature
for this test. If there is no continuity, replace
the sensor.
10.5 To change either sensor, disconnect (2)
electrical terminals from sensor.
10.6 Remove (2) screws holding sensor to tank.
10.7 Install new thermal sensor, replace screws,
reconnect electrical terminals to sensor.
10.8 Replace left side cover.
/