
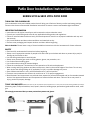
Patio Door Installation Instructions
SERIES 5700 & 5800 VINYL PATIO DOOR
THANK YOU FOR CHOOSING US!
You’ve selected a sturdy and reliable product that will bring you a lifetime of beauty, comfort and energy savings.
Please review these recommended installation instructions to ensure a secure and weather-tight installation.
IMPORTANT INFORMATION
• Instructions are for typical, wood frame wall construction unless otherwise noted
• Consult your local building code offi ce for any applicable building codes and regulations
• Failure to install windows and doors level, plumb and square will result in an improper installation and may void
the warranty
• Only install windows and doors when conditions and materials are dry
• Remove outer packaging and inspect windows and doors before beginning
Note to installer: Please leave a copy of these installation instructions with the homeowner for future reference.
SAFETY
• Read and fully understand all instructions before beginning
• Always use an appropriate number of people to lift and install your windows and doors to prevent injury and/or
damage to the window or door
• Use safe lifting techniques to avoid injuries
• Always wear protective gear such as safety glasses, gloves, ear protection, etc...
• Use caution when handling glass
• Use caution when working at elevated heights
• Follow the manufacturer’s instructions for safe operation of all tools and equipment
• When moving and lifting windows and doors always carry them by the outside edges of the frame. Do not carry
them by the sash lifting/sliding rail (if applicable) or injury or product damage may occur
• Store windows and doors in a dry, well-ventilated area in a vertical position
• Fasteners must penetrate the structure by a minimum of 1” for proper engagement
• Metal fasteners and components may corrode when exposed to preservative-treated and/or fi re retardant-treated
lumber. Use approved fasteners and components to fasten windows and doors. Failure to do so may result in
injury, product or property damage
TOOLS YOU MAY NEED (Additional tools may be required for special conditions or to aid in the removal of existing windows and doors)
Measuring tape, Phillips screwdriver, level, square, hammer, building paper, professional grade exterior caulk, caulk
gun.
We strongly recommend that you wear protective eyewear and gloves.

3
4
5
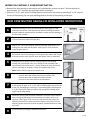
Apply a 3/8” continuous bead of caulk to the entire inside face of the
nailing fi n at the head and the jambs. (See Figure 2) Then caulk the
entire length of the sill.
Place the patio door into the opening from the exterior, making sure that
the caulked side of the nailing fi n is fl ush against the exterior wall. Check
to ensure that the door is plumb, level and square. Shim as necessary.
Starting at one of the top corners, fasten the door in the opening
through the pre-punched holes in the nailing fi n with a fastener that
will penetrate the stud at least 1”. Check the door for level, plumb and
square, adjusting as necessary. Fasten the opposite top corner.
Note: Fasten ONLY the top corners at this time.
NEW CONSTRUCTION NAILING FIN INSTALLATION INSTRUCTIONS
1
Check the opening for level, plumb and square. (See Figure 1) If the
opening is not correct, make adjustments before installing the door to
prevent problems during and after installation. Make sure the opening is
dry and clear of debris.
2
Remove the hardware package and save for later installation. Remove
all three temporary bands from the door.
BEFORE YOU CONTINUE, IT IS IMPORTANT THAT YOU:
• Measure the door opening to ensure that you purchased the correct size door. The door should be
approximately 1/2” less than the opening in width and height
• Apply an 8” to 10” wide strip of building paper to each side of the opening, extending 8” to 10” beyond
the top of the opening. Do not apply building paper to the top of the opening at this time.
6
Remove the temporary blocking from the patio door. (See Figures 3 & 4)
• 1 block above the moving panel at the interlock stile
• 1 block above the moving panel at the lock stile
• 2 blocks in the frame jamb at top and bottom
7
Finish fastening the door in the opening through the pre-punched holes
in the nailing fi n. Apply an 8” to 10” strip of building paper across the top
of the unit, overlapping the nailing fi n. The building paper should extend
8” to 10” beyond the sides of the door and overlap the building paper
applied to the sides earlier.
8
Check the moving panel for proper operation. The rollers can be adjust-
ed by turning the adjusting screws located at the bottom of the mov-
ing panel. (See Figure 5) Do not turn the top screw directly above the
adjusting screw as this screw secures the rollers to the panel. Turn the
adjusting screws clockwise to raise the panel, counterclockwise to lower
the panel.
9
Install the latchset using the included instructions.
Secure Screw
(Top)
Adjusting Screw
(Bottom)
Blocks
Figure 1
Figure 2
Figure 3
Figure 4
Figure 5
SL-328
-
 1
1
-
 2
2


Silver Line Building Products 50 PD ASSEM Operating instructions
- Type
- Operating instructions
- This manual is also suitable for
Ask a question and I''ll find the answer in the document
Finding information in a document is now easier with AI
Related papers

Other documents
-
JELD-WEN 190683 Operating instructions
-
-
JELD-WEN JW2201-01819 Installation guide
-
JELD-WEN LOWOLJW220100268 Installation guide
-
Unbranded 54632 Operating instructions
-
 Ashworth FRSNKTWH6068 Operating instructions
-
 Ashworth PRO6068PS10LTPIWSTNK Installation guide
-
JELD-WEN LOWOLJW155900011 Installation guide
-
 Ashworth 5014038 Installation guide
-
JELD-WEN JW232900501 Installation guide


