Haier AW07LC2VHA Owner's manual

Category
Mobile air conditioners
Type
Owner's manual
WARNING
!
Ductless Split Air Conditioner
Indoor
AW09ES2VHA
AW12ES2VHA
AW18ES2VHA
AW24ES2VHA
AW07LC2VHA/AW07LC2VHB
AW09LC2VHA/AW09LC2VHB
AW12LC2VHA/AW12LC2VHB
AW18LC2VHA/AW18LC2VHB
User Manual
Design may vary by model number.
ŢThis system should be installed by a
HVAC professional. Do not attempt to install
the air conditioner by yourself because
incorrect installation may cause
water
leakage, personal injury or death.
Ţ When abnormalities such as a burnt-smell are
found, immediately power
the main switch
and contact a licensed contractor.
Ţ Do not obstruct or cover the ventilation grille
on the air conditioner. Do not put
or
any other things into the inlet/outlet or swing
louver.
Ţ Do not allow children to play with the air
conditioner. Children should never be allowed
to sit on the outdoor unit
Ţ Please read this manual before using the air conditioner.
Ţ Keep this user manual for future reference.
Cautions and Warnings ................................. 1
Controller Features & Settings ...................... 2
Emergency Operation & Maintenance ........... 5
Troubleshooting ............................................ 6
Limited Warranty .......................................... 7
TABLE OF CONTENTS
PAGE 1
0010586611
CONTROLLER FEATURES & SETTINGSPAGE 2
ENGLISH
3
8
6
19
4
17
18
14
13
109
7
5
16
2
15
11
12
1
1
Power Button
Press the ON/OFF button on the remote control to start
the unit.
2
TURBO/QUIET Button
The TURBO function is used for fast heating or cooling.
Press the TURBO/QUIET
button once and the remote
control will display the TURBO
icon on the bottom right
side of the remote display and switch the unit to the TURBO
function.
The QUIET function may be used when silence is needed for
fast rest or reading. Press the TURBO/QUIET
button
again to switch to QUIET mode and the remote control will
display the QUIET
icon on the bottom left side of the
remote display.
Press the TURBO/QUIET
button a third time to cancel
TURBO/QUIET and return to normal operation.
Note:
TURBO/QUIET modes are only available when the unit is un-
der cooling or heating mode (not for auto or fan mode).
Running the unit in QUIET mode for a long period of time
may cause the room temperature to not reach the set
temperature. If this occurs, cancel QUIET mode and set the
fan speed to a higher setting.
3
COOL Button
In COO/ mode, the unit operates in cooling. When FAN is
set to AUTO, the air conditioner automatically adjusts the
fan speed according to room temperature. The
will be
displayed during COOL mode.
4
HEAT Button
In HEAT mode, warm air will blow out after a short period of
the time due to cold-air prevention function. When FAN is
set to AUTO, the air conditioner automatically adjusts the
fan speed according to room temperature. The
will be
displayed during HEAT mode.
5
DRY Button
DR< mode is used to reduce humidity. In DR< mode, when
room temperature becomes lower than temp. setting 2rF,
unit will run intermittently at LOW speed regardless of FAN
setting. The
will be displayed during DR< mode.
6
Temperature +/- Buttons
Temp Every time the button is pressed, the temperature
setting increases.
Temp - Every time the button is pressed, temperature
setting decreases.
The operating temperature range is 60rF-86rF (16rC-30rC).
7
AUTO Button
Under the mode of auto operation, the air conditioner will
automatically select Cool, Heat, or Fan operation according
to set temperature. When FAN is set to AUTO the air condi-
tioner automatically adjusts the fan speed according to room
temperature. The
will be displayed during AUTO mode.
8
FAN Button
Fan speed selection
Press the FAN
button. For each press, fan speed changes
as follows:
Remote control:
LOW
MED HI
AUTO
Display
circulated
The air conditioner fan will run according to the displayed fan
speed.
When FAN is set to AUTO, the air conditioner automatically
adjusts the fan speed according to room temperature.
9
Louver SWING Button - Vertical
Remote Controller
CONTROLLER FEATURES & SETTINGS PAGE 3
ENGLISH
Air Flow Direction Adjustment
Press the SWING UP/DOWN button to choose the position of
the vertical airƫow louvers.
Status display of air ƫow
COOL/DRY:
HEAT:
Caution:
Ţ It is advisable not to keep the vertical louver in the down-
ward position for an e[tended period of time in COOL or
DRY mode, otherwise condensate water may form on the
louver.
Ţ
Note:
When turning the unit on, the remote control will automatically
return the louver to the previous set swing position. When turn-
LQJWKHXQLWRƩWKHORXYHUZLOOURWDWHWRWKHIXOORSHQSRVLWLRQ
prior to closing.
10
Louver SWING Button - Horizontal
Press the SWING UP/DOWN button to choose the position of
the hori]ontal airƫow louvers.
Status display of air ƫow
COOL/DRY/HEAT:
'
Caution:
Ţ When humidity levels are high, condensate water may oc-
cur at the air outlet if all hori]ontal louvers are adjusted to
left or right.
Note:
When turning the unit on, the remote control will automatically
return the louver to the previous set swing position. When turn-
LQJWKHXQLWRƩWKHORXYHUZLOOURWDWHWRWKHIXOORSHQSRVLWLRQ
prior to closing.
11
Timer ON Button
On-OƩ Operation
1. Start the unit and select the desired operating mode.
2. Press the TIMER ON
button to enter the TIMER ON
mode. The remote control will start ƫashing ŝONŞ.
3. Every time the TIMER ON button is pressed the length of
time increases in 0.5 hour increments between hours 0 and
12, and 1 hour increments for times between hours 12 and
24.
4. Once the desired length of time is selected for the unit to
turn on, press the CONFIRM/CANCEL
to conƪrm
this setting.
The remote control display changes as follows:
BLANK
TIMER ON TIMER OFF TIMER ON-OFF
TIMER OFF-ON
0.5h
0.5h 0.5h
0.5h
Cancel TIMER ON setting:
With a TIMER ON set, press the CONFIRM/CANEL
button once to cancel the TIMER ON.
Turning the unit ON with the TIMER from it being OFF will look
like this on the remote control display:
Note:
Holding the TIMER ON
button down will rapidly cycle
the time. After replacing batteries or a power failure occurs,
the time setting will need to be reset.
According to the Time setting sequence of TIMER ON or
TIMER OFF, either Start-Stop or Stop-Start can be achieved.
12
Timer OFF Button
On-OƩ Operation
1. Start the unit and select the desired operating mode.
2. Press the TIMER OFF
button to enter the TIMER OFF
mode. The remote control will start ƫashing ŝOFFŞ.
3. Every time the TIMER OFF button is pressed the length of
time decreases in 0.5 hour increments between hours 0
and 12, and 1 hour increments for times between hours 12
and 24.
4. Once the desired length of time is selected for the unit to
turn oƩ, press the CONFIRM/CANCEL
to conƪrm
this setting.
The remote control display changes as follows:
BLANK
TIMER ON TIMER OFF TIMER ON-OFF
TIMER OFF-ON
0.5h
0.5h 0.5h
0.5h
Cancel TIMER OFF setting:
With a TIMER OFF set, press the CONFIRM/CANEL
button once to cancel the TIMER OFF.
Turning the unit OFF with the TIMER from it being ON will look
like this on the remote control display:
Note:
Holding the TIMER OFF
button down will rapidly cycle
the time. After replacing batteries or a power failure occurs,
the time setting will need to be reset.
CONTROLLER FEATURES & SETTINGSPAGE 4
ENGLISH
According to the Time setting sequence of TIMER ON or
TIMER OFF, either Start-Stop or Stop-Start can be achieved.
13
SLEEP Button
Sleep mode
Press the E[tra Function
button to enter additional
options, cycle the button to display the
icon, the
icon will ƫash. Press the Conƪrm/Cancel
button to
enter the sleep function.
Sleep Operation Mode
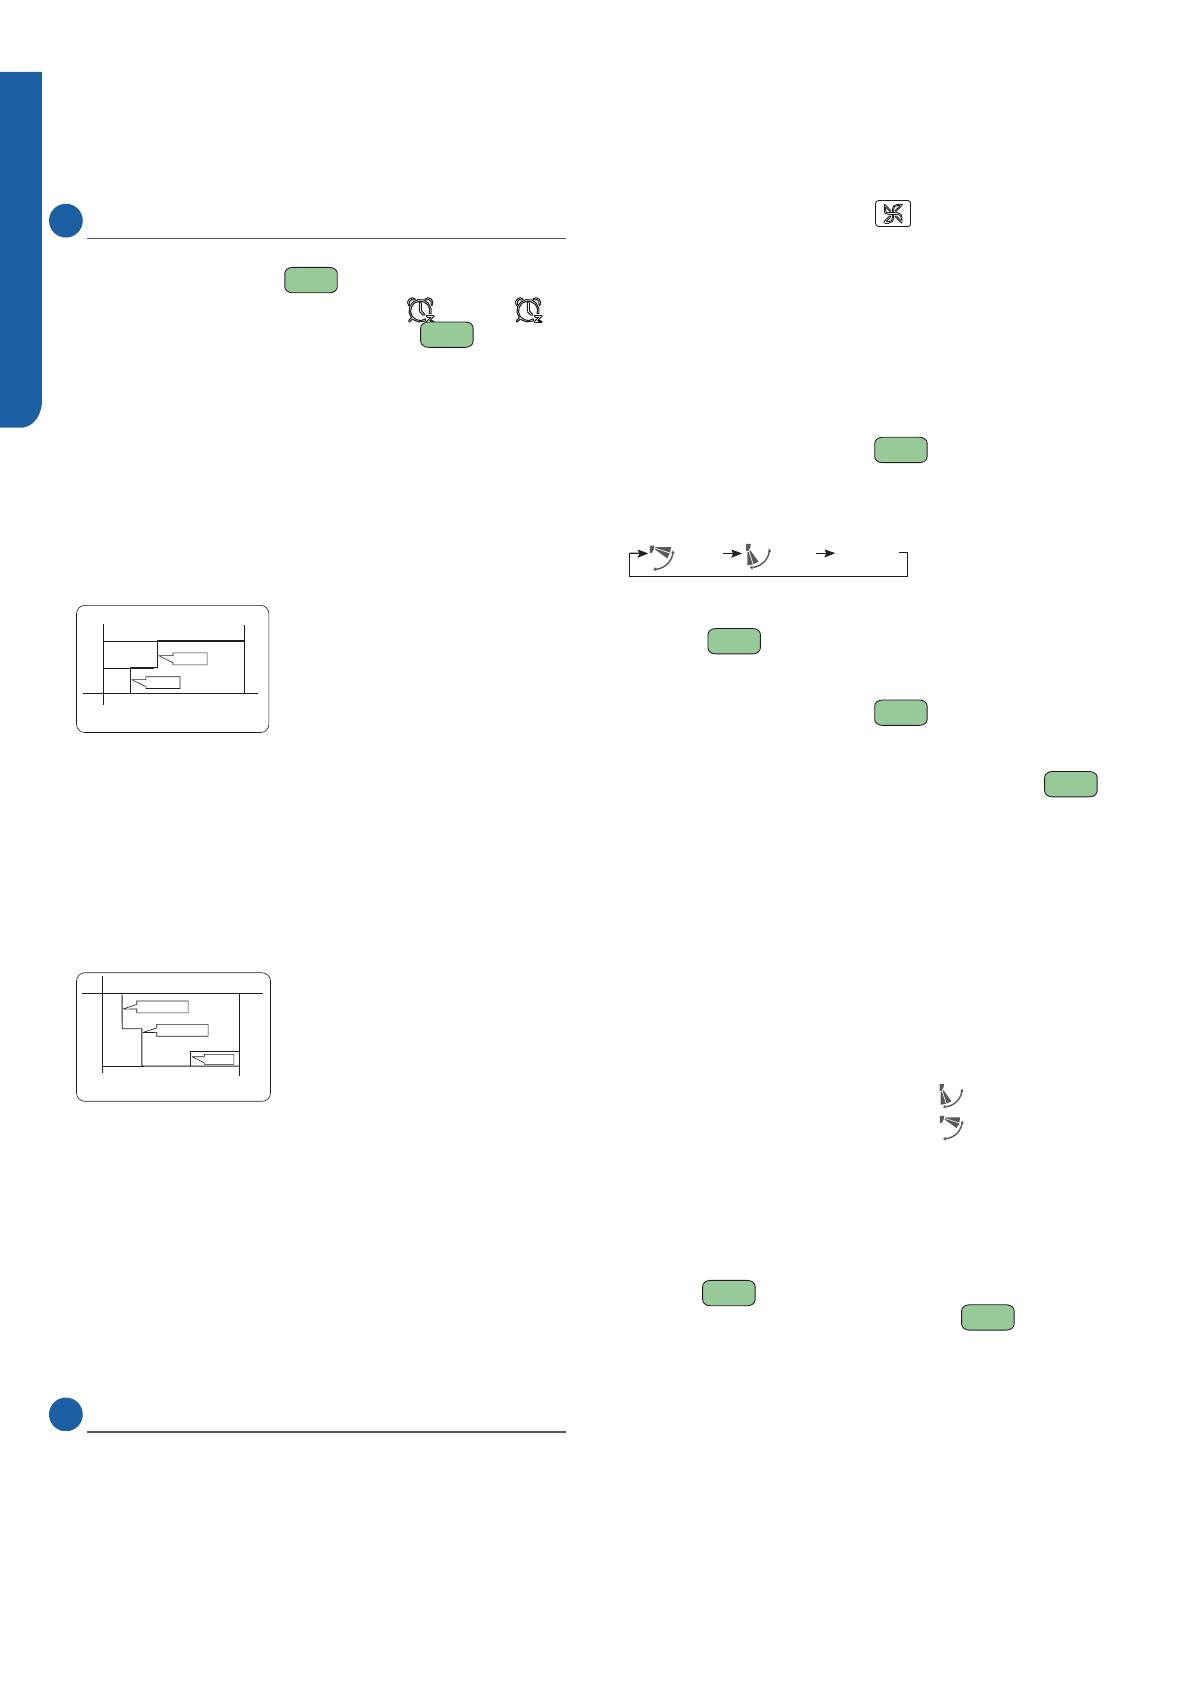
1. SLEEP mode during COOL, DRY modes
One hour after SLEEP mode starts, the temperature will
rise 2rF above set temperature, after another hour, the
temperature rises an additional 2rF. The unit will run for an
additional si[ hours, then turns oƩ. The ƪnal temperature
is 4rF higher than the initial set temperature. Using this
feature will help with achieving ma[imum eƬciency and
comfort from your unit while you sleep.
SLEEP operation starts SLEEP operation stops
Approx.6hrs
1 hr
Rises 2
O
F
Rises 2
O
F
Temp.setting
Unit stop
In COOL, DRY mode
1 hr
2. SLEEP mode during HEAT mode
One hour after SLEEP mode starts, the temperature will
decrease 4rF below set temperature, after another hour,
the temperature will decrease an additional 4rF. After an
additional three hours, the temperature will rise by 2rF.
The unit will run for an additional three hours, then turns
oƩ. The ƪnal temperature is 6rF lower than the initial set
temperature. Using this feature will help with achieving
ma[imum eƬciency and comfort from your unit while you
sleep.
SLEEP
operation starts
SLEEP
operation stops
1 hr
1 hr
3 hrs
3 hrs
Rises 3
O
F
Temp.setting
Unit stop
In HEAT mode
Decreases 4
O
F
Decreases 4
O
F
3. In AUTO mode
The unit operates in corresponding sleep mode adapted
to the automatically selected operation mode.
Note:
-When the unit is set to sleep mode, the fan speed will be
set to low speed and cannot be changed.
-When the TIMER function is set, the sleeping function
cannot be set. If the sleeping function has been set, and
the user sets the TIMER function, the sleeping function
will be canceled, and the unit will be set to the timer
function.
14
EXTRA FUNCTION Button
Function:
A) Refresh air - Feature not available on this series.
B) A-B Yard - This will allow you to control two seperate units
with a single remote control.
Note: this feature would be setup at the time of installation
by the contractor.
C) Fan Mode - Is indicated by the
icon. Only the fan will
operate in this mode. See section 8 ŝFAN ButtonŞ for
changing the fan settings.
',QWHOOLJHQWXSZDUGDLUƋRZ(,QWHOOLJHQWGRZQZDUGDLUƋRZ
)5HVHWLQWHOOLJHQWDLUƋRZSRVLWLRQ
1. Press the ON/OFF button on the remote control to turn
the unit on.
Select the desired operating mode.
2. Setting the intelligent airƫow function
Press the EXTRA FUNCTION
button to enter ad-
ditional options. Press this button repeatedly to access
the louver settings. The louver icon will cycle through the
following three settings.
Healthy
airflow
upward
Healthy
airflow
downward
Present
position
Select the desired position, then press the CONFIRM/
CANCEL
button to set the function.
3. Canceling the intelligent airƫow function
Press the EXTRA FUNCTION
button to enter addi-
tional options. Press this button repeatedly to access the
louver settings. Cycle the button to the louver icon ŝpres-
entŞ position, then press the CONFIRM/CANCEL
button to cancel the function.
Notice: Do not reposition the horizontal louver by hand.
This may cause the louver to run incorrectly and not
match the icon displayed on the remote control. If the
louver is not running correctly, turn the unit oƩ for one
minute, then back on, and adjust the louver setting with
the remote control.
Note:
1. After setting the intelligent airƫow function, the louver
position is ƪ[ed.
2. In cooling, it is better to select the
mode.
3. In heating, it is better to select the
mode.
4. In cooling and dry modes, using the air conditioner for a
long period of time under high humidity conditions, con-
densate water may form on the grille/louver.
G) Fahrenheit/Celsius mode shift on unit and remote -
To switch between Fahrenheit and Celsius press the EXTRA
FUNCTION
button until either Celsius or Fahrenheit
is displayed. Press the CONFIRM/CANCEL
button to
apply the change.
H) 50°F low temperature heating - Feature not available on
this series.
,(OHFWULFDOKHDWLQJ- Feature not available on this series.
CONTROLLER FEATURES & SETTINGS PAGE 5
ENGLISH
Emergency Operation:
Ţ Use this operation only when the remote control is defec-
tive or lost.
Ţ When the emergency operation switch is pressed, the unit
beeps once, which indicates the start of this operation.
Ţ When the power switch is turned on for the ƪrst time and
emergency operation starts, the unit will run automatically
in the following modes:
Ţ During emergency operation, it is not possible to change
the settings of temperature and fan speed. It is also not
possible to operate in timer or dry modes.
Beep
emergency
operation switch
Room
temperature
Designated
temperature
Timer
mode
Fan
speed
Operation
mode
Above 73
o
F
Below 73
o
F 73
o
F
79
o
F
No
AUTO
AUTO
COOL
HEAT
No
1. Remove the battery cover
2. Insert 2 AAA batteries as
illustrated noting battery polarity
3. Reinstall the battery cover
NOTE:
Ţ The distance from the remote
control to the receiver should
be less than 23 feet with no
obstructions.
Ţ If the remote control display is weak or the operating
distance has diminished, the batteries may need to be
replaced.
Ţ Remote control malfunctions can sometimes be corrected
by removing the batteries from the remote for a few min-
utes and then reinstalling them.
Ţ Remove the batteries from the remote control if the unit
will not be in use for an e[tended period of time. If any seg-
ments of the display remain active after battery removal,
press the reset button.
Do not block the air inlet
or outlet
Close doors and windows
during operation
Wipe the air conditioner using a soft and
dry cloth. For serious stains, use a neutral
detergent diluted with water. Wring the water
out of the cloth before wiping down the unit.
Then wipe oƩ the detergent completely.
During cooling operation
prevent direct sunlight
with curtains or blinds
1. Open the inlet grille by pulling
it upward
2. Remove the ƪlter.
*HQWO\SXVKXSRQWKHłOWHUVFHQWHU
WDEXQWLOLWLVUHOHDVHGIURPWKH
VWRSSHUDQGUHPRYHWKHłOWHU
downward.
3. Clean the ƪlter.
Use a vacuum cleaner to remove
GXVWRUZDVKWKHłOWHUZLWKZDWHU
$IWHUZDVKLQJGU\WKHłOWHU
completely.
4. Attach the ƪlter
$WWDFKWKHłOWHUVRWKDWWKH)5217
ODEHOLVIDFLQJWKHIURQW0DNHVXUH
WKDWWKHłOWHULVVHFXUHO\DWWDFKHG
EHKLQGWKHKROGLQJWDEV,IWKHłOWHULV
not attached correctly the unit may
QRWDFKLHYHPD[LPXPHƧFLHQF\
5. Close the inlet grille.
Once every
two months
EMERGENCY OPERATION & MAINTENANCE
Inserting the Batteries
Emergency Operation
Optimizing Performance
Cleaning the Air Filter
15
HEALTH Button
Feature not available on this series.
16
&RQƪUP&DQFHO%XWWRQ
Function: Setting and canceling timer and other functions.
17
LOCK Button
Used to lock buttons and LCD display
18
LIGHT Button
Turns indoor unit display on and oƩ
19
RESET Button
If the remote control is not functioning properly, use a pen
point or similar object to depress this button to reset the
remote.
PAGE 6 TROUBLESHOOTING
ENGLISH
Normal
Performance
Inspection
Problem
The system
does not restart
immediately
Noise is heard
Odd smell
Mist or steam
are blowing out.
In dry mode,
fan speed can’t
be changed.
Poor cooling
Ţ When unit is stopped, it will not restart again for 3 minutes to protect the system.
Ţ When electricity is disconnected and then reconnected, the protection circuit will work for 3 minutes to
protect the air conditioner.
Ţ During unit operation or a stop, a swishing or gurgling noise may be heard. The ƪrst 2-3 minutes after the
unit has started is when the noise is most noticeable. (This noise is generated by refrigerant ƫowing in the
system.)
Ţ During unit operation, a cracking noise may be heard. This noise is generated by the casing e[panding or
shrinking due to temperature changes.
Ţ If the airƫow creating a loud noise during unit operation, the air ƪlter may be too dirty.
Ţ The system circulates smells from the indoor air such as the smell of furniture, paint, and/or cigarettes.
Ţ During COOL or DRY operation, indoor unit may blow out mist. This is due to the sudden cooling of the
indoor air.
Ţ In DRY mode, when the room temperature becomes lower than the set temperature by 2rF, the unit will
run intermittently at LOW speed regardless of FAN setting.
Ţ Is the power plug inserted"
Ţ Is there a power failure"
Ţ Is a fuse blown"
Ţ Is the air ƪlter dirty" Normally it should be cleaned every 2 months.
Ţ Is there anything blocking the inlet and/or outlet"
Ţ Is the temperature set correctly"
Ţ Are there any doors or windows open"
Ţ Is there any direct sunlight through the window during the cooling operation" (Use curtains)
Ţ Are there too many heat sources or too many people in the room during cooling operation"
Cause and Solutions
Conditions
to check for
%HIRUHDVNLQJIRUVHUYLFHFKHFNWKHIROORZLQJƪUVW
LIMITED WARRANTY
5 YEAR LIMITED PARTS WARRANTY
This warranty covers all defects in workmanship or material
for the mechanical and electrical parts contained in this
product for a period of 5 years from the date of purchase. You
must keep and be able to provide your original sales receipt
as proof of the date of purchase.
7 YEAR COMPRESSOR WARRANTY
The compressor contained in this product is warrantied for a
period of 7 years from the date of purchase. You must keep
and be able to provide your original sales receipt as proof of
the date of purchase.
WHO IS COVERED
The original purchaser of this product.
Haier America will replace any mechanical or electrical parts
or that which proves defective in normal operation for a
period of 5 years. Compressor for 7 years.
HOW CAN YOU GET SERVICE
Contact your Installer.
All service must be performed by a licensed HVAC
techninican.
THIS WARRANTY DOES NOT COVER
1. Damages from improper installation.
2. Damages in shipping.
3. Defects other than manufacturing.
4. Damages from misuse, abuse, accident, alteration, lack
of proper care and maintenance or incorrect electrical
voltage or current.
5. Damages from other than household use.
6. Damages from services performed by other than a
licencensed HVAC technician.
THIS LIMITED WARRANTY IS GIVEN IN LIEU OF ALL OTHER
WARRANTIES, EXPRESS OR IMPLIED, INCLUDING THE
WARRANTIES OF MERCHANTABILITY AND FITNESS FOR A
PARTICULAR PURPOSE.
The remedy provided in this warranty is e[clusive and is
granted in lieu of all other remedies. This warranty does not
cover incidental or consequential damages. Some states
do not allow the e[clusion of incidental or consequential
damages, so this limitation may not apply to you. Some
states do not allow limitations on how long an implied
warranty lasts, so this limitation may not apply to you. This
warranty gives you speciƪc legal rights and you may also have
other rights which vary from state to state.
This warranty covers units within the continental United
States, Canada and Puerto Rico.
Haier America,
Wayne, N- 07470
LIMITED WARRANTY
ENGLISH
PAGE 7
Haier America,
Wayne, NJ 07470
©2015 Haier America Trading, LLC.
Indoor Model #: AW09ES2VHA, AW12ES2VHA,
AW18ES2VHA, AW24ES2VHA, AW07LC2VHA/AW07LC2VHB
AW09LC2VHA/AW09LC2VHB,AW12LC2VHA/AW12LC2VHB
AW18LC2VHA/AW18LC2VHB
Issued Date: January 2015
www.Haier.com
  • Page 1 1
  • Page 2 2
  • Page 3 3
  • Page 4 4
  • Page 5 5
  • Page 6 6
  • Page 7 7
  • Page 8 8

Haier AW07LC2VHA Owner's manual

Category
Mobile air conditioners
Type
Owner's manual

Ask a question and I''ll find the answer in the document

Finding information in a document is now easier with AI