Haier AW12LC2VHA User manual

Category
Mobile air conditioners
Type
User manual

This manual is also suitable for

Haier AW12LC2VHA is a ductless air conditioner with a variety of features to keep you comfortable. It can cool, heat, and dehumidify your home, and its turbo mode can quickly reach your desired temperature. You can control the air conditioner with the included remote control or with your smartphone using the Haier Smart Air app. The AW12LC2VHA is also Energy Star certified, so you can save money on your energy bills.

Haier AW12LC2VHA is a ductless air conditioner with a variety of features to keep you comfortable. It can cool, heat, and dehumidify your home, and its turbo mode can quickly reach your desired temperature. You can control the air conditioner with the included remote control or with your smartphone using the Haier Smart Air app. The AW12LC2VHA is also Energy Star certified, so you can save money on your energy bills.

WARNING
!
Ductless Split Air Conditioner
Indoor
AW09ES2VHA
AW12ES2VHA
AW18ES2VHA
AW24ES2VHA
AW07LC2VHA
AW09LC2VHA
AW12LC2VHA
AW18LC2VHA
User Manual
Design may vary by model number.
•Thissystemshouldbeinstalledbyaqualied
HVAC professional. Do not attempt to install
the air conditioner by yourself because
incorrectinstallationmaycausere,water
leakage,personalinjuryordeath.
•When abnormalities such as a burnt-smell are
found,immediatelypowerothemainswitch
and contact a licensed contractor.
•Do not obstruct or cover the ventilation grille
ontheairconditioner.Donotputngersor
anyotherthingsintotheinlet/outletorswing
louver.
•Donotallowchildrentoplaywiththeair
conditioner.Childrenshouldneverbeallowed
to sit on the outdoor unit
• Please read this manual before using the air conditioner.
• Keep this user manual for future reference.
Cautions and Warnings ................................. 1
Controller Features & Settings ...................... 2
Emergency Operation & Maintenance ........... 5
Troubleshooting ............................................ 6
Limited Warranty .......................................... 7
TABLE OF CONTENTS
PAGE 1
CONTROLLER FEATURES & SETTINGSPAGE 2
ENGLISH
3
8
6
19
4
17
18
14
13
109
7
5
16
2
15
11
12
1
1
Power Button
Press the ON/OFF button on the remote control to start
the unit.
2
TURBO/QUIET Button
The TURBO function is used for fast heating or cooling.
Press the TURBO/QUIET
button once and the remote
controlwilldisplaytheTURBO
icon on the bottom right
sideoftheremotedisplayandswitchtheunittotheTURBO
function.
TheQUIETfunctionmaybeusedwhensilenceisneededfor
fast rest or reading. Press the TURBO/QUIET
button
againtoswitchtoQUIETmodeandtheremotecontrolwill
display the QUIET
icon on the bottom left side of the
remote display.
Press the TURBO/QUIET
button a third time to cancel
TURBO/QUIET and return to normal operation.
Note:
TURBO/QUIETmodesareonlyavailablewhentheunitisun-
der cooling or heating mode (not for auto or fan mode).
Running the unit in QUIET mode for a long period of time
may cause the room temperature to not reach the set
temperature.Ifthisoccurs,cancelQUIETmodeandsetthe
fan speed to a higher setting.
3
COOL Button
InCOOLmode,theunitoperatesincooling.WhenFANis
settoAUTO,theairconditionerautomaticallyadjuststhe
fan speed according to room temperature. The
willbe
displayed during COOL mode.
4
HEAT Button
InHEATmode,warmairwillblowoutafterashortperiodof
the time due to cold-air prevention function. When FAN is
settoAUTO,theairconditionerautomaticallyadjuststhe
fan speed according to room temperature. The
willbe
displayed during HEAT mode.
5
DRY Button
DRYmodeisusedtoreducehumidity.InDRYmode,when
roomtemperaturebecomeslowerthantemp.setting+2°F,
unitwillrunintermittentlyatLOWspeedregardlessofFAN
setting. The
willbedisplayedduringDRYmode.
6
Temperature +/- Buttons
Temp+Everytimethebuttonispressed,thetemperature
setting increases.
Temp-Everytimethebuttonispressed,temperature
setting decreases.
Theoperatingtemperaturerangeis60°F-86°F(16°C-30°C).
7
AUTO Button
Underthemodeofautooperation,theairconditionerwill
automaticallyselectCool,Heat,orFanoperationaccording
to set temperature. When FAN is set to AUTO the air condi-
tionerautomaticallyadjuststhefanspeedaccordingtoroom
temperature. The
willbedisplayedduringAUTOmode.
8
FAN Button
Fan speed selection
Press the FAN
button.Foreachpress,fanspeedchanges
asfollows:
Remote control:
LOW
MED HI
AUTO
Display
circulated
Theairconditionerfanwillrunaccordingtothedisplayedfan
speed.
WhenFANissettoAUTO,theairconditionerautomatically
adjuststhefanspeedaccordingtoroomtemperature.
9
Louver SWING Button - Vertical
Remote Controller
CONTROLLER FEATURES & SETTINGS PAGE 3
ENGLISH
Air Flow Direction Adjustment
Press the SWING UP/DOWN button to choose the position of
theverticalairowlouvers.
Statusdisplayofairow
COOL/DRY:
HEAT:
Caution:
• Itisadvisablenottokeeptheverticallouverinthedown-
wardpositionforanextendedperiodoftimeinCOOLor
DRYmode,otherwisecondensatewatermayformonthe
louver.
•
Note:
When turning the unit on, the remote control will automatically
return the louver to the previous set swing position. When turn-
ing the unit o, the louver will rotate to the full open position
prior to closing.
10
Louver SWING Button - Horizontal
Press the SWING UP/DOWN button to choose the position of
thehorizontalairowlouvers.
Statusdisplayofairow
COOL/DRY/HEAT:
'
Caution:
• Whenhumiditylevelsarehigh,condensatewatermayoc-
curattheairoutletifallhorizontallouversareadjustedto
left or right.
Note:
When turning the unit on, the remote control will automatically
return the louver to the previous set swing position. When turn-
ing the unit o, the louver will rotate to the full open position
prior to closing.
11
Timer ON Button
On-OOperation
1. Start the unit and select the desired operating mode.
2. Press the TIMER ON
button to enter the TIMER ON
mode.Theremotecontrolwillstartashing“ON”.
3. Every time the TIMER ON button is pressed the length of
timeincreasesin0.5hourincrementsbetweenhours0and
12,and1hourincrementsfortimesbetweenhours12and
24.
4. Once the desired length of time is selected for the unit to
turnon,presstheCONFIRM/CANCEL
toconrm
this setting.
Theremotecontroldisplaychangesasfollows:
BLANK
TIMER ON TIMER OFF TIMER ON-OFF
TIMER OFF-ON
0.5h
0.5h 0.5h
0.5h
Cancel TIMER ON setting:
WithaTIMERONset,presstheCONFIRM/CANEL
button once to cancel the TIMER ON.
TurningtheunitONwiththeTIMERfromitbeingOFFwilllook
like this on the remote control display:
Note:
Holding the TIMER ON
buttondownwillrapidlycycle
thetime.Afterreplacingbatteriesorapowerfailureoccurs,
thetimesettingwillneedtobereset.
According to the Time setting sequence of TIMER ON or
TIMEROFF,eitherStart-StoporStop-Startcanbeachieved.
12
Timer OFF Button
On-OOperation
1. Start the unit and select the desired operating mode.
2. Press the TIMER OFF
button to enter the TIMER OFF
mode.Theremotecontrolwillstartashing“OFF”.
3. Every time the TIMER OFF button is pressed the length of
timedecreasesin0.5hourincrementsbetweenhours0
and12,and1hourincrementsfortimesbetweenhours12
and 24.
4. Once the desired length of time is selected for the unit to
turno,presstheCONFIRM/CANCEL
toconrm
this setting.
Theremotecontroldisplaychangesasfollows:
BLANK
TIMER ON TIMER OFF TIMER ON-OFF
TIMER OFF-ON
0.5h
0.5h 0.5h
0.5h
Cancel TIMER OFF setting:
WithaTIMEROFFset,presstheCONFIRM/CANEL
button once to cancel the TIMER OFF.
TurningtheunitOFFwiththeTIMERfromitbeingONwilllook
like this on the remote control display:
Note:
Holding the TIMER OFF
buttondownwillrapidlycycle
thetime.Afterreplacingbatteriesorapowerfailureoccurs,
thetimesettingwillneedtobereset.
CONTROLLER FEATURES & SETTINGSPAGE 4
ENGLISH
According to the Time setting sequence of TIMER ON or
TIMEROFF,eitherStart-StoporStop-Startcanbeachieved.
13
SLEEP Button
Sleep mode
PresstheExtraFunction
button to enter additional
options,cyclethebuttontodisplaythe
icon,the
iconwillash.PresstheConrm/Cancel
button to
enter the sleep function.
Sleep Operation Mode
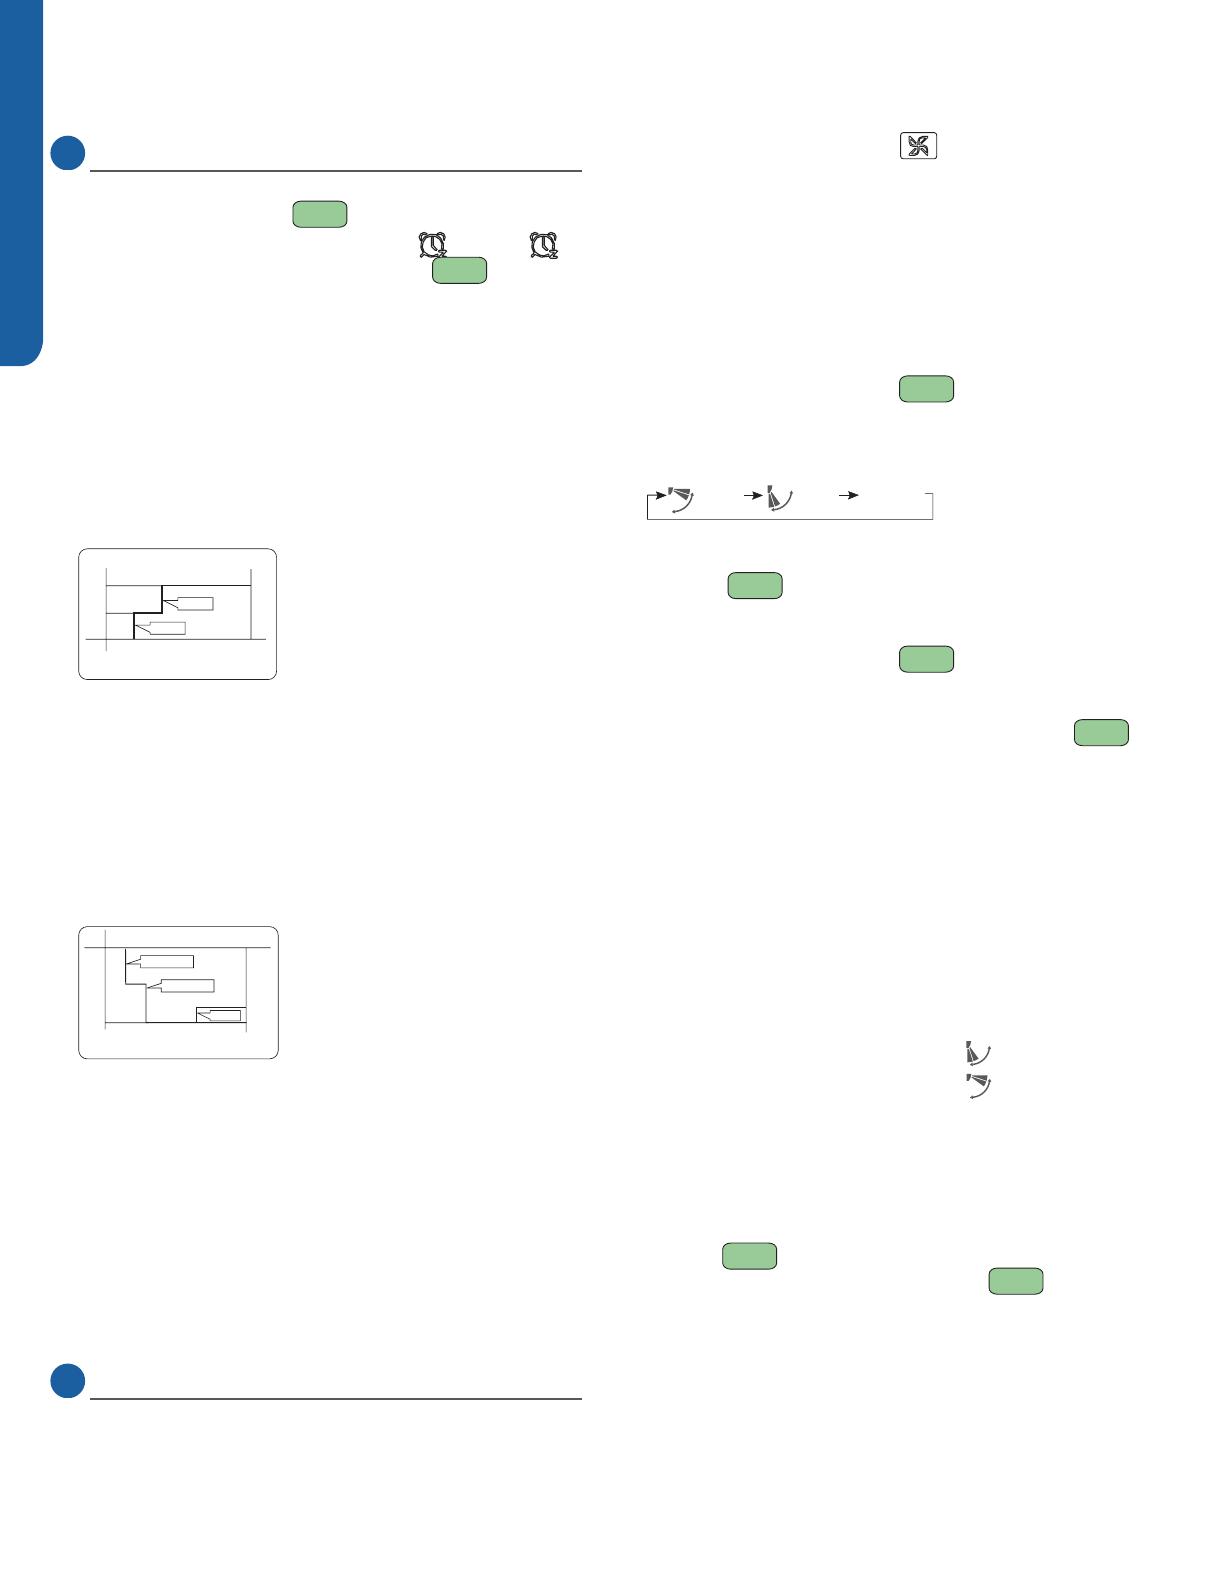
1.SLEEPmodeduringCOOL,DRYmodes
OnehourafterSLEEPmodestarts,thetemperaturewill
rise2°Fabovesettemperature,afteranotherhour,the
temperaturerisesanadditional2°F.Theunitwillrunforan
additionalsixhours,thenturnso.Thenaltemperature
is4°Fhigherthantheinitialsettemperature.Usingthis
featurewillhelpwithachievingmaximumeciencyand
comfortfromyourunitwhileyousleep.
SLEEP operation starts SLEEP operation stops
Approx.6hrs
1 hr
Rises 2
O
F
Rises 2
O
F
Temp.setting
Unit stop
In COOL, DRY mode
1 hr
2. SLEEP mode during HEAT mode
OnehourafterSLEEPmodestarts,thetemperaturewill
decrease4°Fbelowsettemperature,afteranotherhour,
thetemperaturewilldecreaseanadditional4°F.Afteran
additionalthreehours,thetemperaturewillriseby2°F.
Theunitwillrunforanadditionalthreehours,thenturns
o.Thenaltemperatureis6°Flowerthantheinitialset
temperature.Usingthisfeaturewillhelpwithachieving
maximumeciencyandcomfortfromyourunitwhileyou
sleep.
SLEEP
operation starts
SLEEP
operation stops
1 hr
1 hr
3 hrs
3 hrs
Rises 3
O
F
Temp.setting
Unit stop
In HEAT mode
Decreases 4
O
F
Decreases 4
O
F
3. In AUTO mode
The unit operates in corresponding sleep mode adapted
to the automatically selected operation mode.
Note:
-Whentheunitissettosleepmode,thefanspeedwillbe
settolowspeedandcannotbechanged.
-WhentheTIMERfunctionisset,thesleepingfunction
cannotbeset.Ifthesleepingfunctionhasbeenset,and
theusersetstheTIMERfunction,thesleepingfunction
willbecanceled,andtheunitwillbesettothetimer
function.
14
EXTRA FUNCTION Button
Function:
A) Refresh air - Feature not available on this series.
B) A-B Yard -Thiswillallowyoutocontroltwoseperateunits
withasingleremotecontrol.
Note:thisfeaturewouldbesetupatthetimeofinstallation
by the contractor.
C) Fan Mode - Is indicated by the
icon.Onlythefanwill
operateinthismode.Seesection8“FANButton”for
changing the fan settings.
D) Intelligent upward airow, E) Intelligent downward airow,
F) Reset intelligent airow position
1. Press the ON/OFF button on the remote control to turn
the unit on.
Select the desired operating mode.
2.Settingtheintelligentairowfunction
Press the EXTRA FUNCTION
button to enter ad-
ditional options. Press this button repeatedly to access
thelouversettings.Thelouvericonwillcyclethroughthe
followingthreesettings.
Healthy
airflow
upward
Healthy
airflow
downward
Present
position
Selectthedesiredposition,thenpresstheCONFIRM/
CANCEL
button to set the function.
3.Cancelingtheintelligentairowfunction
Press the EXTRA FUNCTION
button to enter addi-
tional options. Press this button repeatedly to access the
louversettings.Cyclethebuttontothelouvericon“pres-
ent”position,thenpresstheCONFIRM/CANCEL
button to cancel the function.
Notice: Do not reposition the horizontal louver by hand.
This may cause the louver to run incorrectly and not
match the icon displayed on the remote control. If the
louverisnotrunningcorrectly,turntheunitoforone
minute,thenbackon,andadjustthelouversettingwith
the remote control.
Note:
1.Aftersettingtheintelligentairowfunction,thelouver
positionisxed.
2.Incooling,itisbettertoselectthe
mode.
3.Inheating,itisbettertoselectthe
mode.
4.Incoolinganddrymodes,usingtheairconditionerfora
longperiodoftimeunderhighhumidityconditions,con-
densatewatermayformonthegrille/louver.
G) Fahrenheit/Celsius mode shift on unit and remote -
ToswitchbetweenFahrenheitandCelsiuspresstheEXTRA
FUNCTION
button until either Celsius or Fahrenheit
is displayed. Press the CONFIRM/CANCEL
button to
apply the change.
H) 50°F low temperature heating - Feature not available on
this series.
I) Electrical heating - Feature not available on this series.
CONTROLLER FEATURES & SETTINGS PAGE 5
ENGLISH
Emergency Operation:
• Usethisoperationonlywhentheremotecontrolisdefec-
tive or lost.
• Whentheemergencyoperationswitchispressed,theunit
beepsonce,whichindicatesthestartofthisoperation.
• Whenthepowerswitchisturnedonforthersttimeand
emergencyoperationstarts,theunitwillrunautomatically
inthefollowingmodes:
• Duringemergencyoperation,itisnotpossibletochange
the settings of temperature and fan speed. It is also not
possible to operate in timer or dry modes.
Beep
emergency
operation switch
Room
temperature
Designated
temperature
Timer
mode
Fan
speed
Operation
mode
Above 73
o
F
Below 73
o
F 73
o
F
79
o
F
No
AUTO
AUTO
COOL
HEAT
No
1. Remove the battery cover
2. Insert 2 AAA batteries as
illustrated noting battery polarity
3. Reinstall the battery cover
NOTE:
• The distance from the remote
control to the receiver should
belessthan23feetwithno
obstructions.
• Iftheremotecontroldisplayisweakortheoperating
distancehasdiminished,thebatteriesmayneedtobe
replaced.
• Remote control malfunctions can sometimes be corrected
byremovingthebatteriesfromtheremoteforafewmin-
utes and then reinstalling them.
• Remove the batteries from the remote control if the unit
willnotbeinuseforanextendedperiodoftime.Ifanyseg-
mentsofthedisplayremainactiveafterbatteryremoval,
press the reset button.
Do not block the air inlet
or outlet
Closedoorsandwindows
during operation
Wipe the air conditioner using a soft and
dry
clo
th.
F
or
seriousstains
,
useaneutr
al
detergentdilutedwithw
ater.
W
ring
thew
ater
out
oftheclo
th
bef
ore
wipingdo
wn
theunit.
Thenwipeothedetergentc
ompletely.
During cooling operation
prevent direct sunlight
with curtains or blinds
1. Open the inlet grille by pulling
itupward
2.Removethelter.
Gently push up on the lter’s center
tab until it is released from the
stopper, and remove the lter
downward.
3.Cleanthelter.
Use a vacuum cleaner to remove
dust, or wash the lter with water.
After washing, dry the lter
completely.
4.Attachthelter
Attach the lter so that the “FRONT”
label is facing the front. Make sure
that the lter is securely attached
behind the holding tabs. If the lter is
not attached correctly the unit may
not achieve maximum eciency.
5. Close the inlet grille.
Once every
two months
EMERGENCY OPERATION & MAINTENANCE
Inserting the Batteries
Emergency Operation
Optimizing Performance
Cleaning the Air Filter
15
HEALTH Button
Feature not available on this series.
16
Conrm/CancelButton
Function: Setting and canceling timer and other functions.
17
LOCK Button
Used to lock buttons and LCD display
18
LIGHT Button
Turnsindoorunitdisplayonando
19
RESET Button
Iftheremotecontrolisnotfunctioningproperly,useapen
pointorsimilarobjecttodepressthisbuttontoresetthe
remote.
PAGE 6 TROUBLESHOOTING
ENGLISH
Normal
Performance
Inspection
Problem
The system
does not restart
immediately
Noise is heard
Odd smell
Mist or steam
areblowingout.
Indrymode,
fan speed can’t
be changed.
Poor cooling
•Whenunitisstopped,itwillnotrestartagainfor3minutestoprotectthesystem.
•Whenelectricityisdisconnectedandthenreconnected,theprotectioncircuitwillworkfor3minutesto
protect the air conditioner.
•Duringunitoperationorastop,aswishingorgurglingnoisemaybeheard.Therst2-3minutesafterthe
unithasstartediswhenthenoiseismostnoticeable.(Thisnoiseisgeneratedbyrefrigerantowinginthe
system.)
•Duringunitoperation,acrackingnoisemaybeheard.Thisnoiseisgeneratedbythecasingexpandingor
shrinking due to temperature changes.
•Iftheairowcreatingaloudnoiseduringunitoperation,theairltermaybetoodirty.
•Thesystemcirculatessmellsfromtheindoorairsuchasthesmelloffurniture,paint,and/orcigarettes.
•DuringCOOLorDRYoperation,indoorunitmayblowoutmist.Thisisduetothesuddencoolingofthe
indoor air.
•InDRYmode,whentheroomtemperaturebecomeslowerthanthesettemperatureby2°F,theunitwill
run intermittently at LOW speed regardless of FAN setting.
•Isthepowerpluginserted?
•Isthereapowerfailure?
•Isafuseblown?
•Istheairlterdirty?Normallyitshouldbecleanedevery2months.
•Isthereanythingblockingtheinletand/oroutlet?
•Isthetemperaturesetcorrectly?
•Arethereanydoorsorwindowsopen?
•Isthereanydirectsunlightthroughthewindowduringthecoolingoperation?(Usecurtains)
•Aretheretoomanyheatsourcesortoomanypeopleintheroomduringcoolingoperation?
Cause and Solutions
Conditions
to check for
Beforeaskingforservice,checkthefollowingrst:
LIMITED WARRANTY
5 YEAR LIMITED PARTS WARRANTY
Thiswarrantycoversalldefectsinworkmanshipormaterial
for the mechanical and electrical parts contained in this
product for a period of 5 years from the date of purchase. You
must keep and be able to provide your original sales receipt
as proof of the date of purchase.
7 YEAR COMPRESSOR WARRANTY
Thecompressorcontainedinthisproductiswarrantiedfora
period of 7 years from the date of purchase. You must keep
and be able to provide your original sales receipt as proof of
the date of purchase.
WHO IS COVERED
The original purchaser of this product.
HaierAmericawillreplaceanymechanicalorelectricalparts
orthatwhichprovesdefectiveinnormaloperationfora
period of 5 years. Compressor for 7 years.
HOW CAN YOU GET SERVICE
Contact your Installer.
All service must be performed by a licensed HVAC
techninican.
THIS WARRANTY DOES NOT COVER
1. Damages from improper installation.
2. Damages in shipping.
3. Defects other than manufacturing.
4.Damagesfrommisuse,abuse,accident,alteration,lack
of proper care and maintenance or incorrect electrical
voltage or current.
5. Damages from other than household use.
6. Damages from services performed by other than a
licencensed HVAC technician.
THIS LIMITED WARRANTY IS GIVEN IN LIEU OF ALL OTHER
WARRANTIES, EXPRESS OR IMPLIED, INCLUDING THE
WARRANTIES OF MERCHANTABILITY AND FITNESS FOR A
PARTICULAR PURPOSE.
Theremedyprovidedinthiswarrantyisexclusiveandis
grantedinlieuofallotherremedies.Thiswarrantydoesnot
cover incidental or consequential damages. Some states
donotallowtheexclusionofincidentalorconsequential
damages,sothislimitationmaynotapplytoyou.Some
statesdonotallowlimitationsonhowlonganimplied
warrantylasts,sothislimitationmaynotapplytoyou.This
warrantygivesyouspeciclegalrightsandyoumayalsohave
otherrightswhichvaryfromstatetostate.
ThiswarrantycoversunitswithinthecontinentalUnited
States,CanadaandPuertoRico.
HaierAmerica,
Wayne,NJ07470
LIMITED WARRANTY
ENGLISH
PAGE 7
HaierAmerica,
Wayne,NJ07470
©2015HaierAmericaTrading,LLC.
IndoorModel#:AW09ES2VHA,AW12ES2VHA,
AW18ES2VHA,AW24ES2VHA,AW07LC2VHA,
AW09LC2VHA,AW12LC2VHA,AW18LC2VHA
IssuedDate:January2015
www.Haier.com
1 / 1

Haier AW12LC2VHA User manual

Category
Mobile air conditioners
Type
User manual
This manual is also suitable for

Haier AW12LC2VHA is a ductless air conditioner with a variety of features to keep you comfortable. It can cool, heat, and dehumidify your home, and its turbo mode can quickly reach your desired temperature. You can control the air conditioner with the included remote control or with your smartphone using the Haier Smart Air app. The AW12LC2VHA is also Energy Star certified, so you can save money on your energy bills.

Ask a question and I''ll find the answer in the document

Finding information in a document is now easier with AI

Ask the document