Planar SA2311W User manual

Category
TVs & monitors
Type
User manual

The Planar SA2311W is a high-performance 23-inch widescreen LCD monitor with full HD 3D functionality and NVIDIA 3D Vision certification. It features direct analog, digital, and HDMI signal inputs, allowing you to connect to a variety of devices. The monitor also has a space-saving, sleek cabinet design, height adjustable stand with tilt and swivel, and Kensington security slot for added security.

The Planar SA2311W is a high-performance 23-inch widescreen LCD monitor with full HD 3D functionality and NVIDIA 3D Vision certification. It features direct analog, digital, and HDMI signal inputs, allowing you to connect to a variety of devices. The monitor also has a space-saving, sleek cabinet design, height adjustable stand with tilt and swivel, and Kensington security slot for added security.

SA2311W
3D Ready Monitor
www.planar3d.com
Contents
Preface
.....................................................................................................................1
Installation
................................................................................................................4
Unpacking .......................................................................................................................................................................5
Introduction ............................................................................................................................................................... ....4
Features ....................................................................................................................................................................... ....4
Screen Position Adjustment .....................................................................................................................................8
Preparing The Monitor For Wall-Mounting .................................................................................................. ....6
Connecting Cables. ......................................................................................................................................................9
Settings for Stereoscopic 3D Use............................................................................... .................................. .....10
Lock Function. ..................................................................................................................................................... ........13
OSD Operation .............................................................................................................................................................14
Supported Timing ......................................................................................................................................................17
Warning.............................................................................................................................................................................1
Safety Precaution..........................................................................................................................................................3
Display Controls
....................................................................................................12
Front Panel Controls...................................................................................................................................................12
Technical Information
...........................................................................................16
Specifications..............................................................................................................................................................16
Troubleshooting
....................................................................................................18
Product Registration and Technical Support
....................................................19
The information contained in this document is subject to change without notice. This document contains
proprietary information that is protected by copyright. All rights are reserved. No part of this document
may be reproduced, translated to another language or stored in a retrieval system, or transmitted by any
means, electronic, mechanical, photocopying, recording, or otherwise, without prior written permission.
Windows is registered trademark of Microsoft Inc. Other brand or product names are trademarks of their
respective holders.
Preface
FCC Statement Warning
This equipment has been tested and found to comply with the limits for a Class B digital device, pursuant
to part 15 of the FCC Rules. These limits are designed to provide reasonable protection against harmful
interference in a residential installation. This equipment generates, uses, and can radiate radio frequency
energy, and if not installed and used in accordance with the instruction, may cause harmful interference
to radio communications.
However, there is no guarantee that interference will not
installation. If this equipment does
occur in a particular
television reception, which can cause harmful interference to radio or
be determined by turning the equipment
uraged to try to correct the
interference by one or more of
the following measures:
Reposition or relocate the receiving antenna.
Increase the separation between the equipment and the receiver.
Connect the equipment into an outlet on a circuit different from that to which the receiver is connected.
Consult the dealer or an experienced monitor technician for help.
Warning
Use only shielded signal cables to connect I/O devices to this equipment. You are cautioned that
changes or modifications not expressly approved by the party responsible for compliance could void
your authority to operate the equipment.
This device complies with part 15 FCC Rules. Operation is subject to the following two conditions(1) This
device may not cause harmful interference. (2) This device must accept any interference received,
including interference that may cause undesired operation.
1
off and on, the user is enco
Canadian DOC Notice
This Class B digital apparatus meets all requirements of the Canadian Interference-Causing
Equipment Regulations.
Cet appareil numérique de la classe B repecte toutes les exigences du Règlement sur le
matériel
Important Recycle Instruction:
Lamp(s) inside this product contain mercury. This product may contain other
electronic waste that can be hazardous if not disposed of properly. Recycle or dispose
in accordance with local, state, or federal Laws. For more information, contact the
Electronic Industries Alliance at WWW.EIAE.ORG
. For lamp specific disposal information
check WWW.LAMPRECYCLE.ORG.
Contains Mercury, Dispose of Properly
2
About Power Cable
Check first to make sure that the power cord you use is the correct type required for your area.
This monitor has a universal power supply that allows operation in either 100/120V AC or 220/240 V
Plug one end of the power cord to the AC Inlet, plug another end to a proper AC outlet.
For unit using at 120 V AC: Use a UL Listed Cord Set, Type SVT wire and plug rated 10 A/125 V.
For unit using at 220/240 V AC (outside of U.S.): Use a Cord Set consisting of H05VV-F cord and plug
the equipment will be installed.
Safety Precautions
Avoid placing the monitor, or any other heavy object, on the power cord to prevent it from fire or
Do not expose the monitor to rain, excessive moisture, or dust to avoid fire or shock hazard.
Do not cover the slots or openings of the monitor for proper heat dissipation.
Always put the monitor in a place where there is adequate ventilation.
For optimal viewing avoid placing the monitor against a bright background or where sunlight or other
Handle with care when transporting the monitor.
Do not touch the screen except when lightly cleaning it with a soft cloth.
Cleaning Your Monitor
Please carefully follow the guidelines below when cleaning the monitor.
Always unplug the monitor before cleaning.
Use a soft cloth to wipe the screen and cabinet front and sides.
AC voltage area. No user-adjustment is required.
rated 10 A, 250 V. The cord set should have the appropriate safety approvals for the country In which
electrical shock.
light sources may reflect on the face of the monitor. Place the monitor just below eye level.
3
For some individuals, prolonged use of a stereoscopic monitor may cause discomfort. Take a break
from stereo viewing if you sense eye fatigue or other symptoms. Individuals who are unaccustomed
to using stereoscopic 3D monitors may require a period of adaptation.
Introduction
Installation
Features
4
* 23 TFT Color LCD monitor
* 16:9 Widescreen
* Full HD 3D functionality
* NVIDIA 3D vision certified
* Recommended resolution: 1920 x 1080 @ 60Hz
* Direct analog signal input
* Direct digital signal input
* Direct HDMI signal input
* Auto adjustment function
* OSD user control
* Kensington security slot
* 100mm VESA mount
* Compact, space saving, sleek cabinet design
* Height adjustable stand with tilt and swivel
TM
Congratulations on your purchase of the SA2311W high performance LCD monitor. This 23-inch wide-
format monitor is 3D ready with full HD resolution for both professional and entertainment use.
Unpacking
User Guide
LCD Monitor
AC Power Cord
15-pin D-Sub Cable
DVI Cable
5
Please check that the following items are present when you unpack the box.
We recommend you save the packaging for future use.
SA2311W
3D Monitor
6
1. Lay the LCD monitor on a flat surface with the LCD screen face down.
To prevent the monitor from being scratched, put a soft cloth on the table.
2. Use a screw driver to release the four screws from the stand pedestal as below.
3. Take the stand away from the monitor head.
Preparing The Monitor For Wall-Mounting
4. Check the stability of the wall-mounting fixture.
7
5. The rear of this LCD display has 4 integrated 4 mm, 0.7 pitches threaded nuts.
Use the four holes (A), (B), (C), and (D) to attach the swing arm or other mounting fixture to the back of
the monitor with screws (not supplied).
6. Follow the instructions included with the mounting fixture to ensure that the monitor is safely attached.
The four threaded holes that are on the back of the panel are compliant with the VESA standard for
mounting flat-panel monitors.
7. Attach a swing arm or other mounting fixture.
Note: The wall-mount uses the 100mm x 100mm spacing standard.
Please use M 4mm x 10mm (L) Screw for this application.
A
C D
B
8
Screen Position Adjustment
In order to optimize the best viewing position, you can adjust the monitor as shown in the
figures below.
20
5
0
0
80 mm
30
0
30
0
Height adjust
Tilt
Swivel
9
Connecting Cables
To connect the monitor to your PC, please follow the steps as given below:
Steps
1.
1-1.Connect VGA Cable
1-2.Connect DVI Cable
1-3.Connect HDMI Cable
Connect one of the cables: VGA, DVI or HDMI.
Make sure both the monitor and computer are turned off.
Connect the blue VGA video cable to the computer.
Connect the white DVI cable to the computer.
Connect the black HDMI cable to the computer.
2. Connect power cord
Connect the power cord to the monitor, then to a properly grounded AC outlet.
3. Turn on the monitor and computer
Turn on the monitor first, then turn on the computer.
This sequence is very important.
4.
If the monitor still does not function properly, please refer to the troubleshooting section to
diagnose the problem.
1-1
1-1
2
A
2
1-21-3
VGA
VGA
1
-
2
DVIHDMI
DVI
1
-
3
HDMI
Note: There is also a audio jack labeled A which allows you to connect the external headphone
or speakers when the input source is HDMI.
10
Settings for Stereoscopic 3D Use
Below are the requirements for stereoscopic 3D viewing:
4. NVIDIA 3D Vision (or 3D Vision Pro) kit which includes 3D glasses, a wireless transmitter and
advanced software.
5. Professional software that supports OpenGL stereo or NVIDIA's 3D Stereoscopic drivers.
Alternatively, visit for a full list of supported games.www.nvidia.com/3dvision
1. Planar SA2311W 3D Ready Monitor with dual link DVI cable.
2. PC with compatible NVIDIA® graphics card. See
for compatible Quadro® cards
and drivers used for professional applications. See for full list of
supported cards for games. Install the latest version of the 3D Vision® USB driver for the appropriate
graphics card.
3. For professional applications, use either the 32-bit or 64-bit versions of Microsoft® Windows® XP,
Vista, Windows 7 or Linux pre-installed on your computer. For games, use either the 32-bit or
64-bit versions of Microsoft Windows Vista or Windows 7.
http://www.nvidia.com/object/quadro_pro_graphics_boards.html
www.nvidia.com/3dvision
For the Quadro graphics cards, go to the nVidia Control Panel and enable stereo
in the “Manage 3D Settings” tab.
When connecting the 3D Vision Ready monitor:
For boards with the stereo connector, select “On-board DIN connector
(with NVIDIA IR Emitter)” and plug in the 3 pin mini-din to 1/8” stereo cable
that came with your 3D Vision glasses kit.
For boards without the mini-din select Generic Active Stereo (with NVIDIA
IR Emitter).
Note: Make sure the display refresh rate is set at 110Hz or 120Hz.
11
Display Controls
Front Panel Controls
Icon
1
2
3
4
5
6
Power LED
Description
Auto adjust screen display .
Press 5 seconds to auto detect the input
source or manually select the input source.
Exit from the present OSD menu.
Backward selection of the OSD menu.
Decrease the value after sub-menu selected.
Forward selection of the OSD menu.
Increase the value after sub-menu selected.
Displays the OSD menu on the screen.
Selects the OSD sub-menu.
Turns on or off .the monitor
Lights up to indicate the power status.
1 2 3 4 5 6
AUTO / Exit
MENU
12
OSD Lock Function
Power Lock Function
OSD lock – all 4 buttons are locked except the “POWER” button.
press the “Menu” and buttons more than 10 seconds to “ ”
lock the OSD function.
Repeat this step to unlock the OSD.
The monitor will show the “OSD Lock” or “OSD Unlock messa
The monitor will show the “Power Lock or “Power Unlock
ge for 3 seconds and it will
for 3 seconds and it will disappear
disappear automatically.
automatically.
Only Power button is locked.
When monitor is in normal condition, hold “MENU” and “ ” button more than 10 seconds to lock
When monitor is in normal condition,
Repeat this step to unlock.
the power keys
function.
13
OSD
OSD Timeout
Adjusts how long OSD menu remains open.
Display
Display Mode
Expands image to full screen or 4:3.
Opticolor
Selects different color modes.
ECO
If on, sets the monitor to a decreased backlight
value.
Sharpness
OD
Adjusts clarity and sharpness.
Enhances gray level response time.
Item
Item
Content
Content
OSD Operation
Pressing the MENU button brings up the first level menu. This menu button is also used to enter the sub-
Item
Content
Picture
Brightness
Adjusts brightness.
Contrast
Adjusts contrast.
H. position
Adjusts picture's horizontal position.
V. position
Adjusts picture's vertical position.
Phase
Adjusts phase to reduce horizontal line noise.
Clock
Adjusts clock to reduce vertical line noise.
Color Temp
Adjusts to different color temperatures
(6500/7500/9300/User).
Auto Adjust
Automatically adjusts all image parameters to
optimal settings.
OSD menu .
14
Information
Item
Content
Content
Other Settings
Language
Select different languages of the OSD.
Reset
Input Select
Resets monitor to original settings.
Select the input source for VGA, DVI or HDMI.
Shows important information about the monitor.
15
Specifications
Technical Information
* All specifications are subject to change without notice.
Model Name Planar SA2311W
LCD Display
Display Type
23" TN Type LCD
Display Area
509.76(H)x286.74(V) mm
Input
Voltage 100-240Vac
Frequency
F
F
F
F
, 30KHz ~ 80kHz
, 30KHz ~ 138kHz
, 55Hz~76Hz
, 56Hz~120Hz
Operational Features
Display Colors 16.7M
Resolution 1920x1080 @ 60 Hz
Interface RGB
Input Connector VGA, DVI, HDMI
Physical Specification
Dimension (H x W x D) 546 x 400x 212 (mm)
Net Weight
7.08 kg
Power
Power Saving (Orange) <2 W
<1 W
Power on Consumption (Blue)
Power DC-Off (No Light)
55 W MAX.
Safety & EMI
Plug and Play
cTUVus, CCC, CB, FCC-B, CE
Supports VESA DDC2B functions
H
H
V
V
Temperature
Operating Temperature:
0 - 40 C
Storage Temperature:
-20 - 60 C
Operating Humidity:
20%-80%
Storage Humidity:
10%-90%
Humidity
VGA:
DVI:
16
Supported Timing
1 VESA 640 õ 48 0 31.469 59.941 25.175
2 MAC 6 4 0 õ 480 35 66.66 30.24
3 VESA 640 õ 48 0 37.861 72.809 31.5
4 VESA 640 x480 37.5 75 31.5
5 VESA 720 õ 40 0 31.469 70.087 28.322
6 VESA 800 õ 60 0 35.156 56.25 36
7 VESA 800 õ 60 0 37.879 60.317 40
8 VESA 800 õ 60 0 48.077 72.188 50
9 VESA 800 õ 60 0 46.875 75 49.5
10 MAC 832 x 624 49.722 74.55 57.28
11 VESA 1024 õ 768 48.363 60.004 65
12 VESA 1024 õ 768 56.476 70.069 75
13 VESA 1024 x 768 60.023 75.029 78.75
14 MAC 1152 x 870 68.681 75.062 100
15 VESA 1152 õ 864 67.5 75 108
16 CEA 1280 õ 72 0 44.955 59.94 74.176
17 VESA 1280 õ 800 49.702 59.81 83.5
18 VESA 1280 õ 960 60 60 108
19 VESA 1280 õ 1024 63.981 60.02 108
20 VESA 1280 x 1024 79.976 75.025 135
21 VESA 1360 õ 768 47.712 60.015 85.5
22 CVT 1440 õ 900 55.935 59.887 106.5
23 VESA 1440 x 900 70.635 75 136.75
24 CVT 1680 õ 1050 65.29 59.954 146.25
25 VESA 1600 õ 1200 75 60 162
26 CEA 1920 õ 1080 67.5 60 148.5
27 CVT-RB 1920 õ 1080 66.587 59.934 138.5
NVA-3D
Pixel rate
MHz
236.54
286.75
29
1920 x 1080
(3D mode)
30
1920 x 1080
(3D mode)
137.861 120
125.668 261.39
28
1920 x 1080
(3D mode)
113.721 100NVA-3D
NVA-3D 110
ResolutionNO.
H-frequency
KHz
V-frequency
Hz
17
Troubleshooting
Before sending your LCD monitor for servicing, please check the troubleshooting list below to
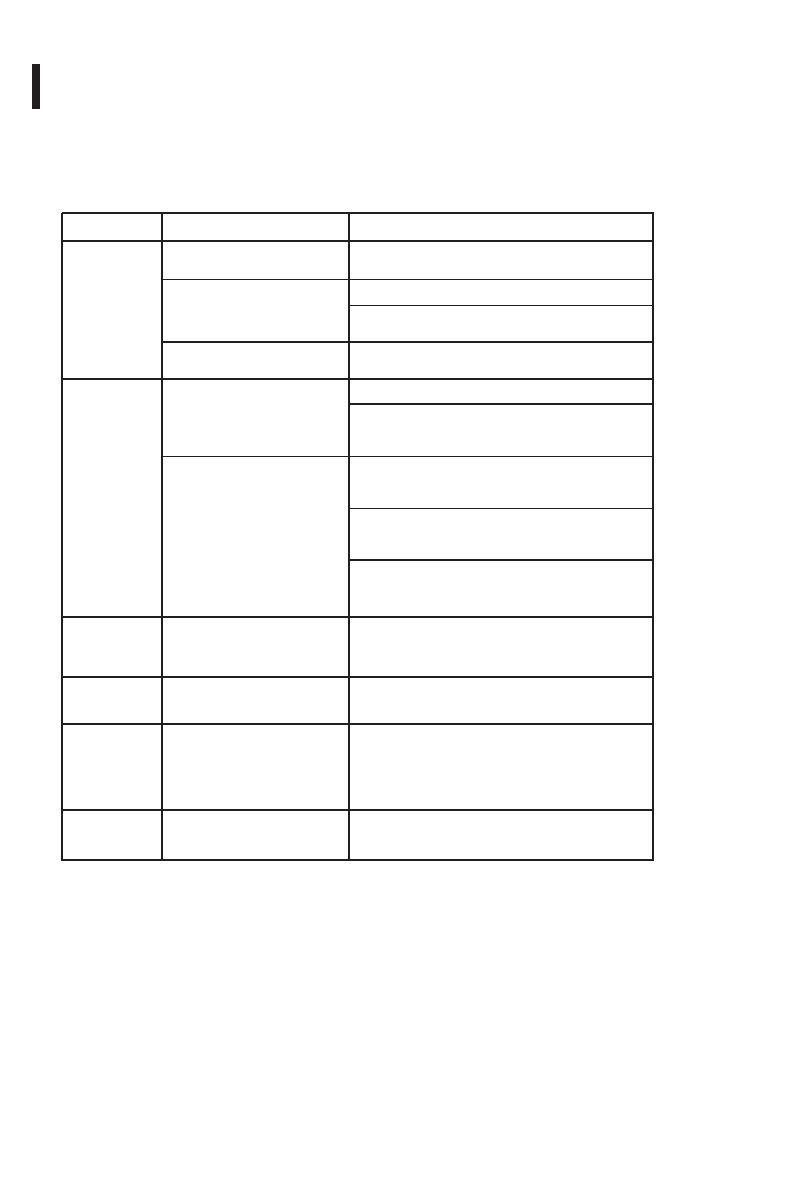
Problems Current Status Remedy
No Picture
LED ON
Using OSD, adjust brightness and contrast to
maximum or reset to their default settings.
LED OFF
Check the power switch.
Check if AC power cord is properly connected to the
monitor.
LED displays amber color
Check if video signal cable is properly connected to
the monitor.
Check if the power of computer system is ON.
Abnormal
Picture
Missing/
Stuck-on
Pixels
Geometric
Distortion
Unstable Picture
Check if the specification of graphics adapter and
monitor is in compliance which may be causing the
input signal frequency mismatch.
Display is missing, center shift,
or too small or too large in
display size
Using OSD, adjust RESOLUTION, CLOCK, CLOCK-
PHASE, H-POSITION and V-POSITION with non-
standard signals.
Using OSD, in case of missing full-screen image,
please select other resolution or other vertical refresh
timing.
Wait for a few seconds after adjusting the size of the
image before changing or disconnecting the signal
cable or powering OFF the monitor.
see if you can self-diagnose the problem.
LCD screen has spots or LCD
screen has bright spots
Screen not centered correctly
Screen has one or more lines
Visible signs of smoke or sparks
Cycle power on-off.
Pixel that is permanently off is a natural defect that
can occur in LCD technology.
Do not perform any troubleshooting steps.
Contact PLANAR immediately.
Reset the monitor to Factory Settings.
Perform monitor self-test feature check and determine
if these lines are also in self-test mode.
Check for bent or broken pins in the video cable
connector.
Horizontal/
Vertical
Lines
Safety
Related
Issues
18
  • Page 1 1
  • Page 2 2
  • Page 3 3
  • Page 4 4
  • Page 5 5
  • Page 6 6
  • Page 7 7
  • Page 8 8
  • Page 9 9
  • Page 10 10
  • Page 11 11
  • Page 12 12
  • Page 13 13
  • Page 14 14
  • Page 15 15
  • Page 16 16
  • Page 17 17
  • Page 18 18
  • Page 19 19
  • Page 20 20
  • Page 21 21
  • Page 22 22

Planar SA2311W User manual

Category
TVs & monitors
Type
User manual

The Planar SA2311W is a high-performance 23-inch widescreen LCD monitor with full HD 3D functionality and NVIDIA 3D Vision certification. It features direct analog, digital, and HDMI signal inputs, allowing you to connect to a variety of devices. The monitor also has a space-saving, sleek cabinet design, height adjustable stand with tilt and swivel, and Kensington security slot for added security.

Ask a question and I''ll find the answer in the document

Finding information in a document is now easier with AI