Page is loading ...

Villager Stove User Guide
Villager Stove User Guide
March 2015
BS EN 13240:2001 +A2:2004 CE
BK550 Rev07

Villager Stove User Guide
Arada Ltd
March 2015
Congratulations on the purchase of your new Villager stove!
More than 30 years of experience has been put into the development
of your stove to ensure ultimate performance and years of trouble free
use and enjoyment. Every detail of your stove has been carefully designed
and engineered which is why we are so condent in the reliability of our
products.
Your Villager stove is built to the highest standard of craftsmanship using
the best materials and the most modern equipment available. It is a highly
ecient and sophisticated piece of machinery and when properly installed
and operated it should provide a lifetime of heating satisfaction.
Should you have any questions about your stove which are not covered
by this manual, please contact the Arada retailer in your area, call our
technical support department on +44 (0)1297 35998 or visit our website
www.aradastoves.com which oers a wealth of information on how to care
for, and get the best from your stove.
Please ensure that you read these instructions in full and understand
them before operating your stove.
Arada has a policy of continuous product development and therefore
we reserve the right to amend specications without prior notice. Due to
printing cycles, items or options may be described before they are generally
available or after they have ceased. Please check with your retailer or
dealer if you are unsure about any aspect of your stove, its installation or
correct use.

Villager Stove User Guide
Contents
1 Warnings 1
1.1 Health and Safety . . . . . . . . . . . . . . . . . . . . . . . 1
2 Advice on fuel types 2
2.1 Wood . . . . . . . . . . . . . . . . . . . . . . . . . . . . . . 2
2.2 Solid fuel . . . . . . . . . . . . . . . . . . . . . . . . . . . . 2
3 Before using your stove 3
4 Air inlet controls 4
4.1 Single Door Stoves . . . . . . . . . . . . . . . . . . . . . . . 4
4.1.1 Primary air . . . . . . . . . . . . . . . . . . . . . . . 4
4.1.2 Airwash system / Secondary air . . . . . . . . . . . 5
4.2 Double Door Stoves . . . . . . . . . . . . . . . . . . . . . . 5
4.2.1 Primary air . . . . . . . . . . . . . . . . . . . . . . . 6
4.2.2 Airwash system / Secondary air . . . . . . . . . . . 6
5 Lighting your stove 7
5.1 Burning wood in a multi fuel stove . . . . . . . . . . . . . . 7
5.2 Burning solid fuels . . . . . . . . . . . . . . . . . . . . . . . 8
5.3 Burning wood in a dedicated wood burning stove . . . . . . 9
5.4 Warning - Fume / smoke emissions . . . . . . . . . . . . . 10
5.4.1 Refuelling on to a low re bed . . . . . . . . . . . . 10
6 Further information for all stove owners 11
6.1 Door glass . . . . . . . . . . . . . . . . . . . . . . . . . . . 11
6.2 Reduced burning . . . . . . . . . . . . . . . . . . . . . . . . 11
6.3 Periods of non-use (summer months) . . . . . . . . . . . . 11
6.4 Replacement parts . . . . . . . . . . . . . . . . . . . . . . . 12
6.5 Ash removal . . . . . . . . . . . . . . . . . . . . . . . . . . 12
6.6 Removing ash from a dedicated wood burning stove . . . . 13
7 Further information for multi fuel stove owners 13
7.1 Multi fuel or Flexifuel grates . . . . . . . . . . . . . . . . . . 13
8 How heat is delivered by your stove 14
8.1 Radiant heat . . . . . . . . . . . . . . . . . . . . . . . . . . 14
8.2 Convected heat . . . . . . . . . . . . . . . . . . . . . . . . 15
BK550 Rev07

Villager Stove User Guide
9 Ongoing care for your Villager stove 15
9.1 Adjusting the door hinges . . . . . . . . . . . . . . . . . . . 15
9.2 Liners / rebricks . . . . . . . . . . . . . . . . . . . . . . . 16
9.3 Throat plate . . . . . . . . . . . . . . . . . . . . . . . . . . 16
9.4 Fire door seal . . . . . . . . . . . . . . . . . . . . . . . . . . 16
9.5 Cracked glass . . . . . . . . . . . . . . . . . . . . . . . . . . 16
10 Further resources / reading 16
11 Guarantee 18
11.1 Guarantee . . . . . . . . . . . . . . . . . . . . . . . . . . . 18
11.2 Terms and Conditions . . . . . . . . . . . . . . . . . . . . . 18
11.3 General . . . . . . . . . . . . . . . . . . . . . . . . . . . . . 20
BK550 Rev07

Villager Stove User Guide
1 Warnings
Pure Petroleum coke or Bituminous house coal must not be burned
in this appliance. The use of these fuels will invalidate the appliance
guarantee.
Arada recommends the use of HETAS approved smokeless fuels which
have been deemed suitable for use on closed appliances, including multi
fuel stoves. If in doubt, contact The Solid Fuel Association, telephone:
0845 601 4406 / 01773 835400 or visit www.solidfuel.co.uk.
It is a legal requirement that the installation of all new or replacement,
wood or solid fuel heating appliances obtain building control approval from
your local authority. This can be done by using a qualied heating engineer,
aliated to a government approved competent persons scheme such as
operated by HETAS. If in doubt, contact HETAS Limited, telephone: 01684
278170 or visit www.hetas.co.uk.
A reguard conforming to BS 8423:2002 should be used in the presence
of children or elderly people. Do not use aerosol sprays or any other
ammable materials near the appliance when in use.
Arada Ltd will not be responsible for any consequential or incidental loss
or injury however caused.
Any manufacturer’s instructions must not be taken as overriding
statutory requirements.
Please Note: Classication of these appliances is for intermittent use.
Any further warnings in this document will be marked out
in a box such as this one. Ignoring the warnings could lead
to damage/injury to persons and/or property.
1.1 Health and Safety
Please consult health and safety guidelines for advice on handling heavy
and/or large items.
BK550 Rev07 1

Villager Stove User Guide
2 Advice on fuel types
Never burn plastics, household waste or liquid fuels in your
stove.
2.1 Wood
As a natural and renewable fuel, wood is the rst choice for burning,
however burning wood requires a little eort and planning.
Any type of wood is suitable (though hardwood is preferable) provided it
is well seasoned and has a moisture content below 20%. This usually
implies that the timber has been suitably stored to allow moisture to
evaporate for at least 9 months in the case of soft wood, and at least
24 months in the case of hard wood. We recommend that for general
burning, wood should be split into logs of no more than 100mm (4 inches)
diameter.
If, when burning wood, you see signs of sticky tar inside the appliance
or chimney, your wood is ‘green’or too wet and requires further seasoning.
An electronic moisture meter can be obtained in order to determine the
moisture content of your wood fuel.
Paper will burn successfully. Burn dry paper only or chimney damage
will occur.
Wet wood must not be used as this will greatly contribute
to the creation of tar and creosote which may, in extreme
cases, run down the chimney in liquid form. This will
seriously damage both the chimney and the appliance and
increase the risk of a chimney re.
2.2 Solid fuel
If you have chosen a multi/solid fuel stove this will have a cast iron
riddling grate which allows you to burn a wider variety of fuel types. It is
important to ensure that your fuel is intended for use in a stove, modern
stoves are designed for use with current cleaner burning and smokeless
fuels.
BK550 Rev07 2

Villager Stove User Guide
Arada recommends the use of HETAS approved smokeless fuels which
have been deemed suitable for use on closed appliances including multi
fuel stoves, these are:
• Anthracite
• Ancit™
• Coalite
Newame™
• Homere™
• Homere Ecoal™
• Homere Coals™
• Maxibrite™
• Phurnacite™
• Pureheat™
• Supertherm™
• Sunbrite™
• Taybrite™
For additional advice on fuels, please refer to The Solid Fuel Association
(www.solidfuel.co.uk) or HETAS (www.hetas.co.uk).
3 Before using your stove
Villager stoves are designed to be operated with the re door(s) closed
at all times, apart from refuelling (when alight) or cleaning (when cold).
Never leave the appliance unattended for an extended length of time
with the door(s) open.
Prior to lighting the stove for the rst time, please check with the
installer that:
• Installation and all building work is complete. (Refer to the installation
guide.)
• The chimney is sound, has been swept and is free from obstruction.
• Building Regulations and any local by-laws have been followed during
installation.
• All rebox liner panels and throat plate are in place.
• The chimney draw has been checked and is within specication
(between 0.1mb to 0.2mb, or 10-20 pascals). This ensures your stove
will operate predictably and eciently.
• A Carbon Monoxide detector is correctly installed in the same room
as the appliance.
BK550 Rev07 3

Villager Stove User Guide
Ensure that you have read and understood these instructions before
lighting the re.
Our YouTube channel www.youtube.com/user/aradastoves features a
collection of videos designed to help you get the best from your Villager
stove.
Always wear suitable protective re gloves when refuelling your stove,
such as the Arada glove supplied with your stove.
We recommend that you light a small re for the rst few days of use
to cure the paint and allow the castings to relax. During this process the
paint surface may smoke briey, and you may smell a slight odour for an
hour or so. The vapour is harmless and should not be confused with fume
emissions, however, it is advisable to keep the area well ventilated until
the vapour disperses.
You may hear your stove produce clicking or ticking noises whilst it
heats up or cools down. This is completely normal and is produced by the
expansion and contraction of the steel components in your stove when its
temperature changes.
4 Air inlet controls
4.1 Single Door Stoves
Your stove has two air inlet controls. These are located either on the
stove body or the stove door.
The primary air inlet provides under draught to the base of the re
chamber and the airwash system (secondary air) provides overdraught
and airwash jets. The exact controls may dier from those illustrated in this
manual but will work in the same way.
4.1.1 Primary air
Primary air enters the appliance through the inlets near to the bottom
of the re door. Your stove has a control knob to adjust the ow of the
primary air.
BK550 Rev07 4

Villager Stove User Guide
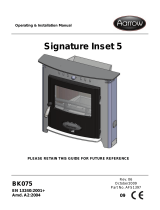
Figure 1: Single door stove air inlet controls.
Sliding the knob to the right will increase the amount of air intake to the
stove, as shown in position 4 (in gure 1). To decrease, push the slider to
the left, as shown in position 3 (in gure 1).
4.1.2 Airwash system / Secondary air
The airwash/secondary air inlet has an internal sliding plate with slots,
housed in a cover plate, and is located either above or at the top of the
re door.
Sliding the control knob to the right as far as it will go, achieves the fully
open position, see position 2 (in gure 1). Sliding it to the left will shut o
the air inlet slots as shown in position 1.
4.2 Double Door Stoves
Your stove will have three or four air inlet controls. These are located
either on the stove body or the stove door(s).
The primary air inlet provides under draught to the base of the re
chamber and the airwash system (secondary air) provides overdraught
and airwash jets. The exact controls may dier from those illustrated in this
manual but will work in the same way.
BK550 Rev07 5

Villager Stove User Guide
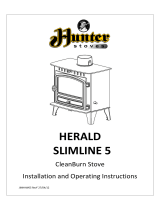
Figure 2: Double door stove air inlet controls.
4.2.1 Primary air
Primary air enters the appliance through the control(s) found near to
the bottom of the re door. Your stove has control knob(s) to control the
primary air which slide left to right.
Sliding the knob(s) open (inwards) will increase the amount of air intake
to the stove, as shown in position 4 in gure 2. To decrease, push the
slider(s) closed (outwards), as shown in position 3 (in gure 2).
4.2.2 Airwash system / Secondary air
The airwash/secondary air inlet has an internal sliding plate with slots,
housed in a cover plate, and is located either above or at the top of the
re door.
Sliding the control knob(s) inwards as far as they will go, achieves the
fully open position, see position 2 in gure 2. Sliding them outwards will
shut o the air inlet slots as shown in position 1.
BK550 Rev07 6

Villager Stove User Guide
5 Lighting your stove
5.1 Burning wood in a multi fuel stove
When wood is burnt it is in fact the wood gas that burns and this requires
a good supply of air coming from above the fuel. For this reason we will
use all the air inlets while igniting the stove, but will then reduce this to air
coming from the airwash system and over draught. As much as 40% of
the heat from burning wood is obtained from secondary combustion and
this can be severely hampered by air entering the re box from below the
fuel via the primary air inlet control.
1. Multi fuel stoves need the grate system set to its wood burning
position using the supplied operating tool as follows:
On stoves with a riddling lever
at the front of the stove body,
push the control inwards.
On stoves with a riddling lever
to the side of the stove, lever
the control upwards.
2. Set the re by using scrunched up newspaper and placing a layer of
dry kindling wood on top of this. The use of two or three re lighters
may assist in lighting the kindling.
3. Fully open your air control(s) and light the re.
4. After the kindling has caught light, you should almost close the re
door leaving it ajar by about 20mm. This will aid ue draw during
the initial lighting of the re.
5. The ue temperature and draw should be established after ve
minutes, and the kindling reduced to form an ember bed. Carefully
load the stove with well seasoned wood and fully close the re door.
BK550 Rev07 7

Villager Stove User Guide
6. After ten to fteen minutes, close the primary air control and regulate the
airwash system to control the burn rate and maintain clear glass, typically
by reducing to approximately half open.
5.2 Burning solid fuels
Solid fuel burns best with its air supply for combustion coming from
underneath the fuel. To achieve this the burn will be controlled by the
primary air control (see section 4 on page 4). This allows you to control
the ow of air underneath the grate. Riddling the stove occasionally will
also help to ensure that burnt fuel does not prevent the supply of air from
reaching the re.
Please do not attempt to burn solid fuels in a dedicated
wood burning stove. To burn solid fuel, your stove must
have a cast iron grate to withstand the higher temperatures
involved. To do so could damage your stove and will void
your warranty.
1. To begin, set your stove riddling grate to its solid fuel setting as
follows:
On stoves with a riddling lever
at the front of the stove body,
push the control inwards.
On stoves with a riddling lever
to the side of the stove, lever
the control downwards.
2. Set the airwash / primary air slider to about one quarter open and
the primary air slider fully open (see section on Air inlet controls on
page 4).
3. Light as with wood fuel (see steps 2, 3 and 4 on the preceding page),
with kindling and re lighters.
BK550 Rev07 8

Villager Stove User Guide
4. Once ue draw has been established, after about ve minutes,
carefully load the stove with fuel and close the door.
5. When the re is well alight regulate the burning rate by controlling
the primary air inlet control.
6. The airwash should be opened suciently to keep the door glass clean.
Whilst burning solid fuel it can be benecial to occasionally riddle the
grate bars so any burnt fuel will fall between the grate bars into the ash pan
below. This will ensure a good under draught is maintained. This should
be done with the supplied operating tool whilst wearing protective gloves.
5.3 Burning wood in a dedicated wood burning stove
Villager wood burning stoves are tted with liners to both the sides and
base of the stove. Wood fuelled res burn best on a bed of ash and with
air for combustion being introduced from above the ame.
The liners are provided to insulate the stove and allow a more consistent
heat output.
Cracked liners do not need replacing as long as they still remain in situ.
However, a crumbling liner or one which does not remain in situ should be
replaced.
BK550 Rev07 9

Villager Stove User Guide
5.4 Warning - Fume / smoke emissions
Warning: Properly installed, with a suitable ue or chimney,
operated and maintained correctly, this appliance will not
emit fumes into the dwelling.
Occasional fumes when de-ashing and refuelling may occur.
However, persistent fume emission is potentially dangerous
and must be investigated by a HETAS registered installer.
Stop using the appliance if you smell fumes or see
smoke escaping.
If fume emission does persist, the following immediate
actions should be taken:
• Open doors and windows to ventilate room.
• Let the re die or extinguish and safely dispose of fuel
from the appliance.
• Check for ue or chimney blockage, and clean if
required.
Seek expert advice from your HETAS registered installer. Do
not attempt to re-light the re until the cause of the fume
emission has been identied and corrected.
5.4.1 Refuelling on to a low re bed
If there is insucient burning material in the rebed to light a new fuel
charge, excessive smoke emission can occur. Refuelling must be carried
out onto a sucient quantity of glowing embers and ash that the new fuel
charge will ignite in a reasonable period. If there are too few embers in the
re bed, add suitable kindling to prevent excessive smoke
BK550 Rev07 10

Villager Stove User Guide
6 Further information for all stove owners
6.1 Door glass
The door glass should remain clear during normal burning. However
under certain conditions, such as burning at a low rate, using damp wood
or overnight burning, the glass may become somewhat blackened. To
remedy this, operate the appliance at a fast rate. Alternatively when
the stove is cold, open the door and clean the inside face of the glass
with a damp cloth or with glass cleaner (available from stove shops and
www.aradastoves.com).
6.2 Reduced burning
When wood is burnt slowly in a closed appliance, it produces moisture
and tar, which will create condensation and deposits in the chimney. This
eect can be minimised by burning hard for a short period, fteen to
twenty minutes twice a day.
To avoid chimney problems your appliance should not be burnt at a
reduced burn rate without a period of fast burning. Fast burning is when
the stove is burnt with a ’lively ame’ and a higher temperature. We also
advise against stoking the re with wood and reducing the air intake(s)
before leaving the stove to extinguish (perhaps when retiring to bed) as
this can lead to a cooling of the stove and ue also resulting in incomplete
combustion and sooty deposits.
Over ring and chimney res
DO NOT over re your appliance. Firing the stove at
maximum for prolonged periods may result in over-ring.
If the chimney connector or casing glows red the appliance
is being over-red and this may result in a chimney re.
6.3 Periods of non-use (summer months)
Please ensure that your stove is left clean and moving components are
well lubricated with a water repelling corrosion inhibitor for the summer
months (during periods of prolonged non-use). If possible store the throat
BK550 Rev07 11

Villager Stove User Guide
plate outside of the stove. Check all moveable components at regular
intervals, to ensure they are moving freely.
Allow air movement through the stove by opening the airwash and
primary air inlet control(s) to about half way, open or leave the door ajar.
This will allow a free ow of air through the appliance thus preventing
moisture and condensation forming inside the stove and chimney. This
preventative maintenance will ensure your stove stays in the best condition
for the coming winter months.
6.4 Replacement parts
As a leading manufacturer we are conscious of being able to support all
our stove users with the supply of spare parts to ensure your continued
enjoyment and warmth from your Villager stove from Arada. You can
nd a complete list of spares and consumables such as liners, grate bars
and throat plates as well as items to enhance its visual appearance and
eciency such as Arada anthracite stove paint and rope kits.
All replacement parts or accessories can be ordered from
your local stove dealer or online direct from Arada at visit
www.aradastoves.com/support.
It is worth noting that the tting of non-ocial Arada parts to your stove
may invalidate its guarantee.
6.5 Ash removal
The appliance will require ash to be removed periodically but an ash bed
of approximately 20mm (3/4 inches) should be maintained when burning
wood.
The ash pan should be emptied when the level of ash reaches the top
of the ash pan. On no account should the ash be allowed to build up to
touch the underside of the grate bars, as this will greatly reduce the life
span of the grate.
BK550 Rev07 12

Villager Stove User Guide
To remove ash use the supplied operating tool:
• Open the door of the stove, pausing briey when ajar so as to allow
the re to adjust to the increased air supply.
• Put the fork end of the operating tool into the slots of the ash pan
and remove from the ash pit chamber.
• Empty the ash into a suitable container and replace the ash pan into
the stove, withdraw the operating tool and close the re door.
Warning: The ash can be very hot. Care must be taken not
to burn hands or household objects with falling embers.
Empty only into a metal container. Even if the ash appears
cold, red-hot embers may be concealed and could easily
start a re or cause an injury.
6.6 Removing ash from a dedicated wood burning stove
In dedicated wood burning stoves the ash should only be removed when
the wood has reduced to embers. To remove the ash, carefully rake the
glowing embers to one side of the re bed and remove the ash into a
suitable metal ash container. This ash will be hot and the ash carrier may
also become hot. Care must be taken that these do not come into contact
with combustible materials until they are no longer hot. Repeat for the
other side of the re bed.
7 Further information for multi fuel stove
owners
7.1 Multi fuel or Flexifuel grates
The grate in your Villager stove comprises of a series of reciprocating
cast iron bars seated on a pivoted comb. These should come
pre-assembled in your new stove.
All bars in the grate are identical, but every other bar is turned 180
degrees, with the ends of the bars marked "H" sitting on the high sections
of the comb, and the ends marked "L" sitting on the low sections.
BK550 Rev07 13

Villager Stove User Guide
The riddling lever, either on the side or front of your stove, can be
operated with the stove operating tool to riddle ash into the ash pan below.
Only riddle the stove with the door closed unless your stove requires you
to open the door to access the riddling mechanism. Stop riddling once red
embers begin to fall into the ash pan.
After extended use it may be necessary to replace some of the grate
bars. Periodic inspection of the bars is recommended and any damaged
bars should be replaced. Also check for obstructions that may prevent the
operation of the riddling mechanism.
8 How heat is delivered by your stove
8.1 Radiant heat
All Villager stoves radiate heat into the room. The radiated heat is most
intense at the front of the stove and less intense the further you move
away from the stove.
This radiated heat is delivered as infrared rays which heat the objects
they strike. It is then these objects (such as the chimney breast, hearth
etc.) which heat the surrounding air.
BK550 Rev07 14

Villager Stove User Guide
8.2 Convected heat
Air immediately adjacent to the stove is heated as a result of contact
with its hot surfaces. This air then rises being replaced by cooler air which
is then heated and rises again.
This creates a circuit or ow of air referred to as a convection current,
which helps to distribute heat around the room in which the stove has
been installed.
9 Ongoing care for your Villager stove
The following items should be checked on your stove at regular intervals
to help ensure that the safe and ecient use of your stove continues for
many years to come. This should only be done when the stove is unlit and
cold.
9.1 Adjusting the door hinges
Once the appliance has been under re for a period of time the re
door may appear to have moved out of alignment with relation to the door
aperture or catch. This is quite normal and due to the settling of the
casting.
Doors attached with two hinges xed to the body with screws can
be re-aligned as follows:
When the appliance is cold, open the re door so that it is at right angles
to the front of the stove and then lift the re door up o its hinges.
Gently tap the hinge pins to compensate for the misalignment and then
re-t the door and check to ensure it now sits square to the body; if not
repeat the above steps.
If the re door needs to be raised, please follow the instructions
below:
When the appliance is cold, open the re door so that it is at right angles
to the front of the stove and lift the re door up o the hinges.
BK550 Rev07 15

Villager Stove User Guide
Drop one washer on the top and bottom hinge pins. Fit the door and
check. Repeat again if necessary.
9.2 Liners / rebricks
The stoves liners (also known as rebricks) may become cracked after
long periods of heavy use or after being knocked by the loading of fuel
or a poorly aimed re poker. If the liners are still staying in situ and are
able to support the throat plate correctly there is no need to replace them.
Cracked liners will not in themselves aect the performance of the stove.
9.3 Throat plate
The throat plate should be removed from the stove and checked once a
month and any accumulated deposits should be cleaned o. This is best
done with a brush. After a period of time the throat plate may begin to
corrode or distort and will require replacing. A replacement throat plate
can be sourced from your dealer or at www.aradastoves.com.
9.4 Fire door seal
The rope seal around the edges of the main re door should also be
checked. Look for signs of fraying, peeling away or the ends not meeting.
If the rope is unable to create a good seal with the stove body it should be
repaired/replaced. A poor seal will decrease your ability to control the burn
rate and its eciency whilst leading to an increase in heat lost through the
ue.
9.5 Cracked glass
It is not recommended to operate the stove with cracked glass; this
can lead to over ring due to air leaking into the rebox and it may fail
completely leading to personal injury or a re. You should discontinue use
of your stove until it has been repaired. You can source replacement glass
kits from your stove dealer or online at www.aradastoves.com
10 Further resources / reading
Once again we would like to thank you for buying your Villager stove.
When you buy a Villager stove, you are not only buying a rst class
BK550 Rev07 16
/