Miele F 1411 Vi Owner's manual

Type
Owner's manual
This merging kit should be used for
side-by-side installation of the following
models:
K 18x1 Vi, K 19x1 Vi
F 14x1 Vi, F 18x1 Vi, F 19x1 Vi
KF 18x1 Vi, KF 19x1 Vi
KWT 16x1 Vi
Before you begin
Please read all instructions in this
manual, as well as the manual which
accompanied your machine, before
installation and use.
This appliance is top-heavy and
must be secured to prevent the
possibility of tipping forward.
Keep the doors closed until the
appliance is completely installed
and secured per the installation
instructions.
To reduce the risk of injury or
damage to the product, two people
should be used for installation.
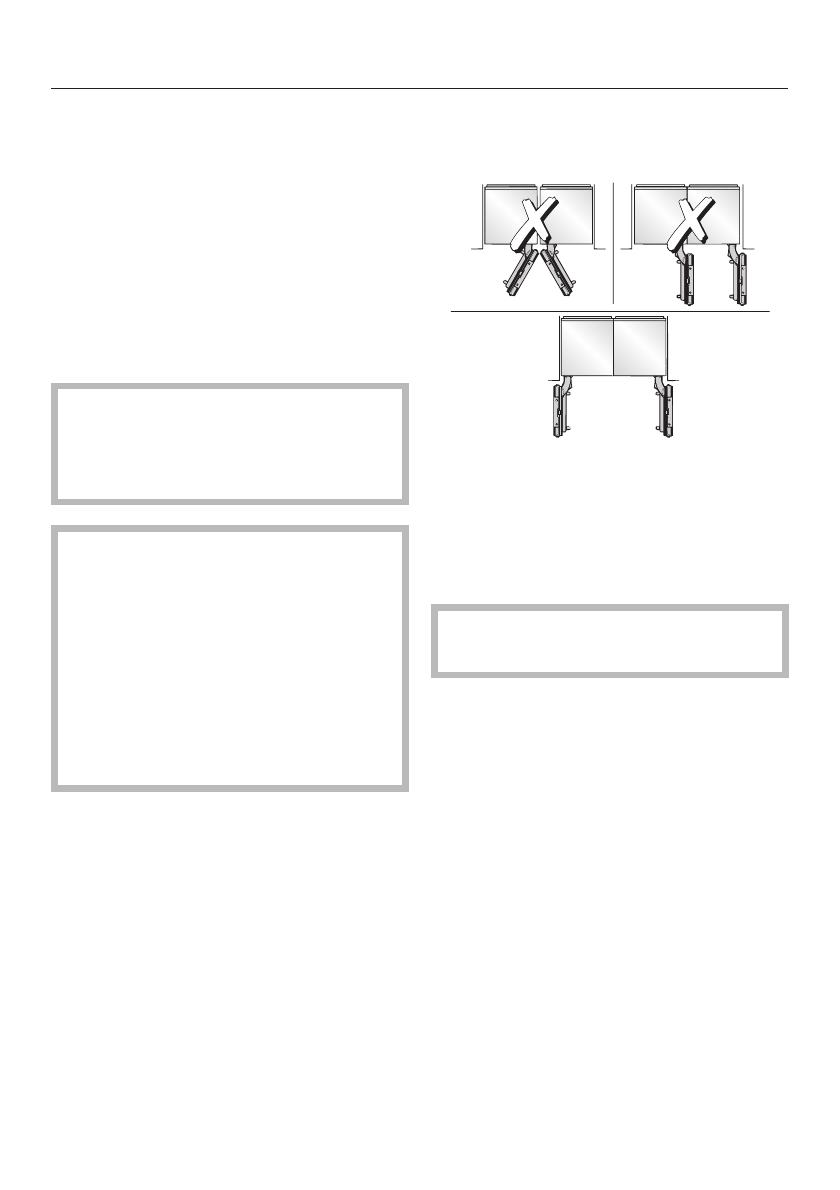
Side-by-side
. . . without partition
If the appliances are installed directly
next to each other (without a partition),
they need to be attached together. A
heating mat must also be installed. This
will help avoid condensation and
prevent damages.
Installing the heating mat will
increase energy consumption.
en
3
. . . with partition
The minimum thickness of the partition
is
5
/
8
" (16 mm).
If there is a partition with a thickness
from
5
/
8
" (16 mm) to 6
5
/
16
" (160 mm)
between the adjacent appliances, then
each appliance should be individually
installed within its own niche using the
mounting accessories included.
In this case, you will only need the
heating mat from the "Merging Kit" to
avoid condensation and prevent
damages.
Installing the heating mat will
increase energy consumption.
When finding the dimensions for the
partition in model 4, note the thickness
of the custom door panels and the door
handles. This will prevent damage to
the doors if they are opened at the
same time.
Required accessories and
tools
Tools
T 20 Torx screwdriver
T 20 Torx bit + magnetic holder
Adjustable wrench
Other
Various bit sizes, suitable for material
Piece of thin material (for example,
linoleum) to protect the floor from
damage
Adhesive tape
en
4
Prepare the appliances
^
Place the appliances next to each
other in the intended configuration.
^ On the handle side of the housing,
remove the side attachment plates.
^
Take the hinge halves from the
side-by-side kit and screw them to
both appliances.
^ Screw the side plates to both
appliances. Check the position of
both appliances!
Installing the heating mat
The heating mat has to be secured on
the right side of the left-standing
appliance.
^
Insert pins through the prepared
holes a.
en
5
^
Pull the protective strip off of the
adhesive tape b.
^
Insert the pins into the upper holes,
while keeping the heating mat away
from the bottom of the appliance c.
^
Press on the heating mat from top to
bottom, and insert the lower pins into
the holes d.
^ Loosen the screws from the
connection box e.
^
Open the connection box f.
^
Attach the cable g.
^
Close the connection box lid h.
^
Secure the connection box screws
i.
^
Loosen the screws on the rear side of
the appliance j. Do not unscrew
completely.
^ Hang the cable cover by its hinge on
the heating mat and, from below,
push into the screws k.
^ Tighten the screws l.
en
6
Connect the appliances
^
Push the appliances together until
the hinge halves interlock.
^ Insert the pins into the hinges.
^
Push the appliances together at the
front as far as possible.
^ Once the appliances have been
pushed together, insert the metal
bracket into the upper and lower
plates. Use a tool to push the bracket
in all the way.
Now attach the appliance
combination to the installation niche.
For instructions, refer to the
installation instructions for each
appliance.
^
Insert the cover strip into the seam
between the appliances.
en
7
  • Page 1 1
  • Page 2 2
  • Page 3 3
  • Page 4 4
  • Page 5 5
  • Page 6 6
  • Page 7 7
  • Page 8 8
  • Page 9 9
  • Page 10 10
  • Page 11 11
  • Page 12 12
  • Page 13 13
  • Page 14 14
  • Page 15 15
  • Page 16 16
  • Page 17 17
  • Page 18 18
  • Page 19 19
  • Page 20 20

Miele F 1411 Vi Owner's manual

Type
Owner's manual

Ask a question and I''ll find the answer in the document

Finding information in a document is now easier with AI