
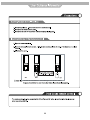
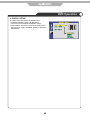
15” Wide screen LCD TV
with DVB & DVD
Model No.: C 1573F

LCD Screen
Although the LCD screen is made with high-precision technology and
99.99% or more of the pixels are effective, black dots may appear or
bright points of light (red, blue or green) may appear constantly on the
LCD screen and is not a malfunction.

Safety Precautions
Caution 1
Safety Information 2
User Guidance Information
3seirosseccA/)weiVtnorF(traphcaefosemaN
Names of each part(Back View) 4
5
snoituacerPnoitallatsnI/
Installing an Antenna
Remote control 6~7
8lortnocetomeresuotwoH/snoituacerP
Connection
9epaToediVgnihctaW/snoitcennoCRCV
01VTelbaCgnihctaW/snoitcennoCxoBpoT-teSVTelbaC/etilletaS
11DVDehtgniyalP/snoitcennoCDVD
21CPsaesuotwoH/snoitcennoCCP
Basic Use
Application
41ecruostupnignitceleS/VTDCLehtgnirewoP
CONTENTS
CustomizingTV SETTINGS 16
18
Customizing the PICTURE Settings
Customizing the SETUP Settings
Customizing the EXTRAS Settings
19
20
21
DVD operation
22
Disc care
26
Customizing the SOUND Settings
Trouble shooting 27
Specifications 28
Maintenance and Service
31noitcnennoCreifilpmAlatigiD/snoitcennoCrotinoMdnareifilpmAoiduA

The lightening flash with arrowhead symbol, within an equilateral triangle is
intended to alert the user to the presence of un-insulated "dangerous voltage"
within the products enclosure that may be of sufficient magnitude to constitute a
risk of electric shock to the persons.
The exclamation point within an equilateral triangle is intend to alert the user to
the presence of important operating and maintenance (servicing) instructions in
the literature accompanying the appliance.
Correct disposal of this Product
This unit is a “CLASS 1” laser product. This product uses a visible laser
beam which could cause hazardous radiation exposure. Ensure the
recorder is operated as instructed. Do not remove any covers or look into
the DVD drawer opening whilst power is applied. Do NOT modify or adjust
any controls that may affect laser emissions. Should the appliance become
faulty consult a qualified technician.
This appliance complies with European Safety and Electrical
directives
“Correct Disposal of Product”
Produced after 13 August 2005. Waste electrical should not be disposed of with household
waste. Please recycle where facilities exist. Check with your local authority or retailer for
recycling advice.
Caution
Caution
1 1

To ensure reliable and safe operation of this equipment, please read carefully all the
instructions in this user guide, especially the safety information below.
Electrical safety
The TV set should only be connected to a mains supply which matches that stated on
the label on the mains adaptor
To prevent overload, don't share the same mains supply socket with too many other
items of equipment.
- Do not place any connecting wires where they may be stepped on or tripped over.
- Do not place heavy items, which may damage the leads, on them.
- Hold the Mains plug, not the wires, when removing from a socket.
- During a thunderstorm or while leaving the TV for long periods, disconnect the
aerial (if outdoor) and mains adaptor from the supply.
- Do not allow water or moisture to enter the TV or mains adaptor. Do NOT use in
wet or moist areas such as Bathrooms, steamy kitchens or near swimming pools.
Pull the plug out immediately, and seek professional help if:
- the mains plug or cable is damaged
- liquid is spilt onto the set, or if it is accidentally exposed to water or moisture
- anything accidentally penetrates the ventilation slots
- the set doesn't work normally.
- Do NOT remove the safety covers. There are no user serviceable parts inside. You
may invalidate the warranty. Qualified personnel must only service this apparatus.
- To avoid battery leakage, remove exhausted batteries from the remote control
handset, or when not using for a long period.
- Do NOT break open or throw exhausted batteries on a fire.
Physical safety
Do NOT block ventilation slots in the back cover. You may place the TV in a cabinet,
but ensure at least 5cm (2") clearance all around.
Do NOT tap or shake the TV screen, you may damage the internal circuits. Take good
care of the remote control, do not drop.
To clean the TV use a soft dry cloth. Do NOT use solvents or petrol based fluids. For
stubborn stains, you may use a damp soft cloth with dilute detergent.
Safety Information
Safety Information
2 2

Remote Control Window
(keep clear)
Power(on/standby)
LED Indicator
Buttons for DVD operation
Insert disc according to the label
next to the disc slot
Buttons For TV operation
Play the next track or chapter
Play the previous track or chapter
Eject the disc
Play the disc playing
Pause the disc playing
Stop the disc playing
Power cable
USER GUIDE
QUICK START GUIDE
QUICK START GUIDE
USER GUIDE
Warranty Card
Warranty Card
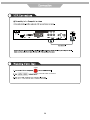
3 3

AC POWER IN
1 5
HEADPHONE OUT
9
HDMI
2
VIDEO
6
RF
10
VGA(D-Sub 15PIN)
3
AUDIO IN (R/L)
7
COAX OUT
YPbPr
11
Common interface
12
PC AUDIO IN
8
SCART
4
1 11
12
2 3 4 5 6 7 8 9 10
DVD
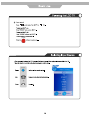
Power Switch:
Turn on the AC power.
COAX
out
Common Interface
YPb
Pr
POWER ON/OFF jack
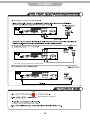
4 4

8
8
75mm
Press the Function button on the remote control to display the input source menu, press / button to select TV,
then press button to confirm. Then you can receive the signal.
COAX
out
Common Interface
YPb
Pr
Installing an Aerial
5 5

STANDBY
Turn the TV on/standby.
FUNCTION
Press to display the input source menu.(see page 14)
OK
+ +
123
456
789
0
RECALL
FUNCTION
STANDBY
PROGVOL
PICTURE
SOUND
MENU EXIT
QUICK START MUTE
EPG
SUBTITLE
TEXT HOLD SLEEP ASPECT
ANGLE AUDIO
INFOFAV
SETUP
ZOOM DVD-MENU
Colour buttons: short cuts-follow the coloured links in
the text.
PICTURE: Select the picture mode.
SOUND: Select the sound mode.
EPG: To show the Electronic Program Guide during
no-menu state only.
SUBTITLES: To switch the dialogue at the bottom of
the screen.
Cursor left/right/up/down: Cursor buttons used in
menus.
OK: CONFIRM BUTTON for menu.
Press OK to show channel list.
MENU: System setup menu.
QUICK START: To tune in your TV.
FAV: Means favorite, to display the favorite channel
list defined by you.
EXIT: Exit the OSD menu.
MUTE: Mutes the Audio.
INFO: Means information, to display the current chan-
nel you are viewing.
VOL+/-: Adjust the volume.
PROG+/-: Scan through channels.
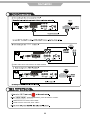
6 6

OK
+ +
123
456
789
0
RECALL
FUNCTION
STANDBY
PROGVOL
PICTURE
SOUND
MENU EXIT
QUICK START MUTE
EPG
SUBTITLE
TEXT HOLD SLEEP ASPECT
ANGLE AUDIO
INFOFAV
SETUP
ZOOM DVD-MENU
0-9
Choose channel directly. Number buttons for DVD.
RECALL: Return to the previous channel viewed.
TEXT: Turn off/on the Teletext display.
HOLD: Hold or carry on the current subpage.
SLEEP: Standby timer.
ASPECT: Press to change the display mode of the -
screen.
SETUP: DVD setup menu
ZOOM: adjust picture size in DVD mode.
DVD-MENU : DVD play list/Disc menu.
: DVD fast forward.
: DVD fast reverse
: DVD next chapter.
: DVD previous chapter.
: load/eject DVD disc.
: play/pause DVD program.
: stop DVD program.
ANGLE: Select DVD picture angle.
AUDIO: To select audio language.
7 7

Use the correct batteries to avoid damage to the remote control.
8 8

, press OK button to comfirm.
COAX
out
Common Interface
YPb
Pr
9 9

, press OK button to comfirm.
COAX
out
Common Interface
YPb
Pr
COAX
out
Common Interface
YPb
Pr
YPbPr cable can be used if there is an YPbPr terminal.
COAX
out
Common Interface
YPb
Pr
YPbPr
If YPbPr has been connected, select “YPbPr”.
YPbPr
10 10

, press OK button to comfirm.SCART
SCART
YPbPr
YPbPr cable can be used if there is an YPbPr terminal.
If YPbPr has been connected, select “YPbPr”.
If HDMI has been connected, select “HDMI”.
COAX
out
Common Interface
YPb
Pr
COAX
out
Common Interface
YPb
Pr
COAX
out
Common Interface
YPb
Pr
SCART
YPbPr
11 11

COAX
out
Common Interface
YPb
Pr
, press OK button to comfirm.
VGA
12 12

Connection
Connecting to the Digital Amplifier
Digital Amplifier Connections
<Digital Amplifier>
Coax Cable
Headphone Connections
Connecting to the headphone
COAX
out
Common Interface
YPb
Pr
COAX
out
Common Interface
YPb
Pr
13 13

FUNCTION
14 14

EXTRAS MENU:
Allows you to set up a variety of lock/time and setup options.
SETUP MENU:
Allows you to setup a variety of setup options.
TV SETTINGS MENU
Allows you to search channels and set up a variety of channel options.
Allows you to customize the aound options and effects.
Use the and buttons to select your main menu option.
EXIT
MENU
15 15

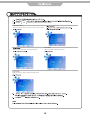
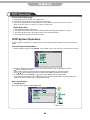
DTV Manual Scan Press button to enter the submenu.
Press or button to select a channel
and press OK button to start search.
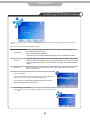
Application
Customizing the TV Settings
The TV SETTINGS menu includes the following options :
Auto Scan Press and buttons to select the Country, and press and buttons
to select “Start”, and press OK button to start auto tuning.
Use the and buttons to select the TV SETTINGS menu(as the picture above), press button to enter the
menu.
16 16

Delete: Select a channel and press the red rectangular button on the remote control, Delete will appear on
the right of the program edit menu next to the channel you have chosen. Press the red rectangular
button again to confirm the delete, the channel will be deleted. However if you decide not to continue
to delete press the menu button to quit.
Rename: Select a program, and press GREEN button, then you can use and buttons to select the
position of the program’s name you want to change, and press and buttons to change the
character, press or button to confirm the change. Press menu to exit and it will automatically
save the current setting.(It can only rename ATV program.)
Move: Select a program, and press YELLOW button, then you can use and buttons to change the
position of the program, press YELLOW again to confirm the change. Press menu to exit and it will
automatically save the current set.
Skip: Select a channel and press the blue rectangular button to label the channel, as long as the channel has
a skip label it will be skipped when searching through the channels with the Prog+ /Prog- buttons.
FAV: Select a program, press FAV button to set the program as the favorite channel.
Note: The function RENAME and MOVE can not be used in DTV mode.
Application
Customizing the TV Settings
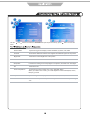
Program Edit: Press button to enter the submenu as the following picture.
ATV Manual Tuning Press button to enter the submenu.
Storage To Select a position to store the program.
Current CH Select a program you want to tune.
Search Press and buttons to manual search.
Fine-Tune Press and buttons to fine-tune.
Skip Select “Yes” to skip the program when you
scan the programs by CH+/-
Frequency Display the current channel’s frequency.
Press RED button to save all the setups you have changed.
CI Information
Please contact your "Pay per View" provider e.g. Setanta who can supply a viewing card and cam
instructions for their use.
unit and
17 17
Page is loading ...
Page is loading ...
Page is loading ...
Page is loading ...
Page is loading ...
Page is loading ...
Page is loading ...
Page is loading ...
Page is loading ...
Page is loading ...
Page is loading ...
-
 1
1
-
 2
2
-
 3
3
-
 4
4
-
 5
5
-
 6
6
-
 7
7
-
 8
8
-
 9
9
-
 10
10
-
 11
11
-
 12
12
-
 13
13
-
 14
14
-
 15
15
-
 16
16
-
 17
17
-
 18
18
-
 19
19
-
 20
20
-
 21
21
-
 22
22
-
 23
23
-
 24
24
-
 25
25
-
 26
26
-
 27
27
-
 28
28
-
 29
29
-
 30
30
-
 31
31


Ask a question and I''ll find the answer in the document
Finding information in a document is now easier with AI
Related papers
Other documents
-
Lenco DVT-2641 Specification
-
Beko 22WLM550DHID User manual
-
Palsonic TFTV8150LED Owner's manual
-
-
-
UMC M20A-GB-TCDI-UK User manual
-
Lenco DVL-2690 Specification
-
Bush 19 User manual
-
VIORE LCD26VH59 Owner's manual
-