
QXBIUDB*T[G3DJH
AVANTIME D66 nu647-2
C:\Documentum\Checkout\nu647-2_eng_T1.WIN 3/4/2002 12:59
-page1

QXBIUDB*T[G3DJH
AVANTIME D66 nu647-2
C:\Documentum\Checkout\nu647-2_eng_T1.WIN 3/4/2002 12:59
-page2
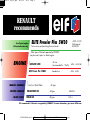
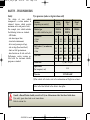
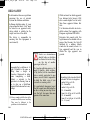
RENAULT
recommends
For all petrol engines,
LPG and multi-valve only.
ENGINE
MANUAL GEARBOX
POWER STEERING
BRAKE FLUID
ELITE Premier Plus 5W 30
Fuel economy and protecting the environment.
Other types of lubricant approved by RENAULT
may be used in petrol or diesel engines:
ULTIMATE 5W40
ELITE Premier Plus 10W40
Consult your Renault Dealer
RENAULTMATIC D2
FRELUB 650
All uses
(recommended for 1.9 dCi)
Standard use
All types
All types
All types
ACEA : A3/B3/B4
ACEA : A3/B3
DEXRON II
DOT 4
ACEA : A1/B1
(Performance)
A3/B3/B4
ELF recommends its lubricants as approved by RENAULT. For more information, go to www.elf-lub.com

QXBIUDB*T[G3DJH
AVANTIME D66 nu647-2
C:\Documentum\Checkout\nu647-2_eng_T1.WIN 3/4/2002 12:59
-page3
0.01
Welcome to your new Renault
This driver’s handbook contains the information necessary:
• to enable you to get to know your Renault, to use it to the best advantage and to benefit from all the latest technical
developments it incorporates.
• to ensure that it is always running well by following the simple - but strict - advice concerning regular maintenance.
• to enable you to deal quickly with minor faults not requiring specialist attention.
The few minutes you spend reading this handbook will be amply rewarded by the information which it provides and the
technical innovations it will bring to your attention. If certain points are still unclear, the technicians in our Network will be
only too pleased to provide you with any additional information you require.
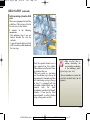
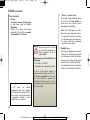
The following symbol will help you when reading this handbook:
To indicate a hazard, danger or safety advice.
The description of the models given in this handbook is based on the technical specifications at the time of writing. This
handbook covers all equipment (both standard and optional) available for these models but whether or not this is fitted
to the vehicle depends on the version, options selected and the country in which the vehicle is sold.
This handbook may also contain information about items of equipment to be introduced later in the year.
This handbook is not to be considered a type specification for all models in this range.
Enjoy driving your new Renault.
Copying or translation, in part or in full, is forbidden unless prior written permission has been obtained from Renault, 92100 Billancourt 2002.

QXBIUDB*T[G3DJH
AVANTIME D66 nu647-2
C:\Documentum\Checkout\nu647-2_eng_T1.WIN 3/4/2002 12:59
-page4
0.02
Brief over view
• Tyre pressures ........................................................................................................ 0.04
• Adjusting the seats and driving position .............................................. 1.09
¬ 1.12
• Child restraint devices ............................................................................ 1.22
¬ 1.31
• Warning and indicator lights .................................................................. 1.34
¬ 1.45
• De-icing/demisting .............................................................. 1.51 - 3.04 - 3.05 - 3.10
• Audible and visual signals ..................................................................... 1.55
¬ 1.57
• Running in, driving ................................................................................. 2.02
¬ 2.19
• Heating/air conditioning ......................................................................... 3.02
¬ 3.17
• Levels (engine o il, screen washer, etc.) ................................................. 4.03
¬ 4.10
• Emergency spare wheel ........................................................................... 5.02
¬ 5.05
• Practical advice (changing the bulbs, fuses) ......................................... 5.10
¬ 5.22

QXBIUDB*T[G3DJH
AVANTIME D66 nu647-2
C:\Documentum\Checkout\nu647-2_eng_T1.WIN 3/4/2002 12:59
-page5
0.03
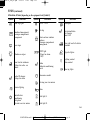
CONTENTS
Sections
1
2
3
4
5
6
7
Getting to know your car .....................................................................
Driving ...............................................................................................................
Your comfort .................................................................................................
Maintenance ..................................................................................................
Practical advice ...........................................................................................
Technical specifications ........................................................................
Alphabetical index ....................................................................................

QXBIUDB*T[G3DJH
AVANTIME D66 nu647-2
C:\Documentum\Checkout\nu647-2_eng_T1.WIN 3/4/2002 12:59
-page6
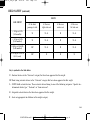
0.04
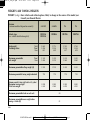
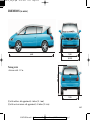
SAFETY - TYRE PRESSURES
Safety
The design of your vehicle
incorporates a certain number of
technical features which provide
maximum active and passive safety.
For example, your vehicle includes
the following features as standard:
-ABSbrakes,
- side door impact bars,
- structural reinforcement,
- driver and passenger air bags,
- side air bags (head and chest),
- front seat belt pretensioners,
- force limiters on all side seat belts
Furthermore, certain versions are
fitted with the electronic stability
program as standard.
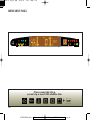
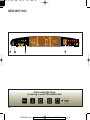
Tyre pressures (in bar or kg/cm² when cold)
Versions
(depending on country)
Petrol Petrol Diesel
2.0 16V V6 2.2
Vehicle type
(see vehicle identification plate)
DE0U06 DE0T06 DE0K06
DE0U02 DE0T02
Normal use
• Front 2.4 2.4 2.5 2.4 2.5 2.4
• Rear 2.2 2.2 2.3 2.2 2.3 2.2
Fully laden (1) or motorway
• Front 2.5 2.6 2.8 2.7 2.6 2.5
• Rear 2.3 2.4 2.5 2.4 2.4 2.3
Tyre sizes 225/55
R16
235/50
R17
225/55
R16
235/50
R17
225/55
R16
235/50
R17
Wheel sizes 7 J 16 - 7.5 J 17
Spare wheel
(for temporary use)
3.2
Tyre size 175/70 R16 98P
(1) For vehicle with trailer, refer to the information on Weights in section 6.
Refer to the label affixed to the driver's door pillar.
Consult a Renault Dealer should you wish to fit tyres of dimensions other than those listed above.
Tyre safety, spare wheel and use of snow chains.
Refer to section five.

QXBIUDB*T[G3DJH
AVANTIME D66 nu647-2
C:\Documentum\Checkout\nu647-2_eng_T1.WIN 3/4/2002 12:59
-page7
1.01
Section 1: Getting to know your car
Keys - Remote control unit .............................................................................................................................. 1.02
Doors ..................................................................................................................................................... 1.03
¬ 1.05
Engine immobiliser ........................................................................................................................................... 1.06
Head restraints - Seats ......................................................................................................................... 1.07
¬ 1.10
Front seat belts ....................................................................................................................................... 1.11 - 1.12
Methods of restraint in addition to front seat belts ......................................................................... 1.13
¬ 1.18
Rear seat belts ...................................................................................................................................... 1.19
¬ 1.21
Child safety ........................................................................................................................................... 1.22
¬ 1.31
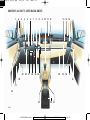
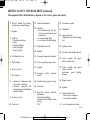
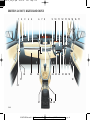
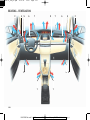
Driver's layout, left-hand drive ............................................................................................................. 1.32 - 1.33
Driver's layout, right-hand drive .......................................................................................................... 1.34 - 1.35
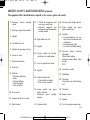
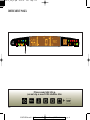
Instrument panel .................................................................................................................................. 1.36
¬ 1.45
On-board computer .............................................................................................................................. 1.46
¬ 1.48
Rear-view mirrors ............................................................................................................................................. 1.49
Steering wheel .................................................................................................................................................. 1.50
De-icing/Demisting ........................................................................................................................................... 1.51
Windscreen wash/wipe ....................................................................................................................... 1.52
¬ 1.54
Lighting and external signals .............................................................................................................. 1.55
¬ 1.56
Warning lights and horn .................................................................................................................................. 1.57
Fuel tank ........................................................................................................................................................... 1.58
Fuel cut-out in event of impact ...................................................................................................................... 1.59

1 2
3
QXBIUDB*T[G3DJH
AVANTIME D66 nu647-2
C:\Documentum\Checkout\nu647-2_eng_T1.WIN 3/4/2002 12:59
-page8
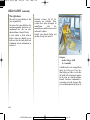
1.02
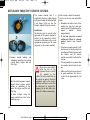
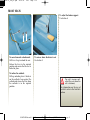
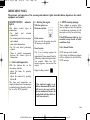
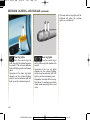
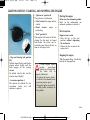
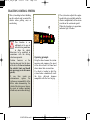
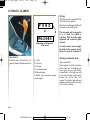
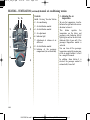
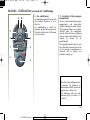
KEYS/RADIO FREQUENCY REMOTE CONTROL
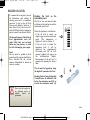
1 Remote control locking and
unlocking, coded key for ignition
switch, doors, tailgate and fuel
filler flap.
Only the radio frequency remote
control device ensures central
locking or unlocking of the
doors, the tailgate and the fuel
filler flap.
To close without using the
remote control unit, refer to the
following page.
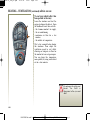
The remote control unit 1 is
supplied by batteries which should
be replaced when the indicator light
2 no longer lights up (see the
Remote control: batteries section)
Interference
Interference may be caused to the
operation of the remote control by
factors in the immediate vicinity
(external installations or the use of
equipment operating on the same
frequency as the remote control).
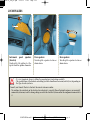
Never leave your vehicle
with the key in the
ignition if there is a child
(or animal) in the
vehicle, he or she could start up
the engine or operate electrical
equipment such as the electric
windows and there is a risk that
the child may be injured (by
trapping his or her neck, arm,
hand, etc.). Risk of serious injury.
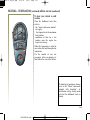
Each remote control transmitter -
receiver set has its own individual
code.
• Remember to make a note of the
number for your key and your
remote control 3 (indicated in the
remote control battery
compartment).
• If you lose your keys or need
another set of keys or a remote
control, contact your Renault
Dealer.
• To replace a remote control, it will
be necessary to take the vehicle to
your Renault Dealer because both
the vehicle and the remote
control are needed to initialise the
system.
• It is not possible to use more than
two remote control units for one
car.
• Make sure the batteries are always
in good condition; they have a
service life of approximately two
years.

1
QXBIUDB*T[G3DJH
AVANTIME D66 nu647-2
C:\Documentum\Checkout\nu647-2_eng_T1.WIN 3/4/2002 12:59
-page9
1.03
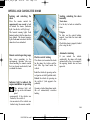
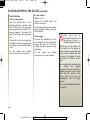
OPENING AND CLOSING THE DOORS
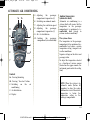
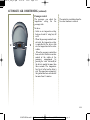
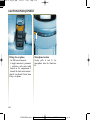
Locking and unlocking the
doors
Press the remote control for
approximately one second to lock
or unlock the doors. (Indicator
light 2 on the key will light up.)
The hazard warning lights flash
twice to indicate that the doors have
been locked. The hazard warning
lights flash once to indicate that the
doors have been unlocked.
Remote control operating range
This varies according to the
environment: therefore take care
when handling the remote control
that you do not inadvertently lock
or unlock the doors.
Indicator light to indicate the
engine immobiliser is operating
This indicator light will
light up on the instrument
panel.
- permanently if the vehicle was
locked by the switch 1;
- for one minute if the vehicle was
locked using the remote control.
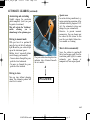
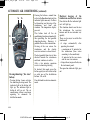
Electric central locking
This allows you to control the locks
for the doors, the tailgate and the
fuel filler flap from inside the
vehicle.
Lock the vehicle by pressing on the
red spot on switch 1 (padlock side).
Unlock the vehicle by pressing on
the switch 1 (side opposite the
padlock).
Opening a locked door from inside
the car automatically overrides
locking.
Locking, unlocking the doors
manually
Front doors:
Use the key to lock or unlock the
door.
Tailgate:
To lock, use the central locking
control 1 and lock the front door
with a key.
Check that a door is properly locked
after using the key.
Automatic relocking
If you unlock the vehicle
accidentally, the doors will relock
automatically after a few seconds if
the opening handle has not been
operated.

1
QXBIUDB*T[G3DJH
AVANTIME D66 nu647-2
C:\Documentum\Checkout\nu647-2_eng_T1.WIN 3/4/2002 12:59
-page10
1.04
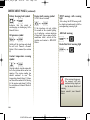
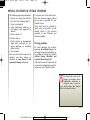
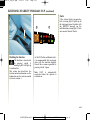
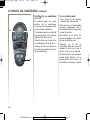
AUTOMATIC DOOR LOCKING WHEN DRIVING
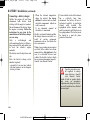
You can decide to activate this
function if you wish.
To activate it
With the ignition on, press the
central door locking button 1 on the
locking side (padlock side) for about
5 seconds, until you hear the beep.
To deactivate it
With the ignition on, press the
central door locking button 1 on the
unlocking side (opposite the
padlock) for approximately 5
seconds, until you hear the beep.
If you decide to keep the
doors locked when you
are driving, remember
that it may be more
difficult for those assisting you
to gain access to your car in the
event of an emergency.
Operating principle
When the vehicle moves off, the
system automatically locks the
doors as soon as a speed of 6 mph (8
km/h) is reached.
Theindicatorlamponthe
instrument panel and that
on button 1 light up; you will hear
the sound of the doors locking at the
same time.
The door is unlocked
- if a door is opened,
- by pressing the door unlocking
button 1.
Faults
If you note a fault (no automatic
locking, indicator light
incorporated in the button 1 does
not light up when the doors are
locked...), first check that that all
the doors are properly closed. If
they are closed correctly, consult
your Renault Dealer.
Also make sure that locking has not
been inadvertently deactivated. If
this is the case, switch the ignition
off and on again and reactivate it as
described above.
Note:
When the ignition is off the function
remains active, only intentional
deactivation will ensure that the
system is inhibited.

3
1
2
QXBIUDB*T[G3DJH
AVANTIME D66 nu647-2
C:\Documentum\Checkout\nu647-2_eng_T1.WIN 3/4/2002 12:59
-page11
1.05
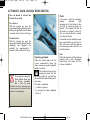
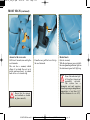
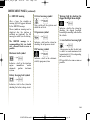
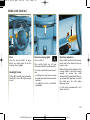
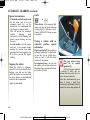
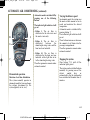
OPENING AND CLOSING THE DOORS
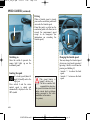
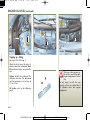
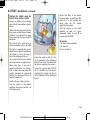
Opening the doors from the
outside
Unlock using the remote control or
the key (the key must be pushed
into the lock 1 as far as it can go).
Place y our hand behind handle 2
and pull it towards you.
Note: when you pull handle 2 the
window in the door lowers slightly
so that you can open the door
without effort and then
automatically rises again when the
door is closed.
Opening the doors from inside
Move handle 3.
Lights on warning buzzer
A warning buzzer will sound when
one of the front doors is opened if
you have left the lights switched on
after switching off the ignition (this
will prevent a drain on the battery).

1
QXBIUDB*T[G3DJH
AVANTIME D66 nu647-2
C:\Documentum\Checkout\nu647-2_eng_T1.WIN 3/4/2002 12:59
-page12
1.06
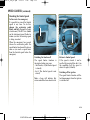
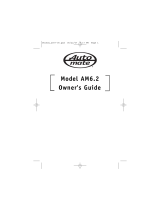
ENGINE IMMOBILISER
This prevents the car being driven
by anyone not in possession of the
car's coded ignition key.
Operating principle
The car is automatically protected
a few seconds after the key is
removed from the ignition.
When the ignition is switched on,
indicator light 1 comes on for a few
seconds and then goes out.
The vehicle has recognised the code
and the engine can be started.
If the vehicle does not recognise the
code of the ignition key, warning
light 1 flashes continuously and the
engine cannot be started.
Indicator light to indicate the
engine immobiliser is operating
Indicator light 1 lights up for three
seconds when the ignition is turned
on and then goes out.
You can then start the engine.
Vehicle protection indicator
light
A few seconds after the ignition has
been switched off, indicator light 1
will flash continuously.
The vehicle will not be protected
until the key has been taken out of
the ignition.
Operating fault warning light
If warning light 1 continues to flash
or remains lit after the ignition is
switched on, it indicates that the
system is not operating correctly.
If the fault in fuel injection message
alternates with the service message
while driving, decelerating or at
idle speed
there is an operating fault in the
system.
- If the coded key is faulty,usethe
second key (supplied with the
vehicle). If you do not have access
to this, it is essential to call a
Renault Dealer because only
dealers in the Renault network are
qualified to repair the engine
immobiliser.
Any work or modification
to the engine immobiliser
system (computers, wiring,
etc.) may be dangerous. It
must be carried out by trained
Renault Network personnel.
¢

1
A
QXBIUDB*T[G3DJH
AVANTIME D66 nu647-2
C:\Documentum\Checkout\nu647-2_eng_T1.WIN 3/4/2002 12:59
-page13
1.07
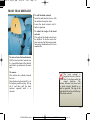
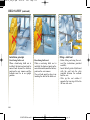
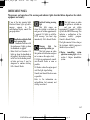
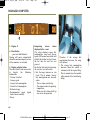
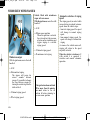
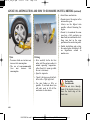
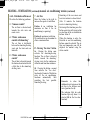
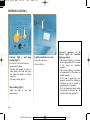
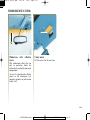
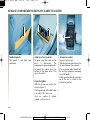
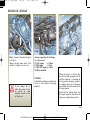
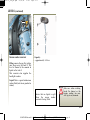
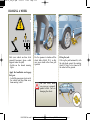
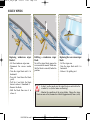
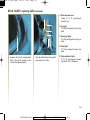
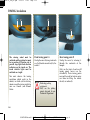
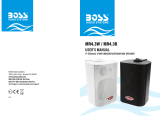
FRONT HEAD RESTRAINT
To raise or lower the head restraint
Pull the head restraint towards you
(i.e. towards the front of the vehicle)
and slide it up or down at the same
time.
To remove
First incline the seatback towards
the rear.
Raise the head restraint until it is at
the highest possible setting. Lift up
tab 1 and then pull the head
restraint upwards until it is
released.
To refit the head restraint
Insert the rods into the sleeves, with
the notches facing the front.
Lower the head restraint until it
locks in position.
To adjust the angle of the head
restraint
The angle of the head restraint can
be adjusted. To do this, move the
front section A of the head restraint
forwards or backwards until it feels
comfortable.
The head restraint is
important for safety. Ensure
that it is in place and in the
correct position. The
distance between your head and
the head restraint should be as
small as possible. The top of the
head should be in line with the top
of the head restraint.

1
1
QXBIUDB*T[G3DJH
AVANTIME D66 nu647-2
C:\Documentum\Checkout\nu647-2_eng_T1.WIN 3/4/2002 12:59
-page14
1.08
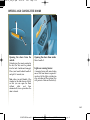
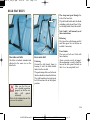
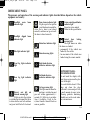
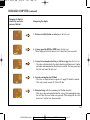
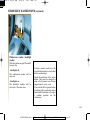
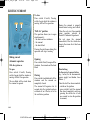
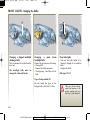
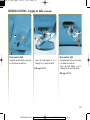
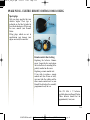
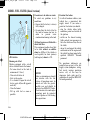
REAR HEAD RESTRAINT
Side head restraint
To raise it:
Simply slide it upwards (only one
position possible).
To remove it:
Press tabs 1 on the head r estraint
guides.
To replace it:
Insert the rods into the sleeves, with
the notches to the front, and lower
the head restraint.
Centre head restraint
To raise it:
Simply slide it upwards (only one
position possible).
To remove it:
Press tabs 1 on the h ead restraint
guides.
To replace it:
Insert the rods into the sleeves, with
the notches to the front, press tabs 1
and lower the head restraint.
The head restraint is
important for safety. Ensure
that it is in place and in the
correct position. The
distance between your head and
the head restraint should be as
small as possible. The top of your
head should be in line with the top
of the head restraint.

3
2
4
1
QXBIUDB*T[G3DJH
AVANTIME D66 nu647-2
C:\Documentum\Checkout\nu647-2_eng_T1.WIN 3/4/2002 12:59
-page15
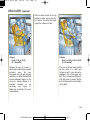
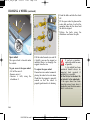
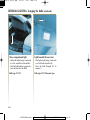
1.09
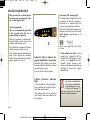
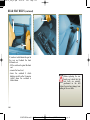
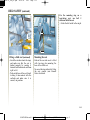
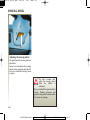
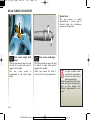
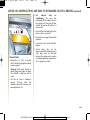
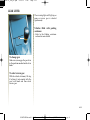
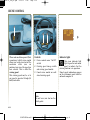
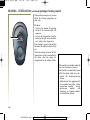
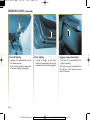
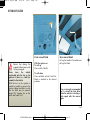
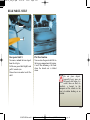
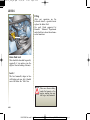
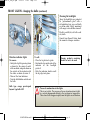
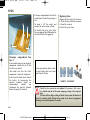
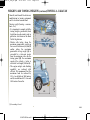
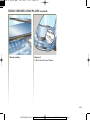
FRONT SEATS
To move forwards or backwards:
Pull lever 1 up to unlock the seat.
Release the lever in the required
position and ensure that the seat is
locked in place.
To incline the seatback:
Pull up unlocking lever 2 which is
on the seatback. Lean against the
seatback and release the lever when
the seatback is in the required
position.
To raise or lower the driver's seat:
Use button 3.
To adjust the lumbar support:
Use button 4.
For safety reasons, only
adjust the seats when the
car is stationary.
For information on the use of
seat belts, refer to the Seat belts
section.

3
1
2
QXBIUDB*T[G3DJH
AVANTIME D66 nu647-2
C:\Documentum\Checkout\nu647-2_eng_T1.WIN 3/4/2002 12:59
-page16
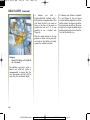
1.10
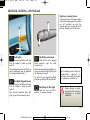
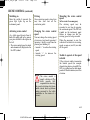
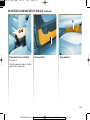
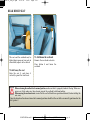
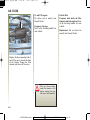
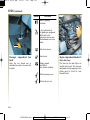
FRONT SEATS (continued)
Access to the rear seats
Pull lever 1 towards you and tip the
seat forwards.
The seat has a memory which
allows it to relock the seat in its
initial position when it is pushed
back as far as its stored stop.
Ensure that the runners
and seatback are locked
in place correctly.
From the rear, pull the lever 3 to tip
the seat forwards.
Heated seats
(Initiale version)
With the ignition on, press switch 2;
the corresponding indicator light on
the instrument panel will light up.
Even if the indicator light
is lit up, the system is not
necessarily activated.
The system has a
thermostat and only operates
when the passenger compartment
temperature is less than 12°C
(with a tolerance of + or –4°C).

1
2
QXBIUDB*T[G3DJH
AVANTIME D66 nu647-2
C:\Documentum\Checkout\nu647-2_eng_T1.WIN 3/4/2002 12:59
-page17
1.11
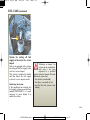
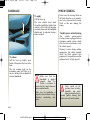
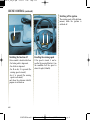
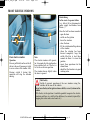
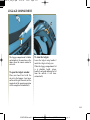
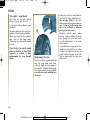
FRONT SEAT BELTS
Always wear your seat belt when
travelling in your car. Comply with
the local legislation in the particular
country you are in.
Before driving off:
- First ensure that your driving
position is correct.
- Then adjust your seat belt as
described below to provide
maximum protection.
Incorrectly adjusted seat
belts may cause injuries
in the event of an
accident.
Even pregnant women should
wear a seat belt. In this case,
ensure that the lap belt is not
exerting too much pressure on
the abdomen.
Adjusting your driving position
• Sit with your back firmly against
the seatback.
This is essential to ensure that
your spinal cord is in the correct
position.
• Adjust the distance between the
seat and the pedals.
Your seat should be as far back as
possible while still allowing you
to depress the clutch pedal fully.
The seatback should be adjusted
so that your arms are slightly bent
when you hold the steering
wheel.
• Adjust the position of your head
restraint.
For maximum safety your head
shouldbeasnearaspossibleto
the head restraint.
• Adjust the height of the seat.
This adjustment allows you to
select the seat position which
offers you the best possible
vision.
• Adjust the position of the steering
wheel.
Adjusting the seat belts.
Sit with your back firmly against the
seatback.
The shoulder strap 1 fits itself
automatically across the chest.
The lap strap 2 should be held
firmly over the thighs and against
the pelvis.
The belt should be worn so that it is
as close to the body as possible, i.e.
avoid wearing heavy clothing or
having bulky objects under the
belts.

1
4
3
5
4
QXBIUDB*T[G3DJH
AVANTIME D66 nu647-2
C:\Documentum\Checkout\nu647-2_eng_T1.WIN 3/4/2002 12:59
-page18
1.12
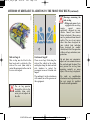
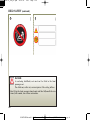
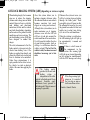
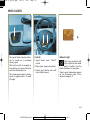
FRONT SEATBELTS (continued)
Locking:
- Unroll the belt 1 slowly and
smoothly andmakesurethatthe
buckle 3 clicks into the housing 4
(check that the belt is locked by
pulling on the buckle 3).
If the belt jams, allow it to return
before attempting to unwind it
again.
Locking (continued)
If your belt becomes completely
jammed:
- pull slowly but firmly until
around 3 cm of belt has been
released; then let the belt rewind
itself;
- unwind it again.
- if the problem persists, consult
your Renault Dealer.
Unlocking:
- Press the button 5, the belt is
rewound onto the inertia reel.
- Guide the buckle to help the
operation.

1
2
QXBIUDB*T[G3DJH
AVANTIME D66 nu647-2
C:\Documentum\Checkout\nu647-2_eng_T1.WIN 3/4/2002 12:59
-page19
1.13
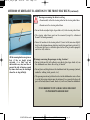
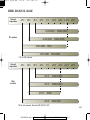
METHODS OF RESTRAINT IN ADDITION TO THE FRONT SEAT BELTS
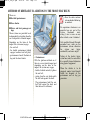
These are:
O Seat belt pretensioners.
O Force limiter.
O Driver and front passenger air
bags.
These systems are provided to act
independently or together when the
car is subjected to a frontal impact.
Depending on the force of the
impact the system may engage:
- the seat belt;
- the buckle pretensioner (which
engages to correct seat belt play);
- pretensioners 1 and 2, the front air
bag and the force limiter.
• Pretensioners
With the ignition switched on, if
there is a severe frontal impact and
depending on the force of the
impact, the system may engage:
- buckle 1 which instantly tightens
the seat belt;
- piston 2 on the seat which pulls
the belt back against the chest.
The pretensioners hold the seat
belt tight against the body and
thus increase its efficiency.
• Have the entire restraint
system checked following
an accident.
• No operations whatsoever are
permitted on any part of the
system (electronic units,
wiring...) nor is reuse on any
other vehicle, even if identical.
• Only qualified Renault Network
personnel may work on the
pretensioner system; otherwise
the system may trigger
accidentally and cause injury.
• Testing of the electric trigger
system may only be carried out
by a specially trained technician
using special equipment.
• When the vehicle is to be
scrapped, contact your Renault
Dealer for disposal of the
pretensioner and air bag gas
generators.

QXBIUDB*T[G3DJH
AVANTIME D66 nu647-2
C:\Documentum\Checkout\nu647-2_eng_T1.WIN 3/4/2002 12:59
-page20
1.14
METHODS OF RESTRAINT IN ADDITION TO THE FRONT SEAT BELTS (continued)
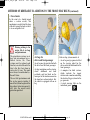
• Force limiter
In the event of a frontal impact
above a certain severity, this
mechanism is used to limit the force
of the belt against the body so that it
is at an acceptable level.
Warning relating to the
service life of air bags
and pretensioners
The pyrotechnic systems in air
bags and pretensioners have a
limited service life. These
systems must be replaced each
time they are activated and at the
latest after they have been in
service for 10 years. This work
must always be undertaken by a
Renault Dealer.
The seat belt pretensioners and
the air bag operate together. If
one of the systems has passed the
date when it is due for renewal, it
will alter the overall safety
protection provided.
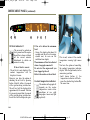
Airbagsfor
driver and front passenger
An air bag may be provided for both
the driver and the front passenger.
Air bag inscriptions on the steering
wheel, dashboard and front
seatbacks, and two labels on the
lower part of the windscreen and on
the door box section indicate that
the vehicle is equipped with an air
bag.
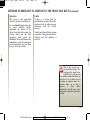
Each air bag system consists of:
- An air bag and gas generator fitted
on the steering wheel for the
driver and in the dashboard for the
front passenger;
- A computer for both systems,
which includes the impact
detector and a monitor controlling
the electrical trigger system for the
gas generator;
- A single warning light on the
instrument panel.
Page is loading ...
Page is loading ...
Page is loading ...
Page is loading ...
Page is loading ...
Page is loading ...
Page is loading ...
Page is loading ...
Page is loading ...
Page is loading ...
Page is loading ...
Page is loading ...
Page is loading ...
Page is loading ...
Page is loading ...
Page is loading ...
Page is loading ...
Page is loading ...
Page is loading ...
Page is loading ...
Page is loading ...
Page is loading ...
Page is loading ...
Page is loading ...
Page is loading ...
Page is loading ...
Page is loading ...
Page is loading ...
Page is loading ...
Page is loading ...
Page is loading ...
Page is loading ...
Page is loading ...
Page is loading ...
Page is loading ...
Page is loading ...
Page is loading ...
Page is loading ...
Page is loading ...
Page is loading ...
Page is loading ...
Page is loading ...
Page is loading ...
Page is loading ...
Page is loading ...
Page is loading ...
Page is loading ...
Page is loading ...
Page is loading ...
Page is loading ...
Page is loading ...
Page is loading ...
Page is loading ...
Page is loading ...
Page is loading ...
Page is loading ...
Page is loading ...
Page is loading ...
Page is loading ...
Page is loading ...
Page is loading ...
Page is loading ...
Page is loading ...
Page is loading ...
Page is loading ...
Page is loading ...
Page is loading ...
Page is loading ...
Page is loading ...
Page is loading ...
Page is loading ...
Page is loading ...
Page is loading ...
Page is loading ...
Page is loading ...
Page is loading ...
Page is loading ...
Page is loading ...
Page is loading ...
Page is loading ...
Page is loading ...
Page is loading ...
Page is loading ...
Page is loading ...
Page is loading ...
Page is loading ...
Page is loading ...
Page is loading ...
Page is loading ...
Page is loading ...
Page is loading ...
Page is loading ...
Page is loading ...
Page is loading ...
Page is loading ...
Page is loading ...
Page is loading ...
Page is loading ...
Page is loading ...
Page is loading ...
Page is loading ...
Page is loading ...
Page is loading ...
Page is loading ...
Page is loading ...
Page is loading ...
Page is loading ...
Page is loading ...
Page is loading ...
Page is loading ...
Page is loading ...
Page is loading ...
Page is loading ...
Page is loading ...
Page is loading ...
Page is loading ...
Page is loading ...
Page is loading ...
Page is loading ...
Page is loading ...
Page is loading ...
Page is loading ...
Page is loading ...
Page is loading ...
Page is loading ...
Page is loading ...
Page is loading ...
Page is loading ...
Page is loading ...
Page is loading ...
Page is loading ...
Page is loading ...
Page is loading ...
Page is loading ...
Page is loading ...
Page is loading ...
Page is loading ...
Page is loading ...
Page is loading ...
Page is loading ...
Page is loading ...
Page is loading ...
Page is loading ...
Page is loading ...
Page is loading ...
Page is loading ...
Page is loading ...
Page is loading ...
Page is loading ...
Page is loading ...
Page is loading ...
Page is loading ...
Page is loading ...
Page is loading ...
Page is loading ...
Page is loading ...
Page is loading ...
Page is loading ...
Page is loading ...
Page is loading ...
Page is loading ...
Page is loading ...
Page is loading ...
Page is loading ...
Page is loading ...
Page is loading ...
Page is loading ...
Page is loading ...
Page is loading ...
Page is loading ...
-
 1
1
-
 2
2
-
 3
3
-
 4
4
-
 5
5
-
 6
6
-
 7
7
-
 8
8
-
 9
9
-
 10
10
-
 11
11
-
 12
12
-
 13
13
-
 14
14
-
 15
15
-
 16
16
-
 17
17
-
 18
18
-
 19
19
-
 20
20
-
 21
21
-
 22
22
-
 23
23
-
 24
24
-
 25
25
-
 26
26
-
 27
27
-
 28
28
-
 29
29
-
 30
30
-
 31
31
-
 32
32
-
 33
33
-
 34
34
-
 35
35
-
 36
36
-
 37
37
-
 38
38
-
 39
39
-
 40
40
-
 41
41
-
 42
42
-
 43
43
-
 44
44
-
 45
45
-
 46
46
-
 47
47
-
 48
48
-
 49
49
-
 50
50
-
 51
51
-
 52
52
-
 53
53
-
 54
54
-
 55
55
-
 56
56
-
 57
57
-
 58
58
-
 59
59
-
 60
60
-
 61
61
-
 62
62
-
 63
63
-
 64
64
-
 65
65
-
 66
66
-
 67
67
-
 68
68
-
 69
69
-
 70
70
-
 71
71
-
 72
72
-
 73
73
-
 74
74
-
 75
75
-
 76
76
-
 77
77
-
 78
78
-
 79
79
-
 80
80
-
 81
81
-
 82
82
-
 83
83
-
 84
84
-
 85
85
-
 86
86
-
 87
87
-
 88
88
-
 89
89
-
 90
90
-
 91
91
-
 92
92
-
 93
93
-
 94
94
-
 95
95
-
 96
96
-
 97
97
-
 98
98
-
 99
99
-
 100
100
-
 101
101
-
 102
102
-
 103
103
-
 104
104
-
 105
105
-
 106
106
-
 107
107
-
 108
108
-
 109
109
-
 110
110
-
 111
111
-
 112
112
-
 113
113
-
 114
114
-
 115
115
-
 116
116
-
 117
117
-
 118
118
-
 119
119
-
 120
120
-
 121
121
-
 122
122
-
 123
123
-
 124
124
-
 125
125
-
 126
126
-
 127
127
-
 128
128
-
 129
129
-
 130
130
-
 131
131
-
 132
132
-
 133
133
-
 134
134
-
 135
135
-
 136
136
-
 137
137
-
 138
138
-
 139
139
-
 140
140
-
 141
141
-
 142
142
-
 143
143
-
 144
144
-
 145
145
-
 146
146
-
 147
147
-
 148
148
-
 149
149
-
 150
150
-
 151
151
-
 152
152
-
 153
153
-
 154
154
-
 155
155
-
 156
156
-
 157
157
-
 158
158
-
 159
159
-
 160
160
-
 161
161
-
 162
162
-
 163
163
-
 164
164
-
 165
165
-
 166
166
-
 167
167
-
 168
168
-
 169
169
-
 170
170
-
 171
171
-
 172
172
-
 173
173
-
 174
174
-
 175
175
-
 176
176
-
 177
177
-
 178
178
-
 179
179
-
 180
180
-
 181
181
-
 182
182
-
 183
183
-
 184
184
-
 185
185
-
 186
186
-
 187
187
-
 188
188
-
 189
189
-
 190
190


Ask a question and I''ll find the answer in the document
Finding information in a document is now easier with AI
Related papers
-
Renault Wind User manual
-
-
-
-
-
-
-
-
-
Renault Zoë User manual
Other documents
-
 VISTEON ELECTRONICS FRANCE QI8-AW1102 User manual
-
 Auto Mate AM6.2 Owner's manual
-
Subaru H4510VA040 WRX Fog Lamp Kit User manual
-
 Boss Audio Systems MR4.3W User manual
-
Saxby 60895 Instruction Leaflet
-
CITROEN C5 User manual
-
Dacia Lodgy Owner's manual
-
LEISUREWIZE emove EM303 User manual
-
-
CITROEN C5 2005 User manual


