
2610_2650 Cover.indd 1 8/1/2003, 4:17:59 PM

© Copyright 2003 Garmin Ltd. or its subsidiaries
Garmin International, Inc.
1200 East 151
st
Street, Olathe, Kansas 66062, U.S.A.
Tel. 913/397.8200 or 800/800.1020
Fax 913/397.8282
Garmin (Europe) Ltd.
Unit 5, The Quadrangle, Abbey Park Industrial Estate, Romsey, SO51 9DL, U.K.
Tel. 44/1794.519944
Fax 44/1794.519222
Garmin Corporation
No. 68, Jangshu 2
nd
Road, Shijr, Taipei County, Taiwan
Tel. 886/2.2642.9199
Fax 886/2.2642.9099
All rights reserved. Except as expressly provided herein, no part of this manual may be reproduced, copied, transmitted, disseminated, downloaded or stored in any
storage medium, for any purpose without the express prior written consent of Garmin. Garmin hereby grants permission to download a single copy of this manual
and of any revision to this manual onto a hard drive or other electronic storage medium to be viewed and to print one copy of this manual or of any revision hereto,
provided that such electronic or printed copy of this manual must contain the complete text of this copyright notice and provided further that any unauthorized
commercial distribution of this manual or any revision hereto is strictly prohibited.
Information in this document is subject to change without notice. Garmin reserves the right to change or improve its products and to make changes in the content
without obligation to notify any person or organization of such changes or improvements.
Visit the Garmin web site (www.Garmin.com) for current updates and supplemental information concerning the use and operation of this and other Garmin prod-
ucts.
Garmin
®
, AutoLocate
®
, MapSource
®
, StreetPilot
®
, and MetroGuide
®
are registered trademarks of Garmin Ltd. or its subsidiaries and may not be used without the
express permission of Garmin. Garmin Corporation is an authorized licensee of the CompactFlash
®
and ™ trademarks.
July 2003 Part Number 190-00257-00 Rev. A Printed in Taiwan
2610_2650 Cover.indd 2 8/1/2003, 4:18:09 PM

,
Serial Number:
Introduction
i
Preface
Congratulations on choosing one of the most advanced GPS navigation systems available! The Garmin
StreetPilot 2610/2650 utilizes the proven performance of Garmin GPS and full featured mapping to create
an unsurpassed mobile navigation system.
This manual covers instructions for the StreetPilot 2610 and Street Pilot 2650. Unit operation and
specifi cations are the same on both models, unless otherwise specifi ed. To get the most out of your
new navigation system, take the time to go through this owner’s manual and learn the operating procedures
for your unit. This manual is broken down into three parts for your convenience.
Part One introduces you to your StreetPilot 2610/2650. This includes warnings and cautions,
maintenance for your StreetPilot 2610/2650, and the confi guration of the buttons.
Part Two is divided into sections that provide detailed references to the advanced features and
operations of the StreetPilot 2610/2650.
Part Three gives additional information such as a glossary of terms and installation instructions. Use the
Table of Contents on the next page for a quick reference to the desired appendix.
Customer Service Product Registration
Help us better support you by completing our on-line registration today! Have the serial number
of your StreetPilot 2610/2650 handy and connect to our web site (www.garmin.com). Look for the Product
Registration link on the Home page. Also, be sure to record your serial number in the right-hand column
for a quick reference.
Product Registration
Serial Number
Use this area to record the serial number (8-digit number
located on the bottom of the unit) in case it is lost, stolen,
or needs service. Be sure to keep your original sales
receipt in a safe place or attach a photocopy inside the
manual.
The Garmin StreetPilot 2610/2650 has no user-service-
able parts. Should you ever encounter a problem with
your unit, please take it to an authorized Garmin dealer
for repairs.
The StreetPilot 2610/2650 is fastened shut with screws.
Any attempt to open the case to change or modify the
unit in any way voids your warranty and may result in
permanent damage to the equipment.
)
NOTE: If you have previously registered a Garmin product purchase, we invite you to re-
register using our on-line system. Many services provided by our new product registration
system are now being automated and re-registering your purchase ensures you the best
possible support from Garmin.
2610_2650 OM.indd i 8/1/2003, 4:15:24 PM

Introduction
ii
Table of Contents
PREFACE.....................................................................i
Product Registration...............................................i
TABLE OF CONTENTS ................................................ii
INTRODUCTION........................................................iii
FCC Compliance.................................................. iii
Warnings and Cautions ..................................... iv-v
Software License Agreement................................. vi
Warranty ............................................................. vii
Maintenance....................................................... viii
Packing List..........................................................ix
Unit Desription ..................................................... x
Keypad Usage........................................................1
Remote Usage........................................................2
Power/Display Adjustments...................................3
Touch Screen/Data Entry.......................................4
Data Entry/Selecting ..............................................5
Unit Pages .............................................................6
REFERENCE ...............................................................7
Map Page...............................................................7
Map Page Options ...............................................11
Next Turn Page....................................................16
Current Route .....................................................17
Trip Information..................................................18
Marking Waypoints .............................................20
Using the Find Menu...........................................21
Using the Routes Menu .......................................27
Main Menu..........................................................31
System Setup.......................................................32
General Tab.....................................................32
Guidance Tab ..................................................33
Routing Tab.....................................................33
Time Tab .........................................................36
Safety Tab........................................................36
Track Log Tab..................................................37
Language Tab ..................................................37
Interface Tab (2650 Only) ...............................38
Info Pages............................................................39
GPS Info..........................................................39
Map Info .........................................................43
System Info .....................................................43
APPENDICES ...........................................................44
Appendix A: Installation......................................44
Appendix A: Time Offsets....................................49
Appendix A: Using Diacritical Marks...................50
Appendix A: CompactFlash
®
Data Cards.............51
Appendix A: Messages.........................................54
Appendix B: Specifi cations ..................................56
Appendix C: Index..............................................58
2610_2650 OM.indd ii 8/1/2003, 4:15:30 PM

Introduction
iii
FCC Compliance
The StreetPilot 2610/2650 complies with Part 15 of the FCC interference limits for Class B digital
devices FOR HOME OR OFFICE USE. These limits are designed to provide more reasonable protection
against harmful interference in a residential installation, and are more stringent than “outdoor” require-
ments.
Operation of this device is subject to the following conditions: (1) This device may not cause harmful
interference, and (2) this device must accept any interference received, including interference that may
cause undesired operation.
This equipment generates, uses and can radiate radio frequency energy and, if not installed and used in
accordance with the instructions, may cause harmful interference to radio communications. However, there
is no guarantee that interference will not occur in a particular installation. If this equipment does cause
harmful interference to radio or television reception, which can be determined by turning the equipment
off and on, the user is encouraged to try to correct the interference by one of the following measures:
• Reorient or relocate the receiving antenna.
• Increase the separation between the equipment and the receiver.
• Connect the equipment into an outlet on a circuit different from that to which the receiver is con-
nected.
• Consult the dealer or and experienced radio/TV technician for help.
The StreetPilot 2610/2650 does not contain any user-serviceable parts. Repairs should only be made
by an authorized Garmin service center. Unauthorized repairs or modifi cations could result in permanent
damage to the equipment, and void your warranty and your authority to operated this device under Part 15
regulations.
FCC Compliance Statement
2610_2650 OM.indd iii 8/1/2003, 4:15:31 PM

Introduction
,
,
,
iv
CAUTION: Use the StreetPilot 2610/2650 at your own risk. To reduce the risk of unsafe operation,
carefully review and understand all aspects of this Owner’s Manual—and thoroughly practice operation
using the simulator mode prior to actual use. When in actual use, carefully compare indications from the
StreetPilot 2610/2650 to all available navigation sources, including the information from other NAVAIDs,
visual sightings, charts, etc. For safety, always resolve any discrepancies before continuing navigation.
CAUTION: IT IS THE USER’S RESPONSIBILITY TO USE THIS PRODUCT PRUDENTLY. THIS
PRODUCT IS INTENDED TO BE USED ONLY AS A NAVIGATIONAL AID AND MUST NOT BE USED
FOR ANY PURPOSE REQUIRING PRECISE MEASUREMENT OF DIRECTION, DISTANCE, LOCATION
OR TOPOGRAPHY. THIS PRODUCT SHOULD NOT BE USED AS AN AID TO DETERMINE GROUND
PROXIMITY FOR AIRCRAFT NAVIGATION.
CAUTION: The electronic chart is an aid to navigation and is designed to facilitate the use of autho-
rized government charts, not replace them. Only offi cial government charts and notices to mariners contain
all information needed for safe navigation – and, as always, the user is responsible for their prudent use.
MAP DATA INFORMATION: One of the goals of Garmin is to provide customers with the most
complete and accurate cartography that is available to us at a reasonable cost. We use a combination of
governmental and private data sources, which we identify as required in product literature and copyright
messages displayed to the consumer. Virtually all data sources contain inaccurate or incomplete data to
some degree. This is particularly true outside the United States, where complete and accurate digital data is
either not available or prohibitively expensive. Because the map data may not be perfect, it helps at times
to cross-check the unit’s map with your actual surroundings to confi rm that you are arriving at the exact
destination.
Warnings and Cautions
2610_2650 OM.indd iv 8/1/2003, 4:15:33 PM

Introduction
Your StreetPilot is equipped with a ‘ Safe Mode’ feature to
improve driver safety. By default, this feature is enabled,
but can be turned off to allow a passenger to operate
the unit. When your vehicle is moving, Safe Mode
disables certain StreetPilot functions which require
signifi cant operator attention and may become a distrac-
tion to use while driving. See page 36 for details.
For instructions on vehicle installation, see
Appendix A (pages 44).
v
WARNING: The Global Positioning System (GPS) is operated by the United States government, which
is solely responsible for its accuracy and maintenance. The system is subject to changes which could affect
the accuracy and performance of all GPS equipment. Although the Garmin StreetPilot 2610/2650 is a preci-
sion electronic NAVigation AID (NAVAID), any NAVAID can be misused or misinterpreted and, therefore,
become unsafe.
WARNING: For use in vehicles, it is the sole responsibility of the owner/operator of the StreetPilot
2610/2650 to secure the unit so that it will not interfere with the vehicle’s operating controls, obstruct
the driver’s view of driving conditions, or cause damage or personal injury in the event of an accident. Do
not mount the StreetPilot 2610/2650 over air bag panels or in the fi eld of air bag deployment. Air bags
expand with a rapid force that can propel objects in their path toward the driver or passengers causing
possible injury. Refer to air bag safety precautions contained in the vehicle’s owner manual. Do not mount
the StreetPilot 2610/2650 in a place where the driver or passengers are likely to impact it in an accident
or collision. The mounting hardware provided by Garmin is not warranted against collision damage or the
consequences thereof.
WARNING: For use in vehicles, it the sole responsibility of the driver of the vehicle to operate the
vehicle in a safe manner, maintain full surveillance of all driving conditions at all times, and not become
distracted by the StreetPilot 2610/2650 to the exclusion of safe driving practices. It is unsafe to operate
the controls of the StreetPilot 2610/2650 while you are driving. Failure by the driver of a vehicle equipped
with a StreetPilot 2610/2650 to pay full attention to operation of the vehicle and road conditions while the
vehicle is in motion could result in an accident or collision with property damage and personal injury.
WARNING: This product, its packaging, and its components contain chemicals known to the State of
California to cause cancer, birth defects, or reproductive harm. This Notice is being provided in accordance
with California’s Proposition 65. If you have any questions or would like additional information, please
refer to our web site at http://www.garmin.com/prop65.
Warnings and Cautions
2610_2650 OM.indd v 8/1/2003, 4:15:34 PM

Introduction
vi
Software License Agreement
BY USING THE STREETPILOT 2610/2650, YOU AGREE TO BE BOUND BY THE TERMS AND
CONDITIONS OF THE FOLLOWING SOFTWARE LICENSE AGREEMENT. PLEASE READ THIS AGREE-
MENT CAREFULLY.
Garmin grants you a limited license to use the software embedded in this device (the “Software) in
binary executable form in the normal operation of the product. Title, ownership rights and intellectual
property rights in and to the Software remain in Garmin.
You acknowledge that the Software is the property of Garmin and is protected under the United States
of America copyright laws and international copyright treaties. You further acknowledge that the structure,
organization and code of the Software are valuable trade secrets of Garmin and that the Software in source
code form remains a valuable trade secret of Garmin. You agree not to decompile, disassemble, modify,
reverse assemble, reverse engineer or reduce to human readable form the Software of any part thereof or
create any derivative works based on the Software. You agree not to export or re-export the Software to any
country in violation of the export control laws of the United States of America.
Software License Agreement
2610_2650 OM.indd vi 8/1/2003, 4:15:35 PM

Introduction
vii
LIMITED WARRANTY
This Garmin product is warranted to be free from defects in materials or workmanship for one year
from the date of purchase. Within this period, Garmin will at its sole option, repair or replace any compo-
nents that fail in normal use. Such repairs or replacement will be made at no charge to the customer for
parts or labor, provided that the customer shall be responsible for any transportation cost. This warranty
does not cover failures due to abuse, misuse, accident or unauthorized alteration or repairs.
THE WARRANTIES AND REMEDIES CONTAINED HEREIN ARE EXCLUSIVE AND IN LIEU OF ALL
OTHER WARRANTIES EXPRESS OR IMPLIED OR STATUTORY, INCLUDING ANY LIABILITY
ARISING UNDER ANY WARRANTY OF MERCHANTABILITY OR FITNESS FOR A PARTICULAR
PURPOSE, STATUTORY OR OTHERWISE. THIS WARRANTY GIVES YOU SPECIFIC LEGAL RIGHTS,
WHICH MAY VARY FROM STATE TO STATE.
IN NO EVENT SHALL GARMIN BE LIABLE FOR ANY INCIDENTAL, SPECIAL, INDIRECT OR
CONSEQUENTIAL DAMAGES, WHETHER RESULTING FROM THE USE, MISUSE, OR INABILITY TO
USE THIS PRODUCT OR FROM DEFECTS IN THE PRODUCT. Some states do not allow the exclusion of
incidental or consequential damages, so the above limitations may not apply to you.
Garmin retains the exclusive right to repair or replace the unit or software or offer a full refund of the
purchase price at its sole discretion. SUCH REMEDY SHALL BE YOUR SOLE AND EXCLUSIVE REMEDY
FOR ANY BREACH OF WARRANTY.
To obtain warranty service, call your local Garmin authorized dealer. Or call Garmin Customer Service
at one of the numbers listed on the right for shipping instructions and an RMA tracking number. The unit
should be securely packed with the tracking number clearly written on the outside of the package. The unit
should be sent, freight charges prepaid, to any Garmin warranty service station. A copy of the original sales
receipt is required as the proof of purchase for warranty repairs.
Products sold through online auctions are not eligible for rebates or other special offers from Garmin.
Online auction confi rmations are not accepted for warranty verifi cation. To obtain warranty service, an
original or copy of the sales receipt from the original retailer is required. Garmin will not replace missing
components from any package purchased through an online auction.
Warranty
Garmin International, Inc.
1200 E. 151st Street
Olathe, KS 66062, U.S.A.
Phone: 800/800.1020
FAX: 913/397.0836
Garmin (Europe) Ltd.
Unit 5, The Quadrangle,
Abbey Park Industrial Estate
Romsey, SO51 9DL, U.K.
Phone: 44/1794.519944
FAX: 44/1794.519222
Garmin Addresses
www.garmin.com
2610_2650 OM.indd vii 8/1/2003, 4:15:35 PM

Introduction
viii
GPS Cleaning
The StreetPilot 2610/2650 case and remote are constructed of high quality materials and do not require
user maintenance other than cleaning. Clean the unit using a cloth dampened with a mild detergent solu-
tion and then wipe dry. Avoid chemical cleaners and solvents that may damage plastic components.
Touchscreen Cleaning
The StreetPilot 2610/2650 touchscreen is intended primarily for fi nger operation. Although a PDA
stylus may also be used to operate touchscreen, never attempt this while operating a vehicle. Never use a
hard or sharp object to operate the touchscreen or damage may result. The touchscreen should be cleaned
using a soft, clean, lint-free cloth. Water, isopropyl alcohol, or eyeglass cleaner may be used if needed. If
these are used, apply liquid to cloth and then gently wipe touchscreen with moistened cloth.
Storage
Do not store the StreetPilot 2610/2650 where prolonged exposure to temperature extremes may occur
(such as in the trunk of a car) as permanent damage may result. User information, such as waypoints,
routes, etc. are retained in the unit’s memory without the need for external power. It is always a good
practice to back up important user data by manually recording it or downloading it to a PC (transferring it
to MapSource).
Storing alkaline batteries in the remote control for extended periods is not recommended. In order to
reduce the chance for battery leakage in the battery compartment, remove the batteries when storing the
unit for more than six months.
Maintenance
2610_2650 OM.indd viii 8/1/2003, 4:15:35 PM

Introduction
ix
Packing List
Before installing and getting started with your unit, please check to see that your package includes the
following items. If any parts are missing, please contact your Garmin dealer immediately.
Standard Package:
• StreetPilot 2610 or 2650
• MapSource City Navigator CD-ROM with Unlock Certifi cate
• CompactFlash® Memory Card
• Dash Mount
• Portable Bean Bag Mount (Friction Mount)
• External Speaker with 12/24-volt Adapter Cable
• A/C Power Adapter
• PC/USB Interface Cable
• DR (Dead Reckoning) Installation Cable (2650 Only)
• Alphanumeric Remote Control (Requires two alkaline AA batteries. Not included)
• Owner’s Manual
• Quick Reference Guide
• Setup Guide
Optional Accessories:
• Remote GPS Antenna (GA 27C)
• Deluxe Carrying Case
• 128 and 256 MB CompactFlash® Memory Cards
2610_2650 OM.indd ix 8/1/2003, 4:15:36 PM

Introduction
x
PAG E
MARK
MENU
ROUTE
FIND
RECENT
SPEAK
VOLUME
StreetPilot 2650
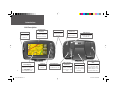
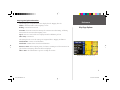
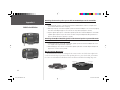
Unit Description
Light Sensor
Automatically adjusts
backlight level
8-Bit Color LCD Touch
Screen Display
On-screen information is
referred to as a “page”.
Press PAGE/MARK key to
select a different screen.
USB Connector
Interface unit with a PC
to program the CF card,
Power Switch
Toggle DOWN to turn
unit ON and UP to
turn OFF.
Power/Speaker
Connector
Connector for power,
speaker, and Dead
Reckoning cable (2650
only)
CompactFlash® Card
Door
Insert programmed CF card
for increased map detail
and information lookup
capability. Keep door shut
to prevent water entry.
Adjustable Mount
Allows the unit to con-
nect to the mounting
base and tilt forward/
backward.
External Antenna
Connector
Connection for optional
external antenna.
Front View
Back View
Infrared Window
Receives signals from
remote control. Do
not block.
Internal Patch
Antenna
Receives signals from GPS
satellites to determine
position. Do not block.
Keypad
Controls unit
operation.
2610_2650 OM.indd x 8/1/2003, 4:15:36 PM

Introduction
1
Keypad Usage
Keypad Usage
The StreetPilot 2610/2650 keypad allows you to perform more than one function using a single key.
The key’s primary function appears in larger text above the secondary function. Always press and release a
key to perform its primary function. Pressing and holding a key activates its secondary function (if avail-
able). For example, quickly pressing and releasing the PAGE/MARK key cycles through the available main
pages. If you press and hold the PAGE/MARK key for more than 2 seconds (then release), the unit marks
the current position as a waypoint (See page 20).
PAGE/MARK Key — PAGE switches between main pages and returns display from an option window
back to a main page. MARK captures your present position and saves it as a waypoint.
MENU/ROUTE Key — MENU displays a menu of options for the current page. Press twice to display
various Info options. ROUTE displays a pop-up window of available route navigation features.
FIND/RECENT Key — FIND displays search options for Cities, Exits, Waypoints, and Recently found
places. If MapSource City Navigator or MetroGuide map data is loaded in an installed CompactFlash®
card, it also searches for various Points of Interest, Addresses, and Intersections. RECENT allows you to
view a sortable list of recent fi nds.
SPEAK/VOLUME Key — SPEAK triggers the voice to repeat the next turn or current destination when
navigating and current GPS status when not navigating. VOLUME displays an adjustment slide on the
screen to change the speaker volume. To hear the volume count (i.e., 1, 2, 3, 4, 5, 6, 7, 8, 9, 10) touch up
or down on the slider. Each press activates the audio number.
2610_2650 OM.indd 1 8/1/2003, 4:15:37 PM

Introduction
2
Remote Usage
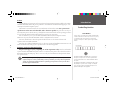
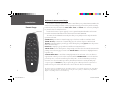
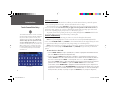
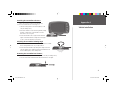
Alphanumeric Remote Control Usage
The StreetPilot 2610/2650’s alphanumeric remote control allows you to perform functions similar to the
unit’s touch screen and keypad controls. The key’s primary function appears on the key and the secondary
functions (same as keys on unit) for the PAGE, MENU, FIND, and SPEAK can be activated by holding the
key for more than 2 seconds (then release).
In order for the remote to operate properly, be sure to point the IR (infrared) window on the remote
towards the unobstructed IR window on the left front of the StreetPilot 2610/2650.
The remote also has additional function keys that allow you to quickly enter data and perform other
operations on the unit:
(ZOOM) IN Key — Zooms in to adjust the Map page scale to show a smaller area with more detail.
(ZOOM) OUT Key — Zooms out to adjust the Map page scale to show a larger area with less detail.
QUIT Key — Returns display to previous page. When entering data, pressing QUIT restores the previous
value (cancels data entry.)
ROUTE Key— Displays a pop-up window of available route navigation features.
THUMB STICK — Selects menu options, changes settings, and enters data. Also controls movement if the
panning cursor on the Map page. Press IN on the THUMB STICK to select/activate a highlighted item or
begin data entry.
ALPHANUMERIC KEYS — Used when entering alphanumeric data in the unit, such as an address or
waypoint name. These keys can be used in conjunction with the THUMB STICK. To select the fi rst letter
press the key once, to select the second letter press the key twice, to select the third letter press the key
three times, or to select the number press the key four times (fi ve times for 7 and 9). (The 1 key only
accepts one press and SPACE/0 key only accepts two key presses.) When you have the correct letter or
number selected, pause and the unit advances the cursor to the next character automatically.
The remote requires two AA alkaline batteries. To install the batteries, press UP on the battery door clip, then pull the
battery door away from the remote. Install batteries observing the correct polarity (see inside battery compartment).
Replace cover, making sure the it is closed all the way.
QUIT
PAG E
FIND
MENU
IN
OUT
ROUTE SPEAK
1
ABC
2
DEF
3
GHI
4
JKL
5
MNO
6
PQRS
7
TUV
8
WXYZ
9
0
ZOOM
IR Window
2610_2650 OM.indd 2 8/1/2003, 4:15:38 PM

Introduction
3
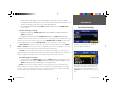
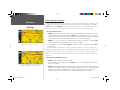
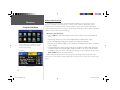
Power/Display Adjustments
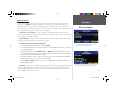
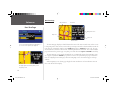
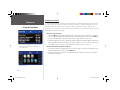
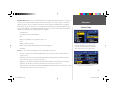
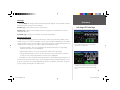
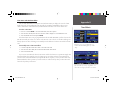
Turning the StreetPilot 2610/2650 On and Off
Toggle the power switch on the right side DOWN to turn the unit On and UP to turn Off. The Wel-
come screen appears briefl y, followed by the Card Information/MapSource copyright page, Press IN on the
THUMB STICK or TOUCH ‘OK’ to acknowledge, or wait briefl y until the Safe Driving Warning Message
appears. Once again, press IN on the THUMB STICK or TOUCH ‘OK’ or wait until the Map Page appears.
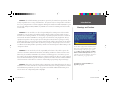
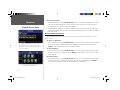
Adjusting the Backlight, Contrast, and Speaker Volume
The StreetPilot 2610/2650 display and keys can be illuminated for operation at night or in bright sun-
light. Backlight intensity and screen contrast are adjustable. When operating the StreetPilot 2610/2650 at
extreme temperatures, you may fi nd that minor adjustments are needed to obtain the clearest screen.
To adjust screen backlighting and contrast:
1. Press the remote or unit MENU key. Select ‘Display’ (see pages 4-5).
2. Adjust the backlight and the contrast to the desired level (see pages 4-5). To have the unit automatically
adjust the brightness, place a check in the ‘Automatic Brightness’ box. For optimum Automatic Brightness
results, set the brightness to a middle level. If Automatic Brightness is checked, the lower the brightness
slide level is set to, the sooner the unit reaches a minimum brightness level. The unit automatically adjusts
the level depending on ambient light conditions.
To adjust the external speaker volume:
1. Press and hold the SPEAK/VOLUME key. A slider adjustment window appears.
2. Adjust the speaker volume (see pages 4-5). The loudest setting is ten, the softest is one. (Alternatively,
volume can be cycled between three settings by repeatedly pressing SPEAK/VOLUME button from this
screen.) Each press activates the audio number.
To calibrate the touch screen:
1. Press the remote or unit MENU key. Select ‘Display’ (see pages 4-5).
2. Press the remote or unit MENU key again to begin calibration. Follow the on-screen instructions.
Brightness
Slider.
Contrast
Slider.
Speaker Volume
Slider.
2610_2650 OM.indd 3 8/1/2003, 4:15:40 PM

Introduction
4
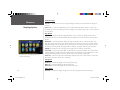
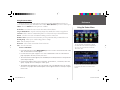
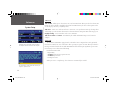
Touch Screen Control
The StreetPilot 2610/2650’s Touch Screen allows you to make menu selections, position the pointer/
cursor, scroll through menu selections, and enter data with the touch of a fi nger.
To use the touch screen control, TOUCH the desired object on the screen, applying just enough pres-
sure to active the function. It is not necessary to apply excessive pressure to the touch screen. If the
‘Touchscreen Tone’ setting is ‘On’, you hear a click from the speaker with every fi nger press. If the touch
screen is not responding properly, it may need to be calibrated (see page 3).
To perform actions such as panning on the map or scrolling through menus, TOUCH and hold on the
screen while sliding your fi nger to the desired map or menu point.
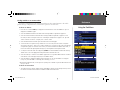
Features and Data Entry
The following features and data entry procedures are referred to throughout this manual.
Cursor — A yellow highlighted area on the screen that can be moved up/down/left/right with the
remote control THUMB STICK or by TOUCH to select individual fi elds on the display. Moving the cursor
to a given location allows you to begin data entry, change settings, or scroll through a list.
Field — The location on a page where a group of characters or an option is entered and displayed. The
cursor is placed on a fi eld (using the THUMB STICK or by TOUCH) to begin data entry or selection of
options.
To enter data in a data fi eld:
1. Use the THUMB STICK by moving it UP, DOWN, LEFT, or RIGHT to highlight the desired data fi eld and
press IN or TOUCH the desired fi eld to begin data entry.
2. For the touch screen, TOUCH the desired letters or numbers. To switch between entering letters and
numbers, TOUCH the ‘A-Z’ tab for letters and the ‘0-9’ tab for numbers. The unit automatically advances
the cursor to the next position. TOUCH ‘<’ to back up the cursor or ‘>’ to advance. TOUCH ‘Space’ to
enter a space. TOUCH ‘Delete’ to delete the highlight character. The unit automatically shows greyed out
predictive text for Find fi elds. TOUCH ‘>’ or press the THUMB STICK RIGHT to use the letters.
For the remote, use the THUMB STICK to highlight the desired letter/number or option and press IN or
for entering letters/numbers, use the ALPHANUMERIC keys by pressing the desired key once for the fi rst
letter, twice to select the second letter, three times to select the third letter, or to select the number press
the key four times. (The 1 key only accepts one press and SPACE/0 key only accepts two key presses,
,
The StreetPilot 2610/2650 touchscreen is intended
primarily for fi nger operation. Although a PDA stylus
may also be used to operate touchscreen, never
attempt this while operating a vehicle. Never use
a hard or sharp object to operate the touch-
screen or damage may result. The touchscreen
should be cleaned using a soft, clean, lint-free cloth.
Water, isopropyl alcohol, or eyeglass cleaner may
be used if needed. If these are used, apply liquid
to cloth and then gently wipe touchscreen with
moistened cloth.
Touch Screen/Data Entry
Entering Data
2610_2650 OM.indd 4 8/1/2003, 4:15:41 PM

Introduction
5
press fi ves times for the number on the 7 and 9 keys.) When you have the correct letter or number
selected, pause and the unit advances the cursor to the next character automatically. Move the cursor all
the way to the left position, then once more to clear the entire data fi eld.
3. Once the desired data has been entered, TOUCH or highlight and press IN on the THUMB STICK on
‘OK’ to confi rm.
To select and change a setting:
1. Highlight the fi eld with the THUMB STICK by pressing UP, DOWN, LEFT or RIGHT, and press IN or
TOUCH the desired fi eld.
2. Highlight the desired setting with the THUMB STICK and press IN or TOUCH the desired setting.
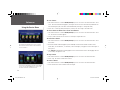
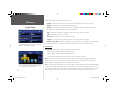
Icons — Similar to “Field” and “On-Screen Buttons”. Icons are graphical pictures of menu items or map
options. Place the cursor on a button and press IN on the THUMB STICK or TOUCH the button select.
As you highlight menu icons with the THUMB STICK, the title text enlarges for easier viewing.
On-Screen Button — Similar to “Field”. Place the cursor on a button and press IN on the THUMB
STICK or TOUCH the button select the action corresponding to that button. An example of an on-screen
button is the ‘Go To’ button appearing at the bottom of the New Waypoint page.
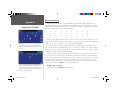
Scroll Bar — When viewing a list of items too long to display on a single page, a scroll bar appears
along the right-hand side of the list. The position of the scroll bar indicates which portion of the list is cur-
rently being displayed. The height of the scroll bar indicates the number of items in the list.
To scroll through a list of items:
1. Move UP or Down on the THUMB STICK. You may also TOUCH the blue up or down arrows to scroll
through the list one item at a time; TOUCH and hold the scroll bar, then slide UP or DOWN to scroll; or
TOUCH the area above or below the scroll bar to scroll a page at a time.
Default — A system-selected format built into the operating software or the unit’s memory that is
followed unless the user chooses a different setting. For example, the default setting for speed readings
is ‘Statute’ or but can be changed to ‘Metric’. Once a setting is changed, the new setting is retained until
another change is made or the ‘Restore Settings’ menu option is selected.
Data Entry/Selecting
An example of an on-screen “button”—the ‘Go To’
button on the Waypoint Marked page.
When viewing a list of items too long to display on a
single page, a scroll bar appears along the right-hand
side of the list. Also, using the LEFT/RIGHT portion of the
THUMB STICK scrolls information one full screen at a
time.
2610_2650 OM.indd 5 8/1/2003, 4:15:42 PM

Introduction
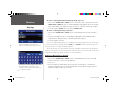
6
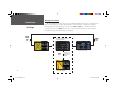
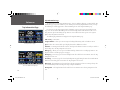
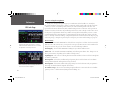
Unit Pages at a Glance
All of the information needed to operate the StreetPilot 2610/2650 is found on ‘pages’—display screens.
There are three main pages, the Map, Trip Information, and Current Route. A fourth page is available
during navigation, the Next Turn page. Press the remote PAGE or QUIT key to switch back and forth
between pages or press the PAGE key on the GPS to cycle forward. The Reference Section describes in
detail what each page does and how they are confi gured.
Map Page
Trip Information Page
Next Turn Page—Available
only during navigation
UNIT OR
REMOTE
PAGE
KEY
Current Route Page—Available
only during navigation
REMOTE
QUIT
KEY
SPEAK
KEY
(Or can be set
to automatically
appear for 10
seconds)
Unit Pages
2610_2650 OM.indd 6 8/1/2003, 4:15:42 PM

Reference
7
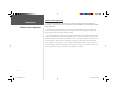
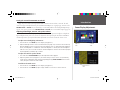
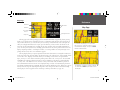
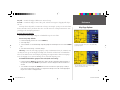
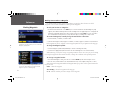
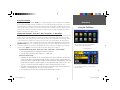
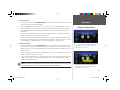
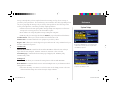
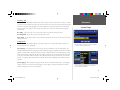
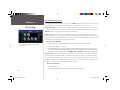
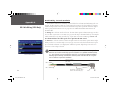
Map Page
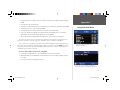
The Map page is the main operating page of the StreetPilot 2610/2650. It graphically shows you map
details, your current location, and marks your route to a destination with a magenta colored route line. It
tells you what direction to go or the direction you are traveling. Customizable data tabs on the right side
allow you to display information such as your speed, the distance you have traveled, the distance to the
next turn, the time remaining before reaching the next turn, and more. If the StreetPilot 2610/2650 has
yet to calculate your location, there is a fl ashing question mark over the vehicle pointer and the status text
displays ‘Acquiring Satellites’, ‘Searching for Satellites’, or ‘Locating Satellites’. A ‘Ready to Navigate’ voice
prompt and tab text (if a tab is set to ‘NextTurn’) appears.
The map display shows your present position and direction of movement as a triangular ‘Position Icon’
in the center of the map. The map display also shows the map scale, north reference, and geographic details
such as lakes, rivers, highways, and towns. When you are driving on roads that are not present in the
maps, you may see a circle drawn around the position pointer. This is the ‘ accuracy circle’. The StreetPilot
2610/2650 uses both map resolution and GPS accuracy in defi ning your location to a point within this
“accuracy circle”. The smaller the circle, the more accurate your location. More detailed map features as
well as information about those features can be displayed using a CF data card containing map data trans-
ferred from a Garmin MapSource CD-ROM. When you zoom into smaller map scales, “MapSource” appears
directly below the map scale indicating that MapSource data is being used to draw a more detailed map.
The map may be also be toggled between a North Up or Track Up orientation. (see page 12)
For maximum map display, you can select ‘Hide
Tabs’. This section of the manual discusses how to
select between the displays. You may also TOUCH
the tabs to hide/show them.
The ‘Hide Tabs’ confi guration showing no Naviga-
tion Information. TOUCH the placeholder to show
the tab again.
Map Page
Map Scale
Route Line
Your Current
Position
Data Fields
Driving Instructions
Next Turn
2610_2650 OM.indd 7 8/1/2003, 4:15:43 PM

Reference
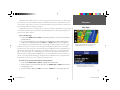
8
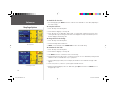
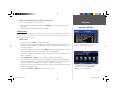
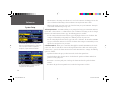
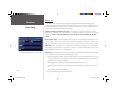
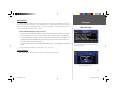
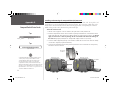
Zooming, Panning and Pointing
There are three main actions you can perform on the Map page: zooming, panning, and pointing. The
map display has 24 map scales (from 120 feet to 800 miles) that are selected by pressing the remote IN
and OUT zoom keys or TOUCH the current map scale in the lower left corner of the map display. You can
change the map scale to show more map area with less detail, or less map area with more detail.
To change the map scale:
1. TOUCH the map scale on the lower left corner. A zoom/pan toolbar appears on the left side of the dis-
play and the data tabs on the right are hidden. TOUCH the ‘+’ magnifying glass icon to zoom IN to see
a smaller area with more detail. You may also use the remote IN zoom key (The toolbar does not appear
when using the remote.) Press and hold this remote key to zoom the map scale rapidly.
2. TOUCH the ‘-’ icon to zoom OUT to see a larger area with less detail. You may also us the remote OUT
zoom key. Press and hold this remote key to zoom the map scale rapidly.
3. To return back to the normal Map page, TOUCH the ‘Back’ (Left) arrow in the upper left or press QUIT
on the remote.
You may also defi ne a particular area to enlarge on the map by drawing a “box” on the touch screen,
then lifting your fi nger from the screen. The zoom/pan toolbar shows both the View Area and Pan icons in
the lower left. The larger of the two icons is the one that is active, with the inactive option appearing as a
smaller icon in the lower right on the zoon/pan toolbar. The View Area option can only be used with the
touch screen.
To zoom in on particular map area:
1. TOUCH the map to display the zoom/pan toolbar.
2. If the Pan (hand) icon is the larger of the two, TOUCH the icon. The icons change places and the View
Area icon is the larger.
3. TOUCH and hold a point adjacent to the area you want to enlarge and then drag to create a box around
the area. Lift your fi nger to complete, allowing the map to redraw. The unit zooms in on the drawn area
and adjust the zoom scale as needed. The unit zooms in greater scale increments if a smaller box is
drawn. Note that when the View Area Selector is active, the Pan Map feature is not usable.
Select ‘+’ to zoom in and ‘-’ to zoom out.
Drag to create a box around the zoom area.
Map Page
2610_2650 OM.indd 8 8/1/2003, 4:15:44 PM
Page is loading ...
Page is loading ...
Page is loading ...
Page is loading ...
Page is loading ...
Page is loading ...
Page is loading ...
Page is loading ...
Page is loading ...
Page is loading ...
Page is loading ...
Page is loading ...
Page is loading ...
Page is loading ...
Page is loading ...
Page is loading ...
Page is loading ...
Page is loading ...
Page is loading ...
Page is loading ...
Page is loading ...
Page is loading ...
Page is loading ...
Page is loading ...
Page is loading ...
Page is loading ...
Page is loading ...
Page is loading ...
Page is loading ...
Page is loading ...
Page is loading ...
Page is loading ...
Page is loading ...
Page is loading ...
Page is loading ...
Page is loading ...
Page is loading ...
Page is loading ...
Page is loading ...
Page is loading ...
Page is loading ...
Page is loading ...
Page is loading ...
Page is loading ...
Page is loading ...
Page is loading ...
Page is loading ...
Page is loading ...
Page is loading ...
Page is loading ...
Page is loading ...
Page is loading ...
Page is loading ...
Page is loading ...
-
 1
1
-
 2
2
-
 3
3
-
 4
4
-
 5
5
-
 6
6
-
 7
7
-
 8
8
-
 9
9
-
 10
10
-
 11
11
-
 12
12
-
 13
13
-
 14
14
-
 15
15
-
 16
16
-
 17
17
-
 18
18
-
 19
19
-
 20
20
-
 21
21
-
 22
22
-
 23
23
-
 24
24
-
 25
25
-
 26
26
-
 27
27
-
 28
28
-
 29
29
-
 30
30
-
 31
31
-
 32
32
-
 33
33
-
 34
34
-
 35
35
-
 36
36
-
 37
37
-
 38
38
-
 39
39
-
 40
40
-
 41
41
-
 42
42
-
 43
43
-
 44
44
-
 45
45
-
 46
46
-
 47
47
-
 48
48
-
 49
49
-
 50
50
-
 51
51
-
 52
52
-
 53
53
-
 54
54
-
 55
55
-
 56
56
-
 57
57
-
 58
58
-
 59
59
-
 60
60
-
 61
61
-
 62
62
-
 63
63
-
 64
64
-
 65
65
-
 66
66
-
 67
67
-
 68
68
-
 69
69
-
 70
70
-
 71
71
-
 72
72
-
 73
73
-
 74
74


Garmin 100027303 User manual
- Category
- Navigators
- Type
- User manual
Ask a question and I''ll find the answer in the document
Finding information in a document is now easier with AI
Related papers
Other documents
-
Mettler Toledo SINGLE REMOTE DISPLAYS Installation guide
-
Uniden GNS 8400 User manual
-
-
Cobra Electronics GPS 1000 User manual
-
Sky PRO III Hard reset manual
-
Nokia 2620 User manual
-
AvMap Geosat 4 Travel User manual
-
AIRIS Navigator User manual
-
Real Flame 2610 User manual
-