Page is loading ...

Apogee Ensemble
Thunderbolt Audio Interface
User’s Guide
Fall 2014

Contents
...........................................................................................................Overview! 5
................................................................................................................Introduction! 5
.......................................................................................................................Features! 5
......................................................................................................Package Contents! 6
...........................................................................Ensemble Thunderbolt Panel Tour! 7
.................................................................................................................Front Panel! 7
..................................................................................................................Rear Panel! 8
........................................................................................................................Display! 9
..................................................................................Input Settings Display Screen! 9
...............................................................................................Getting Started! 10
......................................................Precautions when powering Ensemble On/Off! 10
....................................................................................................Thunderbolt Notes! 10
..................................................................................................Ensemble Software! 11
.............................................................................................System Requirements! 11
...............................................................................Download and Install Software! 11
....................................................................................Update Ensemble Firmware! 12
..............................................................................Connection Examples Diagram! 13
...............................................................................................Front Panel Controls! 14
...............................................................................................Adjust the Input Gain! 14
.............................................................................Accessing other Input Settings:! 14
.............................................................................................Adjust Output Volume! 15
.................................................................................................Assignable Buttons! 15
.....................................................................Getting Started with Audio Software! 16
..................................................Select Ensemble for Mac System Sound Output! 16
....................................................Route Mac System Sound to Different Outputs! 17
................................................................................Select Ensemble in your DAW! 18
..............................................................................Select Ensemble in Logic Pro X! 18
..............................................................................Select Ensemble in ProTools 11! 18
....................................................................................Select Ensemble in Ableton! 19
....................................................................................Monitoring the Input Signal! 20
....................................................................................Using your DAW to Monitor! 20
......................................................................Enable Input Monitor in Logic Pro X! 20
..........................................................................Enable Input Monitor in Pro Tools! 20
.....................................................................Enable Input Monitor in Ableton Live! 20
.........................................................Using Ensemble’s Hardware Direct Monitor! 21
2

........................................................................................................Guitar I/O! 22
..............................................................................................................Introduction! 22
...............................................................................................Guitar Input Features! 22
............................................................................................Guitar Output Features! 22
................................................................................................................Re-Amping! 22
..........................................................................Stage 1: Record the Performance! 23
.......................................................................................Monitoring as you Record! 23
..............................................Stage 2, Part 1: Playback Through Your Guitar Rig! 24
...............................Stage 2, Part 2: Record the amp onto a separate DAW track! 24
.................................................................Notes about re-amping with Ensemble:! 25
..................................................................................................................Unity Gain! 25
.......................................................................................Guitar I/O Circuit Diagram! 25
..........................................................................................Inserting Effects pedals! 26
................................................................................................Main Features! 27
................................................................................................Analog Audio Inputs! 27
.............................................................................................................Guitar Inputs! 27
...........................................................................................Channels 1 - 4 Features! 27
.............................................................................................................Combi Jacks! 27
...................................................Channel 1 & 2 Analog Insert Send/Return jacks! 28
...........................................................................................Channels 5 - 8 Features! 28
..................................................................................Analog Input Circuit Diagram! 28
................................................................................................................Built In Mic! 29
.......................................................................................Recording the Built-In Mic! 29
.............................................................................................Analog Audio Outputs! 29
................................................................................................Monitor Out L1 & R2! 29
........................................................................................................Analog Out 3-10! 29
..........................................................................................................Guitar Outputs! 30
..................................................................................................................Digital I/O! 30
.......................................................................................................................Optical! 30
......................................................................................................................Coaxial! 30
............................................................................................Monitor Control Center! 31
....................................................................................................................Talkback! 31
.........................................................................Using the Built-In Mic for Talkback! 31
..............................................................................Using an External Talkback Mic! 31
.................................................................Choosing the Talkback Mic Destination! 32
...............................................Setting an Assignable Button to activate Talkback! 32
............................................How to set the Monitor Outputs as a fixed Line-Out ! 33
.......................................................How to Setup and Use Multiple Speaker Sets! 33
......................................Using the Assignable Buttons to Change Speaker Sets! 34
.................................How to connect and configure a Surround Speaker Setup! 34
...............................................Adjust for Volume Differences Between Speakers! 35
3

.............................Setup Multiple Headphone/Speaker Mixes via Maestro Mixer! 36
........................................................................Clocking with External Equipment! 37
....................................................................Configure Ensemble as Clock Master! 37
......................................................................Configure Ensemble as Clock Slave! 38
...............................................................................................................Termination! 38
...........................................................................................................Maestro! 39
.....................................................................................................Maestro Features! 39
.......................................................................................................Devices Sidebar! 39
.......................................................................................Device Icon and ID Button! 39
......................................................................................................................Toolbar! 39
....................................................................................................Input Tab Window! 40
.................................................................................................Output Tab Window! 41
..................................................................................Device Settings Tab Window! 43
......................................................................................Input Routing Tab Window! 44
...................................................................................Output Routing Tab Window! 45
....................................................................................................Mixer Tab Window! 46
..............................................................................Mixer Tab Window (Continued)! 47
.....................................................................................System Setup Tab Window! 47
......................................................................................................Menu Bar Menus! 48
.......................................................................................................Reference! 49
............................................................................BNC Termination Best Practices! 49
...........................................................................................Understanding Latency! 51
..................................................................................................................Soft Limit! 53
................................................................................................Specifications! 54
.............................................................................................System Requirements! 54
.................................................................Pinout Diagram for Analog Output 3-10! 54
........................................................................Factory Hardware Reset / Initialize! 54
........................................................................................Additional Support! 56
....................................................Warranty Information and Legal Notices! 56
4

Overview
Introduction
The new Apogee Ensemble is the first Thunderbolt™ 2 audio interface to offer superior sound quality,
the lowest latency performance and the most comprehensive studio functionality all in one box.
Ensemble includes 8 Advanced Stepped Gain mic preamps, monitor controller functionality including
talkback, front panel Guitar I/O, two headphone outputs and digital connectivity for a total of 30 x 34 I/
O. Blending acclaimed innovations, groundbreaking new features and an effortless user interface,
Ensemble empowers you to capture inspiration when creative lightning strikes.
Launched in 2007, the first Ensemble re-defined the possibilities of the personal studio interface,
setting new standards of quality, simplicity and value. Winning that year’s TEC Award for Digital Audio
Technology, Ensemble went on to become the preferred interface for thousands of hit-making
producers, engineers and artists. Now, with 30 years of digital audio expertise and the latest
technological innovations, Apogee has re-built Ensemble to introduce the next generation of music
creation technology.
Features
•
Thunderbolt™ 2 Mac audio interface
•
Analog-to-digital conversion (ADC) for recording up to 24-bit/192kHz
•
Proprietary Thunderbolt audio driver and ESS Sabre32 DAC offer full 32-bit playback
•
Groundbreaking low latency performance
•
Core Audio-optimized hardware DMA Engine frees your Mac CPU
•
2 high-resolution OLED displays show levels and settings
•
Input select buttons and controller knob for convenient selection of parameters and settings
•
4 assignable buttons to control:
•
Talkback mic (built-in or external)
•
Output settings such as speaker set selection, mute, dim, sum to mono
•
Complete input/output control with Apogee’s Maestro software
•
Works with Pro Tools, Logic, Ableton and any Core Audio compliant app on Mac
•
Designed in California – Assembled in the U.S.A.
5

Package Contents
The following items are included in the box with Ensemble:
•
3 pin-IEC power cable
•
QuickStart Guide
•
Rubber Feet
•
Warranty Booklet
Register your product
• Access Apogee’s expert Technical Support for free
• Receive important product update information by email
•
Take the Customer Satisfaction Survey for a chance to win Apogee gear!
www.apogeedigital.com/register
6

Ensemble Thunderbolt Panel Tour
Front Panel
1. Guitar I/O (see page 22):
a. Inputs ch 11/12: Connect high
impedance (Hi-Z) instruments
such as guitar or bass.
b. Outputs ch 11/12: Instrument
level outputs for connecting
directly to a guitar amplifier or
Hi-Z pedal effects/processor.
2. Input Select Buttons:
a. Push to select an input
b. Hold to view the Input
Settings screen
3. Input Controller Knob:
a. Turn to adjust gain. When
viewing input settings, turn to
move to the next parameter.
b. Push to select the next input.
When viewing input settings,
push to change a parameter’s
setting.
4. Output Controller Knob:
a. Turn to adjust the volume of
your monitor speakers.
b. Push to toggle your monitor
speakers mute On/Off
5. Built-In Mic (see page 29):
a. The built-in mic can be recorded,
or used for the talkback function.
b. Is a mono source. The same
signal is duplicated on channels
9 and 10.
6. Assignable Buttons:
Programmed from Maestro software’s Device
Settings tab window (see page 43). Factory
default settings are:
a. Talkback - must hold button
down to use (momentary)
b. Clear Meters
c. Toggle G1/G2 output source
between “Thru” and “From
Software”.
d. Toggle Mute function between Monitor Out
and Headphones outputs.
7. Headphones 1&2 Controller Knobs:
a. Turn to adjust headphone
output volume
b. Push to toggle mute on/off
8. Power Button:
7

Rear Panel
1. Inputs 1-4:
Combination (combi) jacks receive XLR or 1/4”
connectors
a. Use XLR for a microphone or line level input.
b. Use 1/4” for high-impedance (Hi-Z) instrument.
2. Inputs 5-8:
XLR for microphones or line level inputs.
3. Analog Inserts: Channels 1 & 2 (page 28)
a. Send (top) - can use balanced TRS or
unbalanced TS 1/4” cables.
b. Return (bottom) - can use balanced TRS or
unbalanced TS 1/4” cables.
4. Monitor Out:
Balanced TRS outputs for connecting monitor
speakers.
5. Analog Out:
Balanced outputs 3-10.
Requires a 25-pin D-Sub
analog breakout cable.
6. Digital I/O: (page 30)
a. Optical (Toslink): Two In/Out Ports
i. ADAT, 8-channels per
port, 44.1-48k sample
rate.
ii. SMUX, 4-channels per port, 88.2-96k
sample rate.
iii. S/PDIF, 2-channels per port, 44.1-96k
sample rate.
b. Coaxial
i. Provides 2-channels of audio
at sample rates of 44.1 - 192k.
7. BNC Word Clock:
Used to transmit or receive word
clock signal between Ensemble and
other digital devices (page 37).
8. Thunderbolt 2: (page 10)
•
Two ports for daisy chaining
up to six devices.
•
It does not matter which
position Ensemble is placed
in the chain.
•
Backwards compatible with Thunderbolt 1 (see
Thunderbolt Notes on ).
8

Display
Input Settings Display Screen
This screen appears when an Input Select button is held for 1 second. The parameters
available will change depending on the channel being viewed, and the settings made.
For navigation instructions, see page 12.
1. Input Source
a. Mic - XLR input is sent through the microphone preamp
b. Inst - 1/4” input is sent through a Hi-Z to Low-Z circuit then to the microphone preamp
c. +4dBu/-10dBV - Line level signal from XLR input bypasses preamp circuit.
2. Soft Limit - Attenuates transient peaks of the analog input at a threshold of -4dBfs
before the signal is sent to the A/D converter (see page 53).
3. Group - 5 groups available. The gain of input channels set to the same group number
are adjusted simultaneously. Any level offsets that exists before inputs are grouped will
be preserved after a group is chosen.
4. Insert - Directs signal from the Input 1 or 2 Insert Return jack to the A/D converter (Insert
Send is always active and can be utilized as a preamp line-out).
5. ⌀ (Polarity) - Inverts the input signal’s polarity
6. 48v - Toggles phantom power on/off
7. ⦧ - Toggles High Pass filter (80Hz, 12dB/octave) on/off
9

Getting Started
Precautions when powering Ensemble On/Off
Before powering Ensemble On, ensure that any speakers or amplifiers connected to
Ensemble’s analog outputs are powered off, or the volume turned down to the minimum
setting. This will prevent potential damage to your speakers and other equipment from “pops”
that may occur as the unit boots up.
1. Power off speakers
2. Power Ensemble On
3. Power on speakers.
Likewise, before powering Ensemble off, ensure any speakers or amplifiers connected to Ensemble’s analog
outputs are powered off, or the volume turned down to the minimum setting.
1. Power off speakers
2. Power Ensemble Off
Thunderbolt Notes
•
Two Thunderbolt 2 connections on Ensemble enable daisy-chaining other Thunderbolt devices to your
computer.
•
It does not matter which position Ensemble is placed in the chain.
•
Exception: When connecting a mix of Thunderbolt and Thunderbolt™ 2 devices in a chain, connect
Ensemble and other Thunderbolt 2 devices to the computer first.
•
i.e.: Thunderbolt 2 Mac > Thunderbolt 2 devices > Thunderbolt devices
•
Up to 6 peripherals may be connected in a chain.
•
Thunderbolt peripherals continue to operate when Ensemble is powered off. This ensures that displays, hard
drives, or other essential equipment doesn’t lose connection to the computer when Ensemble is not in use.
•
A non-Thunderbolt device (i.e. Firewire, HDMI, DisplayPort, etc.) may be connected to the chain, but it or the
adapter for the device must be placed at the end.
A Mac is compatible with Ensemble if it has the Thunderbolt logo. The Mini DisplayPort, featured on many pre-
Thunderbolt Macs, is the exact same size as the Thunderbolt port but does NOT support Thunderbolt devices.
See the difference below:
X Mini DisplayPort ✓ Thunderbolt Port
10

Ensemble Software
System Requirements
Computer: Thunderbolt equipped Mac
Memory: 4 GB RAM minimum, 8 GB RAM recommended
OS X 10.9.3 or greater
Thunderbolt Cable
Download and Install Software
Before Ensemble will work with the computer, special software must be installed. The latest version of the
software can be downloaded from the Apogee website at:
www.apogeedigital.com/support/ensemble-thunderbolt
The download comes in the form of a dmg image file. Open it to view
the contents. Inside you will find four items:
• Ensemble Thunderbolt Notes.pdf
• Ensemble Thunderbolt Firmware Updater.app
• Ensemble Thunderbolt Software Installer.pkg
• EnsembleThunderboltUninstaller.app
Double-click to launch the Ensemble Thunderbolt Software Installer.pkg. A dialog box will appear with a series of
steps to proceed. Follow the prompts to complete the installation. You will be required to restart your computer.
As a result of the software install:
•
Apogee Maestro controller software is placed in the Mac’s Applications folder (see page 39).
•
When connected, Ensemble Thunderbolt appears as an audio input/output device in Mac Sound System
Preferences
•
Ensemble Thunderbolt Firmware Updater.app is placed in the Mac’s Utilities folder
11

Update Ensemble Firmware
The first time Ensemble is used after the software installation, you
will likely need to update the firmware.
Warning: Do not disconnect power or interrupt the firmware
update process before it is complete as this may damage the unit.
1. Make sure Ensemble is connected to the computer and is
powered on.
2. Open the Ensemble Firmware Updater.app which is inside
the .dmg image file downloaded from the Apogee website.
There is another copy of the firmware updater app located
in the Mac’s Applications > Utilities folder.
3. Select “Update” and follow any prompts that may appear.
Ensemble may reboot several times - this is normal.
4. When the progress reaches 100% and says “Update
Complete”, you are done and can quit the updater.
12

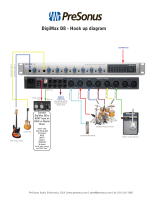
Connection Examples Diagram
13

Front Panel Controls
Many Ensemble settings can be controlled from the front panel. For full control over all settings, use the Maestro
software (page 39).
Adjust the Input Gain
1. Turn the Input Controller knob to adjust the input gain for the selected channel.
2. Select a different channel by pressing the Input Controller knob repeatedly until the
desired input is highlighted.
3. Alternatively, press one of the Input Select buttons to jump directly to that input.
Accessing other Input Settings:
1. Hold an Input Select button for at least 1 second to access
the Input Settings screen.
2. Turn the Input Controller knob to navigate up and down and highlight the different
parameters
3. Press the Input Controller knob to change a parameter to a different setting.
4. To exit the Input Settings screen, hold the Input Select button for at least 1 second.
Ensemble will automatically exit after idling for 15 seconds.
For more information on the parameters of the Input Settings screen, see page 9.
14

Adjust Output Volume
1. Turn the Output Controller, Headphone 1, or Headphone 2 knob to adjust the respective output level.
2. Press the Output Controller, Headphone 1, or Headphone 2 knob to toggle mute on/off.
Assignable Buttons
Assignable buttons A, B, C, & D can be programmed to perform different functions. Press an Assignable button
to perform it’s programmed function.
•
Programming of the Assignable Buttons can only be done in the Maestro application’s Device Settings tab
window. See page 43 and page 32 for more detailed information.
The factory default settings are:
A - Talkback - must hold button down
B - Clear Meters
C - Toggle G1/G2 output source between “Thru” and “From Software”.
D - Toggle Mute function between Monitor Out and Headphones outputs.
15

Getting Started with Audio Software
Select Ensemble for Mac System Sound Output
To get sound from general audio applications such as iTunes and Safari to play out of Ensemble, it must be
selected as the output device in Mac System Preferences.
•
Make sure you have already installed the most recent Ensemble Thunderbolt Software from the Apogee
website before proceeding.
1. Click the icon in the
upper-left corner of your
Mac’s display
"
2. From the drop-down
menu, select “System
Preferences...”
3. In the System Preferences control panel,
select “Sound”
4. At the top of the Sound Preferences
panel, select the “Output” tab
5. Under “Select a device for sound output:” click Ensemble Thunderbolt
Now sound from iTunes or Safari will come through Ensemble’s Monitor Out.
•
For instructions on how to play iTunes or Safari through a different Ensemble output, see page 17.
16

Route Mac System Sound to Different Outputs
1. Open the Audio/MIDI Setup Utility, found in the Applications > Utilities folder of your Mac
2. In the Audio Devices window, [Control+click] on
Apogee Ensemble Thunderbolt.
3. In the Menu that appears, select “Configure
Speakers”.
4. If playing a stereo audio file, select the Stereo tab. If
playing a multi-channel audio file, select the
Multichannel tab.
5. Select the desired Ensemble output channel for
each speaker assignment. For example, if you want
iTunes to play out of Ensemble channels 3 & 4, set
Left Front to “3” and Right Front to “4”.
6. Select the Apply button.
17

Select Ensemble in your DAW
Most professional applications have their own audio preferences that are separate from the Mac System
Preferences. Basic steps for setting up Ensemble are provided. For more detail on this topic, refer to the
documentation that comes with your recording program.
Select Ensemble in Logic Pro X
1. Go to Logic Pro X > Preferences > Audio.
2. In the Devices Tab, select “Ensemble
Thunderbolt” in the Output and Input Device drop-
down boxes.
3. Start by setting the I/O Buffer Size to “64
Samples”. This setting may need to be adjusted
based on your computer’s performance.
4. Select “Apply Changes” and close the
Preferences window.
Select Ensemble in ProTools 11
1. Go to Setup > Playback Engine.
2. In the Playback Engine drop-down box, select
“Ensemble Thunderbolt”.
3. Start by setting the H/W Buffer Size to “64
Samples”. This setting may need to be adjusted
based on your computer’s performance.
4. Select OK.
18

Select Ensemble in Ableton
1. Go to Live > Preferences. Select the Audio tab.
2. In Driver Type, select “CoreAudio”.
3. In Audio Input & Audio Output Device, select “Ensemble Thunderbolt”.
4. Start by setting the buffer size to “64 samples”. This setting may need to be adjusted based on your computer’s
performance.
19

Monitoring the Input Signal
Using your DAW to Monitor
By default, Ensemble is configured for your recording software or DAW to perform the monitoring duty of
passing your input signal on to your output. For instructions on configuring some of the major DAW programs
with Ensemble, see page 18.
Enable Input Monitor in Logic Pro X
1. Open Logic Pro X > Preferences > Audio
2. Make sure the box next to “Software Monitoring”
is checked.
3. Select the “I” button in each track you’d like to
input monitor.
Enable Input Monitor in Pro Tools
• In Pro Tools Native, record enable the track to
activate input monitoring.
•
In Pro Tools HD, the “I” button enables input
monitoring.
Enable Input Monitor in Ableton Live
In the track I/O section, set the Monitor switch to
“Auto”, or “In”.
20
/