Page is loading ...

SCEPTRE X23 Page1
Dear Sceptre Customer,
Congratulations on your new SCEPTRE X23 LCD monitor purchase. Thank you
for your support. To ensure safety and many years of trouble free operation of
your LCD monitor, please read the manual carefully before making any
adjustments, and keep them in a safe place for future reference. We hope you
enjoy your new SCEPTRE X23 LCD monitor.
For technical assistance, please call 1800-788-2878 and select option 3 or
email our tech support group at
monitor-ts@sceptre.com.
For all other inquiries, please call 1800-788-2878 and select option 4 or email
our customer service group at
cs@sceptre.com.
We recommend you register your SCEPTRE X23 LCD monitor with the enclosed
registration card and mail it in. For peace of mind and to protect your investment
beyond the standard warranty, SCEPTRE offers a two year extended warranty
service for your LCD monitor. This plan gives additional coverage once your
standard warranty period runs out. Please call our customer service group to
purchase the extended warranty.

Page2 SCEPTRE X23
Important Information

SCEPTRE X23 Page3
Tips and Safety Precautions
THIS PRODUCT HAS BEEN TESTED FOR COMPLIANCE WITH REGULATORY SAFETY
CERTIFICATIONS
This product is designed and manufactured to operate within defined design limits, and
misuse may result in electric shock or fire. To prevent the product from being damaged, the
following rules should be observed for the installation, use and maintenance of the product.
Read the following safety instructions before operating the display. Keep these instructions
in a safe place for future reference.
• To avoid the risk of electric shock or component damage, switch off the power before
connecting other components to the X23 LCD MONITOR.
• Unplug the power cord before cleaning the X23 LCD MONITOR. Do not use a liquid or
a spray cleaner for cleaning the product. Do not use abrasive cleaners.
• Always use the accessories recommended by the manufacturer to insure compatibility.
• When moving the X23 LCD MONITOR from an area of low temperature to an area of
high temperature, condensation may form on the housing. Do not turn on the X23 LCD
MONITOR immediately after this to avoid causing fire, electric shock or component
damage.
• Do not place the X23 LCD MONITOR on an unstable cart, stand, or table. If the X23
LCD MONITOR falls, it can injure a person and cause serious damage to the
appliance. Use only a cart or stand recommended by the manufacturer or sold with the
X23 LCD MONITOR.
• Any heat source should maintain a distance of at least 5 feet away from the X23 LCD
MONITOR, i.e. radiator, heater, oven, amplifier etc. Do not install the product too close
to anything that produces smoke or moisture. Operating the product close to smoke or
moisture may cause fire or electric shock.
• Slots and openings in the back and bottom of the bezel are provided for ventilation. To
ensure reliable operation of the X23 LCD MONITOR and to protect it from overheating,
be sure these openings are not blocked or covered. Do not place the X23 LCD
MONITOR in a bookcase or cabinet unless proper ventilation is provided.
• It is not recommended to use the X23 LCD MONITOR in a portrait format (by rotating
90 degrees) under high temperature environment (25°C or higher), since this would
retard heat dissipation and would eventually damage the monitor.
• Never push any object into the ventilation slots of the X23 LCD MONITOR. Do not
place any objects on the top of the Product. It could short circuit parts causing a fire or
electric shock. Never spill liquids on the X23 LCD MONITOR.
• The X23 LCD MONITOR should be operated only from the type of power source
indicated on the label. If you are not sure of the type of power supplied to your home,
consult your dealer or local power company.
• The power cable must be replaced when using different voltage from that specified in
the User Manual. For more information, contact your dealer.

Page4 SCEPTRE X23
• The X23 LCD MONITOR is equipped with a three-pronged grounded plug, a plug with
a third (grounding) pin. This plug will fit only into a grounded power outlet as a safety
feature.
If your outlet does not accommodate the three-wire plug, have an electrician install
the correct outlet, or use an adapter to ground the appliance safely. Do not defeat the
safety purpose of the grounded plug.
• Do not overload power strips and extension cords. Overloading can result in fire or
electric shock.
• The wall socket should be installed near the equipment and should be easily
accessible.
• Only the marked power source can be used for the product. Any power source other
than the specified one may cause fire or electric shock.
• Do not touch the power cord during thunderstorms. To avoid electric shock, avoid
handling the power cord during electrical storms.
• Unplug the unit during a lightning storm or when it will not be used for a long period of
time. This will protect the X23 LCD MONITOR from damage due to power surges.
• Do not attempt to repair or service the product yourself. Opening or removing the back
cover may expose you to high voltages, the risk of electric shock, and other hazards. If
repair is required, please contact your dealer and refer all servicing to qualified service
personnel.
• Keep the product away from moisture. Do not expose this appliance to rain or
moisture. If water penetrates into the product, unplug the power cord and contact your
dealer. Continuous use in this case may result in fire or electric shock.
• Do not use the product if any abnormality occurs. If any smoke or odor becomes
apparent, unplug the power cord and contact your dealer immediately. Do not try to
repair the product yourself.
• Avoid using dropped or damaged appliances. If the product is dropped and the
housing is damaged, the internal components may function abnormally. Unplug the
power cord immediately and contact your dealer for repair. Continued use of the
product may cause fire or electric shock.
• Do not install the product in an area with heavy dust or high humidity. Operating the
product in environments with heavy dust or high humidity may cause fire or electric
shock.
• Hold the power connector when removing the power cable. Pulling the power cable
itself may damage the wires inside the cable and cause fire or electric shocks. When
the product will not be used for an extended period of time, unplug the power
connector.
• To avoid risk of electric shock, do not touch the connector with wet hands.
• Insert batteries in accordance with instructions while using the remote control.
Incorrect polarities may cause damage and leakage of the batteries, operator injury
and contamination the remote control.
• If any of the following occurs please contact the dealer:
o The power connector fails or frays.
o Liquid sprays or any object drops into the X23 LCD MONITOR.
o The Display is exposed to rain or other moisture.
o The Display is dropped or damaged in any way.
o The performance of the Display changes substantially.
• Operating environment: Temperature: 5°C ~ 35°C, Humidity: 10% to 90%
non-condensing, Altitude: 0~10,000 ft.

SCEPTRE X23 Page5
Table of Contents
Important Information ......................................................................................................................... 2
Tips and Safety Precautions............................................................................................................... 3
Table of Contents ............................................................................................................................... 5
Opening the Package......................................................................................................................... 6
Package Contents .............................................................................................................................. 6
Optional Accessories.......................................................................................................................... 6
Installing the Base .............................................................................................................................. 7
QUICK START ................................................................................................................................... 8
Mounting Preparations ....................................................................................................................... 9
Identifying Front and Rear Panel ...................................................................................................... 12
Front View.............................................................................................................................. 12
Side View Control Buttons and Hotkey Functions................................................................... 13
Side View Tilt Angle ............................................................................................................... 14
Rear View .............................................................................................................................. 15
Rear View Connections.......................................................................................................... 16
Understanding Your Cables & Connections............................................................................ 17
Connecting the LCD to Your PC ....................................................................................................... 18
If You Have DVI Connection on Your Video Card…................................................................ 18
If You Have VGA Connection on Your Video Card… .............................................................. 19
Connecting the LCD to Your Video Device........................................................................................ 20
If You Have Component Connection on Your DVD Player…................................................... 20
If You Have Component Connection on Your HD Box… ......................................................... 21
If You Have Component Connection on PlayStation® 3… ...................................................... 22
If You Have Component Connection on Xbox 360™…........................................................... 23
On Screen Display (OSD) Functions ................................................................................................ 24
AUTO ADJUST ...................................................................................................................... 25
BRIGHTNESS ....................................................................................................................... 25
CONTRAST........................................................................................................................... 26
SCREEN SETTINGS............................................................................................................. 27
COLOR TEMP....................................................................................................................... 28
LANGUAGE........................................................................................................................... 29
OSD SETTINGS .................................................................................................................... 30
SOURCE ............................................................................................................................... 31
VOLUME ............................................................................................................................... 31
RECALL................................................................................................................................. 32
Supported PC Resolution ................................................................................................................. 32
Supported Video Resolution ............................................................................................................. 33
Troubleshooting................................................................................................................................ 34
How do I clean the LCD?.................................................................................................................. 36
Specification..................................................................................................................................... 37
Call Us If You Need Help! ................................................................................................................. 39
LIMITED PRODUCT WARRANTY.................................................................................................... 40
Disclaimer & Copyright Information................................................................................................... 43
FCC Compliance Statement ............................................................................................................. 44

Page6 SCEPTRE X23
Opening the Package
The SCEPTRE X23 is packaged in a carton together with standard accessories.
The weight of the LCD display is approximately 15.2 lbs. Since the LCD panel can
be easily scratched or broken, please handle the product gently. Never place the
unit on a surface with the glass facing downwards unless it is on a protective
padding. When opening the carton, make sure the product is in good condition
and that all the standard accessories and items are included. After unpacking
your LCD monitor, be sure to save the original box and all packing materials for
future shipping needs.
Package Contents
Monitor Display x 1
User Manual x 1
Warranty Card x 1
Power Cord x 1
VGA Cable x 1
3.5 mm Jack Audio Cable x 1 (for Line In to PC)
Optional Accessories
VGA to Female Component (YPbPr) Video Conversion Cable
3.5mm Mini-jack to Female RCA (red / white) Audio Conversion Cable
You can order the optional accessories from Sceptre Inc. directly. Please
contact Sceptre customer service for further instructions.

SCEPTRE X23 Page7
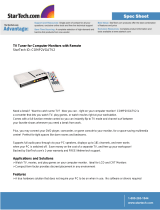
Installing the Base
1. Please place the base on a flat surface (i.e. table).
2. Hold the monitor directly 90 degrees above the base.

Page8 SCEPTRE X23
3. Connect the monitor to the base by inserting the monitor into the base.
QUICK START
The following are short steps to connect and use the monitor with your PC under
Microsoft Windows.
1. After you have installed the base, connect your VGA cord to both the monitor
and PC and turn on the PC and the monitor.
2. Under windows, use your mouse to right click on the background with nothing
selected. Left click on the PROPERTIES option.
3. Click on the SETTINGS tab.
4. Under SETTINGS change your resolution to 1360 x 768 and click on APPLY.
5. Click on ADVANCED button, and then click on MONITOR tab.
6. Under MONITOR make sure your refresh rate is set to 60 Hz.
7. Click on OK on all windows to exit.
8. On the monitor, press the MENU button to bring up the OSD.
9. Use the ▲
and ▼ buttons to select SCREEN SETTINGS. Press MENU to
enter that function.
10. Use the ▲
and ▼ buttons to select MODE and press MENU to enter the
function.
11. Use the ▲
and ▼ buttons to select 1360 x 768 and press MENU.
12. Let the OSD automatically exit and press the button to auto adjust the
image. Your LCD is ready for use.

SCEPTRE X23 Page9
Mounting Preparations
1. Place the monitor on a flat surface with cloth so the bezel does not get
scratched.
2. Start removing the base by putting pressure to the top buckle until it releases.

Page10 SCEPTRE X23
3. Keep the top buckle released while putting pressure to the lower buckle until it
releases as well. Please take the stand off when both buckles are released.
4. Once the base comes off, please remove the label sticker that covers the
screws you need to remove.

SCEPTRE X23 Page11
5. Unscrew the 4 screws that lock the arm to the monitor.
6. Once the 4 screws are removed, slide the arm off the monitor and the monitor
will be ready for mounting.

Page12 SCEPTRE X23
Identifying Front and Rear Panel
Front View
POWER INDICATOR : If light is blue, the monitor is turned on. If the light is
blinking red, the monitor is turned on but not receiving a signal from the computer.
If the light is solid red, the power cord is plugged in but the monitor is not turned
on. If the light is off, the power cord is not connected and no power is provided to
the display panel.
NATIVE RESOLUTION : This monitor’s clearest picture is produced under its
native resolution. The native resolution of the monitor is 1360x768 at 60 Hz
refresh rate.

SCEPTRE X23 Page13
Side View Control Buttons and Hotkey Functions
POWER – This button turns the monitor ON or OFF.
AUTO ADJUST – This button automatically adjusts the screen, making words
clearer and pictures centered. While in the OSD, this button acts as an exit key to
get out of the current menu.
MENU – This button opens the On Screen Display (OSD) Menu. While in the
OSD, this button also acts as the ENTER button and goes into the function you
want to adjust. While adjusting the actual value of options, press this button again
to exit.
▲ – This button adjusts the brightness. Use the ◄ and ► buttons to adjust the
value. While in the OSD this button acts as a navigation button moving selection
upwards.
▼ – This button adjusts the volume. Use the ◄ and ► buttons to adjust the
value. While in the OSD this button acts as a navigation button moving selection
downwards.
◄ – This button allows you to activate the mute function in the OSD menu.
Use the ▲ and ▼ buttons to turn on or turn off the mute function. While in the
OSD this button acts as the decrease adjustment button.
► –
This button allows you to switch sources between DVI and VGA. While in
the OSD this button acts as the increase adjustment button.

Page14 SCEPTRE X23
Side View Tilt Angle
The LCD Monitor’s angle settings range from 0° to 10°.
0
o
to 10
o

SCEPTRE X23 Page15
Rear View
Mounting Specification : 100mm x 100mm using screw size M4.
Length of screw should not exceed 10mm.

Page16 SCEPTRE X23
Rear View Connections
The following descriptions are from left to right.
DVI – DVI stands for Digital Video Interface. This connection is for computers to
send video signals to the monitor digitally so that colors and video are more
accurate and vivid. This port supports video input; however this DVI
connection does NOT support HDCP. If you have a HDCP video device, do
NOT connect the device to this port.
VGA – VGA stands for Video Graphics Array. This connection is for computers to
send video signals to the monitor by an analog signal. This method of connection
is the most commonly used connection. You can also use this connection for
videos by using a VGA to Female Component (YPbPr) video conversion
cable in conjunction with a regular component video cable. It can support
up to 1080P HD videos.
Audio In – This connection is for linking to the PC’s line out connection for
transmitting audio signal to the monitor’s speakers. Do NOT connect a headset
or external speakers to this connection. You can also use this connection for
audio on game consoles or HD video devices by using a 3.5mm Mini-jack to
Female RCA (red / white) audio conversion cable in conjunction with a
regular RCA (red / white) audio cable.

SCEPTRE X23 Page17
Understanding Your Cables & Connections
Cable Name
Cable Picture
Corresponding Connection
Picture
DVI
(digital video)
(No HDCP)
VGA
(analog video)
3.5 mm
Mini-jack
Cable Name Cable Picture
VGA to
Female
Component
YPbPr
(optional
accessory)
3.5mm
Mini-jack to
Female RCA
Audio
(optional
accessory)

Page18 SCEPTRE X23
Connecting the LCD to Your PC
If You Have DVI Connection on Your Video Card…
1. Make sure the power of X23 LCD MONITOR is turned off.
2. Obtain a DVI cable and connect to the DVI connection on your PC. Connect the other
end of the cable to your X23 LCD MONITOR.
3. Obtain the Audio In cable and connect the 3.5 mm Mini-jack cable to the Audio In
connection of the monitor. Connect the other end of the 3.5 mm Mini-jack cable to your
PC’s audio line out connection.
4. Turn on the power of both the X23 LCD MONITOR and the PC.
5. Use the side button
►
to select DVI on the X23 LCD MONITOR.
Please Note :
• DVI cable is not included in the package.
• Some video cards may have their DVI connection turned off by default. If you do
not get video, please consult your video card’s technical support.
• The PC’s clearest picture is produced under 1360x768 at 60Hz.

SCEPTRE X23 Page19
If You Have VGA Connection on Your Video Card…
1. Make sure the power of X23 LCD MONITOR is turned off.
2. If you were previously using a CRT (bulky) monitor, please hook up your old
monitor first and make sure your refresh rate is set to 60 Hz frequency before using the
X23 LCD MONITOR. You can find the refresh rate information and change it by RIGHT
CLICKING on the desktop with nothing selected. After you have right clicked, select the
PROPERTIES option. Click on the SETTINGS tab. Click on the ADVANCED button.
Click on the MONITOR tab. In that tab, change the refresh rate to 60Hz and click on
APPLY. After the refresh rate changed, please shut down the computer and monitor.
3. Obtain the VGA cable and connect to the VGA connection on your PC. Connect the
other end of the cable to your X23 LCD MONITOR.
4. Obtain the Audio In cable and connect the 3.5 mm Mini-jack cable to the Audio In
connection of the monitor. Connect the other end of the 3.5 mm Mini-jack cable to your
PC’s audio line out connection.
5. Turn on the power of both the X23 LCD MONITOR and the PC.
6. Use the side button
►
to select VGA on the X23 LCD MONITOR.
Please Note :
• Some video cards may have their DVI connection turned off by default. If you do
not get video, please consult your video card’s technical support.
• The PC’s clearest picture is produced under 1360x768 at 60Hz.

Page20 SCEPTRE X23
Connecting the LCD to Your Video Device
If You Have Component Connection on Your DVD Player…
1. Make sure the power of X23 LCD MONITOR is turned off.
2. If you have component connection on your DVD player, purchase a VGA to female
component video conversion cable and connect the component end to regular
component cables and regular component cables to the DVD player. Connect the VGA
end to the X23 LCD monitor. Make sure you match the colors on the component
connection.
3. Purchase a 3.5 mm mini-jack to female RCA audio conversion cable and connect the
RCA red / white end to regular RCA red / white cables and regular RCA red / white
cables to your DVD player. Connect the 3.5 mm Mini-jack end to the X23 LCD
MONITOR’s Audio In connection.
4. Turn on the X23 LCD MONITOR and your video device.
5. Use the side button ► to select VGA on the X23 LCD MONITOR.
Please Note :
• Please reference your DVD player manual or call the DVD player’s tech
support to make sure the proper settings are configured for your video
device.
/