Page is loading ...

1

2
The type of terrain: flat and rough-terrain
ASSEMBLING YOUR BICYCLE
1. Gears
2. Rear Brake
3. Rear Reflector
4. Seat Post
5. Saddle
6. Front Brake Lever
7. Gear Selector
8. Handle Bars
9. Bell
10. Rear Brake Lever
11. Front Reflector
12. Front Brake
13. Frame
14. Left Crank
15. Left Pedal
16. Right Pedal
17. Right Crank
18. Chain
19. Tyre
20. Front Wheel Protector
1
2
3
4
5
6
9
8
7
11
12
10
.
18
19
16
15
17
14
20
13
CAREFULLY UNPACK AND TAKE CARE WHEN REMOVING THE
WHEEL FROM THE CRANK AS IT MAY DAMAGE THE SPOKES
Tool Kit
Multi-sized Spanner
Hexagonal Key

3
1.PREPARING YOUR BICYCLE FOR ASSEMBLY
Ensuring that the fork is facing away from the rear wheel, rest your bicycle on the rear
wheel and fork brace, in the upright position.
Rear Wheel
Fork
Fork Brace

4
2. ATTACHING THE HANDLE BARS
Expander Bolt
1. Wedge Nut
2. Head Tube
3. Handle Bar Column
4. Handle Bar Stem
Ensuring that the brake cables do not tangle, gently lower the handle bars into the handle
bar column.
1
2
3
4

5
Using the hexagonal key, secure the handle bars into place.
Hexagonal Key
Handle bar

6
3. ATTACHING THE SADDLE
If not already attached, firmly push the narrow end of the seat post into the hole on the
underside of the saddle, and tighten using the spanner.
Lower the seat post into the frame, and secure using the quick release lever.
Note: the minimum insertion mark must not be visible.
Saddle
Seat Post
Nut
Spanner
Saddle
Quick
Release
Lever
Seat Post

7
4. ATTACHING THE FRONT WHEEL
Position your bicycle as illustrated and remove the fork brace.
Using the spanner, loosen the nut on the front brake to allow enough room between the
brake pads for the front wheel to slide between.
Fork
Fork Brace
Front Brake
Blocks
Nut

8
Remove the front wheel protectors from both ends of the axle, then remove the axle nuts
and tab washers from the wheel, and firmly insert the wheel between the fork so that it
rests securely in place. Replace the tab washers and axle nuts and fasten securely
ensuring that the tab washers locate into the holes provided.
Using the spanner, re-tighten the nut on the front brake to secure the front brake cable.
Brake pads should be between 1.5 – 2.0mm away from rim.
Tab Washer
Fork
Quick release

9
5. ATTACHING THE PEDALS
The pedals and cranks are labelled L for left, and R for right (riding position)
WARNING: Attempting to attach the wrong pedal will result in damaging the thread.
Ensuring that you are inserting the pedal into the correct side. First stand your bicycle in
the upright, then screw each pedal by hand into cranks and tighten using the spanner.
REMEMBER that the left pedal should be fitted anti-clockwise while the right pedal
should be fitted clockwise.

10
6. CHECKING AND ADJUSTING YOUR BICYCLE
Keeping your bicycle in the upright position; stand with a leg either side of the front
wheel, holding the wheel firmly in position. Loosen the handle bars using the hexagonal
key, and adjust to the right height and position for use. Note: the minimum insertion
mark must not be visible. The mid-section of the handle bars must be aligned with the
front wheel. Tighten into place.
Sit on your bicycle to gauge a suitable riding position. The ideal height will allow your

11
toes to touch the ground comfortably.
To adjust the position of the saddle, loosen the quick release lever on the main unit
situated at the bottom of the seat post and adjust and tighten.
Note: the minimum insertion mark must not be visible.
Before riding your bicycle for the first time, ensure that your brakes work. Gently roll
your bicycle backwards and forwards and test that each brake works individually.
When you sit on your bicycle with hands on the handlebar, your left brake lever operates
the rear brake system, and your right brake lever operates the front brake system.

12
To obtain the best performance from your bicycle, check the tyre pressure by squeezing
each tyre between your index and middle finger and thumb. The tyre should feel firm, if
necessary pump air into it. Refer to the manufacturer’s recommendation as shown on the
tyre sidewall.
To adjust rear suspension, change the length of the spring to loosen or tighten the
suspension.
There is no need to adjust the front suspension.

13
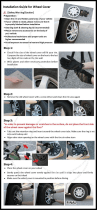
7. V-Style Brake Guide
Instructions Manual
Please follow the below step to adjust the brake system correctly..

14

15

16

17

18
Comply with safety requirement
1. Learn local bicycle laws and regulations. Many communities have special regulations
about licensing of bicycles, riding on sidewalks, laws regulating bike path and trail
use, and so on. Many regions have helmet laws, child carrier laws and special bicycle
traffic laws. In UK and in most foreign countries, a cyclist is required to obey the
same traffic laws as the driver of a car or motorcycle. It is your responsibility to know
and obey the laws.
2. You are sharing the road or the path with others motorists, pedestrians and other
cyclists. Respect their rights, and be tolerant if they infringe on yours.
3. Ride defensively. Assume that the people with whom you are sharing the road are so
absorbed with what they are doing and where they are going that they are oblivious to
you.
4. Think ahead of where you’re going, and be ready to avoid:
·Vehicles slowing or turning in front of you, entering the road or your lane ahead of
your, or coming up behind you.
·Parked car with doors opening in front of you.
·Pedestrians stepping out in front of you.
·Children playing near the road.
·Pot holes, sewer grating, railroad tracks, expansion joints, road or sidewalk
construction, debris and other obstructions that could cause you to swerve into
traffic, catch your wheels or otherwise cause you to lose control and have and
accident.
·The many other hazards and distractions which can occur on a bicycle ride.
5. Ride in designated bike lanes, on designated bikes paths or on the right side of the
road, in the same direction as car traffic and as close to the edge of the road as
possible.
6. Stop at stop signs and traffic lights, slow down and look both ways at street
intersections. Remember that a bicycle always loses in a collision with a motor
vehicle, so be prepared to yield even if you have the right of way.
7. Use hand signals for turning and stopping. Learn the local vehicle code for the correct
signals.
8. Never ride with headphones. They mask traffic sounds and emergency vehicle sirens,
distract you from concentration on what is going on around you, and their wires can
tangle in the moving parts of the bicycle, causing you to lose control.
9. Never carry a passenger, unless it is a small child wearing an approved helmet and
secured in a correctly mounted child carrier.
10. Never carry anything that obstructs your vision or your complete control of the
bicycle, or could become entangled in the moving parts of the bicycles.
11. Never hitch a ride by holding on to another vehicle.
12. Do not do stunts, wheelies or jumps. They can cause you injury and damage your
bike.
13. Do not weave through traffic or make any moves that may surprise people with whom

19
you are sharing the road.
14. Observe and yield the right of way.
15. Never ride your bicycle while under the influence of alcohol or drugs.
16. If possible, avoid riding in bad weather, when visibility is obscured, at dusk or in the
dark, or when extremely tired. Each of these conditions increases the risk of accident.
WARING: An approved bicycle helmet should be worn at all times. Failure to wear
a helmet may result in serious personal injury to the rider.
Reflectors: Reflectors are important safety devices which are designed to be an integral
part of your bicycle.
If this bicycle is to be used at night it is the owner’s responsibility to ensure that it
complies with the Highway Code by fitting a white light to the front and a red light to the
rear of bicycle. Clean lenses and reflectors to ensure they are fully effective.
WARNING: Do not remove the reflectors from your bicycle. They are an integral part of
the bicycle’s safety system. Removing the reflectors may reduce your visibility to others
using the roadway. Being struck by other vehicles may result in serious injury or death.
Keeping your bike in good order
1. Tire
·Always keep tires inflated according to the recommended pressure indicated on the
side wall of the tire.
·Initially, the tire pressure should be checked with a gauge before the bike is ridden.
·Blowouts are a very great danger to the rider’s safety. Take time and extra precaution
in the maintenance and repair of your tires.
2. Brakes maintenance
·Have your brakes overhauled regularly (cleaning and lubricating the cables and the
various pivot points).
·Adjust the control cables and the brake blocks accurately.
·The cable housing must never be damaged or cracked.
·Make sure mounting bolt or bolts are tight.

20
MECHANICAL
MAINTENANCE:
It is extremely important that your bike is checked and serviced at regular intervals
to ensure its reliability and especially that it is safe to ride.
Cleaning and lubrication also forms an important tool in the proper maintenance of your
bike and this is covered in more detail immediately after this section.
The following checks are suggested:
Before you ride – check:
When you are riding, please use a bicycle helmet for your safety.
It is strongly advised to keep all reflectors on your bicycle for possible national legal
requirements when you ride on the public road.
Wheels are tightly secured.
Tyres are inflated to correct pressure (indicated on side-wall of tyre). Also check
condition of tyres for cuts etc. (Note: It is a good idea to carry a puncture repair kit or
spare inner tube, tyre levers and pump with you).
Handlebar, stem and headset locknut are tight and that the steering turns smoothly.
Brakes – Squeeze levers to ensure sufficient pressure can be applied without the
lever touching the handlebars. Also ensure brake blocks are aligned correctly with
rim and the blocks are not badly worn.
Brake cables are not frayed at the end.
Gears operate correctly and smoothly.
Wheels are running true by spinning them. You can also check that mudguards, if
fitted, are correctly adjusted at this time.
The height of the seat could be adjusted from 780mm to 972mm.The vertical
distance from the ground to the top of the seat surface, measured with the seat in a
horizontal position and with the seat-pillar set to the minimum insertion depth.
After long or hard rides or at least every month of regular use – Check same points
as above + the following:
Clean, degrease and lubricate your bike.
Crank, bottom bracket fittings and pedals are tight.
Tyre wear and general condition for cuts, glass, thorns etc.
Spokes are not loose or broken. These need to be attended to before the bike can be
ridden again and you would probably need to get these repaired or replaced.
Hubs are running smoothly.
Tyres are free from imbedded objects such as thorns, glass or nails.
Some servicing and repair tasks require specialised knowledge and tools.
Improper adjustment may result in damage to the bike or may lead to a
serious accident. If you have any doubts consult your cycle dealer.
/