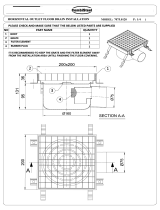
CombiSteel 7075.0130 Horizontal Outlet Drainage Channel Installation guide

  • I've reviewed the installation instructions for the CombiSteel Drainage Channel model 7075.0130. The document outlines the necessary steps for successful installation, from initial parts check to the final tiling process. It emphasizes key aspects like adjusting the channel height, connecting it to the PVC pipe with proper slope, and securing it with concrete. I am ready to answer your questions about the device and its installation.
  • What is recommended to keep away from the installation area until finishing the floor covering?
    What should be the distance between the top of the existing concrete and the anticipated finished floor level?
    What should be ensured regarding the connection to the PVC pipe?
    When the rubber plug can be taken off?

MODEL: 7075.0130

PLEASE CHECK AND MAKE SURE THAT THE BELOW LISTED PARTS ARE SUPPLIED
NO PART NAME QUANTITY
  
  
  
  



A
   

A  
 
VJ   \
 
   
   

 d'
  ? lij
/
 1 1
 
 572 




  






572 

SECTION A-A
1


( HORIZONTAL OUTLET DRAINAGE CHANNEL INSTALLATION MODEL: 7075.0130 P: 2/5 )









( HORIZONTAL OUTLET DRAINAGE CHANNEL INSTALLATION MODEL: 7075.0130 P: 3/5 )
*THE DRAINAGE CHANNEL IS CONNECTED TO THE PVC PIPE. PLEASE MAKE SURE TO HAVE THE REQUIRED
SLOPE AND THE ANGLE OF FLOW.



( HORIZONTAL OUTLET DRAINAGE CHANNEL INSTALLATION MODEL: 7075.0130 P: 4/5 )
*APPROXIMATELY 30-40 MM OF CONCRETE IS POURED AT THE BOTTOM OF EACH FOOT
AND LEFT TO CURE. MAKE SURE THAT THE DRAINAGE CHANNEL IS KEPT UNTOUCHED TILL
THE CONCRETE IS PROPERLY CURED.
 
SLOPED !
( HORIZONTAL OUTLET DRAINAGE CHANNEL INSTALLATION MODEL: 7075.0130 P: 5/5 )
*THE WHOLE GAP AROUND AND UNDER THE DRAINAGE CHANNEL SHOULD BE FILLED WITH
CONCRETE GRADUALLY AND HAVE A SMOOTH TOP SURFACE.
*AS THE LAST STEP, TILING IS APPLIED
*THE WHOLE SURFACE OF THE DRAINAGE CHANNEL MUST BE CLEAN ED PROPERLY
BEFORE PLACING THE FILTER ELEMENT AND THE GRATE.
* PLEASE MAKE SURE THAT THE RUBBER PLUG IS ALWAYS ON. THE RUBBER PLUG
MAY BE TAKEN OFF FOR MAINTENANCE ONLY.
/