Page is loading ...

EXHIBIT Q-3
TO
M. HERMES DECLARATION

GR2071001-MM-00 1 of 43 20121110 –
Ver1
Hybrid Grill
Infrared, Gas & Charcoal Cooking System
Model
s
Number:
GR2071001-MM-00
ASSEMBLY & OPERATING INSTRUCTIONS
For Outdoor Use Only
This instruction manual contains important information necessary for the
proper assembly and safe use of the appliance.
Read and follow all warnings and instructions before assembling/using
the appliance.
Follow all warnings and instructions when using the appliance.
Keep this manual for further reference
ATTENTION
Please do not withdraw all parts from the packing boxes immediately!!
Each assembly step in this instruction manual has shown how can you find the
particular part(s) from the packing box quickly. We strongly recommend that you
read through the assembly procedure before proceeding assembly.
Should you encounter any problem,
CALL US FIRST.
DOT NOT return product to the retail store!!
WE CAN HELP.
For assistance, contact customer service at
customerservice@rankam.com
or at (888) 837-1380, Mon to Fri, 8:00am – 5:00pm Pacific Standard time

2 of 47 20121224-
Ver1
DANGER
If you smell gas:
1. Shut off gas to the appliance.
2. Extinguish any open flame.
3. Open lid.
4. If odor continues, keep away from the appliance and immediately
call your gas supplier or fire department
WARNING
1. Do not store or use gasoline or other flammable liquids or vapors in
the vicinity of this or any other appliance.
2.
An LP cylinder not connected for use shall not be stored in the
vicinity of this or any other appliance
DANGER
(a) Do not store a spare LP-gas cylinder under or near this appliance;
(b) Never fill the cylinder beyond 80 percent full; and
(c) If the information in (a) and (b) is not followed exactly, a fire causing
death or serious injury may occur.
SAFETY LABELS
DANGER: Indicates an imminently hazardous situation which, if not avoided, will
result in death or serious injury
WARNING: Be alert to the possibility of serious bodily injury if the instructions are not
followed. Be sure to read and carefully follow all of the messages.
CAUTION: Indicates a potentially hazardous situation, which, if not avoided, may
result in minor or moderate injury.

3 of 47 20121224-
Ver1
GAS GRILL GENERAL WARNINGS
WARNING
This outdoor cooking gas appliance shall be used only outdoors and shall not be
used in a building, garage or any other enclosed area.
This outdoor cooking gas appliance is not intended to be installed in or on boats.
This appliance is not intended to be installed in or on recreational vehicles.
Use your grill OUTDOORS in a well ventilated space away from dwellings or other
buildings to prevent dangers
associated with gas accumulation
and toxic vapors. The grill should
be situated at least 60 inches (153
cm) from buildings. Not adhering
to these clearances will prevent
proper ventilation and may
increase the risk of a fire and/or
property damage, which could also
result in personal injury.
Maintain a minimum clearance of
60 inches (153 cm) between all
sides of grill, deck railings, walls or
other combustible material. DO
NOT use grill under overhead combustible construction.
DO NOT obstruct the flow of combustion/ventilation air.
DO NOT leave the grill unattended while in use.
DO NOT use while under the influence of drugs or alcohol.
Keep the fuel supply hose away from heated surfaces.
DO NOT put grill in storage or move it immediately after use. Allow grill to cool to
touch before moving/storing. Failure to do so could result in fire resulting in property
damage, personal injury or death.
The appliance is for household use only. DO NOT use this grill for other than its
intended purpose.
Never use natural gas in a unit designed for liquid propane gas.
Never use charcoal or wood briquettes in a gas grill. Flavoring chips must be
contained in a metal smoking box to contain ash and prevent fires.
Leak test must be conducted prior to each use.
Keep a fire extinguisher on hand acceptable for use with gas products. Refer to your
local authority to determine proper size and type.
Grill is hot when in use. To avoid burns:
DO NOT attempt to move the grill.
Wear protective gloves or oven mitts.
DO NOT touch any hot grill surfaces.
DO NOT wear loose clothing or allow hair to come in contact with grill.
Never close the SIDE BURNER LID during operation.
Maintain a minimum clearance of
60 in. from combustible material.

4 of 47 20121224-
Ver1
USE OF LP GAS CYLINDER AND INSTALLATION
BEFORE INSTALLING:
The installation must conform with local codes or, in the absence of local codes, with
either the National Fuel Gas Code, ANSI Z223.1/NFPA 54, Natural Gas and Propane
Installation Code, CSA B149.1, or Propane Storage and Handling Code, B149.2,or the
Standard for Recreational Vehicles, ANSI A 119.2/NFPA 1192, and CSA Z240 RV Series,
Recreational Vehicle Code, as applicable.
BEFORE EVERY USAGE:
Be sure to inspect the hose for leaks, cuts, wear, abrasion, or damage of any sort before
using this appliance. If any damage is apparent the hose must be replaced with a
replacement hose specified by the manufacturer before it is put in use.
LP GAS CYLINDER
The LP (liquid propane) cylinder specifically designed to be used with this unit MUST have
a 20 lb. (9.1kg) capacity with a Type 1 cylinder value and an overfilling protection device
(OPD). Only use LP cylinders with this type of valve.
The nominal cylinder: Height = 18 inches (45.7 cm), Diameter = 12 inches (30.5cm) and
bottom ring diameter = 8 inches (20.3 cm)
LP tank valve must have:
Type 1 outlet compatible with regulator or appliance.
Safety relief valve.
UL listed Overfill Protection Device(OPD). This OPD safety
feature is identified by a unique triangular hand wheel. Use only
tanks equipped with this type of valve.
LP tank must be arranged for vapor withdrawal.
The LP cylinder must be constructed and marked in
accordance with the Specifications for LP-Gas Cylinders of
the U.S. Department of Transportation (D.O.T.) or the
National Standard of Canada CAN/CSA – B339, Cylinder,
Spheres and Tubes for Transportation of Dangerous Goods;
and Commission of Dangerous Goods; and Commission, as
applicable.
The LP cylinder must include a collar to protect the cylinder
valve.
The LP cylinder must be stored outdoors out of the reach of children and pets. It
SHALL NOT be stored in a building, garage, shed, breezeway, or any other enclosed
space. Cylinders can be stored indoors ONLY if cylinders are disconnected and
removed from the appliance.
The cylinder should ALWAYS be put in an upright position.

5 of 47 20121224-
Ver1
WARNING
Place dust cap on cylinder valve outlet whenever the cylinder is not in use. Only install
the type of dust cap on the cylinder valve outlet that is provided with the cylinder valve.
Other types of caps or plugs may result in leakage of propane.
DANGER
DO NOT connect this grill to an existing #510 POL cylinder valve with Left hand
threads. The Type 1 valve can be indentified with the large external threads on the
valve outlet.
DO NOT connect to a propane cylinder exceeding this capacity.
DO NOT connect to a cylinder that uses any other type of valve connection device.
Never store a spare LP gas cylinder under or near your grill. This could cause
pressure to be expelled through the vapor relief valve resulting in fire, explosion, or
severe personal injury including death.
Keep the ventilation opening(s) of the LP gas cylinder enclosure free and clear from
obstructions and debris.
DO NOT insert any foreign objects into the valve outlet. Damage to the back-check
could result. A damaged back-check can cause a leak, possibly resulting in
explosions, fire, severe bodily harm, or death.
Place dust cap on cylinder valve outlet whenever cylinder is not in use. Only install
the type of dust cap on the cylinder valve outlet that is provided with the cylinder
valve. Other types of caps or plugs may result in leakage of propane.
WARNING
FOR FILLING THE LP GAS CYLINDER
Allow only qualified LP gas dealers to properly fill or repair your LP cylinder.
DO NOT allow the cylinder to be filled beyond 80% capacity. Over-filled tanks can
create a dangerous condition. Over-filled tanks can build-up pressure and cause the
relief valve to expel propane gas vapors. The vapor is combustible and if it comes in
contact with a spark source or flame an explosion causing severe burns, bodily
harm, or death could occur.
Always use a safety cap when grill is not connected to cylinder.
If you exchange a cylinder with a qualified exchange program, be sure the cylinder
has a Type 1 valve and an over-filling prevention device (OPD).

6 of 47 20121224-
Ver1
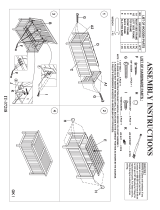
INSTALLING GAS CYLINDER
1. Check that cylinder valve is closed by
turning knob clockwise.
2. Place cylinder to cylinder fixture which
is at the bottom cart of the grill per
picture shown.
WARNING
The pressure regulator and hose assembly supplied with your gas grill must be used.
Replacement pressure regulators and hose assemblies must be those specified by
the grill manufacturer.
Do not attempt to connect it to any other fuel supply source.
Do not attempt to adjust or repair the regulator. The regulator is designed to operate
at the maximum output pressure of 11 inches of water column (2.74 kPa).
CONNECTION PROCEDURES
1. Make sure the tank valve is closed (turn valve
clockwise till tight)
2. Check tank valve to insure it has proper external male
threads.
3. Make sure all burner valves are OFF.
4. Inspect valve connections, port, and regulator
assembly. Look for any damage or debris. Remove
any debris. Inspect hose for damage. Never attempt to
use damaged or obstructed equipment. See local L.P
gas dealer for repair.
5. When connecting regulator assembly to the valve, hand tighten the quick coupling nut
clockwise to a complete stop. Do not use a wrench to tighten. Use of a wrench may
damage the quick coupling nut and result in a hazardous condition.
6. Open the tank valve fully (counterclockwise). Use a soapy water solution to check all
connections for leaks before attempting to light the grill (see below). If a leak is found,
turn the tank valve off and do not use the grill until a local LP gas dealer can make
repairs.
To disconnect LP gas cylinder:
WARNING
If the grill is not in use, the gas must be turned off at the supply cylinder(s). Storage of
the grill is permissible only if the cylinder is disconnected and removed from the grill.
Cylinders must be stored outdoors out of the reach of children and pets and must not
be stored in a building, garage or any other enclosed area.
WARNING: Keep the fuel supply hose
away from any heated surfaces.
Gas
Cylinder
Cylinder
Fixture

7 of 47 20121224-
Ver1
1. Turn the burner valves off.
2. Turn the tank valve off fully (turn clockwise to stop).
3. Detach the regulator assembly from the tank valve by turning the quick coupling nut
counterclockwise.
LEAK TEST
WARNING
DO NOT SMOKE WHILE CONDUCTING LEAK TEST.
NEVER PERFORM LEAK TEST WITH AN OPEN FLAME.
Perform test OUTDOORS only in a well ventilated area.
If it is evident there is excessive abrasion or wear, or the hose is cut, it must be
replaced prior to the appliance being operational. The replacement hose shall be
specified the by manufacturer.
When to perform a leak test:
After assembling the grill and before lighting for the first time, even if purchased
fully assembled.
Every time the LP gas cylinder is refilled or if any of the gas components are
replaced.
Checking for leaks:
1. Create a mixture of 50% water and 50% liquid dishwashing soap.
2. Open the lid.
3. Ensure all control knobs are set to the “OFF”
position.
4. Turn on the fuel supply at the cylinder valve. Turn
the cylinder valve knob one turn counter-clockwise.
5. Apply the soap water mixture to the following:
a. Supply tank weld.
b. Connection nut to tank valve.
c. Back side of connection nut to brass nipple.
d. Brass nipple connection into regulator.
e. Regulator connections to gas supply hoses.
f. Gas supply hose connection.
g. Side burner valve stem cap
h. Side burner connection to hose.
i. Stainless Steel Flexible Gas Tube .
j. The full length of gas supply hose.
k. Tank valve to cylinder.
6. Check each place (a-k) for growing bubbles which indicates a leak.
7. Turn off gas supply at cylinder valve.
8. Turn on control knobs to release gas pressure in hose.
9. Turn control knobs to “OFF” position.
10. Tighten any leaking connections.
11. Repeat soapy water test until no leaks are detected.
12. Turn off gas supply at cylinder valve until you are ready to use your grill.

8 of 47 20121224-
Ver1
LIGHTING INSTRUCTIONS
BEFORE LIGHTING
WARNING
Inspect the gas supply hose prior to turning the gas “ON”.
If there is evidence of cuts, wear, or abrasion, it must be replaced prior to use.
Do not use the grill if the odor of gas is present.
Only the pressure regulator and hose assembly supplied with the unit should be
used.
Perform the “LEAK TEST” according to instruction before operating the grill.
ALWAYS keep your face and body as far away from the burner as possible while
lighting.
LIGHTING THE MAIN BURNER OF GRILL
1.Read all instructions before lighting.
2.Open lid during lighting.
3.Light the IGNITION BURNER first. Push and turn main burner knob slowly to HI. Burner
should light immediately.
4.Once the IGNITION BURNER is lit, you may light the rest of burners.
5.If ignition does not occur in 5 seconds, turn the knob(s) off, wait 5 minutes, then repeat
the lighting procedure or light by match.
6. To turn burners off, turn the control knobs clockwise until they lock in the OFF
position.Turn gas supply to OFF.
Light this burner first! Turn
counterclockwise to open

9 of 47 20121224-
Ver1
LIGHTING THE SIDE BURNER (Side burner):
DANGER
Never close the SIDE BURNER LID during operation
1. Read all instructions before lighting.
2. Open lid during lighting.
3. Push and turn main burner knob slowly to HI. The
side burner should light immediately.
4. If ignition does not occur in 5 seconds, turn the
knob off, wait 5 minutes, then repeat the lighting
procedure or light by match.
5. To turn burners off, turn the control knob
clockwise until it locks in the OFF position. Turn gas supply to OFF.
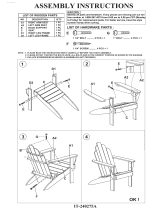
MATCH LIGHTING THE MAIN BURNERS:
1. Turn OFF all burner valves.
2. Make sure the lid is open.
3. Place a lighted match between the coils on the
extension rod and hold next to the burner.
4. Turn the control knob(s) to the “HI” position. Burner
should light immediately.
5. If the burner does not light in 4 seconds turn the
knob off, wait 5 minutes and repeat above
procedures.
MATCH LIGHTING THE SIDE BURNER:
1. Turn OFF all burner valves.
2. Make sure the lid is open.
3. Strike and carefully place a long match 1/2” (1 to 2
cm) from the side burner
4. Turn the control knob to the “HI” position. Burner
should light immediately.
5. If the burner does not light in 4 seconds turn the
knob off, wait 5 minutes and repeat above
procedures.
Lighting Hole
Lighting Rod
Match

10 of 47 20121224-
Ver1
DANGER
Keep your face and hands as far away from the grill as possible when lighting it.
FLAME CHARACTERISTICS
This procedure outlines how to check for proper burner flame
characteristics.
Burner flames should be blue and stable with little yellow tips, with no
excessive noise, or lifting. If the flame is yellow, it indicates
insufficient air. If the flame is noisy and tends to lift away from the
burner, it indicates too much air. If any of these conditions exist call
our customer service line.
Visually check the burner flames prior to each use. The flames should look like this picture.
If they do not, refer to the cleaning burners and side burner of this manual.
MAINTENANCE GUIDE
Before cleaning the grill, place it in an area clear and free from combustible materials,
gasoline and other flammable vapors and liquids.
Do Not obstruct the flow of combustion and ventilation air.
GREASE TRAY
The grease tray should be emptied and wiped down periodically and washed with a mild
detergent and warm water solution. A small amount of sand or cat litter may be placed in
the bottom of grease tray to absorb the grease. Check the grease tray frequently. Don’t
allow excess grease to accumulate in the grease tray. Accumulated grease will easily ignite.
Therefore, it is important to clean and remove grease after each use.
GRILL BURNERS
Extreme care should be taken when removing a burner as it must be correctly centered on
the orifice before any attempt is made to re-light the grill. Frequency of cleaning will depend
on how often you use the grill.
Spiders and small insects occasionally spin webs or make nests in the grill burner tubes
during transit and warehousing. These webs can lead to gas flow obstruction which could
result in a fire in and around burner tubes. This type of fire is known as flashback and can
cause serious damage to your grill and create an unsafe operating condition for the user.
Although an obstructed burner tube is not the only cause of flashback, it is the most
common cause. To reduce the chance of flashback, you must clean the burner tubes
before assembling your grill, and at least once a month in late summer or early fall when
spiders are most active. Also, perform this burner tube cleaning procedure if your grill has
not been used for an extended period of time.

11 of 47 20121224-
Ver1
You should inspect the burners at least once a year or immediately after any of the
following conditions occur:
1. The smell of gas in conjunction with the burner flames appearing yellow.
2. The grill does not reach temperature.
3. The grill heats unevenly.
4. The burners make popping noises.
WARNING
ENSURE that the gas supply and the knobs are in the “OFF” position.
Cleaning The Burner Tubes and Burner Ports (For main burners)
To reduce the chance of FLASHBACK FIRE you must clean the Burner Tubes as follows
at least once a month in summer and fall or whenever spiders are active in your area, and if
your grill has not been used for an extended period of time.
Removing the main burner(s):
1. Turn all Burner Valves to the full OFF position.
2. Turn the LP Gas tank valve to the full OFF position.
3. Detach the LP Gas regulator assembly from your gas
cylinder.
4. Remove the Cooking Grates and Heat Distribution
Plates from your grill.
5. Remove the screw from the front of each Burner using a
Phillips Head Screwdriver.
6. Carefully lift each Burner up and away from the Gas
Valve Orifice.
7. Check and clean burner/ venturi tubes for insects and
insect nests. A clogged tube can lead to a fire beneath the grill.
8. Bend a stiff wire or wire coat hanger into a small hook as shown and run the hook
through the Burner Tube and inside the Burner
several times to remove debris.
WARNING
For safe operation ensure the Gas Valve Assembly
Orifice is inside the Burner Tube before using your
grill. See figure. If the Orifice is not inside the
Burner Tube, lighting the Burner may cause
explosion and/ or fire resulting in serious bodily
injury and/or property damage.

12 of 47 20121224-
Ver1
When an appliance is supplied on casters and is connected to the supply piping by means
of a connector for movable appliances, the operator shall be aware there is a restraint on
the appliance and, if disconnection of the restraint is necessary, to reconnect this restraint
after the appliance has been returned to its originally installed position.
Cleaning The Infrared side burner
1. Turn all Burner Valves to the full OFF position.
2. Turn the LP Gas tank valve to the full OFF position.
3. Detach the LP Gas regulator assembly from your gas
cylinder.
4. Remove the Cooking Grates from the side burner.
5. Remove the mounting screws at the back of side burner.
6. Slide the infrared burner out of the enclosure.
7. Check and clean burner/ venturi tubes for insects and
insect nests. A clogged tube can lead to a fire beneath the
grill.
8. Bend a stiff wire or wire coat hanger into a small hook as shown and run the hook
through the Burner Tube and inside the Burner several times to remove debris.
WARNING
For safe operation ensure the Gas Valve Assembly Orifice is inside
the Burner Tube before using your grill. See figure. If the Orifice is
not inside the Burner Tube, lighting the Burner may cause
explosion and/ or fire resulting in serious bodily injury and/or
property damage.
CAUTION
Keep outdoor cooking gas appliance area clear and free from combustible materials,
gasoline and other flammable vapors and liquids.
Do not obstruct the flow of combustible and ventilation air.
Keep the ventilation openings of the cylinder enclosure free and clear of debris.
Check and clean burner/venturi tubes for insects and insect nests. A clogged tube
can lead to a fire beneath the grill.
Clean the Grill
Clean grill often, preferably after each cookout. If a bristle brush is used to clean any of the
grill cooking surfaces, ensure no loose bristles remain on cooking surfaces prior to grilling.
It is not recommended to clean cooking surfaces while grill is hot.

13 of 47 20121224-
Ver1
CHARCOAL GRILL GENERAL WARNINGS
WARNING
The maximum weight of charcoal to be used is 3.3lb (1.5kg). Too much
charcoal may cause the gas component to over heat and malfunction.
The charcoal chamber is for charcoal cooking only. Gas grill and side burner
cannot be used for charcoal cooking.
Only use this grill on a hard, level, non-combustible, stable surface (concrete,
ground etc.) capable of supporting the weight of the grill. Never use on wooden
or other surface that could burn.
DO NOT use grill without charcoal ash tray in place. DO NOT attempt to
remove charcoal ash tray while tray contains hot coals.
Use your grill OUTDOORS in a well ventilated space away from dwellings or
other buildings to prevent dangers associated with gas accumulation and toxic
vapors. The grill should be situated at least 60 inches (153cm) from buildings.
Not adhering to these clearances will prevent proper ventilation and may
increase the risk of a fire and/or property damage, which could also result in
personal injury.
Maintain a minimum clearance of 60 inches (153 cm) between all sides of grill,
deck railings, walls or other combustible material. DO NOT use grill under
overhead unprotected combustible construction.
For outdoor use only. Do not use this grill for other than its intended purpose.
For household use only. Do not use this grill for other than its intended purpose.
We recommend the use of a Charcoal Chimney Starter to avoid the dangers
associated with charcoal lighting fluid.
Use charcoal chimney starter or charcoal that has been pre-treated with lighter
fluid when starting fire in charcoal section of your grill.
Do not store lighter fluid or other flammable liquids, material or charcoal that
has been pre-treated with lighter fluid under the grill or inside storage shelves.
Do not use gasoline or alcohol for lighting charcoal. Use of any of these or
similar products could cause an explosion possibly leading to severe bodily
injury.
Never add charcoal lighting fluid to hot or even warm coals as flashback may
occur causing severe burns.
Place grill in an area where children and pets cannot come into contact with
unit. Close supervision is necessary when grill is in use.
Do not leave grill unattended when in use.
When adding charcoal and/or wood, use extreme caution and follow instruction
in Adding Charcoal / Wood during cooking section of this manual.
Do not store or use grill near gasoline charcoal or other flammable liquids or
where flammable vapors may be present.
Use caution when adjusting charcoal grate height. Handle may be hot when in
use.
Use caution since flames can flare-up when fresh air suddenly comes in
contact with fire. When opening the lid, keep hands, face and body a safe

14 of 47 20121224-
Ver1
distance from hot steam and flame flare-ups.
Extinguished coals and ashes should be placed a safe distance from all
structures and combustible materials.
Never raise or lower charcoal grate when water is smoking as hot water may
splash onto coals.
Use caution since flames can flare-up when fresh air suddenly comes in
contact with fire. When opening the lid, keep hands, face and body a safe
distance from hot steam and flame flare-ups.
After each use, clean the grill thoroughly and apply a light coat of vegetable oil
to the interior to prevent rusting. Cover the grill to protect it from excessive
rusting.
Grill is hot when in use. To avoid burns:
DO NOT attempt to move the grill
Wear protective gloves or oven mitts.
DO NOT touch any hot grill surfaces.
DO NOT wear loose clothing or allow hair to come in contact with grill.
PREPARATION FOR USE & LIGHTING INSTRUCTIONS
WARNING
OUTDOOR USE ONLY. DO NOT OPERATE GRILL INDOORS OR IN AN ENCLOSED SPACE
Never use grill indoors. Carbon Monoxide poisoning can lead to death.
Curing your grill
Prior to your first use of the Grill, follow the instructions below carefully to cure your grill. Curing
your grill will minimize damage to the exterior finish as well as rid the grill of paint odor that can
impart unnatural flavors to the first meal prepared on the grill.
IMPORTANT: To protect your grill from excessive rust, the unit must be properly cured and
covered at all times when not in use.
Step 1
Lightly coat all interior surfaces of the grill with vegetable oil or vegetable oil spray.
Step 2
Follow the instructions below carefully to build a fire. You may use charcoal and/or wood as fuel for
the grill (see “Adding Charcoal/Wood during Cooking” section of this manual).
WARNING
Use only a high grade plain charcoal or charcoal /wood mixture.
NOTE: To extend the life of your grill, make sure that hot coals and wood do not touch the
walls of grill.

15 of 47 20121224-
Ver1
IF USING CHARCOAL CHIMNEY STARTER, PROCEED TO STEP 5.
If you choose to use charcoal lighting fluid, ONLY use charcoal lighting fluid approved for lighting
charcoal. Do not use gasoline, kerosene, alcohol or other flammable material for lighting charcoal.
Follow all manufacturer’s warnings and instructions regarding the use of their product. Start with
3.3 lb(1.5 kg ) of charcoal. This should be enough charcoal to cook with, once the curing process
has been completed. Place the charcoal in the center of each charcoal grate.
Step 3
Saturate charcoal with lighting fluid. With lid open, wait 2 to 3 minutes to allow lighting fluid to soak
into charcoal. Store lighting fluid a safe distance from the grill.
Step 4
With grill lid and doors open, stand back and carefully light charcoal through the doors. Allow to
burn until covered with a light ash (approximately 20 minutes).
WARNING
Charcoal lighting fluid must be allowed to completely burn off prior to closing grill lid (approximately 20
minutes). Failure to do this could trap fumes from charcoal lighting fluid in grill and may result in a flash-fire or
explosion when lid is opened.
Step 5
Place lump or briquette charcoal on top of grate in chimney starter until full. Underneath grate place
balled up paper and light with match or lighter thru holes in bottom of chimney sides. Once paper
lights, fire will spread up thru charcoal until entire column is glowing red in the bottom with ash
formation on top. Pick up by handle and pour lit charcoal into grill.
With coals burning strong, close the lid and doors. Allow the temperature to reach 225°F (107°C)
on both heat indicators. Maintain this temperature for 2 hours.
Step 6
Increase the temperature to 400°F (205°C) on charcoal chamber indicator. This can be achieved
by adding more charcoal and/or wood (see “Adding Charcoal/Wood During Cooking“ section of
this manual). Maintain this temperature for 1 hour then allow unit to cool completely.
IMPORTANT: to protect your grill from excessive rust, the unit must be cured periodically
and covered at all times when not in use.
OPERATING INSTRUCTIONS
WARNING
DO NOT use grill without charcoal ash tray in place. DO NOT attempt to remove charcoal ash tray while tray
contains hot coals.
CAUTION
Always wear oven mitts/gloves when adjusting cooking levels to protect your hands from burns.

16 of 47 20121224-
Ver1
Grilling/Searing
Step 1
Follow the instructions below carefully to build a fire. You may use charcoal and/or wood as fuel in
the charcoal side of the Hybrid Grill (see “Adding Charcoal/Wood During Cooking” section of this
manual).
WARNING
Use only a high grade plain charcoal or charcoal/wood mixture.
If using a Charcoal Chimney Starter, follow “Operating Instruction Step 4” or follow all
manufacturer’s warnings and instructions regarding the use of their product.
Start with 3.3 pounds (1.5 kg ) of charcoal. When charcoal is burning strong, carefully place hot
coals in center of the charcoal tray.
WARNING
DO NOT use grill without charcoal ash tray in place. DO NOT attempt to remove charcoal ash tray
while tray contains hot coals.
NOTE: To extend the life of your grill, make sure that hot coals and wood do not touch the walls of
grill.
IF USING CHARCOAL CHIMNEY STARTER, PROCEED TO STEP 4.
If you choose to use charcoal lighting fluid, ONLY use charcoal lighting fluid approved for lighting
charcoal. Do not use gasoline, kerosene, alcohol or other flammable materials for lighting charcoal.
Follow all manufacturer’s warnings and instructions regarding the use of their product. Start with 3.3
pounds (1.5 kg ) of charcoal. Place the charcoal in center of the charcoal tray.
Step 2
Saturate charcoal with lighting fluid. With lid and doors open wait 2 to 3 minutes to allow lighting
fluid to soak into charcoal. Store charcoal lighting fluid a safe distance from the grill.
Step 3
With grill lid and doors open, stand back and carefully light charcoal and allow to burn until covered
with a light ash (approximately 20 minutes).
WARNING
Charcoal lighting fluid must be allowed to completely burn off prior to closing grill lid and doors
(approximately 20 minutes).Failure to do this could trap fumes from charcoal lighting fluid in grill and
may result in a flash-fire or explosion when lid is opened.
Step 4
Place cooking grates on grill support lips. Use charcoal tray handle adjuster to position charcoal grates to
desired cooking level.
WARNING
Always wear oven mitts/gloves when adjusting cooking levels to protect your hands from burns.

17 of 47 20121224-
Ver1
Step 5
Place food on cooking grates and close grill lid. Always use a meat thermometer to ensure food is
fully cooked before removing from grill.
Step 6
Allow grill to cool completely, and then follow instructions in the “After-Use Safety” and “Proper Care
& Maintenance” sections of this manual.
Flavoring Wood
To obtain your favorite smoke flavor, experiment by using chunks, sticks or chips of flavor producing
wood such as hickory, pecan, apple, cherry, or mesquite. Most fruit or nut tree wood may be used
for smoke flavoring. Do not use resinous wood such as pine as it will produce an unpleasant taste.
Wood chunks or sticks 3” to 4” (7 to 10 cm) long and 1” to 2” (2 to 4 cm) thick work best. Unless the
wood is still green, soak the wood in water for 30 minutes or wrap each piece in foil and tear several
small holes in the foil to produce more smoke and prevent the wood from burning too quickly. Only a
few pieces of wood are required to obtain a good smoke flavor. A recommended amount for the grill
is 5 to 6 wood chunks or sticks. Experiment by using more wood for stronger smoke flavor or less
wood for milder smoke flavor.
Additional flavoring wood should not have to be added during the cooking process. However, it may
be necessary when cooking very large pieces of food. Follow instructions and cautions in the
“Adding Charcoal/Wood During Cooking” section of this manual to avoid injury while adding wood.
Regulating Heat
By adjusting the position of the charcoal tray, the
temperature of grill can be regulated. To increase the heat,
move the charcoal towards the cooking grates. Lowering it
will decrease the temperature.
To increase heat, more wood and/or charcoal may be needed. Follow instructions in “Adding Charcoal/Wood
During Cooking” section of this manual. To maintain the temperature, more wood and/or charcoal
may need to be added during the cooking cycle.
NOTE: Dry wood burns hotter than charcoal, so you may want to increase the ratio of wood to
charcoal to increase the cooking temperature. Hardwood such as oak, hickory, mesquite, fruit and
nut wood are an excellent fuel because of their burning rate. When using wood as fuel, make sure
the wood is seasoned and dry. DO NOT use resinous wood such as pine as it will produce an
unpleasant taste.

18 of 47 20121224-
Ver1
Adding Charcoal/Wood During Cooking
Additional charcoal and/or wood may be required to maintain or increase cooking temperature.
Step 1
Stand back and carefully open grill lid. Use caution since flames can flare-up when fresh air
suddenly comes in contact with fire.
Step 2
Wearing oven mitts/gloves, use charcoal tray adjuster to place charcoal tray at the lowest level of
cooking chamber. Open doors to allow access to charcoal tray.
Step 3
Stand back at a safe distance and use long cooking tongs to lightly brush aside ashes on hot coals.
Use cooking tongs to add charcoal and/or wood to charcoal tray, being careful not to stir-up ashes
and sparks. If necessary, use your Charcoal Chimney Starter to light additional charcoal and/or
wood and add to existing fire.
WARNING
Never add charcoal lighting fluid to hot or even warm coals as flashback may occur causing severe
burns.
Step 4
When charcoal is burning strong again, wear oven mitts/gloves and carefully return charcoal tray to
desired cooking level. Extinguish any hot ashes, coals or embers which may have fallen from doors
or beneath and around grill.
Step 5
Close the grill lid and doors. Allow food to continue cooking.
.
AFTER-USE SAFETY
CAUTION
Always allow grill and all components to cool completely before handling.
Never leave coals and ashes in grill unattended. Make sure coals and ashes are completely
extinguished before removing.
Before grill can be left unattended, remaining coals and ashes must be removed from grill.
Use caution to protect yourself and property. Place remaining coals and ashes in a
non-combustible metal container and completely saturate with water. Allow coals and water to
remain in metal container 24 hours prior to disposing.
Extinguished coals and ashes should be placed a safe distance from all structures and
combustible materials.
With a garden hose, completely wet surface beneath and around the grill to extinguish any
ashes, coals or embers which may have fallen during the cooking or cleaning process.
Cover and store grill in a protected area away from children and pets.

19 of 47 20121224-
Ver1
Proper Care & Maintenance
Cure your grill periodically throughout the year to protect against excessive rust.
To protect your grill from excessive rust, the unit must be properly cured and covered at all
times when not in use.
Wash cooking grates with hot, soapy water, rinse well and dry. Lightly coat grates with
vegetable oil or vegetable oil spray.
Clean inside and outside of grill by wiping off with a damp cloth. Apply a light coat of
vegetable oil or vegetable oil spray to the interior surface to prevent rusting.
If rust appears on the exterior surface of your grill, clean and buff the affected area with steel
wool or fine grit emery cloth. Touch-up with a good quality high-temperature resistant paint.
Never apply paint to the interior surface. Rust spots on the interior surface can be buffed,
cleaned, and then lightly coated with vegetable oil or vegetable oil spray to minimize rusting.
How do I season my Cast Iron Grates?
1. Wash grates in hot, soapy water. Rinse grates and dry completely using a towel. Towel may
become discolored. This is normal.
2. Apply a thin, even coating of melted shortening (Crisco, as an example) to the grates with a
soft cloth or paper towel. Apply to both sides of the grates.
3. Heat grill with a small fire to around 350 degrees. Place grates in grill not directly over the
coals and close lid. Leave closed for at least one hour. Let grates remain in grill until cool.
4. Place grates in proper position in the grill.
Your cast iron grates should be properly seasoned and ready to use!
Tips & Suggestions:
1. Seasoning is an ongoing process. Periodically reapply the oil to grates with a soft cloth,
especially if you see any rust developing or before long periods of storage.
2. Never put your Cast Iron Grates in the dishwasher or allow to air dry.
3. IF rust does appear, remove with a grill brush and repeat the seasoning process.
4. Cleaning of the grates should be done before the cooking begins, not after the cooking is over.
A little residue left on the Cast Iron crates helps protect them between uses.
5. The more Cast Iron Grates are used the better the non-stick qualities become. This is a great
excuse to grill more often!
/