Boss Audio Systems 745BA User manual

Category
Car media receivers
Type
User manual

This manual is also suitable for

Although the purpose of applying this Bluetooth system is trying to
minimize the risk of traffic accidence which may take place providing
that the driver is engaged in telephone conversation during driving , it
might not absolutely prevent the occurrence of serious traffic
accidence. Manufacturer of this product is not in the position to
responsible to any traffic accidence or problem induced due to the
application of this Bluetooth system.
Caution:
!
1
17 2
LOCATION AND FUNCTION OF CONTROLS
1. SEL BUTTON AND VOL KNOB
2. RELEASE BUTTON
3. LCD
4&5. >>| and | << BUTTON
6. AS/PS BUTTON
7. BAND BUTTON
8. LOUD BUTTON
9. LOC BUTTON
10. POWER BUTTON
11. MO/ST BUTTON
12. MUTE BUTTON
13. TOP/>||,INT,RPT,RDM
and 1-6 NUMBER BUTTO N
14. MODE BUTTON
15. CLOCK BUTTON
16. INFRARED REMOTE CONTROL SENSOR
17. T-M BUTTON
18. TEL BUTTON
19. CLEAR BUTTON
20. BUILT-IN MICROPHONE
21. BLUETOOTH LED INDICATOR
22. USB SOCKET
23. AUX SOCKET
24. EJECT BUTTON
25. CD SLOT
26. ANTI-THEFT L
ED INDICATOR
27. RESET BUTTON
28. SCAN BUTTON
O2
Qtek
45
46
Qtek
48 SPV
47
The list of compatible mobile
phones with blue tooth function:
Item Brand model
1 Sony Ericsson T39
2 T68/T68i
3
4
T610
5
T630
6 P910i
7 Z600
8 K700i
9 K750i
10 S700i
11
V600
12
E398
13
3650
14
8910
15
Verizon
16
Nokia
17
Nokia
18
6230
19
20
21
22
23
24
25
6600
7600
7610
Nokia
6310
MPX220
E680i
Motorola
Motorola
Motorola
A760
V500
V501
Sony Ericsson
Sony Ericsson
Sony Ericsson
Sony Ericsson
P800
Sony Ericsson
Sony Ericsson
Sony Ericsson
Sony Ericsson
Sony Ericsson
Motorola
Motorola
Motorola
Motorola
Motorola
Nokia
Nokia
Nokia
Nokia
Sharp GX-T15
GX-31
S55
S65
36 X88
37
818
38
565
39
40
41
42
43
MDA Compact
Panasonic
BenQ
BenQ
X700
M315
P50
Sharp
Siemens
Siemens
Siemens
SX1
Panasonic
Dopod
Dopod
T-Mobile
26
Nokia 6260
27
28
29
30
31
Siemens
SK65
32
Samsung
D500
33
Samsung
D508
34
Panasonic
X70
35
M x220P
S100
XDA II mini
SP3
44
8010
C500
JAM
i-Mate
i-Mate
Note: for the function transferring the audio of the file
being played by itself to the Car Audio Player, the
Mobile Phone must support A2DP.
3
16
SPECIFICATION
Power requirement................................................................DC 12V.
Current consumption..........................................................10A MAX.
POWER OUTPUT...............................4 X 80W(Measured at 14.4V).
Frequency range...............................................87.5MHz -107.9MHz
Usable sensitivity.........................................................................3uV.
I.F Frequency.......................................................................10.7MHz.
Frequency range.................................................530KHz - 1710KHz
I.F Frequency........................................................................450KHz
Usable Sensitivity.......................................................................40dB
Output........................................................................ MAX 1200mv
System.................................................................MP3 audio system.
Frequency characteristics......................................20-100Hz 5dB
10-20KHz 5dB.
Signal to noise ..............................................................50dB [1KHz]
GENERAL
FM SECTION
AM SECTION
LINE - OUT
CD/USB PLAYBACK
Number of channels................
.........................................2 STEREO.
Chassis dimensions...................................178[W] X 50[H] X 165[D].
Usable disc.........................................CD/CD-R/CD-RW/MP3/WMA
BASIC OPERATION:
1. To turn on/off the unit
2. To select playback mode
3. To adjust the volume level
4. To mute or resume the sound
5. To turn on/off LOUD mode
6. To display and adjust the clock time
7. To select and adjust the mode of the sound and menu
Press any button except the EJECT and REL button to turn on the unit. It also can
turn on the unit to insert disc or USB. Press the power button and hold for more than
0.5 seconds to turn off the unit.
Press MODE button to select a different mode of operation as indicated on the display
panel. Available modes include Tuner, CDP, USB and AUX.
To increase the volume, rotate the volume knob clockwise. To decrease the volume,
Rotate the volume knob counter clockwise. When the volume is adjusted, the volume
level will be shown on the display panel as a number ranging from 0 (lowest) to
46 (highest).
Pres
s MUTE button momentarily to mute the audio volume, and MUTE will flash in the
display. Press the mute button again to restore volume to the previous setting.
To resume the sound immediately, can also press one of the MODE,
BAND, SEL button or rotate the VOL knob.
Press the LOUD button to turn on/off LOUD mode.
When turning on the LOUD mode, it will enhance bass level immediately when the
bass is not enough.
A) Time display
Press the CLOCK button shortly to display time for 5 seconds, and then it returns
to its previous display unless the button is pressed again.
B) Time adjustment
From the clock mode, press the CLOCK button and hold for more than 1 seconds to
flash time and then rotate the VOL knob clockwise to adjust minute, rotate the VOL
knob counter clockwise to adjust hour.
A) To select and adjust the sound mode:
Press SEL button briefly and repeatedly to select the mode of VOL(volume),BAS
(BASS)(without preset DSP), TRE(treble)(without preset DSP), BAL(balance) and
FAD(FADER) in the sequence and circulation. In each mode, the waiting time is
about 5 seconds, and when the waiting time is
over, it will return to the the last
display mode. After select a desired sound item, rotate the VOL knob on the front
panel or press the + or - button on the remote controller to adjust level of the
selected sound item.
15 4
B) To select and adjust the menu mode:
Press SEL button long to turn on MENU mode, and the LCD will display BEEP
2ND/BEEP ALL/BEEP OFF, then press SEL button shortly and repeatedly to
select SEEK1/SEEK2(in RADIO mode), DSP OFF/FLAT/POP M/CLASSICS/
ROCK, SUBW ON/OFF, VOL LAST/ VOL ADJ and ESP 6 / ESP 25 in the
sequence and circulation. After selecting a desired mode, rotate the VOL knob
on the front panel or press the + or - button to select one setup item of the
desired mode.
C) BEEP 2ND/BEEP ALL/BEEP OFF:
BEEP 2ND mode: the beep is only generated when an allotted double key is
pressed long(1second).
BEEP ALL mode: the beep is generated when every key is pressed(except power
and release buttons).
BEEP OFF mode: the beep is disabled.
D) SEEK1/SEEK2:
SEEK1: press >>| or |<< button hold to seek up or down for the strong signal
station. And then stop seek when received the strong signal station.
SEEK2: press >>| or |<< button hold to seek up or down for the strong signal
station. And do not stop seek when received the strong signal
station. After
release it and then received the strong signal station, the seek will stop.
E) DSP OFF/FLAT/POP M/CLASSICS/ROCK
To select a preset EQ mode or turn off it.
F) VOL LAST/ VOL ADJ
VOL LAST: During playback, turn off the power and then turn on the power again,
at the time, the volume level will be the one before turn off the power.
VOL ADJ: When it is in VOL ADJ mode, the next mode will be A-VOL after
VOL ADJ mode, then you can adjust the defaulted volume level. The
minimum value of the defaulted volume level you can set is 10.
G) ESP 6/ESP 25
To select the time of the electronic shock protection for disc playback.
When the LCD displays wrongly or some function knobs are disable, press the
REL button to flip down the front panel and then take it away from the unit chassis.
Push the RESET button with one needle analog to reset the distorted program to zero.
Press the REL button to flip down the front panel and then take it away from
the head unit. And the anti-theft LED indicator will be flas
h all the time till the
front panel is assembled back to the head unit.
8. To reset the unit
9. To take away the front panel
TROUBLE SHOOTING
To solve the common problem, read the trouble shooting list. If you still
can not solve the problem, consult your nearest service dealer.
Symptom
No power
Disc cannot
be loaded
Cause
The fuse is blown
Presence of CD disc inside
the player
Inserting the disc in upside
down
Compact disc is extremely
dirty or defective
Temperature inside the
car is too high
Volume is in minimum
No sound
The operation
keys do not
work
Sound skips
The antenna cable is not
connected
the signals are too weak
Insert the antenna cable firmly
select a station manually
The radio does
not work
the radio
station
automatic
selection does
not work
1.The built-in microcomputer
is not operating properly
due to noise
2.Front panel is not pro
perly
fix into its place
1. Press the RESET button
2. Reinstall the front panel
Wiring is not properly
connected
The installation angle
is more than 30 degrees
The disc is extremely
dirty or defective
Clean the compact disc/try to
play a new one
Adjust the installation angle
to less than 30 degrees
Adjust volume to a desired level
Check wiring connection
Cool off until the ambient
temperature returns to normal
Clean the disc or try to play a
new one
Insert the compact disc with
the label facing upward
Remove the disc in the player
then put a new upward
Replace the fuse
The car ignition is n
ot on. If the power supply is properly
connected to the car accessory
switch the ignition key to " ACC "
Solution
Disc cannot
be read
5 14
Under RADIO mode, press the BAND button shortly and repeatedly to select
your desired radio band in sequence and circulation as follows:
-->FM1-->FM2-->FM3-->AM1-->AM2--> .
Under RADIO mode, short press the >>| or |<< button repeatedly to manually tune
up or down for the desired radio station step by step. Long press the >>|/ |<< button
to automatically tune up or down for the radio station of strong signal.
Under RADIO mode:
A) Press one of 1-6 number buttons hold for more than 1 second until the second
beep output to store the current station in the preset memory bank of the number
button for the current band. So the unit can store 30 preset stations.
B) Press one of 1-6 number buttons shortly to turn on the preset station stored in
the preset memory bank of the number button for the current band.
A) Long press the AS/PS button, it will search from the current frequency and check the
signal strength until 1 cycle search is finished on current band, and then 6 strongest
stations will be preset to the corresponding preset memory banks of the 6 number
buttons. When the auto-storage operation is
completed, it will turn on the preset
station stored in the memory bank of the 1 button.
B) Short press the AS/PS button to scan for each preset station for the current band.
When the field strength level is more than the threshold level of stop level, the radio
is holding at that preset station for 5 seconds with releasing mute, while memory
digital and frequency will flash on LCD, and then scan again.
In FM band, FM1, FM2 and FM3 is checked one at a time.
Press SCAN button to scan up by one channel step with station detection. If a
valid signal has detected, the current frequency is blinked within 5 seconds, then
press it again to stop scan and remain the current frequency; otherwise, the unit
continue to scan up by one channel step with station detection 5 seconds later.
In FM mode, press the MO/ST button to select the STEREO or MONO sound mode.
RADIO OPERATION:
1. To select radio band
2. To select the radio station manually or automatically
3. To store the current station or turn on the preset station
4. To automatically store for the strongest stations and scan for each
stored stations
Under RADIO mode:
5. To scan for strong signal of radio station
6. STEREO/MONO BUTTON
CARE FOR USING CD'S:
1. To keep the disc clean:
Before playing a disc, wipe it off with a clean, dust-free cleaning cloth.
Wipe the disc outwards from the disc center.
2. When one has already been inserted. Doing so may damage the unit
Do not attach any sticker or adhesive tape on the disc.
. Inset a disc
with labeled surface up, or it will damage the unit.
3. sources such as heating vents,
caliduct
Do not leave disc in a car if it is parked in direct sunlight as that will lead to a
considerable rise in the temperature inside the car.
4. Do not use any secondhand or rented disc, usually, there is glue on the surface of
those discs, it will stop the unit working and damage it.
7.
Handle the disc by its edge to keep the disc clean and do not touch the surface.
Do not expose the disc to direct sunlight or nearby heat
which can cause the disc to warp.
5. Always store the disc in its case for protection. Scratched up discs will produce poor
sound performance and
cause CD player to skip.
6. In raining day or wet area, the moisture may form on the disc or the optical parts, The
playback may not be possible. If moisture forms on the disc, wipe it off with a soft cloth.
If moisture forms on the optical parts of the unit, allow the unit to sit for about one hour
with power on.
Do not use solvents such as benzine or thinners. Commercially available cleaners or
anti-static spray will damage the unit.
About CD-R/CD-R/W discs:
In addition to commercially-recorded audio CD's, this unit can play CD-R and
CD-R/W discs. In come cases, particularly when recorded on older CD burners,
some CD-R and CD-R/W discs may not play. Also, whenever you are recording
a CD for playback in this receiver, it is recommended that you record at 24x or
slower speed for CD-R and 4x or
slower for CD-R/W to achieve higher signal
quality and better playback performance.
13 6
7. LOC BUTTON
1. To load/unload disc
2. To load/unload USB storage
NOTE
3. To select next or previous track to play
4. To select next or previous 10 track to play for USB or MP3/WMA
5. To play fast forward or backward
6. How to use the PLAY/PAUSE/TOP button
A) In FM mode, when the signal of the distance radio station are very weak and
the receiving effect is bad during tuning, check whether there is the word LOC
on LCD. If there is the word LOC on LCD, press this button to turn off the LOC
function, then tune again for the distance radio station;
B) In FM mode, when the signal of the local radio station are too strong to lead
that the interference to the receiving effect during tuning, press this button to
turn on the LOC function to display the word LOC on LCD, then tune again
for the local radio station.
Press the REL button to flip down the front panel and then insert the disc
into the disc compartment or press the EJ button to eject the dis
c from the
disc compartment.
Insert the USB storage into USB socket, then the playing mode will be changed into
USB mode and display USB on LCD, and then play the first track of USB.
: Always remember to switch off the unit s power or switch to other mode then
remove out the USB Stick. Never try removing the USB Stick while playing music file
on the USB stick. It may damage the USB stick and sometimes w ill caused the unit
system lock up.
Under USB or DISC mode, press the >>| button to select next track to play.
Press the |<< button within 1 seconds after selecting a track to select the
previous track to play. Press the |<< button 1 seconds later after selecting a
track to select the current track and play from the beginning of the current track.
Under USB or MP3 mode, short press M6 or M5 button to select next or
previous 10 TRACK during normal play.
Under USB or DISC mode, during playback, press the >>|/|<< button and hold
to skip forward or backward.
Under USB or DISC mode, during playback, press TOP button to pause
USB or Disc
playback, press TOP button again to resume USB or Disc playback. Press TOP button
long to play the first track of the USB or Disc.
USB or DISC OPERATION:
’
INSTALLATION METHOD
This is an anti-theft installation method.
The main unit wears a METAL MOUNTING SLEEVE.
Please connect the wiring, eg, the Power Supply, the Speakers and the Antenna
according to the requirements of this Instruction Manual, then install the metal
mounting sleeve into the car as per the diagram illustrated below.
METAL SUPPORT STRAP
To boost up the capability of anti-jam ming,
please make sure fix tightly the support
strap into the metal joint that connect to the
chassis of the car.
metal
To properly fix the meal mounting
sleeve, bend the tabs of
the sleeve
against the DASHBOARD with
a screwdriver.
METAL MOUNTING SLEEVE
DASHBOARD
FRONT PANEL
PLASTIC TR IM RING
UN IT CHA SSI S
NOTE
To attach the removable faceplate back to
the unit chassis , firstly join the left guide
block hole to the left cylinder, then join the
right guide block hole and the right
cylinder, finally flip the front panel up to
combine w ith chassis.
Befor e mounting and operating
the CD p layer, remov e the metal
mounting sleeve illustra ted b y the
arrow s.
Remove the two screws that
fix the CD deck mechanism
player during transportation
before moun
ting the player.
RES ET BUTTON
Push this reset button with a cuspidal
object to renovate the d i storted program
once the program is distorted.
To remove the front panel,
afte r flipping down the fro nt
panel, push it rightwar d s
firstl y, then draw the left of
the front panel o utw ards.
EJECT (EJ) BUTTON
To remove the unit out of the metal mounting sleeve,
insert the two supplied KEYS into the left and right side
slots of the chassis at the same time. Then pull the chassis
out of the metal mounting sleeve as shown in the right
illustration.
Before inserting or ejecting disc, press
the REL button to flip down t
he faceplate.
7 12
UnderUSBmode,pressINTbuttonshortlytodisplayM-INTandplaythefirst10
secondspartofeachtrackofall.
UnderCD/MP3/WMAdiscmode,pressINTbuttonshortlytodisplayS-INTandplay
thefirst10secondspartofeachtrackofall.
UnderUSBorMP3/WMAdiscmode,pressINTbuttonlongtodisplayD-INTandplay
thefirst10secondspartofeachincurrentfolder.
UnderINTmode,pressINTbuttonagaintostopINTmodeandretainplayingthe
trackcurrentlyselected.
UnderUSBmode,pressRPTbuttonshortlytodisplayM-RPTandplaythecurrenttrack
repeatedly.
UnderCD/MP3/WMAdiscmode,pressRPTbuttonshortlytodisplayS-RPTandplay
thecurrenttrackrepeatedly.
UnderUSBorMP3/WMAdiscmode,pressRPTbuttonlongtodisplayD-RPTand
playthecurrentfolderrepeatedly.
DuringRPTmode,pressRPTbuttonagaintocancelRPTmode.
UnderUSBmode,pressRDMbuttonshortlytodisplayM-RDMandplaythetrackof
allinrandomorder.
UnderCD/MP3/WMAdiscmode,pressRDMbuttonshortlytodisplayS-RDMandplay
thetrackofallinrandomorder.
UnderUSBorMP3/WMAdiscmode,pressRDMbuttonlongtodisplayD-RDMand
playthetrackinthecurrentfolderinrandomorder.
UnderRDMmode,pressRDMbuttonagaintocancelRDMmode.
UnderMP3/WMAdiscmodeorUSBmode,pressAS/PSbuttonrepeatedlytoselect
TRACKSEARCH,FIRSTCHARACTERSEARCHorDIRECTORYSEARCHmode.
A)UnderTRACKSEARCHmode,theLCDwilldisplayTRKT000andflashthebiggest
digit0thattheUSBstorageorMP3/WMAdisccontain.ThenrotatetheVOLknobon
thefrontpanelorholdthe+or-buttonontheremotecontrollertoselectthenumber
oftheflashingdigitfrom0~9.ThenpressSELbuttontoconfirmthenumberandflash
nextsmallerdigit0.Withthesamemeans,selectthenumberoftheflashingdigit.
Afterfinishingselectingthenumberofallflashingdigit,pressSELbuttontoplaythe
trackoftheselectedserialnumber.
B)UnderDIRECTORYSEARCHmode,theLCDwilldisplaytherootfolder(ifthereis
nottherootfolder,itwillfindarootfoldernamedROOT).ThenrotateVOLknobor
pressthe+or-buttontoselectyourdesiredfolderandthenpressthe>>|/|<<button
toselectyourdesiredtrackinthefolder.FinallypresstheSELbuttontoplaythe
selectedtrack.
7.Toscantracks
8.Torepeattrack(s)
9.Toplaytracksinrandom
10.ToquicklyselectthetrackinMP3/WMAformattoplay
WIRINGCONNECTION
YELLOW
ANTENNAPLUG
CONSTANT
12VOLTS
BLACK
GROUND
IGNITIONSWITCH
12VOLTS
RCALINEOUT
REDR
YELLOW
FRONT
REAR
RIGHT
SP
BLUEAUTOANT
FRONT
WHITE
WHITE/BLACK
GREEN/BLACK VIOLET/BLACK
GRAY/BLACK
GRAY
VIOLET
GREEN
REAR
LEFT
SP
10AFUSE
FILTER
BOX
0.5AFUSE
BLUETOOTHANT
NOTES:
1.Onlyspeakerswith4ohmsimpedancemaybeused.
2.Ensurethattheblueautoantennacabledoesnotmakecontactwithany
groundconnection.
3.FrontAUXINandrearAUXINcannotbeconnectedtoatthesametime.
WOOFERLINEOUT
WHITEL
RCALINEOUT
REDR
WHITEL
AUXLINEIN
REDR
WHITEL
FRONT(BLACK)
REAR(GRAY)
(BROWN)
RED
PDF created with FinePrint pdfFactory trial version http://www.pdffactory.com
C) Under FIRST CHARACTER SEARCH mode, the LCD will display A--......, If there are
files names its first character are A , the ......is the first file name its first character is
A by the order of A~Z and 0~9; otherwise, the ......is NONE. Rotate the V OL knob or
press the + or - button to select file s first character by the order of A~Z and 0~9.
Then press the >>|/ |<< button to select one file its first characters is the selected one.
Finally press SEL button to play the selected file.
Under USB or MP3/WMA disc mode, if you press BAND button repeatedly, the file
name, folder name, information will be scrolling on the
LCD display. As long as the current playing music contains relevant
tag information in version 1.0/2.0 format, the 3 items underlined above will be scrolling
on the LCD display; otherwise, they will not.
Under CD/MP3/WMA format-mixed disc playback mode, long press BAND button,
it will change from one mode to another mode.
11.To display ID3 information
12.To play CD/MP3/WMA format-mixed disc
song s title, artist and album’
MP3/WMA ID3
BLUE TOOTH HANDFREE SYSTEM:
A) Long press MODE button more than 3 seconds to allow pairing with a mobile
phone, and PAIRING will be displayed on LCD. To leave pairing mode, long
press MODE button again.
B) During pairing, turn on the Bluetooth mode of the mobile phone, then select the
item of Finding the Bluetooth Device and enter it. A fter finishing the finding, it will
show the name of the Bluetooth Device if finding a Bluetooth Device. Select it and
enter it, then it will show a interface that ask you to input a password, input the
password and then enter it. Then it will tell you that pair OK and connection
OK, and the LCD of the car audio system will show PAIR OK and then show CONN
OK.
A) Use the mobile phone to do connection or disconnection
B) In the connection status, find the paired and connected Bluetooth Device, then
press the disconnection button to do disconnection.
C) In the disconnection status, find the paired and disconnected Bluetooth Device,
then press the connection button to do connection.
1. Pairing
1234
2. Connection or disconnection
BATTERY INFORMATIO N OF REMOTE CONTROL
Replace Battery in Remote Control
Note about the Battery of Remote Control
:
:
1.
3. Do not short the battery.
4. Do not throw the battery into the fire.
5. To avoid the risk of accident, keep the battery out of reach of children.
1.Before using the remote control for the first time, pull the insulating
sheet out of the remote control as the direction indicated by the
arrow.(see fig.1)
2.Press the movable block hold as the direction indicated by the A arrow
(See fig.2), then pull the battery holder out of the remote control as
the direction indicated by the B arrow(see fig.2).
3.Replace the old b
attery by a new battery with (+) polarity side upward.
(See fig.3).
4.Insert the battery holder to the original position in remote control.
(See fig.3).
Improper use of battery may cause overheating or explosion. so that
Result in injury or fire .
2. Battery leakage may cause damage to the remote control(Battery
Life: 6 months with normal use in normal room temperature).
Fig.1
Fig.2
Fig.3
A
B
+ side up
11 8
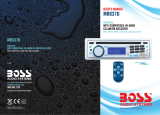
D) Use the front panel of the car audio system to do connection or disconnection
E) In the connection status, long press the CLEAR button to do disconnection.
F) In the disconnection status, short press the TELEPHONE button to do connection.
Note:
(1) CONN OK appears on LCD upon successful connection; NOT CON appears on
LCD if connection fail.
(2) The Bluetooth LED indicator on the front panel indicates the three connection
status:
LED Turn off: No connection at all
LED Blinking: Connection status
-LED Turn on: Talking status
(3) Bluetooth icon appears on LCD only when in connection status.
(4) In the connection status: Mobile phone transfers to the car audio whenever a
dialling takes place; Mobile phone transfers to the car audio whenever receiving
a call.
A) Dial with the mobile phone directly.
B) Dial with remote control or front panel with the following procedures:
(1) Short press TELEPHONE button, then CALL will appear on LCD.
(2) Input telephone number with number buttons 0-9
(3) Short press CLEAR button to cancel the wrongly input number if necessary
(4) Long press CLEAR button to cancel all the input numbers if necessa
ry.
(5) Short press TELEPHONE to execute the dialling. The talking time will appear
on LCD if dialling is successful and it is received.
C) Voice Dialling
(1) At connection status.
(2) Recording your voice from the mobile phone itself to your mobile voice book
at first.
(3) Short press TELEPHONE button.
(4) Short press T-M button and there w ill be a beep sound .
(5) Say the name which has been recording in your mobile voice book towards
the microphone.
(6) If the dialling is successful, ring-tone can be heard.
(7) If the dialling is not successful, LCD will show No Match and it will get back to
the last mode.
D) To redial the last phone number dialled
E) Short press TELEPHONE button twice continually. It will show the last phone
number dialled on LCD.
F) Short press TELEPHONE, It will dial the number directly.
G) To dial with preset phone number:
(1) Short press T-M button;
(2) Short press any one of the number buttons or rotate VOL knob to check the
preset number.
(3) Short press TELEPHONE button to dial with the preset number.
-
-
3. Dialling when in connection
status
If the selected memory platform has not preset phone number,
EMPTY will appear on LCD.
A) During ringing, short press TELEPHONE button to accept the call
B) During ringing, short press CLEAR button to reject the call
C) During talking, short press T-M button to hold the call(no voice). Short press
T-M button again to resume the call(can hear the voice again).
D) During talking, short press CLEAR button to end the call
During talking status, long press TELEPHONE button to exit handfree system for a
private listening over the mobile. Long press TEL button again to get back to handfree
system again. During call transferring, TRANSFER appears on LCD.
A) Procedures to preset or edit phone number into number buttons 0-9
(1) Short press TELEPHONE button to enter Calling mode.
(2) Long press T-M button to enter PRESET status.
(3) Input or edit telephone number one by one.
(4) Long press the relevant number button to store the latest preset number.
B) Follow above 3.5 procedures to dial with preset phone number
If Automatic Answer Call is selected in T.MENU, the unit will
accept a call auto-
matically after 3 times of ringing tone.
4. Accept/ Reject/ Hold/ End Call
Note: During talking, talking time appears. During ringing, PHONE appears.
5. Call transferring
6. Memory Call
. Automatic answer call
At talking status, adjust the sound output to a suitable level and this sound level
will be kept as default.
Long press T-M button to enter setup menu and then short press T-M button repeatedly
to select the setup items as follows:
- AUTO ANS/MANUAL: To enable or disable automatic answer call by rotating
VOL knob.
- RING VOL: To set the ring-tone volume level by rotating VOL knob.
When the car audio at sleep mode (Acc on and Power off), to execute a dialling
(with mobile phone) or there comes a call, the car audio will temporarily woke up.
After the call has been done, it gets back to unit sleep mode.
In the connection status between the Bluetooth devices of the Car Audio Player
and a Mobile Phone, if the mobile phone can play audio or video files and support
A2DP, when the Mobile Phone plays an audio or video file(For some Mobile Phones,
you must select Pla
y by BT firstly), press the MODE button to switch on the A2DP
mode, then the audio of the playing file will be transferred to the Car Audio Player.
In A2DP mode, if the Bluetooth device of the Mobile Phone support AVRCP, the
functions of the >>|, |<< and PLAY/PAUSE buttons are the same as one in disc
mode(no fast forward/backward functions for the >>|/|<< buttons). The other
buttons available in disc mode are not available.
In A2DP mode, if the Bluetooth device of the Mobile Phone support AVRCP,
pressing the MODE button can switch on between the radio, disc, USB and A2DP.
But after entered the A2DP mode again, to resume the audio of the file played and
transferred to the Car Audio Player by the Mobile Phone, you must press the
PLAY/PAUSE button.
7. Talking volume level setting
8. Telephone setup Menu
9
10. Dialling or receiving call at unit sleep mode
11. To transfer the audio of a file played by Mobile Phone to the Car Audio Player
9 10
  • Page 1 1
  • Page 2 2
  • Page 3 3
  • Page 4 4
  • Page 5 5
  • Page 6 6
  • Page 7 7
  • Page 8 8
  • Page 9 9
  • Page 10 10

Boss Audio Systems 745BA User manual

Category
Car media receivers
Type
User manual
This manual is also suitable for

Ask a question and I''ll find the answer in the document

Finding information in a document is now easier with AI