Page is loading ...

271 - 274
Spezialnähmaschine mit Direktantrieb
Betriebsanleitung
Instruction manual
Instructions d’emploi
Instrucciones de manejo
Instruções
Istruzioni per l’uso
Postfach 17 03 51, D-33703 Bielefeld
•
Potsdamer Straße 190, D-33719 Bielefeld
Telefon (05 21) 9 25- 0
•
Telefax (05 21) 9 25 24 35
GB
D
F
E
P
I
Ausg./Edition: 01/2000 Printed in Federal Republic of Germany Teile-Nr.: 0791 271743

Foreword
This instruction manual is intended to help the user to become
familiar with the machine and take advantage of its application
possibilities in accordance with the recommendations.
The instruction manual contains important information on how to
operate the machine securely, properly and economically.
Observation of the instructions eliminates danger, reduces costs
for repair and down-times, and increases the reliability and life of
the machine.
The instruction manual is intended to complement existing
national accident prevention and environment protection
regulations.
The instruction manual must always be available at the
machine/sewing unit.
The instruction manual must be read and applied by any person
that is authorized to work on the machine/sewing unit. This
means:
–
Operation, including equipping, troubleshooting during the
work cycle, removing of fabric waste,
–
Service (maintenance, inspection, repair and/or
–
Transport.
The user also has to assure that only authorized personnel work
on the machine.
The user is obliged to check the machine at least once per shift
for apparent damages and to immediatly report any changes
(including the performance in service), which impair the safety.
The user company must ensure that the machine is only operated
in perfect working order.
Never remove or disable any safety devices.
If safety devices need to be removed for equipping, repairing or
maintaining, the safety devices must be
remounted directly after completion of the maintenance and
repair work.
Unauthorized modification of the machine rules out liability of the
manufacturer for damage resulting from this.
Observe all safety and danger recommendations on the
machine/unit! The yellow-and-black striped surfaces designate
permanend danger areas, eg danger of squashing, cutting,
shearing or collision.
Besides the recommendations in this instruction manual also
observe the general safety and accident prevention regulations!

General safety instructions
The non-observance of the following safety instructions can cause bodily in-
juries or damages to the machine.
1. The machine must only be commissioned in full knowledge of the instruction
book and operated by persons with appropriate training.
2. Before putting into service also read the safety rules and instructions of the
motor supplier.
3. The machine must be used only for the purpose intended. Use of the machine
without the safety devices is not permitted. Observe all the relevant safety
regulations.
4. When gauge parts are exchanged (e.g. needle, presser foot, needle plate, feed
dog and bobbin) when threading, when the workplace is left, and during
service work, the machine must be disconnected from the mains by switching
off the master switch or disconnecting the mains plug.
5. Daily servicing work must be carried out only by appropriately trained persons.
6. Repairs, conversion and special maintenance work must only be carried out by
technicians or persons with appropriate training.
7. For service or repair work on pneumatic systems, disconnect the machine from
the compressed air supply system (max. 7-10 bar).
Before disconnecting, reduce the pressure of the maintenance unit.
Exceptions to this are only adjustments and functions checks made by
appropriately trained technicians.
8. Work on the electrical equipment must be carried out only by electricians or
appropriately trained persons.
9. Work on parts and systems under electric current is not permitted,
except as specified in regulations DIN VDE 0105.
10. Conversion or changes to the machine must be authorized by us and made
only in adherence to all safety regulations.
11. For repairs, only replacement parts approved by us must be used.
12. Commissioning of the sewing head is prohibited until such time as the entire
sewing unit is found to comply with EC directives.
It is absolutely necessary to respect
the safety instructions marked by these signs.
Danger of bodily injuries !
Please note also the general safety instructions.

Contents Page:
Preface and General Safety Information
Part 1: Operating Instructions Class 271-274 Direct drive
1. Product Description
. . . . . . . . . . . . . . . . . . . . . . . . . . . 5
2. Proper Use
. . . . . . . . . . . . . . . . . . . . . . . . . . . . . . . . . 5
3. Subclasses
. . . . . . . . . . . . . . . . . . . . . . . . . . . . . . . . . 6
4. Optional Equipment
. . . . . . . . . . . . . . . . . . . . . . . . . . . . 8
5. Technical Data
. . . . . . . . . . . . . . . . . . . . . . . . . . . . . . . 10
6. Operation
6.1 Threading the Needle Thread . . . . . . . . . . . . . . . . . . . . . . . 15
6.2 Setting the Needle Thread Tension . . . . . . . . . . . . . . . . . . . . 15
6.3 Releasing the Needle Thread Tension . . . . . . . . . . . . . . . . . . 15
6.4 Winding the Underthread . . . . . . . . . . . . . . . . . . . . . . . . . 16
6.5 Inserting the Underthread Bobbin . . . . . . . . . . . . . . . . . . . . . 17
6.6 Setting the Underthread Tension . . . . . . . . . . . . . . . . . . . . . 18
6.7 Changing Needles . . . . . . . . . . . . . . . . . . . . . . . . . . . . . 19
6.8 Setting the Thread Regulator . . . . . . . . . . . . . . . . . . . . . . . 20
6.9 Setting the Sewing Foot Pressure . . . . . . . . . . . . . . . . . . . . . 21
6.10 Setting the Stitch Length . . . . . . . . . . . . . . . . . . . . . . . . . . 22
6.11 Sewing Foot Lift . . . . . . . . . . . . . . . . . . . . . . . . . . . . . . . 23
6.12 Arresting the Sewing Foot in the High Position . . . . . . . . . . . . . . 23
6.13 Roller Top Feed (Classes 273 and 274) . . . . . . . . . . . . . . . . . 24
6.13.1 The Electropneumatic Feed Roller Switching . . . . . . . . . . . . . . 24
6.13.2 "Lift/Lower Feed Roller" Function Module . . . . . . . . . . . . . . . . 24
6.13.3 Parameter Table for the "Lift/Lower Feed Roller" Function Module . . 25
6.14 Edge Trimmer . . . . . . . . . . . . . . . . . . . . . . . . . . . . . . . . 26
6.15 Setting Dial on the Head Cover (only Class 274 or Class 273 with
optional equipment . . . . . . . . . . . . . . . . . . . . . . . . . . . . . 28
6.16 Keypad on the Sewing Machine Arm . . . . . . . . . . . . . . . . . . . 29
GB

Contents Page:
7. Sewing
. . . . . . . . . . . . . . . . . . . . . . . . . . . . . . . . . . . 30
8. Maintenance
8.1 Cleaning and Inspecting . . . . . . . . . . . . . . . . . . . . . . . . . 32
8.2 Lubrication . . . . . . . . . . . . . . . . . . . . . . . . . . . . . . . . . 33

1. Product Description
The
DÜRKOPP ADLER 271-274
are universally employable special sewing machines.
2. Proper Use
The
271-274
are special sewing machines which can properly be used for the sewing of
light weight material. Such material is, as a rule, material made up of textile fibers or
leather. These materials are used in the garment and home upholstery industries.
Further, it may be possible to also conduct so-called technical seams with these special
sewing machines. Here, however, the operator (
DÜRKOPP ADLER
would be pleased to
collaborate) must make an evaluation of the possible dangers because such
applications are, on the one hand, comparatively rare and, on the other, the variety is
immense. Dependent on the result of this evaluation, appropriate safety measures are
to be taken.
Generally, only dry material may be worked with these special sewing machines. The
material may be no thicker than 6 mm when pressed together by the lowered sewing
foot. The material may not contain any hard objects because otherwise the automatic
sewing unit could only be operated with eye protection. Such eye protection is not
available at this time.
The seam is generally sewn with sewing yarns of a dimension up to 30/2 Nm (synthetic
threads) or 30/3 Nm (core spun threads). Those desiring to use other threads must first
estimate the dangers arising therefrom and, if necessary, take appropriate safety
measures.
These special sewing machines may only be installed and operated in dry and clean
premises. If the sewing unit is used on other premises which are not dry and clean,
further measures, which are to be agreed upon, may be necessary (see
EN 60204-31:1999).
We, as a manufacturer of industrial sewing machines, assume that at least semi-skilled
operating personnel will be working on our products so that all normal operations and,
where applicable, their dangers are presumed to be known.
3. Subclasses
Base type
Single needle-double lockstitch machine with bottom feed and thread cutter for light to
medium weight Material, with 4mm stitch length and a built-in drive (Direct Drive).
Cl. 271-140331
as base type with 4 mm stitch length, but with sealed
needle and presser foot bar and a feed dog with a smaller lifting cam
ensuring an improved flat seam by small stitch length and
lightweight material.
Equipped with the sewing motor Quick QE 3760.
Cl. 271-140332
as base type, but with automatic solenoidal bartacking and
solenoidal sewing foot lift, sealed needle and presser foot bar
and a feed dog with a smaller lifting cam ensuring an improved
flat seam by small stitch length and lightweight material.
Standard equipped with keys for bartacking within the course of
a seam, for needle high-low. Single stitch and calling-up or
suppressing bartacks.
Equipped with the sewing motor Efka DC 1500.
GB
5

Cl. 271-140341
as base type. Equipped with the sewing motor Quick QE 3760.
Cl. 271-140342
as base type, but with automatic solenoidal bartacking and
solenoidal sewing foot lift. Standard equipped with keys for
bartacking within the course of a seam, for needle high-low.
Single stitch and calling-up or suppressing bartacks.
Equipped with the sewing motor Efka DC 1500.
Cl. 271-140432
as base type, but with automatic solenoidal bartacking and
solenoidal sewing foot lift. Oil-free point of sewing with
lubrication-free hook, a feed dog with a smaller lifting cam and a
changed regulator ensuring an improved flat seam by small
stitch length and lightweight material. Standard equipped with
keys for bartacking within the course of a seam, for needle
high-low. Single stitch and calling-up or suppressing bartacks.
Equipped with the sewing motor Quick QE 3760.
Cl. 271-140442
as base type, but with automatic solenoidal bartacking and
solenoidal sewing foot lift, oil-free point of sewing with
lubrication-free hook. Standard equipped with keys for bartacking
within the course of a seam, for needle high-low, single stitch and
calling-up or suppressing bartacks.
Equipped with the sewing motor Quick QE 3760.
Cl. 272-140331
as base type, but with additional needle transport.
Equipped with the sewing motor Quick QE 3760.
Cl. 272-140332
as base type, but with needle transport, with automatic
solenoidal bartacking and solenoidal sewing foot lift. Standard
equipped with keys for bartacking within the course of a seam, for
needle high-low, single stitch and calling-up or suppressing
bartacks.
Equipped with the sewing motor Efka DC 1500.
Cl. 272-140341
as base type, but with needle transport.
Equipped with the sewing motor Quick QE 3760.
Cl. 272-140342
as base type, but with needle transport, with automatic
solenoidal bartacking and solenoidal sewing foot lift. Standard
equipped with keys for bartacking within the course of a seam, for
needle high-low, single stitch and calling-up or suppressing bartacks.
Equipped with the sewing motor Efka DC 1500.
Cl. 272-160362
as base type with 6 mm stitch length and needle transport,
large hook (170%), automatic solenoidal bartacking and
solenoidal sewing foot lift. Standard equipped with keys for
bartacking within the course of a seam, for needle high-low,
single stitch and calling-up or suppressing bartacks.
Equipped with the sewing motor Efka DC 1500.
Cl. 272-640642
as base type, but with needle transport, with automatic solenoidal
bartacking and solenoidal sewing foot lift, an edge trimmer
powered by the sewing machine which is switched on via a
lever. Standard equipped with keys for bartacking within the
course of a seam, for needle high-low, single stitch and
calling-up or suppressing bartacks.
Equipped with the sewing motor Efka DC 1500.
6

Cl. 272-740642
as base type, with automatic solenoidal bartacking and
solenoidal sewing foot lift, an electromotorically-powered edge
trimmer which is switched on via a key. Standard equipped
with keys for bartacking within the course of a seam, for needle
high-low, single stitch and calling-up or suppressing bartacks
and edge trimmer on/off.
The present subclass needs a pneumatic connection.
Equipped with the sewing motor Efka DC 1500.
Cl. 273-140342
as base type, with an intermittent roller top feed, automatic
solenoidal bartacking and solenoidal sewing foot lift, standard
equipped with keys for bartacking within the course of a seam,
for needle high-low, single stitch and calling-up or suppressing
bartacks and raising or lowering the top feed roller.
The present subclass needs a pneumatic connection.
Equipped with the sewing motor Efka DC 1500.
Cl. 273-140432
as base type, with an intermittent roller top feed, solenoidal
sewing foot lift. solenoidal bartacking and solenoidal sewing
foot lift. Oil-free point of sewing with lubrication-free hook, a
feed dog with a smaller lifting cam and a changed regulator
ensuring an improved flat seam by small stitch length and
lightweight material. Standard equipped with keys for
bartacking within the course of a seam, for needle high-low,
single stitch and calling-up or suppressing bartacks and raising
or lowering the top feed roller.
The present subclass needs a pneumatic connection.
Equipped with the sewing motor Efka DC 1500.
Cl. 274-140342
as base type, with needle transport, with an intermittent roller top
feed, automatic solenoidal bartacking and solenoidal sewing
foot lift. Standard equipped with keys for bartacking within the
course of a seam, for needle high-low, single stitch and
calling-up or suppressing bartacks and raising or lowering the
top feed roller.
The present subclass needs a pneumatic connection.
Equipped with the sewing motor Efka DC 1500.
GB
7

4. Optional Equipment
Subclasses
Materials no. Equipment
0271 001671
Parts kit-Manual bartacking X X X X X X X X X X X X X X X
N900 003441
Synchronized binder kit X X X X X X X X X X X X X
0271 000892
Triple-foot holder X X X X X X X X X X X
N900 020031 Edge stop
(triple-foot holder)
X X X X X X X X X X X X X X X X
N900 060034
Edge stop, double-sided X X X X X X X X X X X X X X X X
N900 020036 Edge stop-
Vertical trimmer,
X X X X X X X X
0271 002121
Conversion kit-K hook 170 % X X X X X X X X X X X X X X X
Z117 001941
Conversion kit-"Bartacking and
Lifting"
X XX X XX X XX X X X X X
Z120 001801
Thread wiper X X X X X X X X X X X X X X X X
Z120 001851
Electropneumatic
thread wiper
X X X X X X X X X X X X X X X X
0271 590024
Z133 027101
Infrared reflecting light barrier
X X X X X X X X X X X X X X X
0271 000661
Knee lever retro-fit kit X XX X X X X X X X X X X X X
0273 001041 "Height Adjustment of the Presser
Foot" kit
X X X X X X X X X X X X X X X X
9800 330009
V810 control panel X X X X X X X X X X X X X X X X
9800 330010
V820 control panel X X X X X X X X X X X X X X X X
0272 590014
Electropneumatic mechanism for
sewing with two preset needle
thread tension values and two
differing stitch lengths
X X X X X X
271 - 140341
271 - 140342
271 - 140442
272 - 140341
272 - 140342
272 - 160362
272 - 640642
272 - 740642
273 - 140342
274 - 140342
271 - 140331
271 - 140332
271 - 140432
272 - 140331
272 - 140332
273 - 140432
8

Subclasses
Materials no. Equipment
0271 590034
Z134 027101
Photoelectric remaining thread
monitor for the underthread.
Contains hook 0271 001991
(small) and bobbin 0271 002003
X X X X X X X X X X X X X X X
9800 340001
OC-Top control panel X X X X X X X X X X X X X X
9830 515031 Angle for the mounting of
the control panel on the
sewing machine
X X X X X X X X X X X X X X X X
9822 510001
Sewing lamp (Waldmann Halogen)
to be attached to the sewing
machine head
X X X X X X X X X X X X X X X X
0APP 001041
Attachment kit for 9822 510001 X X X X X X X X X X X X X X X X
0789 500088
Sewing lamp transformer X X X X X X X X X X X X X X X X
9822 510125
Light lead-sewing lamp X X X X X X X X X X X X X X X X
9880 271001
Attachment kit for 9822 510125 X X X X X X X X X X X X X X X X
9822 510000
Stand sewing lamp (Waldmann) X X X X X X X X X X X X X X X X
9822 510011
Table clamp for 9822 510000 X X X X X X X X X X X X X X X X
0271 590014
Conversion kit-hook "oil-free" X X X X X X X X X X X X X X X
9780 000108
Maint. unit K WE8 X X X X X X X X X X X X X X X X
0797 003031
Pneumatic connections pack X X X X X X X X X X X X X X X X
Z124 000501
Electropneumatic mechanism for
turning the edge trimmer on and off
X X X X X X X
Z145 000001
Kit for stepped trimming X X X X X X X X
Z145 000101
Kit for stepped trimming in
light-weight material
X X X X X X X X
0722 002041
Suction device for a head with
edge trimmer
X X X X X X X X
9800 8100021
Blower with connection lead and
safety switch for 3 x 380-415 V,
50 Hz
X X X X X X X X
9800 8100022
As 9800 8100021, but with
3 x 220-240 V, 50 Hz
X X X X X X X X
9800 8100023
As 9800 8100021, but with
3 x 220-240 V, 60 Hz
X X X X X X X
MG53 400015
MG 53-3 with a pedal,
table top 1060 x 500
X X X X X X X X X X X X X X X X
MG53 400016
MG 53-3 with a pedal, table top
1060 x 600
X X X X X X X X X X X X X X X X
MG53 400017
MG 53-3 with pedal, table top
1250 x 900/700
X X X X X X X X X X X X X X X X
271 - 140341
271 - 140342
271 - 140442
272 - 140341
272 - 140342
272 - 160362
272 - 640642
272 - 740642
273 - 140342
274 - 140342
271 - 140331
271 - 140332
271 - 140432
272 - 140331
272 - 140332
273 - 140432
GB
9

5. Technical Data
Subclasses
Class 271
Sewing stitch type 301
Hook type Horizontal hook
small oil-free small oil-free
Number of needles 1
Needle system 134, 797 or Sy 195 501
Needle thickness max. (dependent on E no.)[Nm] 70 - 120 80
Needle thread size max. 30/3 120
Max. stitch length
- forward [mm] 4
- reverse [mm] 4
Max. no. of stitches [min
-1
] 5.500 4.000 5.500 4.000
No. of stitches at delivery [min
-1
] 4.800 4.000 4.800 4.000
Sewing foot stroke
- when lifted [mm] 8
Operating pressure [bar] --
Air consumption [NL] --
Length, width, height [mm] 500 x 175 x 380
Weight [kg] 33 35 35 33 35 35
Design voltage range [V/Hz] 1 x 190 - 240 V 50/60 Hz
Design voltage at delivery
[V/Hz] 1 x 230 V 50/60 Hz
Design power [kVA] 0.5
Noise
: Workplace-relevant emission value to DIN 45635-48-A-1-KL2
Lc [dB (A)] 82 82 82
Stitch length [mm] 3,2 3,2
No. of stitches [min
-1
] 4.800 4.000 4.800
Material G1 DIN 23328 2-play
271 - 140341
271 - 140342
271 - 140442
271 - 140331
271 - 140332
271 - 140432
10

Subclasses
Class 272
Sewing stitch type 301
Hook type Horizontal hook
small large small
Number of needles 1
Needle system 134, 797 oder Sy 195 501
Needle thickness max. (dependent on E no.) [Nm] 7 0 - 120 80
Needle thread size max. 30/3 120
Max. stitch length
- forward [mm] 4 6 4
- reverse [mm] 4 6 4
Max. no. of stitches [min
-1
] 5000
with stitch length longer than 4 mm [min
-1
] 4000
No. of stitches at delivery [min
-1
] 4800 4000 4800
Sewing foot stroke
- when lifted [mm] 8
Operating pressure [bar] -- 6 --
Air consumption [NL] -- 0,05 --
Length, width, height [mm] 500 x 175 x 380
Weight [kg] 31 33 33 36 38 31 33
Design voltage range [V/Hz] 1 x 190 - 240 V 50/60 Hz
Design voltage at delivery
[V/Hz] 1 x 230 V 50/60 Hz
Design power [kVA] 0,5
Noise
: Workplace-relevant emission value to DIN 45635-48-A-1-KL2
Lc [dB (A)] 83
Stitch length [mm] 3,2
No. of stitches [min
-1
]4.800
Material G1 DIN 23328 2-play
272 - 140341
272 - 140342
272 - 160362
272 - 640642
272 - 740642
272 - 140331
272 - 140332
GB
11

Subclasses
Class 273
Sewing stitch type 301
Hook type Horizontal hook-small oil-free
Number of needles 1
Needle system 134, 797 oder Sy 195 501
Needle thickness max. (dependent on E no.) [Nm] 70 - 120 80
Needle thread size max. 30/3 120
Max. stitch length
- forward [mm] 4
- reverse [mm] 4
Max. no. of stitches [min
-1
] 5500 4000
No. of stitches at delivery [min
-1
] 4800 4000
Sewing foot stroke
- when lifted [mm] 6
- with reverse rotation [mm] 6
Operating pressure [bar] 6
Air consumption [NL] 0,02
Length, width, height [mm] 500 x 175 x 380
Weight [kg] 35
Design voltage range [V/Hz] 1 x 190 - 240 V 50/60 Hz
Design voltage at delivery
[V/Hz] 1x230V 50/60 Hz
Design power [kVA] 0,5
Noise
: Workplace-relevant emission value to DIN 45635-48-A-1-KL2
Lc [dB (A)] 82
Stitch length [mm] 3,2
No. of stitches [min
-1
]4.800
Material G1 DIN 23328 2-play
273 - 140342
273 - 140432
12

Subclasses
Class 274
Sewing stitch type 301
Hook type Horizontal hook-small
Number of needles 1
Needle system 134, 797 or Sy 195 501
Needle thickness max. (dependent on E no.) [Nm] 70 - 120
Needle thread size max. 30/3
Max. stitch length
- forward [mm] 4
- reverse [mm] 4
Max. no. of stitches [min
-1
]5000
No. of stitches at delivery [min
-1
] 4800
Sewing foot stroke
- when lifted [mm] 6
Operating pressure [bar] 6
Air consumption [NL] 0,02
Length, width, height [mm] 500 x 175 x 380
Weight [kg] 36
Design voltage range [V/Hz] 1 x 190 - 240 V 50/60 Hz
Design voltage at delivery
[V/Hz] 1 x 230 V 50/60 Hz
Design power [kVA] 0,5
Noise
: Workplace-relevant emission value to DIN 45635-48-A-1-KL2
Lc [dB (A)] 83
Stitch length [mm] 3,2
No. of stitches [min
-1
]4.800
Material G1 DIN 23328 2-play
274 - 140342
GB
13

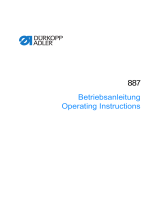
Illus. a: Correct thread interlacing in
the middle of the material
Illus. b: Needle thread tension too low
or
underthread tension too high
Illus. c: Needle thread tension too high
or
underthread tension too low
1
2
3
4
14

6. Operation
6.1 Threading the Needle Thread
Caution Risk of Injury !
Turn the main switch off !
Thread the needle thread only with the sewing machine
turned off.
–
Place the spool of yarn on the yarn stand as shown in the illustration (Page 14).
–
Thread the needle thread according to the drawing on the previous page.
6.2 Setting the Needle Thread Tension
Setting of the needle thread pretension
The main tension 4 of the needle thread is open during the thread trimming. For a
secure thread trimming, it is, however, necessary that the needle thread remains
slightly taut during thread trimming. This is achieved through the needle thread
pretension 1. At the same time, the needle thread pretension 1 influences the length of
the cut needle thread end and, thereby, the thread length which is required for the next
secure seam beginning.
Base position: Turn knurled nut 2 until its front lies flush with bolt 3.
Shorter beginning thread: Turn knurled nut 2 clockwise
Longer beginning thread: Turn knurled nut 2 counterclockwise.
Note: After greater changes in the needle thread pretension
the main tension 4 may possibly need correction in
order to achieve the same sewing results.
Setting the main tension
The needle thread pretension 1 and main tension 4 together build the thread tension
required for the seam (see Illus. a).
Setting: Turn knurled nut 4 accordingly
Increase tension: Turn knurled nut 4 clockwise
Decrease tension: Turn knurled nut 4 counterclockwise
6.3 Releasing the Needle Thread Tension
Automatic
The main tension 4 is automatically opened during thread trimming.
GB
15

6.4 Winding the Underthread
–
Place the bobbin on the winder shaft 1.
–
Thread the underthread as shown in the illustration.
–
Wind the underthread clockwise onto the bobbin core.
–
Pull the thread end through the trimming clamp 2 and cut.
–
Swing the winder flap 3 against the bobbin.
–
Turn the main switch on.
–
Start the sewing sequence.
–
After reaching the set bobbin-fill quantity (see Service Instructions), the winder
turns off automatically.
12
3
16

6.5 Inserting the Underthread Bobbin
Caution Risk of Injury !
Turn the main switch off.
Insert the underthread bobbin only with the sewing
machine turned off.
Removing the bobbin
–
Lift the bobbin case retainer 1.
–
Remove hook base 2 with bobbin.
–
Remove the empty bobbin from hook base 2.
Inserting a full bobbin
–
Place full bobbin 3 into hook base 2.
–
Pull the underthread through the slit 4 under tension spring 6 and into the drilled
hole 5.
–
Pull the underthread approx. 5 cm out of hook base 2.
When the thread is pulled off, the bobbin must turn in the direction of the arrow.
–
Insert the hook base 2 into the hook again.
–
Close the bobbin case retainer 1.
2
3
4
5
6
1
GB
17

6.6 Setting the Underthread Tension
Caution Risk of Injury !
Turn the main switch off.
Setting the underthread tension only with the sewing
machine turned off.
Setting the underthread tension
The underthread tension must be set so that a seam as shown in Illus. a)
in Chapter 6 results.
–
With a recommended underthread tension of e.g. 30g, 15g should be achieved
through the brake spring 1 and 15g through the tension spring 4.
–
The following applies as the base setting for the tension spring 4:
The bobbin case must slowly lower under its own weight. See sketch in Chapter 6.5.
The brake spring 1 hinders a running-on of the bobbin during the thread trimming
sequence.
To regulate the two tension values one proceeds as follows:
–
Turn adjusting screw 3 back so far that the tension of the tension spring 4 is
completely released.
–
Set the brake spring 1 by turning the screw 2 so that half of the recommended
hook thread tension value is achieved through the brake spring.
Attention !
Not for classes: 271-140432, 271-140442, 273-140432
–
Insert the bobbin into the hook base and thread the underthread (see Chapter 6.5).
–
Insert the bobbin case with the bobbin into the hook.
–
Turn the handwheel until the sewing machine has conducted a stitch.
–
Pull the underthread to the top of the needle hole with the aid of the needle thread.
–
Pull off the underthread in the direction of sewing at an angle of 45°. About half of
the tension value should be felt.
Then tighten the adjusting screw 3 to the recommended tension value.
1
43
2
18

6.7 Changing Needles
Caution Risk of Injury !
Turn the main switch off.
Change the needle only with the sewing machine turned off.
–
Loosen screw 1 and remove the needle.
–
Push the new needle up to the stop into the drilled hole in the needle bar 4.
ATTENTION !
The furrow 2 must face the hook point 3 (see sketch).
–
Tighten screw 1.
ATTENTION !
After a change to a different needle thickness, the
clearance of the hook to the needle must be corrected (see
Service Instructions).
Not observing the above correction can lead to the following errors:
–
Change to a thinner needle: - Missing stitches
- Damage to the thread
–
Change to a thicker needle: - Damage to the hook point
- Damage to the needle
4
1
2
3
GB
19
/