Dometic Duo Therm Brisk Air 59528-59529-59530 Series Roof Top AC_Use Installation guide
- Category
- Split-system air conditioners
- Type
- Installation guide

1
59528, 59529 & 59530 Series Air Conditioner With Analog Thermostat and Air Distribution Box
INSTALLATION
INSTRUCTIONS
This manual must be read and un-
derstood before installation, adjust-
ment, service, or maintenance is per-
formed. This unit must be installed
by a qualified service technician.
Modification of this product can be
extremely hazardous and could re-
sult in personal injury or property
damage.
Important: Instructions must stay with unit.
Owner read carefully
USA
SERVICE OFFICE
The Dometic Corporation
2320 Industrial Parkway
LaGrange, IN 46761
(574) 294-2511
CANADA
Dometic Distribution
866 Langs Dr.
Cambridge, Ontario
CANADA N3H 2N7
(519) 653-4390
For Service Center
Assistance Call:
800-544-4881
MODELS
59528.601
59529.531
59529.601
59529.631
59530.531
BRISK AIR®
59528 Series
59529 Series
59530 Series
ROOF TOP AIR CONDITIONER
USED WITH
3107210 AIR DISTRIBUTION BOX KIT and
3107541.009 ANALOG RELAY KIT
REVISION
Form No. 3108477.054 2/05
(Replaces 3108477.047)
(French 3109437.040)
©2005 Dometic Corporation
LaGrange, IN 46761
Lire et comprendre ce manuel avant
de procéder à l'installation, à des
réglages, de l'entretien ou des
réparations. L'installation de cet
appareil doit être effectuée par un
réparateur qualifié. Toute modification
de cet appareil peut être extrêmement
dangereuse et entraîner des blessures
ou dommages matériels.
C
U
S
59530.532
59530.536
59530.601
59530.631
RECORD THIS INFORMATION FOR FUTURE
REFERENCE BEFORE INSTALLING THE
UNIT:
Model Number
Serial Number
Date Purchased
Place of Purchase

2
59528, 59529 & 59530 Series Air Conditioner With Analog Thermostat and Air Distribution Box
A. THIS AIR CONDITIONER IS DESIGNED FOR:
1. Installation on a recreational vehicle during the time
the vehicle is manufactured.
2. Mounting on the roof of a recreational vehicle.
3. Roof construction with rafters/joists on minimum of
16 inch centers.
4. Minimum of 2.00 inches and maximum of 4.00
inches distance between roof to ceiling of recre-
ational vehicle. Alternate installation methods will
allow for roofs more than 4.00 inches thick.
B. The ability of the air conditioner to maintain the desired
inside temperature depends on the heat gain of the RV.
Some preventative measures taken by the occupants of
the RV can reduce the heat gain and improve the
performance of the air conditioner. During extremely
high outdoor temperatures, the heat gain of the vehicle
may be reduced by:
1. Parking the RV in a shaded area
2. Using window shades (blinds and/or curtains)
3. Keeping windows and doors shut or minimizing
usage.
4. Avoiding the use of heat producing appliances
Operating on High Fan/Cooling mode will give optimum
or Maximum efficiency in high humidity or high outside
temperature.
Starting the air conditioner early in the morning and
giving it a "head start" on the expected high outdoor
ambient will greatly improve its ability to maintain the
desired indoor temperature.
For a more permanent solution to a high heat gain,
accessories like A&E outdoor patio and window awnings
will reduce heat gain by removing the direct exposure to
the sun. They also add a nice area to enjoy company
during the cool of the evening
C. Condensation
Note: The manufacturer of this air conditioner will not be
responsible for damage caused by condensed moisture on
ceilings or other surfaces. Air contains moisture and this
moisture tends to condense on cold surfaces. When air
enters the RV, condensed moisture may appear on the
ceiling, windows, metal parts, etc. The air conditioner
removes this moisture from the air during normal operation.
Keeping doors and windows closed when this air conditioner
is in operation will minimize condensed moisture on cold
surfaces.
1.GENERAL INFORMATION
SAFETY INSTRUCTIONS
This manual has safety information and instruc-
tions to help users eliminate or reduce the risk of
accidents and injuries.
RECOGNIZE SAFETY INFORMATION
This is the safety-alert symbol. When you see this
symbol in this manual, be alert to the potential for
personal injury.
Follow recommended precautions and safe op-
erating instructions.
UNDERSTAND SIGNAL WORDS
A signal word , WARNING OR CAUTION is used
with the safety-alert symbol. They give the level of
risk for potential injury.
indicates a potentially hazard-
ous situation which, if not avoided, could result in
death or serious injury.
indicates a potentially hazard-
ous situation which, if not avoided, may result in
minor or moderate injury.
used without the safety alert
symbol indicates, a potentially hazardous situa-
tion which, if not avoided, may result in property
damage.
Read and follow all safety information and instruc-
tions.
!
WARNING
!
CAUTION
CAUTION
!

3
59528, 59529 & 59530 Series Air Conditioner With Analog Thermostat and Air Distribution Box
MODEL NO. 59528.601 59529.601 59529.531 59530.531 59530.532 59530.601
59529.631 59530.536
Electrical Rating 120V AC, 60 Hz, 1 Ph.*
Compressor
Rated Load Amps 6.0 7.4 7.7 8.3 8.0 8.0
Locked Rotor Amps 45.6 44 49.0 53.0 53 48.3
Fan Motor
Run Load Amps 2.0 2.0 2.0 2.0 2.5 2.0
Locked Rotor Amps 5.6 5.6 5.6 5.6 5.8 5.6
Refrigerant R22 (oz.) 16.5 20.5 18.5 19.0 18.5 19.0
Minimum Wire Size** 12 AWG Copper Conductors up to 24 ft.
AC Circuit Protection 15 Amp Time Delay Fuse
(User Supplied) or HACR Circuit Breaker
DC Circuit Protection 3 Amps
(User Supplied)
Installed Weight (1 lb.) 92 93 94 94 94 94
Min. Generator*** 1 Unit 2.5 KW
2 Units 4.0 KW
*Maximum unit performance achieved at full rated voltage.
** For lengths over 24 ft., consult the National Electrical Code.
*** The Dometic Corp. gives general guidelines for generator requirements. These guidelines come from experiences people have had in actual
applications. When sizing the generator, the total power usage of your recreational vehicle must be considered. Also keep in mind generators
lose power at high altitudes and from lack of maintenance.
1. PRECAUTIONS
WARNING
!
Improper installation may damage equipment/
could endanger life, cause serious injury and/
or property damage.
A. Read Installation and Operating Instructions carefully
before attempting to start your air conditioner installa-
tion.
B. The Dometic Corporation will not be liable for any
damages or injury incurred due to failure in following
these instructions.
C. Installation must comply with the National Electrical
Code and any State or Local Codes or regulations.
D. DO NOT add any devices or accessories to this air
conditioner except those specifically authorized by
Dometic.
E. This equipment must be serviced by qualified personnel
and some states require these people to be licensed.
2. CHOOSING PROPER LOCATION
FOR THE AIR CONDITIONER
This air conditioner is specifically designed for installation on
the roof of a recreational vehicle (RV).
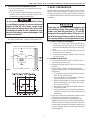
A. NORMAL LOCATION
The air conditioner is designed to fit over an existing roof
vent opening. When the vent is removed, it normally
creates a 14-1/4" X 14-1/4" (±1/8") opening.
INSTALLATION INSTRUCTIONS
B. OTHER LOCATIONS
When no roof vent is available or another location is
desired, the following is recommended:
1. For one unit installation: The air conditioner should be
mounted slightly forward of center (front to back) and
centered from side to side.
2. For two unit installations: Install one Air Conditioner
1/3 and one Air Conditioner 2/3’s from front of RV and
centered from side to side.
It is preferred that the air conditioner be installed in a relatively
flat and level roof section measured with the RV parked on
a level surface.
Note: A 15° slant to either side, or front to back, is
acceptable.
FIG. 1
SPECIFICATIONS
34.4"
12.7" *
29.5"

4
59528, 59529 & 59530 Series Air Conditioner With Analog Thermostat and Air Distribution Box
C. AFTER LOCATION HAS BEEN SELECTED:
1. Check for obstructions in the area where air condi-
tioner will be installed.
2. The roof must be designed to support 130 pounds
when the RV is in motion. Normally a 200 lb. static
load design will meet this requirement.
CAUTION
It is the responsibility of the installer of this
air conditioner system to ensure structural
integrity of the RV roof. Never create a low
spot on the roof where water will collect. Wa-
ter standing around the air conditioner may
leak into the interior causing damage to the
product and the RV.
3. Check inside the RV for air box obstructions (i.e. door
openings, room dividers, curtains, ceiling fixtures, etc.)
3.ROOF PREPARATION
Before preparing the ceiling opening, the type of system
options must be decided upon. If a furnace is to be con-
nected, wires must be run from the furnace to the Dometic A/
C. Read all of the following instructions before beginning the
installation.
WARNING
!
There may be electrical wiring between the
roof and the ceiling. Disconnect 120 volt AC
power cord and the positive (+) 12 volt DC
terminal at the supply battery. Failure to fol-
low this instruction may create a shock haz-
ard causing death or severe personal injury.
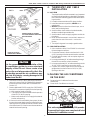
A. CEILING OPENING REQUIREMENTS
1. A 14-1/4" x 14-1/4" (±1/8") opening must be cut
through the roof and ceiling of the RV. This opening
must be located between the roof reinforcing mem-
bers.
2. Mark a 14-1/4" x 14-1/4" (±1/8") square on the roof
and carefully cut the opening.
3. Using the roof opening as a guide, cut the matching
hole in the ceiling.
B. OPENING PREPARATION
1. If the opening exceeds 14-3/8" x 14-3/8", it will be
necessary to install spacers.
2. If the opening is less than 14-1/8" x 14-1/8", it must be
enlarged.
3. Route a copper 12 AWG, with ground, 120 VAC
supply line from the fuse or circuit breaker box to the
roof opening.
a. This supply line must be located in the front portion
of the 14-1/4" (±1/8") opening.
b. The power MUST be on a separate 15 amp time
delay fuse or HACR circuit breaker.
c. Make sure that at least 15" of supply wire extends
into the roof opening. This ensures easy connec-
tion at the junction box.
d. Wiring must comply with all National, State and
Local Wiring Codes.
e. Use a steel sleeve and a grommet or equivalent
methods to protect the wire where it passes into
the opening.
4. If a furnace is to be connected, wires must be run from
the furnace to the Dometic Air Conditioner.
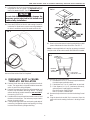
5. The opening created must be framed to provide
adequate support and prevent air from being drawn
from the roof cavity. Lumber 3/4" or more in thickness
must be used. Remember to provide an entrance hole
for power supplies, furnace wiring (if applicable) and
thermostat wires.
FIG. 2
7-5/8"
5-1/4" 14-7/8"
7-5/8"
REAR
OF
UNIT
KEEP THIS AREA FREE OF OBSTRUCTIONS
FRONT 18"
14-1/4"x
14-1/4"
OPENING

5
59528, 59529 & 59530 Series Air Conditioner With Analog Thermostat and Air Distribution Box
CAUTION
It is the responsibility of the installer of this
air conditioner system to ensure structural
integrity of the RV roof. Never create a low
spot on the roof where water will collect. Wa-
ter standing around the air conditioner may
leak into the interior causing damage to the
product and the RV.
6. The 14-1/4" x 14-1/4" (±1/8") opening is part of the
return air system of the Air Conditioner and must be
finished in accordance with NFPA Standard 501C
Section 2.7.
7. Route a dedicated 12V DC supply line (18-22 AWG)
from the RV's converter or battery to the roof opening.
a. Wire must be fused at 3 Amps.
b. This supply line must be located in the front portion
of the 14-1/4" (±1/8") opening.
c. Make sure that at least 15" of supply wire extends
into the roof opening.
8. If a furnace is to be controlled by the system, the two
furnace thermostat leads must be routed to the roof
opening of the air conditioner that will control it. Make
sure that at least 15" of the furnace thermostat wires
extend into the roof opening.
15"
min.
3/4"
MIN. FRAME OPENING SO IT WON'T
COLLAPSE WHEN BOLTING DOWN
AIR CONDITIONER
LEAVE ACCESS FOR
POWER SUPPLY WIRING
FIG. 3
4. THERMOSTAT AND CABLE
INSTALLATION
A. LOCATION
The proper location of the thermostat is very important
to insure that it will provide a comfortable RV tempera-
ture. Observe the following general rules when select-
ing a location.
1. Locate the thermostat about 54" above the floor.
2. Install thermostat on a partition, NEVER on an
outside wall;
3. NEVER expose it to direct heat from lamps, sun or
other heat producing items;
4. Avoid locations close to doors that lead outside,
windows or adjoining outside walls;
5. Avoid locations close to supply registers and the air
from them;
6. Never locate thermostat in a room that is warmer or
cooler than the rest of the coach - such as the
kitchen.
7. The major living area is normally a good location.
B. CABLE INSTALLATION
1. A six-conductor cable, 18 to 22 AWG is to be used
for low voltage connections.
2. Choose the shortest, direct route from the 14-1/4"
(± 1/8") opening to the thermostat location selected.
3. Consider where screws, nails or staples might con-
tact the cable.
4. Leave approximately 6" of cable extending through
the wall for connection to the thermostat.
5. Leave approximately 10" of cable extending into the
14-1/4" ± (1/8") opening for connection at unit
6. If system is to control a gas furnace: Route two 18
gauge wires from the furnace to 14-1/4" ± (1/8")
opening at this time.
5.PLACING THE AIR CONDITIONER
ON THE ROOF
A. Remove the Air Conditioner from the carton
and discard.
B. Place the Air Conditioner on the roof.
CAUTION
!
This unit weighs approximately 100 pounds.
To prevent back injury, use a mechanical hoist
to place Air Conditioner on roof.
FIG. 4

6
59528, 59529 & 59530 Series Air Conditioner With Analog Thermostat and Air Distribution Box
FIG. 6
C. Lift and place the unit over the prepared opening using
the gasket on unit as a guide. The exposed coil goes
toward the rear of the RV. See FIG. 5
CAUTION
Do not slide the unit. This may damage the
neoprene gasket attached to the bottom and
create a leaky installation.
D. Place the 3107210 Air Box Kit and Analog Control Kit
inside the RV. Both boxes contain mounting hardware
for the air conditioner and will be used inside the RV.
This completes the outside work. Minor adjustments can be
done from the inside of the RV if required.
6. DISCHARGE DUCT & CEILING
TEMPLATE INSTALLATION
A. Remove the air box and mounting hardware from their
carton. The upper duct is shipped inside the lower duct
which is part of the ceiling template.
B. Remove the upper duct from the ceiling template and
locate it over the blower discharge. NOTE: The edge
without the flange installs toward the rear and side of
the opening. See FIG. 6
C. Use two of the sharp pointed sheet metal screws to hold
the duct to the base pan. The holes are pre-punched in
the pan for each location.
D. Check gasket alignment over roof opening and adjust if
necessary (roof gasket centers over opening). Unit may
be moved from below by lifting and sliding.
FIG. 5
GASKET
CENTER A /C
FROM BEL OW
MEASURE
CEILING
THICKNESS PULL DOW N
ELECTRICAL CORD
FIG. 7
E. Reach up into the return air opening and pull the conduit
power cable down for later connection. See FIG. 7
Note: In some applications it may be necessary to extend
the 6 pin cable. Order cable number 3105584.001 if needed.
F. Measure the ceiling thickness:
1) If the distance is 2" to 3", remove the perforated tabs
from both upper and lower ducts.
2) If the distance is 3" to 4", install ducts as received.
3) If the distance is 4" to 6" (maximum thickness),
optional Duct Kit and Bolt Kit are available:
Duct Kit (Part No. 3106775.004
Bolt Kit (Part No. 3100895.006
G. Remove the junction box cover from the Analog Control
Box.
H. Plug the electrical conduit (6 pin connector) from the
upper unit into the mating connector in Analog Control
Box.

7
59528, 59529 & 59530 Series Air Conditioner With Analog Thermostat and Air Distribution Box
I.Freeze Control Installation (Two Types)
1. Type using a snap on spring clip
a. Fits on all 579, 590, 591 and 595 Series Brisk
Air units by placing the cold control switch up
through the base pan and on the second refrig-
erant tube from the bottom in the center of the
evaporator coil. Make sure the spring clip is
fastened securely to the tubing and the cold
control surface is making contact with alumi-
num fins on evaporator coil. See FIGS. 8 & 8A.
b. Keep wires away from heat strip (if applicable)
and sharp edges to prevent damaging the wires.
Use wire ties if necessary. See FIGS. 8 & 8A.
c. Remove installation notice hang tag from freeze
control. See FIGS. 8 & 8A.
2. Type using a horseshoe welded snap clip.
a. Install on return bend located at left (curb side)
side of evaporator coil as follows:
b. Locate “D” shaped notch in flange of evapora-
tor coil. See FIG. 8B.
c. Place the horseshoe end of the freeze control
through this notch and snap onto the coil re-
turn bend. When positioned correctly, control
wires will be toward the evaporator housing away
from the evaporator coil header. See FIG. 8B.
d. Remove installation notice hang tag from freeze
control. See FIG. 8B
FIG. 8B
FIG. 8A
Remove
Hang Tag Up
Through
Place Cold
Control In
Center Of Coil
On 2nd Tube
From Bottom
FIG. 8
Wrap Closed Cell Foam
Insulation Around Cold
Control Switch
Snap The Open
Loop Of Spring Clip
On Second Tube In
Center OF Evapora-
tor Coil 7. WIRING OF SYSTEM
A. CONNECTION OF 120 VOLT POWER SUPPLY
WARNING
!
Disconnect 120 volt AC. Failure to follow these
instructions could create a shock hazard
causing death or severe personal injury.
WARNING
!
This appliance is equipped with a 3-wire
(grounded) system for protection against
shock hazard. Make sure that the appliance
is wired into a properly grounded 120 volt AC
circuit and the polarity is correct. Failure to
do so could result in death, personal injury or
damage to the equipment.
1. Route the 120 VAC supply line through the strain
relief in Analog Control box. Tighten strain relief,
making sure enough wire is inside electronic box to
connect with unit 120 VAC wire. Tighten screws on
strain relief connector being careful not to pinch and
cut into the insulation on power supply leads.
2. Connect the white to white; black to black; and
green to green or bare copper wire using appropri-
ately sized twist wire connectors. Tape the twist
wire connectors to the supply wiring to assure they
do not vibrate off.
3. Push the wires into the box and tighten the strain
relief.
4. Install the cover (part of the mounting hardware) with
the one blunt point screw provided.

8
59528, 59529 & 59530 Series Air Conditioner With Analog Thermostat and Air Distribution Box
B. CONNECTION OF LOW VOLTAGE WIRES - See FIG. 9
FIG. 9
THERMOSTAT WITH COVER REMOVED
FIG. 10
CAUTION
Disconnect the positive (+) 12 volt DC terminal at the
supply battery. Damage to equipment could occur if
the 12 volt DC is not shut off.
1. Current model color coding
a. Connect the previously run +12V DC to the red wire
labeled +12V protruding from the relay kit.
b. Connect the previously run -12V DC to the black wire
labeled -12V protruding from the relay kit.
c. Connect the red/white wire to the thermostat +7.5.
d. Connect the unit green wire to the thermostat GND
terminal.
e. Connect the unit yellow wire to the thermostat COOL
terminal.
f. Connect the unit tan wire to the thermostat FAN
terminal.
g. Connect the unit blue wire to the thermostat HI FAN.
h. Connect the unit white wire to the thermostat FUR
terminal (if applicable).
i. Connect the unit blue/white wires to the two furnace
control wires (if applicable).
2. Early model color coding
a. Connect the previously run +12V DC to the red wire
labeled +12V protruding from the relay kit. Connect
the previously run -12V DC to the black wire protruding
from the relay kit.
b. Connect the other red wire labeled +12V to Tstat +12
Screw.
c. Connect the other relay kit black wire (unmarked) to
the thermostat GND terminal.
d. Connect the relay kit yellow wire to the thermostat
COOL terminal.
e. Connect the relay kit orange wire to the thermostat
FAN terminal.
f. Connect the relay kit blue wire to the thermostat HI
FAN.
g. Connect the relay kit white wire to the thermostat
furnace terminal (if applicable).
h. Connect the relay kit blue wires with white strip to the
two furnace control wires (if applicable).
C. Locate the Analog Control Kit 3107541 on the ceiling
template as shown in FIG. 10. Drive two #10 x 3/8 blunt
point Phillips head screws (provided) through ceiling
template into holes in electronic kit to hold into place.
D. Take the ceiling template and slide the lower unit over the
upper duct.
E. Hold the ceiling template with one hand and with the
other, install the four 1/4" mounting bolts through the
template and into the base pan.
1. Finger-tighten the (4) bolts and check alignment.
There should be an equal opening on each side
and the rear flange must be tight against the roof
opening.
2. EVENLY tighten the bolts to a torque of 40 to 50 inch
pounds. This will compress the roof gasket to
approxi- mately 1/2".
CAUTION
If bolts are left loose there may not be an
adequate roof seal or if over tightened, dam-
age may occur to the air conditioner base or
ceiling template. Tighten to torque specifica-
tions listed in this manual.
9. AIR BOX INSTALLATION
A. Remove return air grille from air box by pulling in on half-
round finger catches. See FIG. 11
B. Hold air box up to ceiling template and install three (3) #10
x 3/8" (C) screws at air box mounting point.
C. Snap hole plug (E) into place at rear of air box.
D. Install four (4) wood screws (B) which hold the air box tight
to ceiling, if desired.
E. Reinstall return air grille and filter into air box.
F. The air conditioner installation is now complete. Turn on
power to the unit for operational check. Please read Unit
Operating Instructions before proceeding.
Note: There are four optional mounting holes on the outer
edge of the return air opening for which screws are provided.
These are only required where an uneven ceiling does not
allow proper fitting of the air box.

9
59528, 59529 & 59530 Series Air Conditioner With Analog Thermostat and Air Distribution Box
D. (1) Hole Plug
AIR CONDITIONING UNIT
RELAY KIT FIELD WIRING DIAGRAM -
Cooling/Furnace
UPPER UNIT WIRING
DIAGRAM
FIG. 11
A. (4) 1/4" — #20 x 7" bolts
B. (4) #8 x 5/8" long sharp point wood screws
C. (4) #10 x 3/8" blunt point tapping screws
MOUNTING PARTS FIG. 12
-
 1
1
-
 2
2
-
 3
3
-
 4
4
-
 5
5
-
 6
6
-
 7
7
-
 8
8
-
 9
9


Dometic Duo Therm Brisk Air 59528-59529-59530 Series Roof Top AC_Use Installation guide
- Category
- Split-system air conditioners
- Type
- Installation guide
Ask a question and I''ll find the answer in the document
Finding information in a document is now easier with AI
Related papers
-
Dometic Duo therm 3103875 Center Duct Kit For Use Installation guide
-
-
-
-
-
-
Dometic 600315.326 Installation Instructions Manual
-
-
-