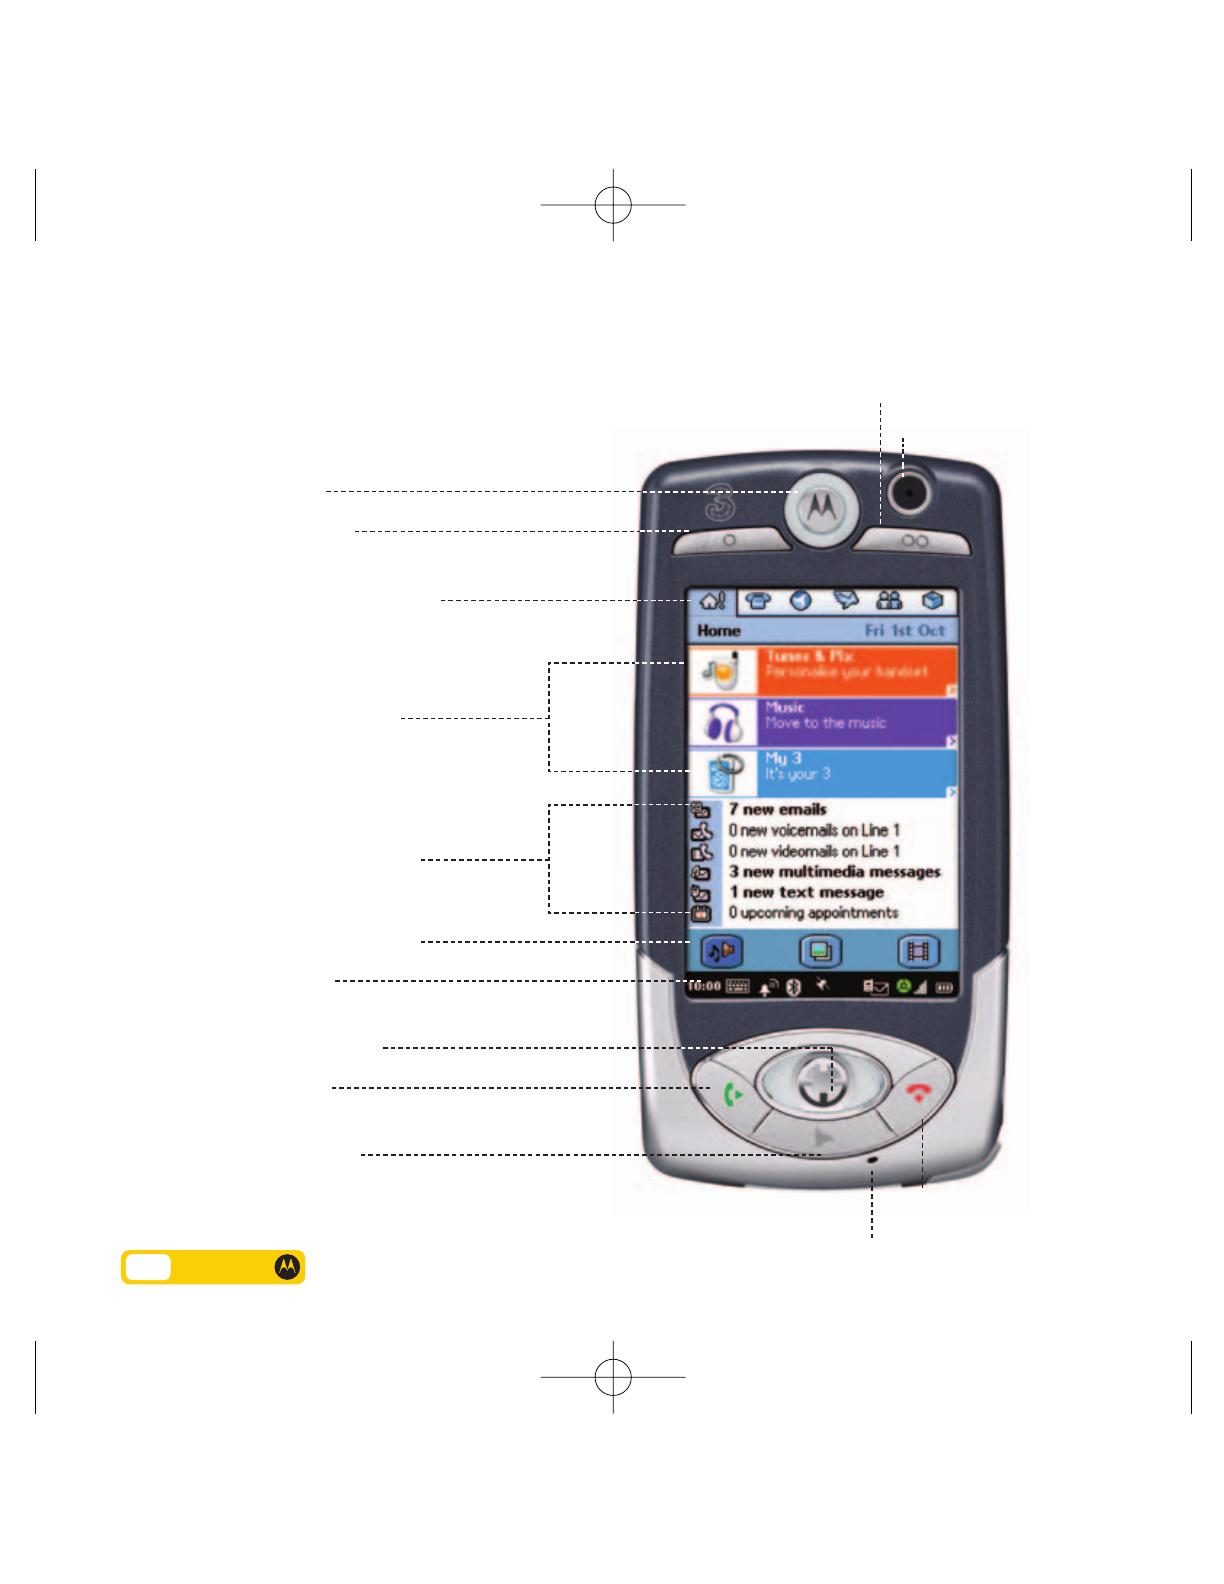
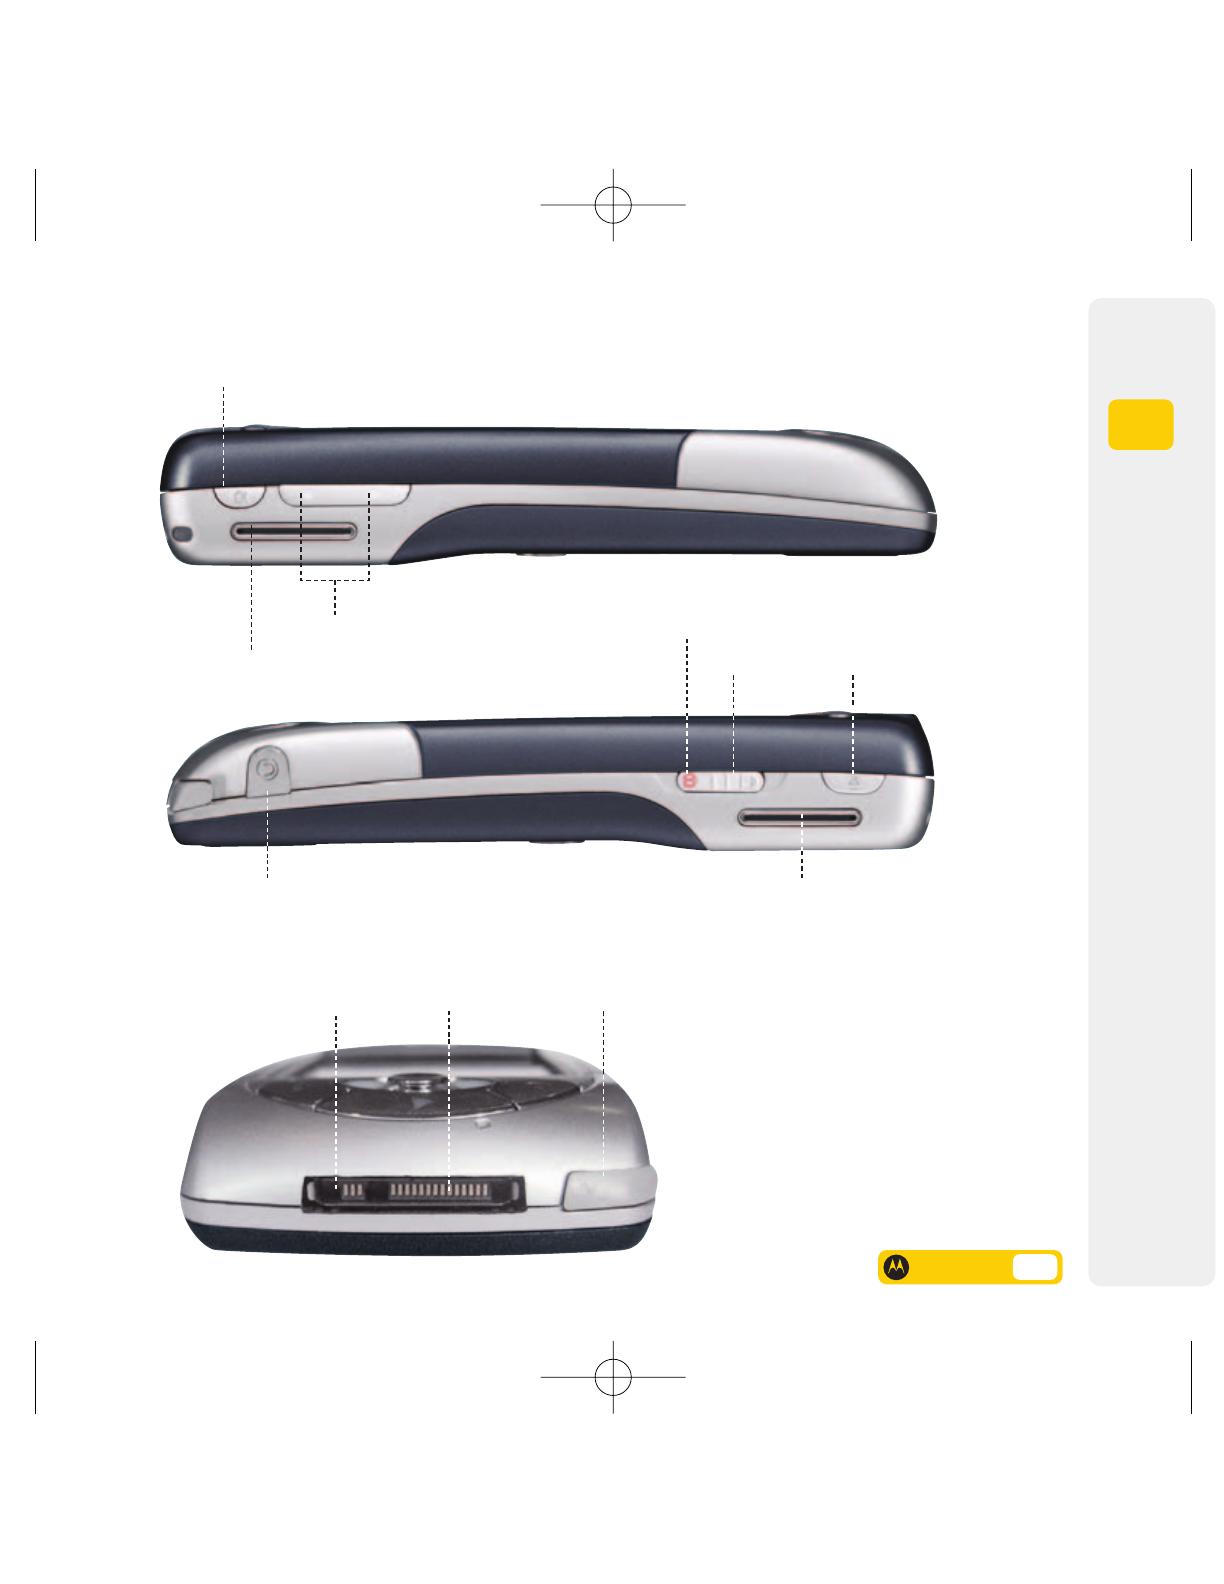
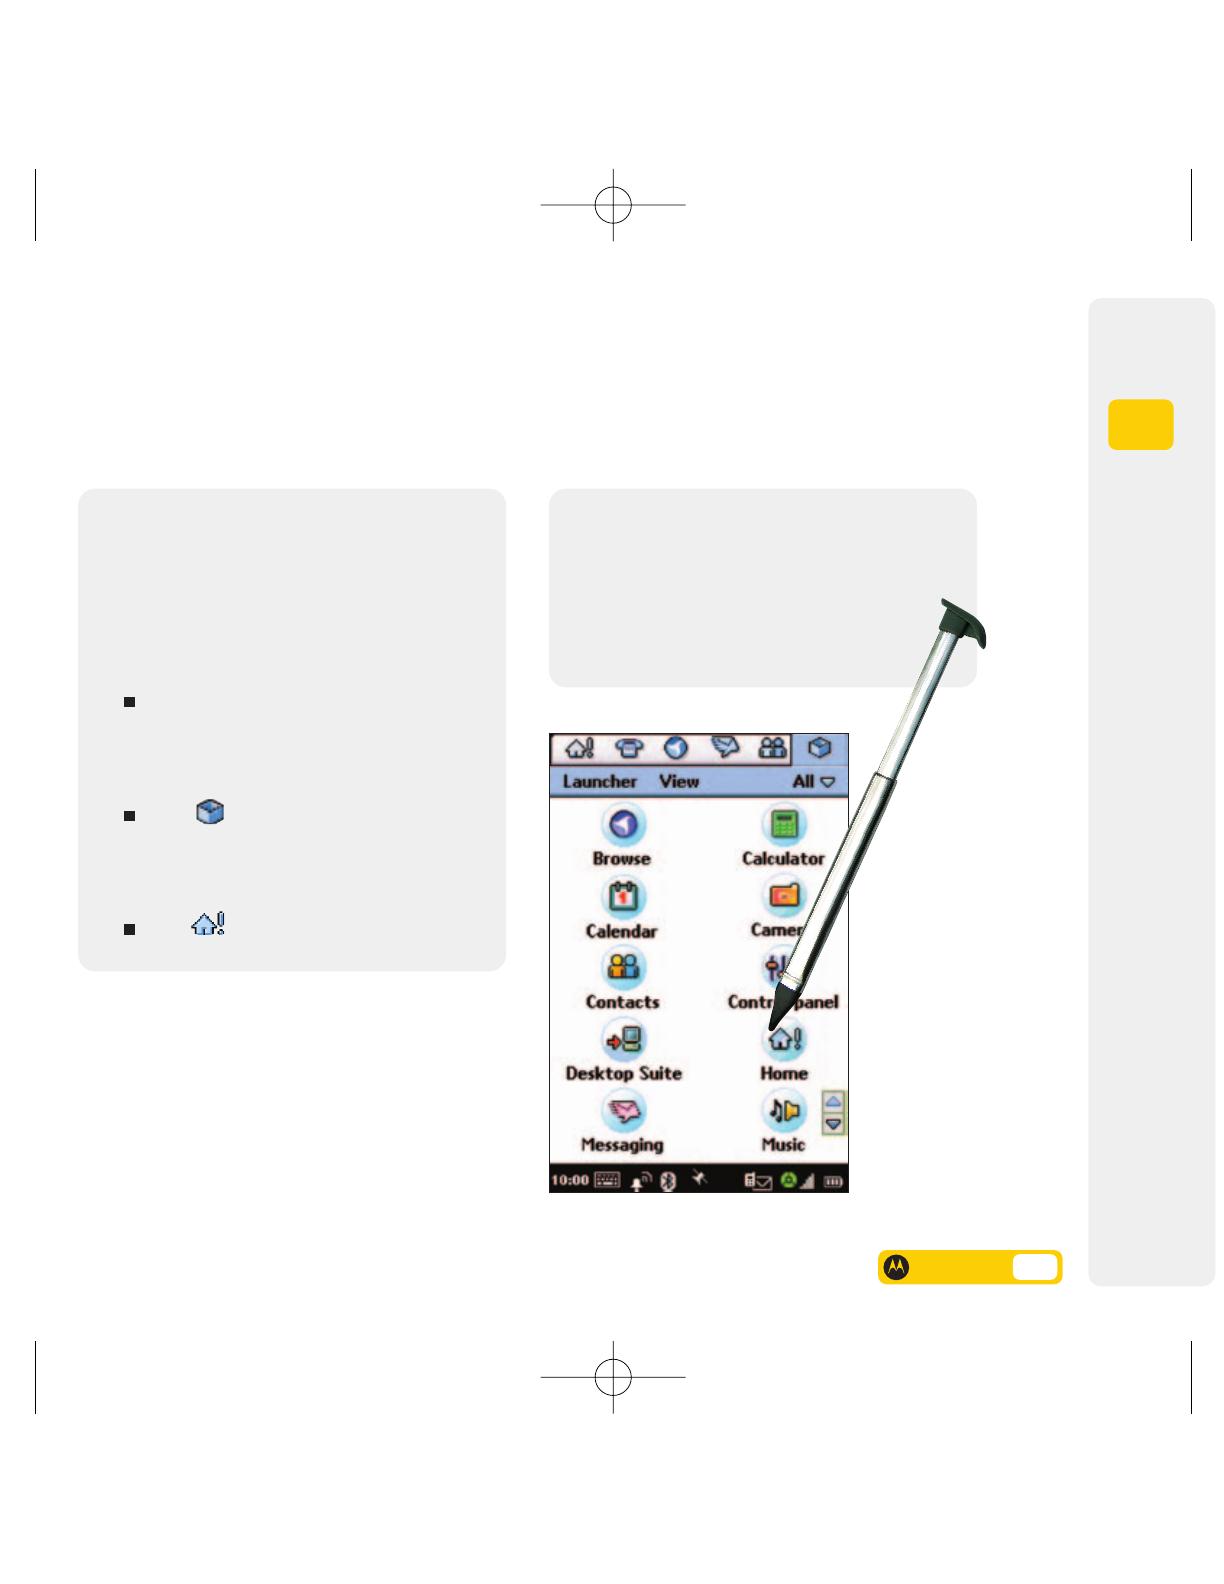
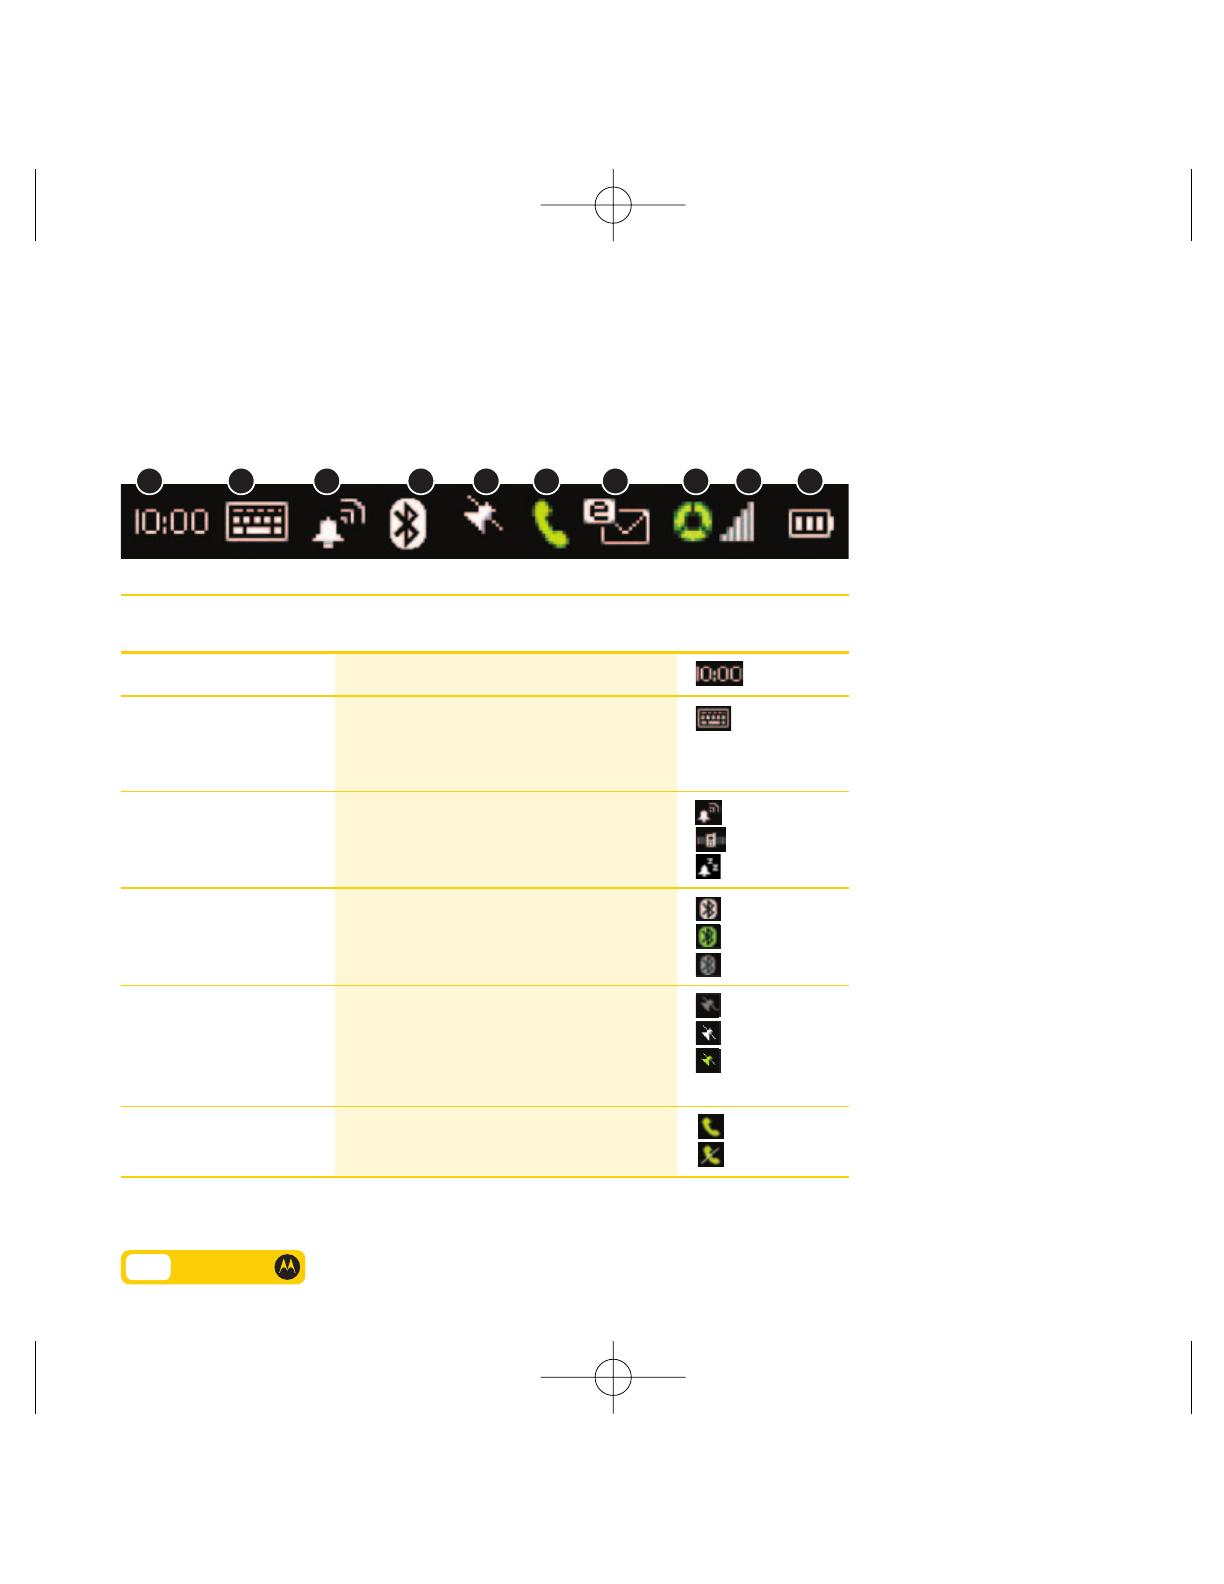
Motorola A1000 User manual

Category
Smartphones
Type
User manual
3 Customer Services, Hutchison 3G UK Ltd,
PO Box 333, Hemel Hempstead, HP2 7YW,
United Kingdom. three.co.uk
Published by Hutchison 3G UK Limited.
All rights in this publication are reserved and
no part may be reproduced without the prior
written permission of the publisher.
© 2004 Hutchison 3G UK Limited. A Hutchison
Whampoa company. Registered office:
9 Queen Street, Mayfair, London W1J 5PE.
The contents are believed to be correct at the
time of going to press, but any information,
products or services mentioned may be
modified, supplemented or withdrawn. The
provision of any products and services by
Hutchison 3G UK Limited is subject to 3’s
customer terms (available at three.co.uk). The
customer terms will take precedence if there is
any discrepancy with this publication. ‘3’ and
related images, logos and names referred to in
this publication are trademarks of the
Hutchison Whampoa group of companies.
Designed by Dutton Merrifield Ltd, Bristol.
This publication is printed on fully recyclable
paper. DM04321 Oct04
A1000
3 services user guide
04321 (Front).aw 13/10/04 2:04 pm Page 1
Getting set up
Your mobile explained
Get going
Today on 3
Calls
Contacts
Media centre
Mail & Messaging
Synchronisation
Extra features & Security
Motorola Health & General Information
Troubleshooting, Index & Useful Numbers
A1000
1
2
3
4
5
6
7
8
9
10
11
12
Easy as...
3 services user guide
04321 (Front).aw 13/10/04 2:04 pm Page 2
Ready for it.
04321 (Front).aw 13/10/04 2:04 pm Page 3
User guides can be daunting things, can’t they?
Well we’ve made this one as simple as possible. Let’s go.
Your user guide is designed to do two things. First there’s an
explanation on how to use your new Motorola A1000, so finding your
way around the mobile will soon become second nature. Then there’s
an introduction to the wide range of services offered by 3, to make
sure you get the best from them.
If all you want to do is power up and get going, that’s fine. But if you
want to know more about what you can do with 3, you’ll find it here.
Hutchison 3G UK Limited trading as 3 is a service provider and has provided the information in this user guide concerning what you might expect
from 3 services. Motorola, Inc. is the manufacturer of the Motorola A1000 mobile and has provided the information on its features and use set out
in this user guide. Mobile information ©2004 Motorola, Inc. Please see section 11 for Motorola’s safety and general information related to your mobile.
04321 (Front).aw 13/10/04 2:04 pm Page 4
Getting set up
1.1 Installing the SIM and memory card
1.3 Installing and charging the battery
1.5 Battery use
Your mobile explained
2.1 Getting to know your Motorola A1000
2.3 Your mobile’s start screen
2.4 Opening applications
2.5 Status indicators
2.6 Your mobile’s keys and navigation
Get going
3.1 Turning your mobile on and off
3.2 Recalibrating your screen
3.3 Setting the time and date
3.4 Setting system sounds
3.5 Choosing ringtune and alert profiles
3.6 Setting a wallpaper
3.7 Entering text
3.8 Text entry shortcuts
3.9 General shortcuts
Today on 3
4.1 Today on 3
4.2 Using Today on 3
4.3 Getting to know the services screen
4.4 The service icons
4.7 Tunes & Pix
4.9 Downloading a ringtune
4.11 Music
4.12 Accessing Music
4.13 Games
4.15 Finding a game
4.16 Playing a game
4.17 Football
4.19 Accessing football services
4.20 How to set goal alerts for your football team
4.21 Downloading and storing match highlights
from an alert
4.23 Comedy
4.25 Using Comedy
4.26 Other useful services
4.27 Setting your favourite locations
4.28 Using Quick Map
4.29 Using My Nearest
4.30 Viewing the latest news
4.31 Setting up a financial portfolio
Calls
5.1 Making and receiving a voice call
5.2 Making and receiving a video call
5.3 Making a call from Contacts or
recent calls list
5.4 Grouptalk
5.5 Caller ID
5.6 Diverting incoming voice / video calls
and faxes
Contacts
6.1 Storing a contact
6.3 Sending contacts
6.4 Editing and deleting a contact
6.5 Searching Contacts
Contents The sections in orange describe 3 services, and those in black describe Motorola services.
1
5
6
3
4
2
04321 (Front).aw 13/10/04 2:04 pm Page 5
7
6.6 Copying a contact between mobile and SIM
6.7 Copying all contacts between SIM
and mobile
Media centre
7.1 Taking a photo
7.2 Making a video clip
7.3 Viewing photos or videos
7.4 Playing an audio clip
7.5 Deleting and copying audio, picture
and video clips
Mail & Messaging
8.1 Setting up and listening to your voicemail
8.2 Creating and sending a text message
8.3 Setting up your email username
8.4 Setting up your email profile
8.5 Setting up your POP3 email account
8.6 Creating and sending emails – direct
8.7 Capturing and sending a video message
8.9 Capturing and sending a photo as a
multimedia message
8.10 Addressing a message using Contacts
8.11 Viewing text and multimedia
message Inbox
8.12 Viewing your email Inbox
Synchronisation
9.1 Connecting with a Bluetooth headset
9.2 PC Synchronisation
9.3 Installing Motorola software on your PC
9.4 Backing up and customising synchronisation
Extra features & Security
10.1 Storing an appointment
10.2 Setting alarms
10.3 Setting the SIM PIN code
10.4 Locking your mobile
Motorola Health & General
Information
11.1 A message from Motorola your mobile
manufacturer
Troubleshooting, Index
& Useful Numbers
12.1 Troubleshooting
12.3 Index
12.5 Useful Numbers
8
9
10
11
12
04321 (Front).aw 13/10/04 2:04 pm Page 6
04321 (Front).aw 13/10/04 2:04 pm Page 7
1
1 Getting set up
First things first.
There are a few simple things to do before you can use your new mobile.
This section shows you how to install your SIM and battery and how to charge it up.
1.1 Installing the SIM and memory card
1.3 Installing and charging the battery
1.5 Battery use
Getting set up
04321 (S1) Getting.aw 13/10/04 2:11 pm Page 1
1.1 User guide
Installing the SIM and memory card
How to get your own mobile number and other details onto your mobile.
1. Slide the SIM card door towards
top, then lift upward to open.
2. Insert your SIM card into the tray, ensuring the
gold plate is facing down and the notch to the right.
First you have to insert your SIM
(subscriber identity module) into
your mobile. It contains your mobile
and fax numbers, service details
and contacts.
The holder for your SIM is underneath
the battery. If the SIM is removed,
you won’t be able to use your
mobile until a valid one is inserted.
Remember to always disconnect the
charger and other accessories from
your mobile before inserting and
removing the SIM.
You can only use your 3 SIM in
mobiles which are enabled for
3 services. If you try and use the
SIM in other mobiles you may cause
serious damage to the SIM which may
stop
you from being able to use it,
including preventing you from
making emergency calls. If this
happens, we are not responsible for
any such damage or usage problems.
04321 (S1) Getting.aw 13/10/04 2:11 pm Page 2
User guide 1.2
1
Getting set up
3. Close the SIM card holder and slide it back to lock,
as shown in the illustration.
4. Slide the memory card door to the left, as shown in
the illustration, and lift open. Insert your memory card
into the tray, ensuring the gold plate is facing down.
Close the memory card holder and pull it out to lock.
04321 (S1) Getting.aw 13/10/04 2:11 pm Page 3
1.3 User guide
Installing and charging the battery
How to get your mobile charged up.
1. Push down the release latch, and slide
the cover back down to remove it.
2. Insert the battery under the tab at the top of the battery
compartment and push down into position.
Your new mobile battery does
not come fully charged. Before you
can use your mobile, you need to
install and charge the battery as
shown below.
Your mobile is designed to
be used only with Motorola Original
â„¢
batteries, and we recommend that
you store your battery in the
protective case when it’s not in use.
While you’re charging, the battery
level indicator at the bottom of your
screen will show you how much of
the battery is charged.
Your battery will perform at its
best after several charge and
discharge cycles.
If a battery hasn’t been used for
a long time, it will need to be
completely discharged by leaving
the mobile turned on and then
recharged 2 or 3 times before
reaching its full capacity.
04321 (S1) Getting.aw 13/10/04 2:11 pm Page 4
1
Getting set up
User guide 1.4
3. Replace the battery cover and
slide into place until it locks.
4. Plug in the travel charger with the
release tab facing upwards on the mobile.
Plug the charger into an electrical outlet.
When your mobile indicates on screen
that the battery is fully charged
(Battery Status: High, Charging
Complete), press the release tab
and remove the charger.
04321 (S1) Getting.aw 13/10/04 2:11 pm Page 5
1.5 User guide
Battery use
How to get the most out of your battery.
Your battery performance depends
on many factors, including:
signal strength
the features and / or settings you
select and use
the amount of voice, data and other
applications you use.
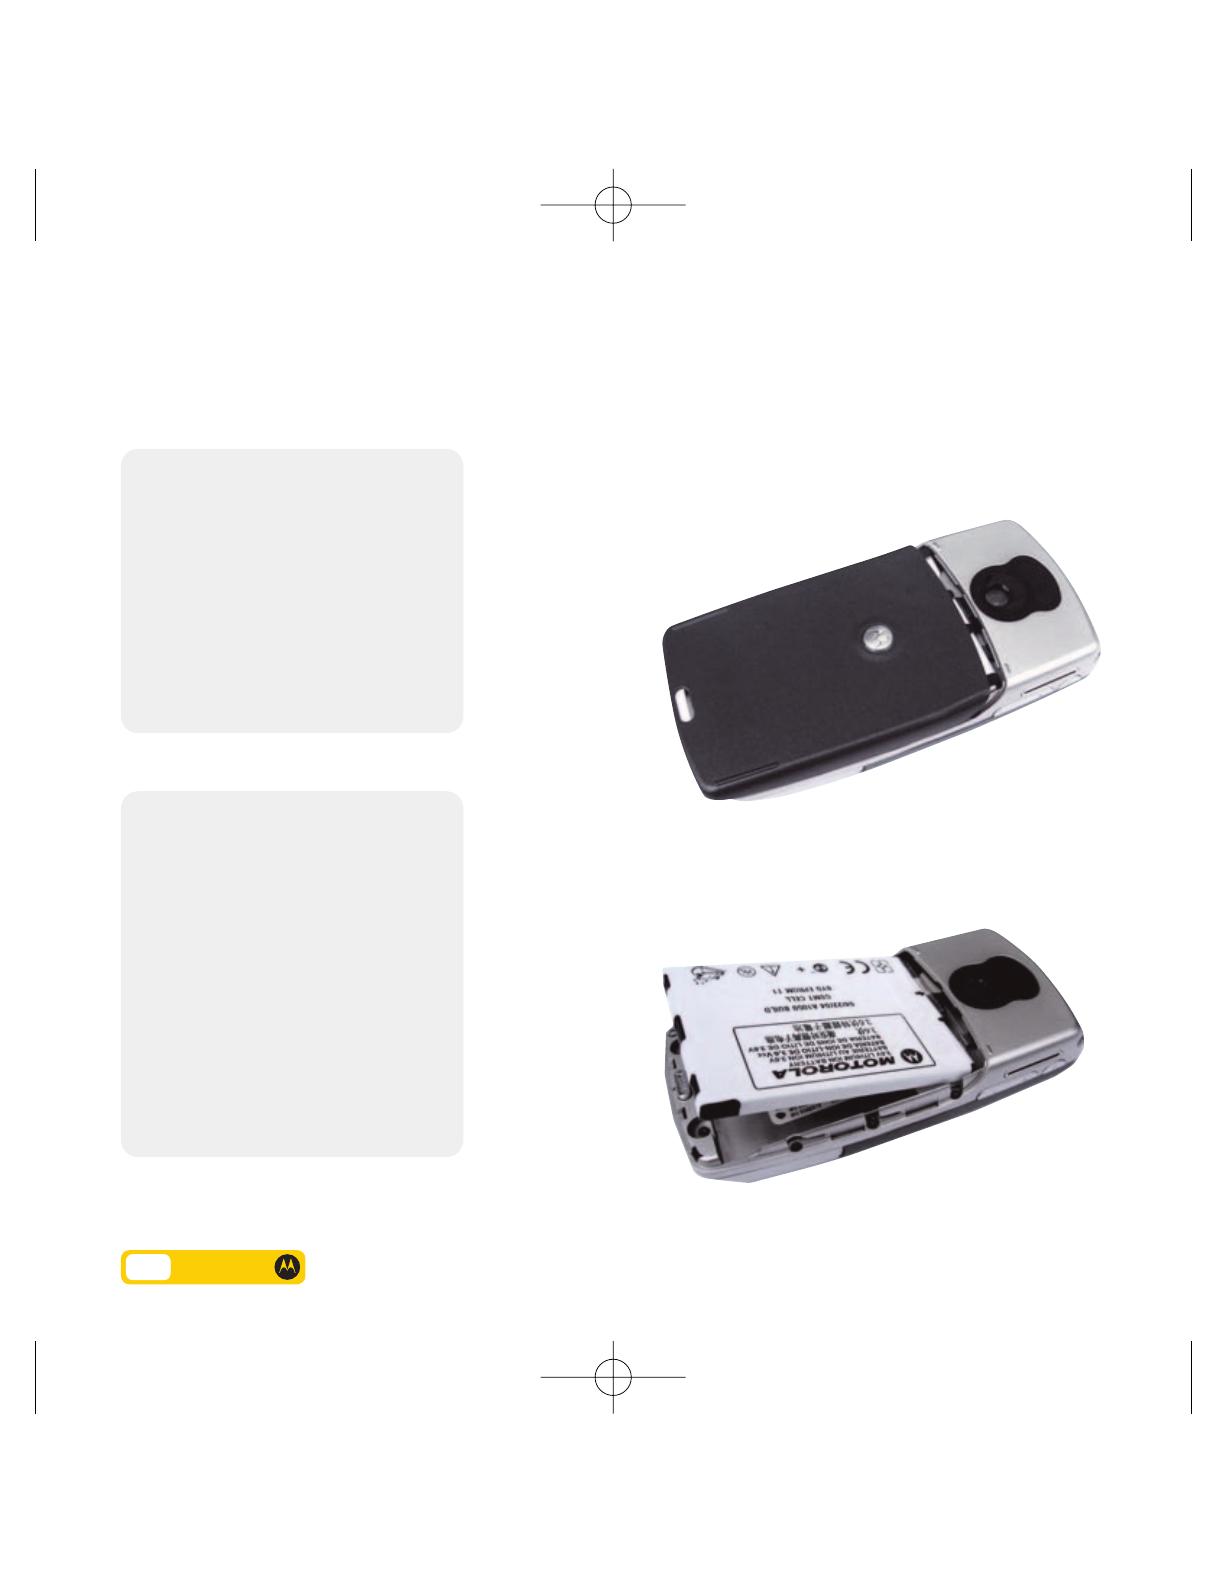
Battery care
To prevent burns and other injuries, don’t
let metal objects contact or short-circuit
the battery terminals.
For optimum battery performance, always
use Motorola Original
â„¢
batteries and battery
chargers. Motorola’s mobile warranty does
not cover damage caused by using non-
Motorola batteries and / or battery charger.
New batteries, or batteries which have
been stored for a long time, may need
to be charged for longer.
Keep your battery at or near room
temperature when charging and don’t
expose batteries to temperatures below
-10
º
C (14
º
F) or above 45
º
C (113
º
F).
If you don’t intend to use your battery for
a while, store it uncharged in a cool, dark,
dry place, such as a refrigerator.
Over time, batteries gradually wear down
and need longer charging times. This is
normal. If you charge your battery regularly
and notice a decrease in talk time or an
increase in charging time, then it’s probably
time to buy a new battery.
Your Motorola A1000 battery must be
disposed of properly and may need to
be recycled. Refer to your battery’s label
for battery type and contact your local
recycling centre for proper disposal
methods. Never dispose of batteries
in a fire – they may explode.
04321 (S1) Getting.aw 13/10/04 2:11 pm Page 6
2 Your mobile
explained.
Your Motorola A1000 can do a lot of things, so it makes sense for you
to know your way around its navigation and controls.
Spend a few minutes familiarising yourself with your mobile’s screen
and icons now, and you’ll be ready to explore all its features.
This section explains what all the icons and symbols mean, and shows
you how to find your way around your mobile.
2.1 Getting to know your Motorola A1000
2.3 Your mobile’s start screen
2.4 Opening applications
2.5 Status indicators
2.7 Your mobile’s keys and navigation
Your mobile explained
2
04321 (S2)handset expla.aw 13/10/04 4:06 pm Page 1
2.1 User guide
Getting to know your Motorola A1000
Familiarise yourself with its features.
Send key
To make voice calls and answer calls.
Triangle key
Access to Today on 3, connecting you to a world of
communications, information and entertainment.
Camera
Game key A
Microphone
End key
To end calls
Application Selector Bar
Earpiece
Status Bar
Application Shortcuts
Information Snack
Personal Information
Game key B
Navigation key
04321 (S2)handset expla.aw 13/10/04 4:06 pm Page 2
2
Your mobile explained
User guide 2.2
Speaker
Volume keys
Speaker
Earpiece
On / off power
Screen lock Speakerphone key
Stylus
Charger
socket
Camera key
Serial / USB
connector
socket
04321 (S2)handset expla.aw 13/10/04 4:06 pm Page 3
2.3 User guide
1 Application Selector Bar
The Application Selector Bar displays
six icons that allow fast, easy access
to commonly used applications.
2 Menu Bar
The Menu Bar displays menus for
the application that’s currently open.
3 Information Snacks
Shortcut access to Tunes & Pix,
Music and My 3.
4 Personal Information
Shows the number of new emails,
picture and video messages, text
messages, upcoming appointments
and active tasks.
5 Application Shortcuts
Shows three icons that let you
start three popular applications.
6 Status Bar
The Status Bar displays your current
mobile status information.
Your mobile’s start screen
Your mobile’s screen is divided into six basic displays: the Application Selector Bar, the Menu Bar,
Information Snacks, Personal Information, Application Shortcuts and the Status Bar.
04321 (S2)handset expla.aw 13/10/04 4:06 pm Page 4
2
Your mobile explained
User guide 2.4
Use the arrows to
scroll up or down the
application screen.
Opening applications
There are several different ways to get applications working, including using your stylus.
Your mobile has many built-in applications
for communications, information and
entertainment. Every application has
a corresponding icon.
You can open an application in the
following ways:
Select one of the icons in the Application
Selector Bar at the top of the screen.
These shortcuts are always visible on
the screen.
Select . The Application Selector Bar
displays icons of all of your mobile’s
applications. Select the application
you want to open.
Press to open your start screen.
Using touch-screen control
Choose any feature you want by selecting
the relevant icons, text and on-screen keys /
buttons with your stylus. The stylus is stored
in the back of your Motorola A1000.
04321 (S2)handset expla.aw 13/10/04 4:06 pm Page 5
2.5 User guide
Status indicators
The status bar at the bottom of the screen shows the following indicators.
To change the setting of an icon, select it and then select the setting you want.
1 2
3
4 5
6 7 9
10
8
Icon type
Audio
Vibrate
Silent
White = On
Green = Connected
Grey = Idle
Grey = Off
White = Idle
Green = Busy
Connected
Muted
Description
Shows the current time.
Select this to display the on-screen
keyboard when the cursor is in a
text-entry field.
Shows the currently selected alert mode
to notify you of an incoming call or
message. The default setting is Audio.
Shows the current Bluetooth status.
Shows whether the GPS (Global
Positioning System) location service is
off, idle or busy. The colour indicates
the location mode.
Shows the status of an active call.
Name
1. Clock
2. Keyboard Launcher
3. Alert Mode
4. Bluetooth
5. Location Mode
6. Phone
04321 (S2)handset expla.aw 13/10/04 4:06 pm Page 6
2
Your mobile explained
User guide 2.6
Icon type
Email
SMS
MMS
No service
Emergency service
Video service area (3G)
While on a roaming 3G network
Voice & picture service area (2G)
Voice & picture service
area (2.5G / GPRS)
Aeroplane mode (mobile disabled)
Strong
Weak
The more bars visible , the greater
the power. The indicator displays in
orange when your mobile is
consuming a large amount of battery
power, such as during a video call.
Description
Shows that you have a new message.
Note: If someone sends you a text message
(SMS) or a picture or video message (MMS)
and their mobile number is in your Contacts
list, the indicator is white, otherwise, the
indicator is amber. If several types of new
messages are available, is displayed.
Shows the type of network service connection.
Note: When you’re in a voice & picture
service area, or abroad, the network indicator
segments are amber.
Shows the strength of your mobile’s
connection with the network.
Indicates the amount of power left in
your battery.
Name
7. Message
8. Network
9. Signal Strength
10. Battery Strength
04321 (S2)handset expla.aw 13/10/04 4:06 pm Page 7
  • Page 1 1
  • Page 2 2
  • Page 3 3
  • Page 4 4
  • Page 5 5
  • Page 6 6
  • Page 7 7
  • Page 8 8
  • Page 9 9
  • Page 10 10
  • Page 11 11
  • Page 12 12
  • Page 13 13
  • Page 14 14
  • Page 15 15
  • Page 16 16
  • Page 17 17
  • Page 18 18
  • Page 19 19
  • Page 20 20
  • Page 21 21
  • Page 22 22
  • Page 23 23
  • Page 24 24
  • Page 25 25
  • Page 26 26
  • Page 27 27
  • Page 28 28
  • Page 29 29
  • Page 30 30
  • Page 31 31
  • Page 32 32
  • Page 33 33
  • Page 34 34
  • Page 35 35
  • Page 36 36
  • Page 37 37
  • Page 38 38
  • Page 39 39
  • Page 40 40
  • Page 41 41
  • Page 42 42
  • Page 43 43
  • Page 44 44
  • Page 45 45
  • Page 46 46
  • Page 47 47
  • Page 48 48
  • Page 49 49
  • Page 50 50
  • Page 51 51
  • Page 52 52
  • Page 53 53
  • Page 54 54
  • Page 55 55
  • Page 56 56
  • Page 57 57
  • Page 58 58
  • Page 59 59
  • Page 60 60
  • Page 61 61
  • Page 62 62
  • Page 63 63
  • Page 64 64
  • Page 65 65
  • Page 66 66
  • Page 67 67
  • Page 68 68
  • Page 69 69
  • Page 70 70
  • Page 71 71
  • Page 72 72
  • Page 73 73
  • Page 74 74
  • Page 75 75
  • Page 76 76
  • Page 77 77
  • Page 78 78
  • Page 79 79
  • Page 80 80
  • Page 81 81
  • Page 82 82
  • Page 83 83
  • Page 84 84
  • Page 85 85
  • Page 86 86
  • Page 87 87
  • Page 88 88
  • Page 89 89
  • Page 90 90
  • Page 91 91
  • Page 92 92
  • Page 93 93
  • Page 94 94
  • Page 95 95
  • Page 96 96
  • Page 97 97
  • Page 98 98
  • Page 99 99
  • Page 100 100
  • Page 101 101
  • Page 102 102
  • Page 103 103
  • Page 104 104
  • Page 105 105
  • Page 106 106
  • Page 107 107
  • Page 108 108
  • Page 109 109
  • Page 110 110
  • Page 111 111
  • Page 112 112
  • Page 113 113
  • Page 114 114
  • Page 115 115
  • Page 116 116
  • Page 117 117
  • Page 118 118
  • Page 119 119
  • Page 120 120
  • Page 121 121
  • Page 122 122
  • Page 123 123
  • Page 124 124
  • Page 125 125
  • Page 126 126
  • Page 127 127
  • Page 128 128
  • Page 129 129

Motorola A1000 User manual

Category
Smartphones
Type
User manual

Ask a question and I''ll find the answer in the document

Finding information in a document is now easier with AI