Vigo VG15373 Installation guide
- Category
- Sanitary ware
- Type
- Installation guide
This manual is also suitable for

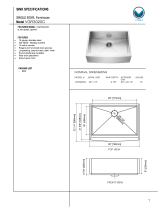
SINK SPECIFICATIONS
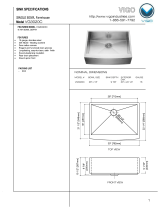
SINGLE BOWL Farmhouse
Model VG3020C
MODEL # BOWL SIZE SINK DEPTH EXTERIOR GAUGE
VG3020C 9 7/8" 30" x 22 1/4" 16
28" x 18"
DIM.
NOMINAL DIMENSIONS
TOP VIEW
FRONT VIEW
30" [764mm]
22 1/4" [566mm]
28" [712mm]
FEATURED MODEL VG3020C
9 7/8" BOWL DEPTH
FEATURES
16 gauge, stainless steel
304 Nickel - Bearing Content
Zero radius corners
Elegant and functional drain grooves
Long-lasting, easy-to-clean, satin finish
Sound-deadening insulation
Rear drain placement
Round apron front
PACKING LIST
- SINK
9 "
[230mm]
9 7/8"
[250mm]
10 1/2" [267mm]
18" [457mm]
21 1/2" [547mm]
1

General Recommendations:
Read installation and maintenance instructions thoroughly before installation. Inspect your sink for any
noticeable damage before installation. Check all local applicable plumbing and building codes.
These instructions are based on application to composite material or solid surface countertop
installation only; countertop application to stone, marble, granite or butcher-block should be referred to
experienced countertop fabricator for custom installation.
Vigo Farmhouse series sinks are individually hand-crafted and Vigo suggests using experienced and
professional installers only. For custom cutting of countertop and installation of the actual sink, on-site
installation is also recommended. Acceptable variances are approximately 1/2 of an inch. Alignment to
cut-out and precise application and trimming of any adhesive sealant are critical to a superior fit and
finished look. Please take extra care in this regard.
Vigo Farmhouse series sinks require custom order cabinets. Consult your cabinet dealer.
Vigo does not accept any liability for damage to countertop, sink fixture, faucets or personal injury
during installation. Warranty is void if installation instructions are not followed.
Tools and Materials needed:
Tape Measure Denatured Alcohol Wood Braces
Pencil (NOT ink) Ear Protection Framing Square
Silicone Adhesive Sealant Eye Protection Shims
Rags Hacksaw/Jigsaw
Be sure to use proper tools and always wear personal safety accessories for your protection.
Installation instructions Farmhouse Sinks
2

Installation Options:
Vigo Farmhouse series sinks offer installation options depending on your design.
Figure 1 Figure 2
Caution: All installation types need to allow room for faucet installation. Ensure adequate clearance
behind the sink for any faucet and backsplash, as well as full range of motion for faucet spouts and
handles.
Typical undermount installation with 1/4" reveal recommended.
3
Typical flush mount and above counter installation
Above counter installation may expose sink sides to be raised above the countertop.
Undermount Installation
Flush mount Installation
Above counter Installation
Figure 3
Figure 4
Figure 6
Figure 5
Figure 7
Contact your retailer if any product is damaged or missing prior to installation. Never install a
damaged sink as it can void your warranty.
Typical
Sink Profile
Finished Wall
from
countertop
front end
Sink Front End
Cabinet
Front Line
Typical
Sink Profile
Finished Wall
from
countertop
front end
Sink Front End
Cabinet
Front Line

1. Prepare the sink base cabinet
Farmhouse sinks require custom order sink base cabinets with a
front cutout to accommodate a 10" deep sink. Build structural
supports on the inside frame of the sink base cabinet. The
structural supports must support the weight of the sink and any
attachments such as garbage disposals. When the sink is placed
onto the cabinet support, make sure the top of the sink is evenly
flush against the bottom of the countertop. Allow clearance for
water supply line and drains or garbage disposal, as necessary.
2. Make template and cutout
Depending on the installation option, make proper cutout of the
countertop. Vigo recommends a 1/4" reveal on 3 sides when
installed undermount style. For a flush mount or above counter
installation, cut countertop along with outside of sink profile. Front
end of Vigo Farmhouse sinks are designed to be installed 3/4"
extended out beyond the front end of the countertop. Cut
countertop accordingly. No template is provided due to the custom
nature of each application and installation. The actual sink is used
as the template guide for each installation. After centering the sink
and allowing for faucets and backsplashes, use a pencil to outline
the sinks as your guide for the cutout, allowing for any reveal
before the actual cutting.
3. Set the sink
Set the sink on top of the cabinet or into the cabinet front cutout.
Apply sealant if necessary as a gasket between the sink and
cabinet.
4. Install the countertop
Carefully clean bottom of countertop and top flange of sink with
denatured alcohol. Apply bead of silicone adhesive (not supplied)
around the top edge of the sink. Place countertop onto the sink.
Remove excess sealant from the lip of any surfaces with a cleaner
recommended by manufacture of adhesive sealant.
4

5
Care and Maintenance
ALWAYS
preventative cleaning.
affect the appearance of your sink.
abrasive such as Comet.
up over time with a mild solution of vinegar and water followed by a thorough flushing with water.
grain. NOT RECOMMENDED FOR MIRROR FINISH.
NEVER
develop rust spots in the stainless steel surface.
finish of your sink.
the finish of your sink.
sink. Silver cleaners can also contain acids that will damage the sink surface.

KITCHEN SINK LIMITED LIFETIME WARRANTY
EFFECTIVE JANUARY 1, 2010
end-user for personal household use. For commercial uses, additional limitations apply.
VIGO warrants the Product to be free from defects in workmanship and materials under normal use and service for the period commencing from
the initial date of purchase by the owner or end-user, contractor, or builder, from VIGO or an authorized VIGO dealer, through the lifetime of the
original owner or end-user.
Subject to the Warranty Service provision below, any product reported to the authorized dealer or to VIGO as being defective within the warranty
period will be repaired or replaced (with a product of equal value) at the option of VIGO. This warranty extends to the original owner or end-user
and is not transferable to a subsequent owner.
Neither the distributor, authorized VIGO dealer, nor any other person has been authorized to make any affirmation, representation, or warranty
other than those contained in this warranty. Any affirmation, representation, or warranty other than those contained in this warranty shall not be
enforceable against VIGO or any other person.
VIGO reserves the right to modify this warranty at any time, it being understood that such modifications will not alter the warranty conditions
applicable at the time of sale of the products in question.
Limitations
This warranty shall not apply to instances of incorrect operating procedures, breakages, or damages caused by fault through improper installation,
carelessness, abuse, misuse, misapplication, improper maintenance, or alteration of the Product, as well as chemical or natural corrosion,
accident, fire, flood, an act of God, or any other casualty. Avoid abrasive cleaners, steel wools, and harsh chemicals as these will scratch,
damage, and / or dull the product and / or finish and void this warranty. The owner/end-user of the Product covered by the present warranty is
entirely responsible for its proper installation and any applicable plumbing or electrical wiring. VIGO neither installs nor supervises the installation
nor hires a contractor for this purpose; consequently, VIGO cannot be held responsible for any default, breakage, or damages caused thereby or
resulting thereof, either directly or indirectly.
The owner/end-user must provide access to the components of the Product as described in the installation guide so that VIGO can execute the
warranty specified herein. If such access is not available, all expenses to provide said access will be the responsibility of the owner/end-user.
This warranty does not apply to Products that have not been installed or operated in accordance with instructions supplied by VIGO and all
applicable rules, regulations, and legislation pertaining to such installations.
This warranty does not apply unless the VIGO Product is installed by fully insured licensed professionals. Vigo strongly recommends that such
licensed professionals have experience in the installation of bathroom and kitchen products. Installation of certain products, including, without
limitation, glass products (i.e., shower doors and glass sinks) by an inexperienced person may result in glass breakage and, consequently, cause
personal injury or death.
VIGO is not liable for personal injuries or deaths to any persons or for any direct, special, incidental, or consequential damage, loss of time, loss of
profits, inconvenience, incidental expenses, labor or material charges, or any other costs resulting from the use of the product or equipment or
pertaining to the application of the present warranty, or resulting from the removal or replacement of any product or element or part covered by
this warranty.
EXCEPT AS OTHERWISE PROVIDED ABOVE, VIGO MAKES NO WARRANTIES, EXPRESSED OR IMPLIED, INCLUDING WARRANTIES OF
MERCHANTABILITY AND FITNESS FOR A PARTICULAR PURPOSE OR COMPLIANCE WITH ANY CODE.
In any case, VIGO cannot be held liable for any amount over and above the purchase price paid for the Product by the owner/end-user,
contractor, or builder.
Commercial Limitations
In addition to the above conditions and limitations, the warranty period for products installed for commercial applications or used in commercial
ventures is one (1) year from the initial date of purchase by the owner/end-user, contractor, or builder from an authorized dealer. VIGO is not
responsible for loss of use or profit under any circumstances. If the product is used as a display, the warranty period begins when the product is
placed on display. This warranty gives the owner/end-user specific legal rights. The owner/end-user may also have other rights which can vary
from one state or province to another.
Warranty Service
In order to obtain service provided under this warranty during regular business hours, contact the dealer or distributor who sold the unit, or contact
VIGO directly. VIGO will provide the warranty service described above when the following conditions have been met: the failure is of the nature or
nature of the problem during the warranty period; conclusive evidence (e.g., proof of purchase or installation) is provided to the foregoing by the
user proving that the failure occurred or was discovered within the warranty period; an authorized independent service person or company
representative has been permitted to inspect the product during regular business hours within a reasonable time after the problem was reported
*Certain models are pending approval.
Certification may be ended by VIGO or certification agencies without notice.
6
-
 1
1
-
 2
2
-
 3
3
-
 4
4
-
 5
5
-
 6
6
Vigo VG15373 Installation guide
- Category
- Sanitary ware
- Type
- Installation guide
- This manual is also suitable for
Ask a question and I''ll find the answer in the document
Finding information in a document is now easier with AI
Related papers
-
 Vigo VG15240 Installation guide
-
Vigo VG15452 Installation guide
-
 Vigo VG15115 Installation guide
-
 Vigo VG15359 Installation guide
-
 Vigo VG15473 Installation guide
-
 Vigo VG15470 Installation guide
-
Vigo Industries VG15192 User manual
-
 Vigo VG15442 Installation guide
-
Vigo VG14020 User manual
-
 Vigo VGR3620C Installation guide
Other documents
-
Miseno MSS3620F/MK281 Installation guide
-
JimsMaison HS-FS1-30 Installation guide
-
VANITYFUS VF-HS-3318SQ Installation guide
-
ANZZI K-AZ258 Installation guide
-
Golden Vantage KS0337 Installation guide
-
Ancona AN-3355 Installation guide
-
Water Creation SSS-AS-3322A Installation guide
-
Luxier AFS30-16R-V User guide
-
Luxier AFS30-18Z-V Measurement Guide
-
 World Imports BF3317 Installation guide


