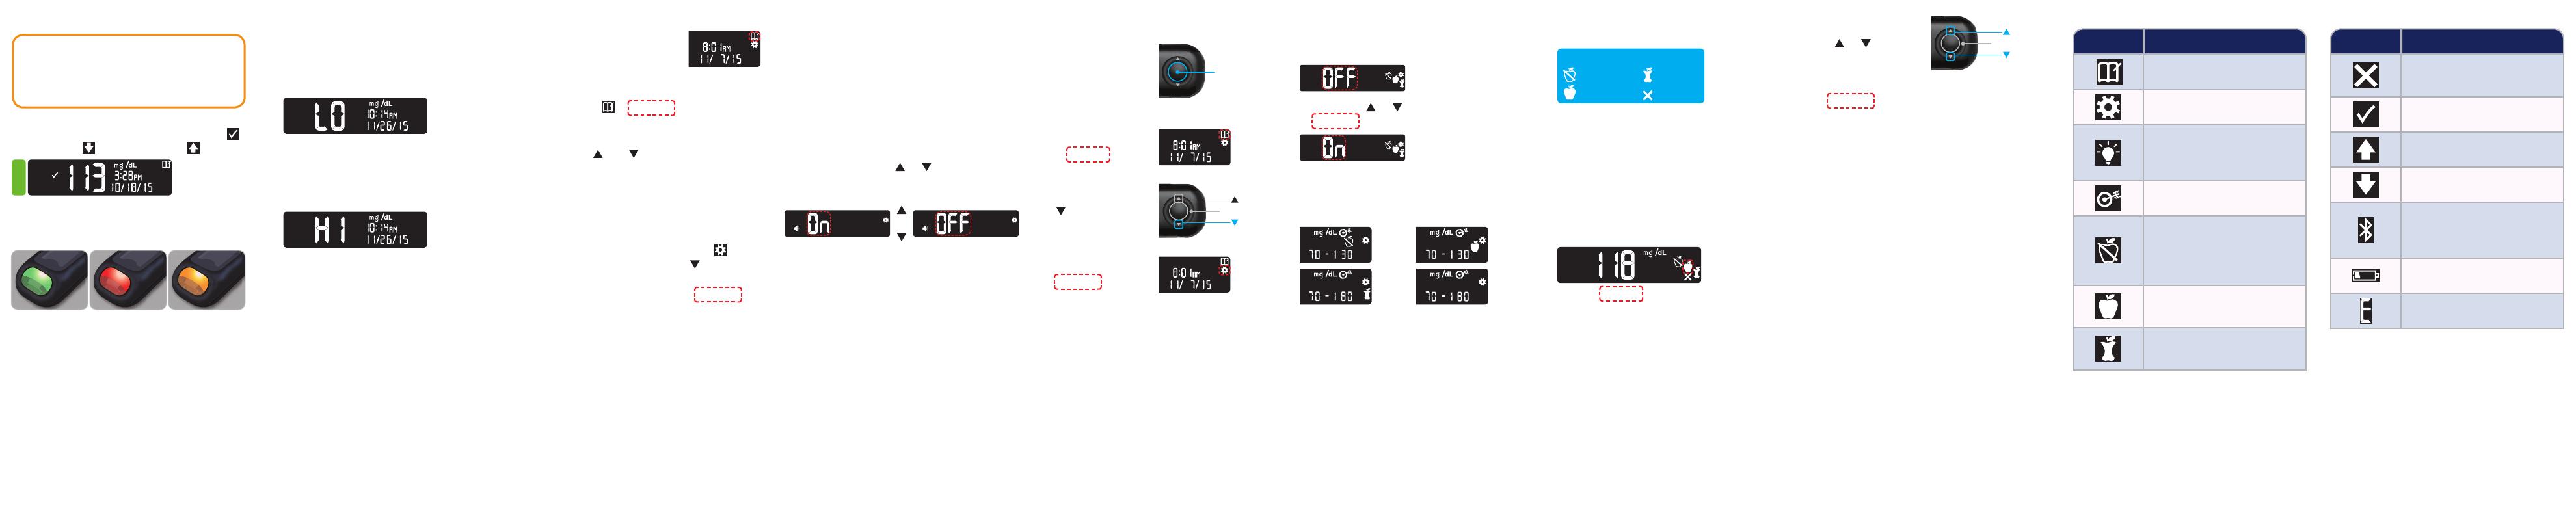
LO or HI Results
• If the meter beeps twice and displays the
LO screen, your blood sugar reading is
under 20 mg/dL. Follow medical advice
immediately. Contact your health care
professional.
• If the meter beeps once and displays the
HI screen, your blood sugar reading is
over 600 mg/dL.
1. Wash and dry your hands well.
2. Retest with a new strip.
If results are still over 600 mg/dL, follow
medical advice immediately.
To turn the meter off, remove the teststrip.
Logbook
1. To turn on your meter,
press and hold the OK
button for 2 seconds.
The Home screen has 2 options: Logbook
and Settings.
The Logbook
is blinking.
2. To view your Logbook entries, press the
OK button.
3. Press the
and buttons on the outer
ring to scroll through the Logbook.
Settings
You can turn settings such as Sound and
Target Light (smartLIGHT) On and Off in
Settings.
1. To highlight the Settings symbol
on
the Home screen, press the
button on
the outer ring.
2. When the Settings symbol is blinking,
press the OK button to enter Settings.
3. Continue to press the OK button as you
go through each setting until you find the
setting you want to change.
You will see options such as:
• Time Format
• Time
• Date Format
• Date
• Sound
• Meal Markers
• Target Ranges
• Target Lights
(smartLIGHT)
• Bluetooth
®
4. When you find the setting you want to
change, press the
or button on the
outer ring to turn the setting On or Off or
to change the value.
or
5. To accept the change, press the
OK button.
To exit from the Logbook or the last
Settings screen and return to Home, press
the OK button.
Turn Meal Markers On
If your meter is
not ON:
1. Press and hold the
OK button about
2 seconds until the
meter turns on.
OK Button
2. Wait until the
Logbook symbol
is blinking on the
Home screen.
3. Press the
button on the
outer ring.
Outer Ring
4. When the
Settings symbol is
blinking, press the
OK button.
Symbol What it Means
No Mark Selected; used when
testing at times other than after
fasting or before or after a meal
Blood sugar test result is in
Target range
Blood sugar test result is above
Target range
Blood sugar test result is below
Target range
Bluetooth symbol; indicates
the Bluetooth setting is On; the
meter can communicate with a
mobile device
Batteries are low and need to
be changed
Indicates a meter error
Symbol What it Means
Your Logbook
Settings
Target Light (smartLIGHT)
Setting (Green=In Target;
Red=Below Target;
Yellow=Above Target)
A Target range or Target setting
is displaying
Fasting Meal marker; used
when testing after fasting
(no food or drink for 8 hours,
except water or non-caloric
beverages)
Before Meal marker; used
when testing within 1 hour
before a meal
After Meal marker; used when
testing within 2 hours after the
first bite of a meal
5. Continue to press the OK button to move
through each setting until you see the
Meal Marker setting screen.
Do not press the OK
button yet.
6. Press the
or button so that On is
blinking.
7. Press the OK button.
8. Review each target range and press the
OK button to move to the next range.
The Meal Marker feature is On.
Fingertip Testing, continued
CAUTION
For instructions on removing the lancet
from your lancing device, see the
lancing device insert.
The meter displays your result with the units,
time, date, and target indicator: In Target
,
Below Target
, or Above Target .
The test strip port displays a color
representing your result value compared to
the Target Range.
In Target Below Target Above Target
Select a Meal Marker During a
Blood Sugar Test
Meal Marker Symbols
Fasting
Before Meal
After Meal
No Mark
NOTE: You must do a blood sugar test
before you can select a Meal Marker. You
cannot select a Meal Marker in Settings.
1. Test your blood sugar. See Fingertip
Testing in this guide.
2. Do not remove the test strip until you
select a Meal Marker.
A Meal Marker blinks on the blood sugar
result screen:
3. If the blinking Meal Marker is the one you
want, press the OK button.
To select a different
Meal Marker, press
the
or button on
the outer ring to scroll
between markers.
Outer Ring
4. When the Meal Marker you want is
blinking, press the OK button.
NOTE:
• If you do not select a Meal Marker within
30 seconds, the screen dims. Press any
button to turn the screen back on and
make a selection.
• If you do not select a Meal Marker within
3 minutes, the meter turns off. Your blood
sugar reading is stored in the Logbook
without a Meal Marker.
Your Meter Display