Page is loading ...

Style #:
Lot:
Date:
___________
___________
___________
January 18, 2014, 24684 R3
©2014 DELTA ENTERPRISE CORP.
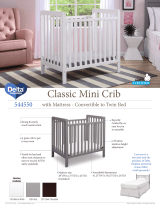
A
4 in 1 Crib
Conforms to
ASTM F1169-10a Full
Size Crib & F1821
Safety Standards
Consumer Care:
www.DeltaChildren.com
Delta Children’s Products
114 West 26th Street
New York, NY 10001
Tele.212-645-9033
REV
THIS PRODUCT IS NOT INTENDED FOR INSTITUTIONAL OR COMMERCIAL USE.
To register your product for important safety alerts and updates to your product please
visit www.DeltaChildren.com and click on Product Registration.
When contacting Delta Consumer Care please reference
the above information. Before contacting Delta Consumer
Care please ensure that the information above matches the
information found on the label on the Crib End bottom rail,
please reference the information found on the product
when contacting Delta Consumer Care.
Read all instructions before assembly and use.
KEEP INSTRUCTIONS FOR FUTURE USE.
ADULT ASSEMBLY REQUIRED
Due to the presence of small parts during assembly, keep out of
reach of children until assembly is complete.

WARNING:
*Infants can suffocate on soft bedding. Never add a pillow or comforter. Never place additional padding under an
infant.
*Failure to follow these warnings and the assembly instructions could result in serious injury or death.
DO NOT use
this crib if you cannot exactly follow the accompanying instructions.
*To reduce the risk of SIDS, pediatricians recommend healthy infants be placed on their backs to sleep, unless
otherwise advised by your physician.
*Strangulation Hazard: STRINGS CAN CAUSE STRANGULATION! Do not place items with a string around a
child's neck, such as hood strings or pacifier cords. Do not suspend strings over a crib or attach strings to toys.
*Strangulation Hazard: To help prevent strangulation tighten all fasteners. A child can trap parts of the body or
clothing on loose fasteners.
*Strangulation Hazard: Do not place crib near window or patio door where cords from blinds or drapes may
strangle a child.
*Fall Hazard: When child is able to pull to a standing position, set mattress to lowest position and remove bumper
pads, large toys and other objects that could serve as steps for climbing out. This crib has an adjustable mattress
support. For the convenience of the parent when the baby is very small, the mattress support may be used in the
highest position. Important: with the mattress support and mattress in the highest position, be absolutely sure that
the top of the front crib side is at least 3 inches higher than the top surface of the mattress. If it is not, lower the
mattress support and the mattress to the next highest position.
*Fall Hazard: Stop using crib when child begins to climb out or reaches a height of 35in. (89cm), whichever occurs
first. The child should be placed in a youth or regular bed.
*Check this product for damaged hardware, loose joints, loose bolts or other fasteners, missing parts, or sharp edges
before and after assembly and frequently during use. Securely tighten loose bolts and other fasteners. Do not use
crib if any parts are missing, damaged or broken. Contact Delta Children's Products for replacement parts and
instructional literature if needed. Do not substitute parts.
*Follow warnings on all products in a crib.
*If refinishing, use a non-toxic finish specified for children's products.
*Never use plastic shipping bags or other plastic film as mattress covers because they can cause suffocation.
*Infants can suffocate in gaps between crib sides and a mattress that is too small.
*Ensure a safe environment for the child by checking regularly, before placing the child in the crib, that every
component is properly and securely in place.
*To avoid head injury, do not allow any child to play underneath the crib.
*Never add an accessory such as a bassinet or changing table that extends over the sleeping area.
*In Canada Only - Use a crib mattress that is no thicker than 15 cm and is of such a size that, when it is pushed
firmly against any side of the crib, it does not leave a gap of more than 3 cm between the mattress and any part of
the sides of the crib. Do not use this crib for a child who can climb out of it or who is taller than 90 cm.
CAUTION:
ANY MATTRESS USED IN THIS CRIB SHALL
BE AT LEAST 27 1/4 BY 51 5/8 IN. WITH A
THICKNESS NOT EXCEEDING 6 IN.

3
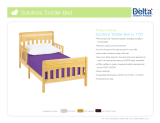
TODDLER BED
WARNING
INFANTS HAVE DIED IN TODDLER BEDS FROM ENTRAPMENT.
Openings in and between bed parts can entrap head and neck of a small child.
NEVER use bed with children younger than 15 months.
ALWAYS follow assembly instructions.
The maximum user weight is 50lbs (22.7kg)
WARNING
STRANGULATION HAZARD
NEVER place bed near windows where cords from blinds or drapes may strangle a child.
NEVER suspend strings over a bed.
NEVER place items with a string, cord, or ribbon, such as hood strings or pacifier cords,
around a child's neck. These items may catch on bed parts.
CAUTION
ENTRAPMENT HAZARD
To avoid dangerous gaps, any mattress used in this bed shall be a full-size crib mattress
at least 51 5/8 in (1310mm) in length, 27 1/4 in (690mm) in width and 4 in (100mm) in
thickness. The mattress thickness must not exceed 6 in (150mm).
NOTES ON ASSEMBLY:
-During the assembly process whenever using screws or bolts, check each by placing the screw/bolt
on the diagram of the item which is drawn actual size and design. Be sure to use the proper size and
shape specified in the instructions.
-To assemble this unit you may be required to place the unit on it’s side and face. It is strongly
recommended that assembly is done on a soft, non-abrasive surface (such as the foam packing wrap)
to avoid damaging the finish.
NOTES ON CARE AND MAINTENANCE:
- Do not scratch or chip the finish.
- Inspect the product periodically, contact Delta Children's Products for replacement parts or questions.
- Do not store the product or any parts in extreme temperatures and conditions such as a hot attic or a
damp, cold basement. These extremes can cause a loss of structural integrity.
-To preserve the luster of the high quality finish on your product, it is recommended to place a doily or
felt pad under any items you place on the finish.
-Clean with a damp cloth, then a dry cloth to preserve the original luster and beauty of this fine finish.
-Do not use abrasive chemicals.
-Do not spray cleaners directly onto furniture.
-Lift slightly when moving on carpeting to prevent leg breakage.
-Use of a vaporizer near furniture will cause wood to swell and finish to peel.
NOTES ON USE:
Keep children and others safe by following these simple rules:
- Do not allow any child to play on furniture
- Do not allow climbing on any piece of furniture.
- Do not allow hanging from any piece of furniture.
- Always monitor your child’s activity when in the nursery.

HARDWARE SYSTEM - REVIEW BEFORE ASSEMBLY
Ensure all bolts are tightened.
Install (1) bolt and (1) Plastic Clamp at a time.
Tighten until it looks like the picture.
3.Slide the Plastic Clamp over the exposed bolt, behind the head
of the bolt. Tighten the bolt with the Allen wrench provided.
2.Insert the Bolt into the slot. Turn clockwise with fingers or the
Allen wrench provided. DO NOT fully tighten, leave 1/2”
(12mm) exposed.
1. Insert the Dowels in the Rail into the holes in the Post.
AA. M6 x 50 mm Bolt x 2
HH. Plastic Clamp x 2
4

PARTS: MAKE SURE THAT ALL PRE-ASSEMBLED PARTS ARE TIGHT.
D. Left Post x 2
Part #24677
E. Right Post x 2
Part #24678
J. Conversion rail x1
Part #24682
L. Mattress Support x 1
Part #23742
5
A. SIDE x 2
Part #24674
C. Right Crib End x 1
Part #24676
CC. M6 x 30 mm Bolt x 4
EE. Φ3 x 32 mm Metal
Pin x 20
AA.
M6
x 50 mm Bolt x 2
BB. M6 x 45 mm Bolt x 24
POUCH ATTACHED TO MATTRESS SUPPORT
- KEEP INSTRUCTIONS IN THIS POUCH
AFTER ASSEMBLY.
WARNINGS RELATED TO THE SAFE USE OF
THIS CRIB ARE PRINTED ON THE POUCH.
No drills necessary. Do not
use power screwdriver.
HARDWARE KIT PART #24683.
B. Left Crib End x 1
Part# 24675
PRODUCT LABEL
WARNING LABEL
H. Center Base Rail x1
Part #24681
F. Left Base Rail x2
Part #24679
G. Right Base Rail x2
Part #24679
DD. M6 x 18 mm Bolt x 8
FF. Cam Bolt x 4
GG. Cam Lock x4
HH. Plastic Clamp x 2
M4 Ball End Hex Wrench
Included
PHILLIPS SCREWDRIVER
NOT SUPPLIED

6
M4 Allen Wrench
Supplied
D. Left Post x 2
E. Right Post x 2
R
Attach (1) Left Post (Part D) and (1) Right Post (Part E) to the (1) Left Crib End (Part B) using
(4) Φ3 X 32mm Metal Pins(Part EE) and (6) M6x45mm Bolts (Part BB). Tighten with the M4 Allen Wrench.
Make sure Product label Faces inside. Repeat with the Right Crib End (Part C).
Step 1
Section 1: Crib Assembly
Parts and tools required to complete step.
BB. M6 x 45 mm Bolt x 12
EE
ED
EE. Φ3 x 32 mm Metal
Pin x 8
B. Left Crib End
x 1
PRODUCT LABEL
C. Right Crib End
x 1
WARNING LABEL
INSIDE
EE
EE
EE
BB
BB
BB
BB
BB
BB
B or C

M4 Allen Wrench
Supplied
From Step 1
BB. M6 x 45 mm Bolt x 6
Step 2
Section 1: Crib Assembly
Parts and tools required to complete step.
A. SIDE x1
EE. Φ3 x 32 mm Metal
Pin x 4
7
Left End
Right End
Right End
Left End
A
BB
BB
BB
BB
EE
EE
EE
EE
WARNING LABEL
Attach (1) Crib Side (Part A) to the assemblies from Step 1 using (6)M6x45 Bolts (Part BB)
and (4) Metal Pins (Part EE).
Tighten bolts with the M4 Allen Wrench.

From Step 2
! WARNINGS ON POUCH MUST FACE UP.
ALL CORNERS
UP
M4 Allen Wrench
Supplied
N
L. Mattress Support x 1
Attach the Mattress Support (Part L) in all corners using (1) M6X18 mm Bolt (Part DD) in each corner.
Tighten with the M4 Allen Wrench.
WARNING:
!
!
The Warnings printed on the pouch attached to the
mattress support must face up, the springs must face up.
This crib has (3) adjustment positions, use the highest only
for new borns, move the mattress down as the child grows.
Fall Hazard: When child is able to pull to a standing position,
set mattress to lowest position and remove bumper pads,
large toys and other objects that could serve as steps
for climbing out.
Step 3
Section 1: Crib Assembly
Parts and tools required to complete step.
DD. M6 x 18 mm Bolt x 4
8

Step 4
Section 1: Crib Assembly
Parts and tools required to complete step.
From Step 3
Attach Crib side (Part A) to the assembly from Step 3 using(4) Φ3 x 32mm Metal Pins(Part EE)
and (6) M6x45mm Bolts (Part BB).
Tighten with the M4 Allen Wrench.
A. SIDE x1
M4 Allen Wrench
Supplied
BB. M6 x 45 mm Bolt x 6
EE. Φ3 x 32 mm Metal
Pin x 4
9
Gently pull ends to get pins in place
EE
BB
EE
EE
EE
EE
BB
BB
BB
BB
BB
BB

10
From Step 4
Step 5A
Section 1: Crib Assembly
Parts and tools required to complete step.
GG. Cam Lock x4
G. Right Base Rail x2
F. Left Base Rail x2
EE
FF
G
F
GG
EE. Φ3 x 32 mm Metal
Pin x 4
PHILLIPS SCREWDRIVER
NOT SUPPLIED
Lay Crib on it’s side and attach (1) Right Base Rail (Part G) and (1) Left Base Rail (Part F) using (2)
Metal Pins (Part EE), (2) Cam Bolts (Part FF), and (2) Cam Locks (Part GG). Tighten the Cam Bolts
(Part FF) with a Phillips Screwdriver, tighten the Cam Locks (Part GG) with the M4 Allen Wrench.
Repeat for Other Side.
M4 Allen Wrench
Supplied
FF. Cam Bolt x 4

11
H. Center Base Rail x1
Step 5B
Section 1: Crib Assembly
CC. M6 x 30 mm Bolt x 4
From Step 5A
Attach Center Base Rail (Part H) Using (4) M6 x 30mm Bolt (Part CC).
Tighten with M4 Hex Wrench.
M4 Allen Wrench
Supplied
CC
CC
H

Assembly Instruction
Booklet
WARNING: SEE PAGE 2 FOR INFORMATION
Store the assembly instruction booklet in the pouch attached to the matress support. Store all parts
and tools separately, in a safe place.
Step 6
Section 1: Crib Assembly
Parts and tools required to complete step.
Style #:
Lot:
Date:
___________
___________
___________
MARCH 12, 2013, 22117 , R5
©2013 DELTA ENTERPRISE CORP.
A
4 in 1 Crib
Conforms to
ASTM F1169-10a Full
Size Crib & F1821
Safety Standards
Consumer Care:
www.DeltaChildren.com
Delta Children’s Products
114 West 26th Street
New York, NY 10001
Tele.212-645-9033
FACTORYREV
THIS PRODUCT IS NOT INTENDED FOR INSTITUTIONAL OR COMMERCIAL USE.
To register your product for important safety alerts and updates to your product please
visit www.DeltaChildren.com and click on Product Registration.
When contacting Delta Consumer Care please reference
the above information. Before contacting Delta Consumer
Care please ensure that the information above matches the
information found on the label on the Crib End bottom rail,
please reference the information found on the product
when contacting Delta Consumer Care.
Read all instructions before assembly and use.
KEEP INSTRUCTIONS FOR FUTURE USE.
ADULT ASSEMBLY REQUIRED
Due to the presence of small parts during assembly, keep out of
reach of children until assembly is complete.
AI BAG
12

M4 Allen Wrench
Supplied
Remove the Base installed in Step 5 of Section 1.
Remove the Side installed in Step 6 of Section 1.
Step 1
Section 2: Toddler Bed Conversion
Parts and tools required to complete step.
13
Gently pull ends to remove pins
From Step 5B

A
AA. M6 x 50 mm Bolt x 2
HH. Plastic Clamp x 2
EE. Φ3 x 32 mm Metal
Pin x 2
M4 Allen Wrench
Supplied
14
J. Conversion rail x1
From Section 2:
Step 1
Install Conversion Rail to the Crib Front Using (2) Metal Pins (Part EE), (2) M6 x 50mm Bolts
(Part AA) and (2) Plastic Clamps (Part HH).
See page 4 for Hardware Instructions.
Step 2
Section 2: Toddler Bed Conversion
Gently pull ends to get pins in place
EE
AA
HH
J

Step 2
Section 2: Toddler Bed Conversion
Repeat Step 5 from Section 1
EE
FF
G
F
GG
CC
CC
H
15

16
WARNING:
TODDLER BED WARNINGS
SEE PAGE 3 FOR
The mattress support must be in the lowest position.
Store all hardware safely.
Read all warnings on page 3.
As shown, use as a day bed or love seat sofa.
Do Not use without stabilizer bar installed.
Stabilizer bar must be used when converted
to a toddler bed.
Step 2
Section 2: Toddler Bed Conversion
A toddler bed guardrail is available for this
crib.
Please see your crib retailer, visit
www.DeltaChildren.com or contact Delta
Consumer Care for more information.
This crib uses Delta Style # 0080 Guardrail.

You have the option to convert the crib to a full size bed. Simply follow steps in reverse order to
disassemble the crib. Store any unused parts and hardware safely out of the reach of small children.
See page 3.
Step 1
Section 3: Full Size Bed Conversion
M4 Allen Wrench Supplied
Parts and tools required to complete step.
17

18
Parts and tools required to complete step.
M4 Allen Wrench
Supplied
EE. Φ3 x 32 mm Metal
Pin x 8
BB. M6 x 45 mm Bolt x 12
A. SIDE x 2
D. Left Post x 2
E. Right Post x 2
Step 2
Section 3: Full Size Bed Conversion
To create the HeadBoard assemble (1) Left Post (Part D) and (1) Right Post (Part E) to the (1)
Side Rail (Part A) using (4) Φ3 x 32mm Metal Pins (Part EE) and (6) M6x45mm Bolts (Part
BB).
Repeat to create the Footboard.
EE
EE
EE
EE
BB
BB
BB
BB
BB
BB
D
E
A
Complete

19
M4 Allen Wrench
Supplied
From Section 3 Step 2
Attach Bed Frame to the Headboard (and Footboard) (From Section 3 Step 1)
using M6 x 18mm Bolts (Part N). Follow all instructions supplied with the Bed Rails or Bed Frame.
Note: Bed system is not included, see your furniture or mattress retailer. Contact Delta
Chidren’s Products for information or with questions.
Step 2
Section 3: Full Size Bed Conversion
Parts and tools required to complete step.
DD. M6 x 18 mm Bolt x 8
Use Delta 0050 Wood Bed Rails
Use Delta 0040 Metal Bed Frame
NOTE: SHOWN AS A FULL
SIZE HEADBOARD AND
FOOTBOARD, NOT ALL BED
FRAME SYSTEMS ALLOW
USE OF A FOOTBOARD.
x2

Warranty: This Delta Crib is warranted to be free from defects for a period
of 1 year from the date of purchase under normal use. This warranty extends
only to the original retail purchaser and is valid only when supplied with proof of
purchase, or if received as a gift, when the registration is on file with Delta.
Consumer Care:
www.DeltaChildren.com
Delta Children’s Products
114 West 26th Street
New York, NY 10001
Tele.212-645-9033
Please do not return this item to the store before contacting
us about missing parts or with any questions.
To register your product for important safety alerts and updates to
your product please visit www.DeltaChildren.com
To report a problem, please log on to www.DeltaChildren.com and
click the Consumer Care Tab, or contact us by phone at
(212) 645-9033.
In the event that you need to contact our customer service
department please have the Style Number and Lot Number available.
Use the space below to make note of those numbers. They can be
found on the label on the Crib End bottom rail.
Lot No. : _______________________
Pack Date:_____________________
Date of Purchase: _____________
(you should also keep your receipt)
COLOR
FTY
REV
STYLE No: 6792
A
/