Page is loading ...

Read all instructions before
assembling crib.
Save instructions for future use.
Carefully remove and lay out all parts.
Familiarize yourself with all diagrams to
facilitate the assembly of your crib.
Check parts and the enclosed hardware
bag with the hardware parts list to be
sure all are included and quantities
are correct.
Destroy cardboard and plastic bags
immediately.
Attention: In order to properly assemble
the crib, follow the assembly instructions
in the specified order.
Failure to assemble the crib in the
manner recommended could make the
crib hazardous.
Warning:Never use this product if there
are any loose or missing fasteners,
loose joints,broken parts, or torn
mesh/fabric. check before assembly and
periodically during use. Contact
ORBELLE. for replacement parts and
instructional literature if needed.
TINA
PORTABLE CRIB
ASSEMBLY INSTRUCTIONS
PARTS LIST FOR #TINA
A: Left head board (1PC)
AB
B: Right head board (1PC)
C: Front rail (1PC)
D: Back rail (1PC)
a: 3” Allen head bolt (10 pcs) c: 2” Allen wrench (1 pc)
d: 1-1/2” Wood dowel (2 pcs) e: Castors (4 pcs)
b: Barrel nuts (10 pcs)
E: Mattress board (1PC)
F: Stabilizer bar (1PC)
G: Mattress (1PC)
CAUTION:Any mattress used in this crib must be at least 23-5/8”(600mm) by
37-3/4”(959mm) with a thickness not exceeding 2”(51mm). This crib conforms
to applicable regulations promulgated by the consumer product safety
commission.
****Keep instructions for futher use****
.This product meets or exceeds specifications as issued by the consumer product safety for non-full size baby cribs.
.In gaps between a mattress too small or too thick and product sides.
.On soft bedding never add a mattress, pillow,comforter,or padding.
****Infants can suffocate****
.Use up and middle level mattress support only for a new born baby and not more than the first 3 months.
.Failure to follow these warnings and the instructions could result in serious injury or death.
.Caution:Before using this unit recheck all screws to be sure they are tightened securely. a periodic check should be made of
all screws&nuts to be sure they remain tight.
.Do not use plastic shipping bag or other plastic film as mattress covers not sold and intended for that purpose, they can
cause suffocation.
.Never place product near window where cords from blinds or drapes can strangle a child.
.Strings can cause strangulation! Never place items with a string around a child’s neck,such as hood strings or pacifier cords.
Never suspend strings over product or attach strings to toys.
.Never use this product if there are any loose or missing fasteners, loose joints,broken parts, or torn mesh/fabric. check before
assembly and periodically during use. Contact ORBELLE. for replacement parts and instructional literature if needed.
.Never substitute parts, the product including side rails, must be fully erected prior to use.
.Discontinue use of the product when child is able to climb out or reaches the height of 35in.(890mm).
.When child is able to pull to standing position,set mattress/base to lowest adjustment position and remove bumper pads,
large toys ,and other objects that could serve as steps for climbing out.
.Never use a watter mattress with this product, if refinishing,use anontoxic finish specified for children’s products.
.To reduce the risk of SIDS, pediatricians recommend healthy infants be placed on their back to sleep, unless otherwise
advised by your physician.
.Always provide the supervision for continued safety of your child.
WARNING
WARNING
WARNING
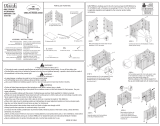
Make sure that the latch on the bottom of each
headboard ( A & B ) are locked.
Connect back rail ( D) to the headboard ( A & B) by
screws (a) and nuts (b).
STEP 1 STEP 2
ABa
b
b
c
a
a
b
D
A
B
Assemble stabilizer bar (F) to the headboard ( A & B )
by sccrews(a) and nuts (b) and wood dowels(d).
Connect front rail ( C) to the headboard ( A & B)
according to step 2.
STEP 3
STEP 4
a
c
a
aa
aab
b
b
d
d
A
B
C
D
Put the mattress support (E) in the double plastic holder
on the headboard according to your required height ,
and lay it down, then add the mattress (G).
Warning: please put the mattress support on
the up and middle height only for newborn baby.
A
B
C
D
E
E
Assemble casters (e) to the leg bottoms
on the leg on headboard (A & B).
STEP 5
STEP 6
A
B
C
D
E
e
e
e
Follow bellow to fold the crib:
1.take out the mattress (G)
2.take out the mattress board (E)
3.unlock the latch on the headboard
4.fold the crib
E
MADE IN CHINA
ORBELLE’S ORIGINAL DESIGN
/