Page is loading ...

SwimErg
SwimErg
SwimErg
PART 1 - Assembly .................................................. 2
Parts List and Parts Descriptions ................................ 2
Assembly Instructions ............................................ 3-9
Power Meter Installation ......................................10-11
Post-Assembly Safety Checklist ................................ 12
Recording Order Information ................................... 13
PART 2 – Using the Vasa Ergometer ..................... 14
Safety Review .....................................................14-17
Resistance Settings ............................................18-19
Using the Vasa Monitor ........................................20-32
Power Meter Summary of Functions ......................... 33
PART 3 – Technique & Form .................................. 34
Swim Stroke Technique .......................................35-39
Surf Paddling Technique ......................................40-41
Kayak & Canoe Paddling Technique ......................42-43
Nordic Poling Technique ......................................44-45
Other Exercises ................................................... 46-47
PART 4 – Swim Training Tips & Workouts ............ 48
High Elbow and Pulling Path .................................... 48
Drills for Improving Swim Technique .....................49-53
Stroke Rates of Olympic Swimmers .......................... 54
Training Videos ....................................................... 54
Workouts & Tips from Coach Richard Shoulberg ........ 55
Workouts: General .............................................56-58
Workouts: Triathlon/Open Water Swim ................59-62
Training Log ........................................................... 63
PART 5 - Maintenance & Troubleshooting ............ 64
Maintenance Instructions .....................................64-69
Troubleshooting ..................................................70-71
Guarantee & Warranty Information .......................72-73
PART 6 - Vasa Extras ............................................. 74
Accessories & Replacement Parts .........................74-75
VASA, INC.
1 ALLEN MARTIN DRIVE
ESSEX JUNCTION, VERMONT USA 05452
TEL: 802.872.7101
FAX: 802.872.7104
EMAIL: [email protected]
WEB: www.vasatrainer.com
USER’S MANUAL

2 May 2015
Vasa Swim Ergometer User’s Manual
PART 1 - Assembly
PART NAME PART NUMBER
1. Front Assembly ...........................VE-1
2. Monorail ....................................... 16AL-E
3. Bench ..........................................4P
4. Seat Carriage ...............................3-VT0796
5. Tether Cord ................................. VE-TETHER
6. Rear Stanchion ............................VE-2
7. Power Meter ................................VM-1
8. Damper Door ...............................VE1-DD
9. Wheel Bracket Assembly ............. VE-1-WBA
(Swim paddles, exercise handles not shown)
V A S A
Swim
Erg
➊
➋
➎
➍
➌
➏
➐
➑
➒
VASA ERGOMETER - PARTS LIST
PART 1 - ASSEMBLY
1.1 - VASA ERGOMETER - PARTS DESCRIPTIONS
BOX 1 CONTENTS (36x16x9 inches / 91x40x22 cm)
PART NAME PART # QUANTITY LOCATION
REAR STANCHION ASSEMBLY VE-2 1 BOX 1
STANDARD BENCH (or XL Bench) 4P (XL UPGR) 1 BOX 1 (XL IN BOX 4)
SEAT CARRIAGE ASSEMBLY 3-VT0796 1 BOX 1
WHEEL BRACKET ASSEMBLY VE-1-WBA 1 INNER BOX
TETHER CORD VE-TETHER-M 1 INNER BOX
EXERCISE HANDLES 8M-WHD 1 pair INNER BOX
POWER PADDLES PWR PPAD 1 pair INNER BOX
INSTRUCTION MANUAL IM-ERGO 1 INNER BOX
HARDWARE BAG (see below) 1 bag INNER BOX
button head screw - 2 1/2” 11P 2
hex jam nut 18PS 2
hex cap screw - 1” (yellow zinc) 14SC 4
lock washer 14A-P 4
atwasher 19P 4
hex key allen wrench - 3/16” 12A-PS 1
hex key allen wrench - 5/32” 12B-PS 1
wrench - 7/16” 14B-PS 1
wrench - combo 9/16” & 1/2” 14D-PS 1
screwdriver VE-1-SDR 1
BOX 2 CONTENTS (89x3x3 inches / 226x7x7 cm)
MONORAIL 16AL-E 1 BOX 2
BOX 3 CONTENTS (35x29x18 inches / 88x73x45 cm)
FRONT ERGOMETER ASSEMBLY VE-1-FF 1 BOX 3
POWER METER
(batteries included)
VM-1-PM or VM1-PM-W 1 INNER BOX
SAVE
ALL
PACKAGING
Box & inner packaging
for Box #3

V A S A
Choice of World Champions
R
R
V A S A
Swim
Erg
METERS
SPM
/100M
WATTS
Shift
Setup
Review
Display
3
Vasa Swim Ergometer User’s Manual
May 2015
REAR
STANCHION
(VE2)
STANDARD
BENCH
(4P)
XL BENCH
IN BOX #4
SEAT CARRIAGE
(3-VT0796)
WHEEL BRACKET
ASSEMBLY
(VE-1-WBA)
TETHER CORD
(VE-TETHER)
POWER PADDLES
(PWR PPAD)
EXERCISE HANDLES
(8M-WHD)
MONORAIL (16AL-E)
2 1/2” button
head screw (2)
hex jam nut (2)
1” hex cap screw (4)
lock washer (4)
at washer (4)
3/16” hex key allen
wrench (1)
5/32” hex key allen
wrench (1)
7/16” wrench (1)
9/16”-1/2”
combo wrench (1)
screwdriver (1)
HARDWARE BAG INCLUDES:
POWER METER
(INNER BOX)
FRONT END
ASSEMBLY
BOX #1
BOX #3
BOX #2
PART 1 - Assembly
SAVE
ALL
PACKAGING
Box & inner packaging
for Box #3
1.2 - ASSEMBLING YOUR VASA ERGOMETER
SWIM ERG ASSEMBLY VIDEO
Located on the Vasa Erg FAQ page at www.vasatrainer.com or on the Vasa YouTube Channel.
UnpackandassembleyournewVasaErgometerinthespecicorderoutlinedbelow(unpackand
assemble the parts from Box 1 and Box 2 as instructed, then you will unpack and attach the front
assemblyfromBox3).Thisspecicorderistoavoidanydamagetothefrontassembly.
STEP 1: UNPACK BOX 1 AND BOX 2 (DO NOT UNPACK BOX 3 YET)
1.1.UnpackBox1andBox2andlaythecontentsoutontheoor.

4 May 2015
Vasa Swim Ergometer User’s Manual
NOTE: be sure the U-bolt on your seat carriage is positioned
on the same end as the narrow end of your bench.
BOTTOM SIDE OF
BENCH
U-BOLT
SEAT CARRIAGE
tighten with 7/16” wrench
1” hex cap screw
(brass colored)
lock washer
at washer
CAUTION: do not over tighten
NARROW END
(FRONT)
WIDE END
(BACK)
U-BOLT
UNDER SIDE OF
BENCH
SEAT CARRIAGE
insert hex cap screws
with washers through
the middle hole of each
corner bracket
Figure A
Figure B
DO NOT USE
FRONT HOLES
PART 1 - Assembly
STEP 2: ASSEMBLE BENCH TO SEAT CARRIAGE
2.1. Laythepaddedbenchontheoorsothesidewiththefourorsixholes(withthreadedmetalnuts
inside the bench) is facing up. If you have six holes, you will mount the seat carriage to the four holes
closer to the rear of the bench. The remaining two front holes will not be used.
2.2. Position the seat carriage so that the metal bracket with the drilled holes is face down on the bench
(Figure A). Line up the middle holes of the bracket with the holes in the padded bench. NOTE:
Tapered
benches will be wider on one end than the other. Position the seat carriage so that the U-bolt on the
seat carriage is at the narrower end of the bench.
2.3.Putonelockwasherontoeachoffour1”hexcapscrews(brasscolored).Thenputoneat
washer onto each of the four 1” screws.
2.4. Thread one screw with both washers through the middle hole on the corner brackets of the seat
carriage (Figure B) and into the holes in the padded bench. Tighten the screws with the 7/16” wrench
until the lock washer and the bolt are snug. DO NOT OVER TIGHTEN.

5
Vasa Swim Ergometer User’s Manual
May 2015
STEP 3: PADDED BENCH ASSEMBLY ONTO MONORAIL
3.1. Laythebenchassembly(withtheseatcarriageup)ontheoornexttothemonorail.
3.2.KeepthemonoraillevelwiththeT-slotchannelfacingup.Slowlyfeedthemonorailbetweentherstset
of rollers (Figure A).
3.3. Gradually guide the monorail through to the second set of rollers (Figure B), continuing to keep it level.
DO NOT FORCE through to prevent damage to the rollers.
3.4. After installing the rail through the seat carriage, it should look like Figure C.
NOTE:Youmayndthattheseatcarriageseems“tight”onthemonorail,rollingwithsomeresistance.
This is normal, since the rollers need to conform to the monorail. You’ll need to do about 25 - 100
repetitions on your Vasa Erg before the rollers wear and conform to the monorail and roll smoothly. As the
rollers wear, they’ll leave some residue on the monorail which needs to be wiped off regularly. Any dust
or residue accumulation on the monorail will inhibit optimal functioning of the rollers. See maintenance
section of this manual for instructions on how to clean your monorail.
T-slot UP
KEEP MONORAIL LEVEL
& DO NOT FORCE
carefully & slowly feed the monorail
through 2nd set of rollers
Figure A
Figure C
Figure B
U-BOLT
REAR
FRONT
PART 1 - Assembly

6 May 2015
Vasa Swim Ergometer User’s Manual
U-BOLT
slide the bracket on to the REAR of the monorail.
NOTE: The U-bolt is closer to front
loosen the socket set screw
STEP 4: MONORAIL INTO THE REAR STANCHION ASSEMBLY
4.1. Loosen the socket set screw on the corner of the rear stanchion head (Figure A) using the 3/16” hex key
Allen wrench.
4.2. Hold the rear stanchion assembly upside down and slide the bracket over the rear section of the
monorail (Figure B).
4.3 Align the holes and insert a 2 1/2” button head screw through bracket and monorail. Thread the hex jam
nut on the end of bolt. Tighten to secure with a 5/32” Allen wrench and 7/16” wrench (Figure C).
4.4 Tighten the socket set screw against monorail using the 3/16” hex key Allen wrench. This will secure
the monorail to the inside of the sleeve so that it won’t loosen or rattle while in use (Figure C).
4.5AfxatethercordtotherearstanchionD-ringandtheU-boltontheseatcarriage(FigureD).
attach cord
REAR FRONT
REAR STANCHION
ASSEMBLY
Figure A
Figure C
Figure B
Figure D
➊
➋
1. insert and tighten 2 1/2” button head
screw and hex jam nut.
2. tighten socket set screw with 3/16” hex
key wrench
attach the tether cord to the seat carriage U-bolt and
the rear stanchion D-ring
PART 1 - Assembly

BOX #3
SIDE 1
down
1. lay box on SIDE 1 3. pull out (with bag)2. open bottom of box
bottom
of box
7
Vasa Swim Ergometer User’s Manual
May 2015
slide out
Figure CFigure A
➊
➋
Figure B
➌
PART 1 - Assembly
STEP 5: UNPACKING FRONT ERGOMETER ASSEMBLY (BOX #3)
5.1.Laythefrontendboxdownon“SIDE1”(FigureA).
5.2 Open bottom end of box (Figure B). DO NOT OPEN TOP OF BOX. Remove the
cardboard insert & set aside. Leave the bag on the assembly.
5.3. Slide the assembly & bag out of the box (Figure C). Remove the smaller inner box
(containing the Power Meter) and set aside until Step 9.
SAVE
ALL
PACKAGING
Box & inner
packaging
CAUTION: DO NOT STAND THE FRONT ASSEMBLY UPRIGHT UNTIL DIRECTED. It will
not stand securely by itself. Hold securely until it is attached to the monorail in STEP 6.

8 May 2015
Vasa Swim Ergometer User’s Manual
➍
Swim
Erg
V A S A
MONORAIL
hex jam nut
➌
insert and tighten
2 1/2” button
head screw and
hex jam nut
tighten socket set
screw with 3/16”
hex key wrench
INSTALLATION TIP
Press the rear cover in to allow more
clearance for the 2 1/2” screw.
THUMB IS PUSHING COVER IN
1. lift front end upright
2. slide monorail into front stanchion sleeve
3. install 2 1/2” bolt with locking nut
4. secure set screw
Figure A Figure B
1/2” screw
(x2)
5. attach wheel bracket
Figure C
➊
➋
➎
PART 1 - Assembly
IMPORTANT: If you purchased an accessory that needs to be installed on the Monorail, do so before
continuing to STEP 6. Those accessories will include a separate assembly sheet in the front of this manual.
i.e Kayak Foot Brace, Erg Trainer Strap Bar - Deluxe, ROM Knob Kit, etc.
STEP 6: ATTACH FRONT ERGOMETER ASSEMBLY TO MONORAIL & ADD WHEEL
BRACKET
6.1. Insert the monorail into front assembly sleeve (Figure A). Align the holes. Be sure to have a
secure hold on the frame so it does not fall over.
NOTE: You may need to loosen the socket set screw on the corner of the front Ergometer assembly
(Figure B) using the 3/16” hex key allen wrench.
6.2. Insert one 2 1/2” button head screw through the sleeve and the monorail (Figure B). Thread and
tighten one hex jam nut with 5/32” allen wrench and 7/16” wrench.
6.3. Tighten the socket set screw against monorail using the 3/16” allen wrench. This will secure the
monorail to the inside of the sleeve so that it won’t loosen or rattle while in use (Figure B).
6.4. Install the Wheel Bracket Assembly (located in Box #1) on the bottom of the front of frame (Figure C).
Use two 1/2” button head screws and 5/32” allen wrench to attach.

V A S A
Swim
Erg
9
Vasa Swim Ergometer User’s Manual
May 2015
Figure B
DRIVE CORD
CLIP
Figure A
SWIM PADDLES
Attach the clip to bail
on paddle
EXERCISE HANDLES
Attach the clip to metal
D-ring on handle
PART 1 - Assembly
STEP 7: ATTACHING PADDLES OR HANDLES TO DRIVE CORD
7.1. Choose which attachment you would like to use for your workout: swim paddles, exercise handles,
or other optional attachment.
7.2. Take the drive cord clip (Figure A) on each end of the drive cords, and snap desired attachment into
the connection loop/ring (Figure B).

10 May 2015
Vasa Swim Ergometer User’s Manual
Vasa Inc. www.vasatrainer.com 1(800)488-VASA
Connect the RED cable to “R”
port. Connect the other cable to
“L” port.
Figure C
Figure A
Cables extending through cable
channel ABOVE damper door.
Vasa Inc. www.vasatrainer.com 1(800)488-VASA
Use R and L ports.
Figure B
CONNECTION
PORTS
RED
STRIP
PART 1 - Assembly
STEP 8: INSTALLING BATTERIES IN THE POWER METER
CAUTION: The Power Meter is a sensitive unit. Please handle with care at all times.
8.1. Locate the Power Meter in the small box packed inside BOX 3.
8.2.Insertthetwo“AA”batteries(included)intothebatterycompartmentonthebacksideofthePower
Meter.
IMPORTANT: REMOVE THE BATTERIES if the Vasa Ergometer will be idol for 3 months or more.
STEP 9: ATTACHING THE CABLES TO THE POWER METER
9.1. Locate the two cables extending from rear cover (Figure A).
9.2 Locate the two connection ports on the back of the Power Meter: R and L (Figure B).
9.3. Connect the RED cable into the R port and the remaining unmarked cable into the L port (Figure C).
IMPORTANT: Always turn the Power Meter OFF after you connect the cables to reset.

11
Vasa Swim Ergometer User’s Manual
May 2015
Figure C -
adjusting ANGLE
adjust ANGLE by rotating on ball and socket.
Do NOT slide left and right, use stem to slide
Figure D -
adjusting POSITION
adjust POSITION of PM by sliding
stem Left & Right
SLIDE STEM
ONLY
Do NOT hold PM
to slide left to
right
Tighten hose clamp
Figure B
Insert mounting ball into socket
mounting ball
cable
channel
Figure A
mounting
stem
hose clamp
(over socket end)
PART 1 - Assembly
STEP 10: POWER METER - INSTALLING & ADJUSTING
NOTE: The Power Meter may automatically turn ON when the cables are connected. Before beginning
your workout, turn the monitor OFF and wait a second or two until you hear a beep. Push the ON button
to power back on and begin your workout.
10.1. Slide the hose clamp over the stopper pin and position the clamp over the end of the socket (to
cover prongs). Insert the mounting ball into the socket (Figure A).
10.2. Establish the desired viewing angle and secure it by tightening the hose clamp with your screw
driver to secure in position (Figure B).
10.3. The mounting stem is designed to allow for customized viewing. To adjust the ANGLE (tilted up
and down, tilted right and left), use the ball and socket (Figure C). To move the POSITION (right side or
left side), be sure to use the stem to slide the Power Meter right or left (Figure D).
IMPORTANT: Do NOT slide the Power Meter to adjust Left and Right position. You will NOT have to
loosen the Hose Clamp for any of these adjustments.

V A S A
12 May 2015
Vasa Swim Ergometer User’s Manual
➋
➍
socket set screw
is tight
➎
U-bolt is
towards front
narrow end of bench is towards front
➏
➐
tether cord attached
➑
cables are attached correctly to
“R” & “L” labeled ports.
➒
hose clamp is tightened around socket
prongs and secures mounting ball
➊
button head screw and nut are
assembled on stanchion head
and monorail
➌
button head
screw and nut
are assembled
on stanchion
head and
monorail
power meter is mounted
socket set screw
is tight
13
11
10
foot brace is positioned for
comfort & locked in place.
(optional accessory)
monitor angle & position adjusted
PART 1 - Assembly
1-3. POST ASSEMBLY SAFETY CHECKLIST
Please review the steps below to assure that your Vasa Ergometer is assembled correctly and ready for safe
use (check if complete).
FRONT
1. ____ Button head screw and nut are assembled on front stanchion head and monorail.
2. ____ Socket set screw on front stanchion head is tightened against the monorail.
REAR (CHECK IF COMPLETE)
3. ____ Button head screw and nut are assembled on rear stanchion head and monorail.
4. ____ Socket set screw on rear stanchion head is tightened against the monorail.
BENCH / SEAT CARRIAGE (CHECK IF COMPLETE)
5. ____ U-bolt on the seat carriage is towards the front assembly.
6. ____ Narrower end of the bench is towards the front assembly.
7. ____ Tether cord is attached between rear stanchion and U-bolt on underside of seat carriage.
POWER METER (OPTIONAL ACCESSORY)
8. ____ Power Meter installed on the mounting stem.
9.____Connectioncablesareattachedcorrectlyto“R”and“L”labeledportsonthePowerMeter.
10. ____ Hose Clamp is tightened around socket prongs (if applicable).
11. ____ Power Meter is adjusted for best viewing (ANGLE and POSITION).

13
Vasa Swim Ergometer User’s Manual
May 2015
PART 1 - Assembly
1.4 - RECORD ORDER INFORMATION
Now that you have completed the assembly, please take a minute to record some information found on
your Vasa Invoice. This will allow us to service you better in the future. Please record:
INVOICE NUMBER: ____________ DATE OF INVOICE: ____________
If you have any questions at this point with the assembly, please contact us.
US customers, please call us toll-free at: 1 (800) 488-VASA
International customers, please call us at:: 1 (802) 872-7101
E-Mail: info@vasatrainer.com

14 May 2015
Vasa Swim Ergometer User’s Manual
Place hands in handles
or paddles.
Pull handles/paddles to
engage drive cord and place
hands on front edge of bench.
Lie on bench and keep
one foot on oor to your
adjust position on bench.
Bring foot o oor and
bring hands into start
position.
➋ ➍➊ ➌
PART 2 - Using the Vasa Ergometer
PART 2 – USING THE VASA ERGOMETER
The following sections contain guidelines and tips for using your Vasa Ergometer, the performance moni-
tor, and adjusting the resistance.
2.1. SAFE OPERATION
GETTING SAFELY ON AND OFF
Getting safely on and off your Vasa Ergometer is an important part of your program. Please follow the
guidelines below.
CAUTION: Do not suddenly release the paddles or handles while using the Ergometer. They could
strike the monitor or front assembly and cause damage or injury. Always gently return the handles or
paddles to the ready position on the front assembly.
SWIM POSITION - Lying prone on the bench using swim paddles or exercise handles
1) Place your hands in the handles or paddles, then pull handles/paddles to engage the drive cord.
2) Walk towards bench, placing your hands at the top of bench.
3)Lieonthebenchsothatyourchestisevenwiththefrontofthebench,keeponefootonooruntil
you are positioned comfortably.
4)Bringyourfootofftheoor,thenbringhandsintostartposition.

15
Vasa Swim Ergometer User’s Manual
May 2015
Straddle bench, steady
bench with knuckles as you
kneel. Bring hands into
position.
Straddle bench, then sit on
bench. Bring hands into
position.
SITTING
FACING FORWARD
Straddle bench, then sit on
bench. Bring hands into
position.
Pull drive cord, then
straddle bench, attach drive
cord to ankle straps, then
sit on bench.
KNEELING
FACING FORWARD
SITTING
FACING BACKWARD
USING ANKLE STRAPS
FACING BACKWARD
PART 2 - Using the Vasa Ergometer
CAUTION: Do not suddenly release the paddles or
handles while using the Ergometer. They could strike the
monitor or front assembly and cause damage or injury.
Always gently return the handles or paddles to the ready
position on the front assembly.
CAUTION: Do not pull the drive cord past the end of the ergometer. This could result in damage
to the Ergometer.
GETTING SAFELY ON AND OFF - CONTINUED
OTHER POSITIONS - using handles or ankle straps

V A S A
Swim
Erg
16 May 2015
Vasa Swim Ergometer User’s Manual
IMPORTANT: Do not release the paddles or handles while using the Ergometer. They could strike
the monitor or front assembly and cause damage or injury. Always return the handles or paddles
slowly to the ready position on the front assembly.
Do not operate
with plastic
covers removed
Do not release handles or paddles while
using the Ergometer. They could strike
and damage the monitor.
Do not force the monitor when adjusting it
side to side or up and down. If necessary,
loosen the clamp a bit before adjusting.
Keep hands, clothing
and loose hair free
of moving seat, drive
cord and ywheel.
Keep eyes and hands clear of air outlet.
Do not put anything through the holes of
the perforation in the air inlet and air outlet.
Be sure to remove fastpin with blue handle
before adjusting the damper door.
IMPORTANT: Do NOT pull the
drive cord past the end of the
ergometer. It could damage
the machine.
DAMPER DOOR
MONITOR
AIR
OUTLET
AIR INLET
DRIVE CORD &
DRIVE CORD CLIP
PART 2 - Using the Vasa Ergometer
SAFETY REMINDERS
It’s very important to use common sense and adhere to these safety guidelines in order to avoid injury to
yourself or damage to your Vasa Ergometer. The next few pages review several areas of safety.
Thefollowingisa“pre-ight”safetycheckyoushoulddobeforeusingyourVasaErgometer:
•DO NOT LET GO OF THE HANDLES, SWIM PADDLES OR PADDLE SHAFT while the drive cords are
extended - they could hit and damage your monitor which is NOT covered under warranty. Always
return the handles or paddles slowly to the ready position on the front assembly.
•FollowinstructionsonthepreviouspageforsafelygettingonandofftheVasaErgometer.
•Alwaysinstructbystanders,especiallychildren,tokeeptotallyclearwhileErgometerisinuse,especially
ofthemovingseatcarriage,drivecordsandywheel.Avoidwearinglooseorslipperyclothing.Always
tie up long hair so it’s clear of moving parts on the machine.
•Keepeyesandhandsclearoftheairoutletbelowthedamperdoor.Toavoidblowingdustintotheair,
eyes or into the electronics, do not operate in a dusty area.
•Donotoperateiftheplasticcoversonthefrontassemblyareremoved.
•DonotpullthedrivecordspasttheendoftheVasaErgometer.Ifthedrivecordsbecomesdifcultto
pull (like the cord is stuck), do not continue to pull as this may damage your Ergometer.
•PerformpropermaintenanceonyourVasaErgometerasrecommendedin“Part5-Maintenance&
Troubleshooting”.

17
Vasa Swim Ergometer User’s Manual
May 2015
PART 2 - Using the Vasa Ergometer
SUPERVISING CHILDREN
We recommend supervising children at all times while using the Vasa Ergometer. Please review the
Safety Reminders and Getting On and Off Safely in this section with all children who will use the
Vasa Ergometer. In particular, we recommend the following:
1. Children should train with or be instructed by a parent or coach whenever possible. This
will help reduce the chance of injury. It also can be more motivating and fun.
2. Instruct user’s, especially children, to NEVER LET GO OF THE HANDLES SWIM PADDLES, OR
KAYAK SHAFT while using the Vasa Ergometer to protect the Power Meter from being damaged.
Keep hands on the handles, swim paddles or kayak shaft until the workout is complete. Return
the handles/paddles/shaft slowly to the ready position on the front assembly (see page 22).
3. Instruct all bystanders to stay clear of the Ergometer while in use, especially of the mov-
ing seat carriage, drive cords and tether cords. Avoid wearing loose clothing and always
tie up long hair.
4. Keep eyes and hands clear of the air outlet below the damper door. To avoid blowing
dust into the air or into the electronics, do not operate in a dusty area.
5. Do not pull the drive cords past the end of the Vasa Ergometer. If the drive cords stops
pulling, do not continue to pull as this will damage your Ergometer.
SECURING YOUR VASA ERGOMETER IN A PUBLIC SETTING
If your Vasa Ergometer is left in a public area, you may wish to secure or vandal-proof it to avoid unau-
thorized use. We recommend the following:
1. Remove any drive cord attachment (swim paddles, handles, or kayak shaft) and tether cords.
Store these and any other accessories in a secure place.
2. To deter unwanted use and protect your investment, keep your Vasa Ergometer covered when
not in use. Vasa Ergometer Covers are available at www.vasatrainer.com and in the back of
this manual.
3. You may wish to unplugandremovethePowerMeterforsafekeeping.See“Part1-Step8”
and follow instructions in reverse order to detach.
4. Use a cable and lock between the D-ring on the rear stanchion head and the U-bolt on the under-
sideoftheseatcarriage.Thiswilllockthebenchinaxedposition.
5. Store the Vasa Ergometer in a dry, secure room or closet. Avoid storing it in a humid, chlorine or
salt-air environment.
MEDICAL CLEARANCE - See your Doctor before beginning any exercise program.
CAUTION: Before exercising with the Vasa Ergometer or any other form of exercise, please check
withyourphysicianrst.Thisisespeciallyimportantifyouareoverweight,ifyouhavebeeninac-
tive for awhile, if you have injuries, or if you have any history of heart disease in your family. If
youareover35,it’sagoodideatoperformanexercisestresstestwithaqualiedphysicianbefore
you begin training. Training with the Vasa Ergometer can be vigorous and demanding. We sug-
gest that you be in good health to achieve the best results.

18 May 2015
Vasa Swim Ergometer User’s Manual
Figure A
1
7
M
O
R
E
R
E
S
I
S
T
A
N
C
E
DA M P E R D OOR
SETTING #1
(door closed)
Lowest/Easiest
Figure B
SETTING #7
(door open)
Highest/Hardest
Damper door
setting number
Lock door = turn clockwise
Unlock door = turn counter-clockwise
SETTING #
1
KNOB:
Lock/Unlock
1
PART 2 - Using the Vasa Ergometer
2.2. SETTING THE RESISTANCE
TheywheelandthedamperdoorworkinconcerttoaffecttheresistanceyouwillfeelusingtheVasa
Ergometer. Tether cords are used to restrict the distance the bench travels on the monorail, and are not
intended as resistance cords.
FLYWHEEL
Theairowresistanceoftheywheelsimulatestheresistanceofwater-theharderyoupull,themore
resistance you feel.
DAMPER DOOR
Youcanadjusttheairowresistancebychangingtheopeningofthe
damperdooronthefrontofyourVasaErgometer.Thelowestsetting“1”
(doorfullyclosed)providestheleastresistanceandsetting“7”(doorfully
open) provides the most resistance. Setting #1 is similar to going WITH
the current and Setting #7 is similar to going AGAINST a strong current.
To adjust the damper door / change resistance level:
1. Unlock knob - turn counter-clockwise
2. Lift/Lower door (Settings: 1=easiest / 7=hardest)
3. Lock knob - turn clockwise

Figure B
19
Vasa Swim Ergometer User’s Manual
May 2015
Figure A
ROM KNOB KIT
$10 + shipping
May only be installed on aluminum monorails.
LOCKING STRAPS
Available at most hardware stores.
PART 2 - Using the Vasa Ergometer
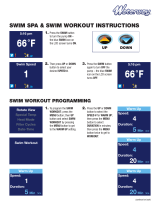
DAMPER DOOR SETTINGS RELATING TO POWER AND FORCE OUTPUT
At high settings (5, 6, 7) it feels like swimming against a current. At low settings (1 & 2) it feels more like
swimming with a current. So if you select a setting of 1, you will have to move your arms faster than your
normal speed in still water to generate the same power (faster stroke rate). If the you select a setting of 7,
you will have to move your arms slower than your normal speed in still water to generate the same power
(slower stroke rate).
Mathematically, this is expressed by the equation Power = Force x Velocity. The fan resistance determines
the force (a higher setting is a higher force) and the hand speed is the velocity. So the same power can
be achieved with either a high resistance setting combined with a low hand speed or a low resistance set-
ting combined with a high hand speed. As you would expect, there will be a setting where an individual can
producethemaximumpowerduetophysiologicalandbiomechanicalefciency,andthissettingwilllikely
be different depending on the individual’s body and training. The monitor calculates power by sampling the
force and hand speed many times per second throughout the stroke. Therefore it calculates power produced
& distance swam precisely regardless of the damper door setting. This allows users to choose a damper door
setting according to personal preference.
It is important to remember that the damper door setting is subjective, depending on body type, conditioning
level, and stroke technique. We think that most distance swimmers excel at the low to mid range damper set-
tings (either 2, 3 or 4).
Suggestion: once per week for one month do a 500 meter or a 1000 meter time trial at race pace & race
stroke rate. On week one, set the damper door at 2, for week 2, set it at 3 and so on. You’ll discover the
damper door setting that allows you to perform your best for that distance. Measure your heart rate, watts,
andtime.Monitoringthesewillhelpyouarriveatthemostefcientstrokerate,techniqueandheartrateto
sustainthepowerandpaceyouneedtoimprove.NOTE:Usethe“AudibleStrokeRateTempoBeeper”to
help swim at your desired stroke rate. For full details on the Audible Tempo Beeper, continue to the section
on Monitor Operation.
TETHER CORD
The tether cord is designed to prevent the seat from rolling too far forward. The user
should be able to complete a full range of motion without contacting the front unit.
NOTE:Allowingthebenchtorollfreelycanprovideauseful“treadmill”affect,whereby
the user will notice a drop in average power because the bench will roll backwards.
ANCHOR BENCH TO PREVENT MOVEMENT
If you prefer to keep the bench from rolling on the monorail, you can use a range of motion knob (Figure A)
or by using a locking strap to anchor to rear stanchion (Figure B).
NOTE: The ROM KNOB KIT is an additional accessory (part# ROM KNOB KIT). Locking straps are available
at most hardware stores.

Shift
Setup
Review
Display
METERS
SPM
/100M
WATTS
5:48
I05
I:25
30 45
Shift
Setup
Review
Display
METERS
SPM
/100M
WATTS
5:48
I05
I:25
30 45
ELAPSED TIME
ACCUMULATED
DISTANCE
PACE
/ 100M(SWIM)
/ 500M*(KAYAK)
STROKE POWER
ON/OFF
button
STROKES PER
MINUTE
Shift
Setup
Review
Display
METERS
SPM
K
/100M
WATTS
48:40
8000
3:00
30
95
20 May 2015
Vasa Swim Ergometer User’s Manual
Figure A
Figure C
Figure B
Kayak Display
shows “K” here
Swim Display
is blank here
PART 2 - Using the Vasa Ergometer
2.3. POWER METER - GENERAL OPERATION
The Power Meter (PM) gives you the opportunity to get instant feedback on your performance. Having
reliable information on your performance will allow you to:
• monitor progress
• create repeatable performance testing & training
• set up workouts based on time & distance
• perform intervals or distance training
• simulate races
• analyze imbalance (right and left power)
Specicsonhowthepowermetercalculatesdatacanbefoundattheendofthissection.
INITIALIZE THE POWER METER
Each time after you install the connection cables, you must:
• power OFF (by pushing the ON/OFF button)
• wait for delayed beep
• power ON
This process will allow for the PM to communicate accurately with the Ergometer. If you see irregular
readings, repeat the initialize steps above.
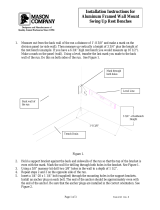
VIEWING OPTIONS: SWIM VS. KAYAK
There is a SWIM VIEW (default) and KAYAK VIEW on the Power Meter that
provides relative data based on the sport.
The upper left corner of the top screen denotes the view:
Swim View = no display/blank (Figure B)
KayakView=“K”displayed(FigureC)
To change between views:
Step 1: Begin with the power meter OFF.
Step2:HoldSHIFTandthenpressON/OFF.ReleasebuttonsandwaitforLCDtestsequencetonish.
Step 3: Hold SHIFT and then press ON/OFF so it will display a series of
numbers. Release buttons.
Step 4: Hold the SHIFT and press SETUP button. Release buttons. The
display will turn off followed by a short beep.
Step 5: Turn ON for the new view.
The Power Meter will remain in the selected view (Swim or Kayak) for all future workouts
until you change it back. Repeat the sequence above if you want to change to the other
view.
*PACING NOTE: In the Kayak View, the Power Meter will calculate PACE/500M. Swim View is always displayed
in PACE/100M.
/